DROPS Merino Extra Fine
100% Wool
from 19.00 RON /50g
Get the yarn to make this pattern from 304.00RON.

The yarn cost is calculated from the pattern’s smallest size and the yarn’s cheapest product type. Looking for an even better price? You might find it on the DROPS Deals!

DROPS SS24

Waterfall

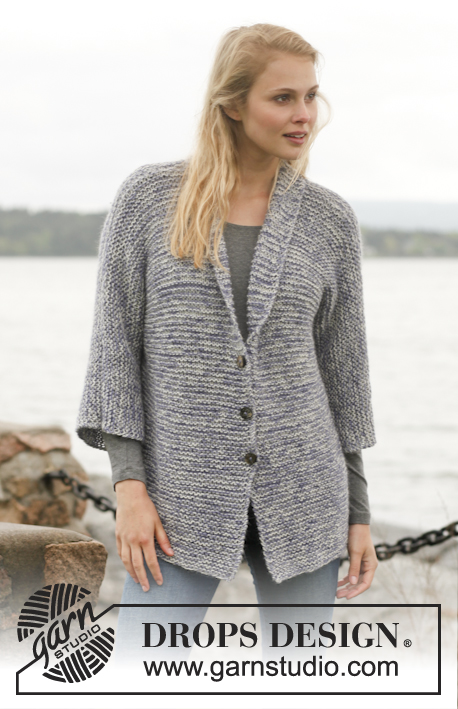
Crochet DROPS jacket with shawl collar in ”Merino Extra Fine”. Size: S - XXXL.

DROPS 149-37
DROPS design: Pattern no me-064
Yarn group B
-----------------------------------------------------------
Size: S/M – L/XL - XXL - XXXL
Materials:
DROPS MERINO EXTRA FINE from Garnstudio
800-900-1000-1050 g colour no 13, denim blue.

DROPS CROCHET HOOK SIZE 5 mm – or size needed to get 3 repetitions of A.1a = width 10 cm or 13 tr = 10 cm in width.

-------------------------------------------------------

Alternative Yarn – See how to change yarns here
Yarn Groups A to F – Use the same pattern and change the yarn here
Yarn usage using an alternative yarn – Use our yarn converter here

-------------------------------------------------------

DROPS Merino Extra Fine
100% Wool
from 19.00 RON /50g
Get the yarn to make this pattern from 304.00RON.

The yarn cost is calculated from the pattern’s smallest size and the yarn’s cheapest product type. Looking for an even better price? You might find it on the DROPS Deals!

Pattern instructions

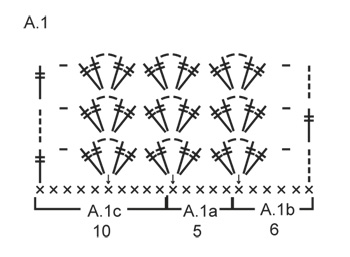
DTR-GROUPS:
1 dtr-group = 2 dtr + 2 ch + 2 dtr.

PATTERN:
See diagram A.1.
----------------------------------------------------------

BACK PIECE:
Worked back and forth. Work 108-120-133-145 ch on hook size 5 mm with Merino Extra Fine. Work first row as follows (= WS): 1 dc in 2nd ch from hook and then 1 dc in each of the next 3 ch, * skip 1 ch, 1 dc in each of the next 4 ch *, repeat from *-* until 3-5-3-5 ch remain, skip 1 ch, 1 dc in each of the next 2-4-2-4 ch = 86-96-106-116 dc.
Continue to work as follows:

ROW 1 (= RS): Work A.1b 1 time, then work A.1a until 10 dc remain (= 14-16-18-20 times in width) and finish with A.1c 1 time. REMEMBER THE CROCHET TENSION!
ROW 2 (= WS): Turn piece and work A.1c 1 time, A.1a (= 14-16-18-20 times in width), A.1b 1 time.
ROW 3 (= RS): Turn piece and work A.1b 1 time, A.1a (= 14-16-18-20 times in width), A.1c 1 time.
Repeat 2nd and 3rd row until piece measures approx. 46-50-54-58 cm - adjust to finish with 3rd row (= RS). Fasten off.

Work 30-25-25-20 loose ch, beg from WS and continue A.1 over back piece as before and finish with 34-29-29-24 loose ch, turn piece. Continue to work as follows:
ROW 1 (= RS): In 10th ch from hook work 2 dtr + 2 ch + 2 dtr (= A.1b), work A.1a 4-3-3-2 times in total, skip the last 4 ch, in dtr at beg of back piece work 2 dtr + 2 ch + 2 dtr (= 1 dtr-group), then work A.1a over back piece as before but in last dtr at end of back piece work 2 dtr + 2 ch + 2 dtr, then work over the last 30-25-25-20 ch as follows: Skip the next 4 ch, A.1a 4-3-3-2 times in total and then A.1c 1 time, turn piece.
ROW 2 (= WS): Turn piece and work A.1c 1 time, A.1a 24-24-26-26 times and finish with A.1b 1 time.
ROW 3 (= RS): Turn piece and work A.1b 1 time, A.1a 24-24-26-26 times and finish with A.1c 1 time.
Repeat 2nd and 3rd row until piece measures approx. 70-76-81-86 cm - adjust to finish with 3rd row (= RS).

Work 11-11-12-12 dtr-groups, finish with 1 ch and 1 dtr in ch-space on next dtr-group. Fasten off. Skip 2 dtr-groups (= neck). Work 1 sl st in ch-space on next dtr-group, then work 5 ch. Work 11-11-12-12 dtr-groups. Fasten off.

RIGHT FRONT PIECE:
Worked back and forth. Work 98-104-110-117 ch on hook size 5 mm with Merino Extra Fine. Work 1 dc in 2nd ch from hook and then 1 dc in each of the next 3 ch, * skip 1 ch, 1 dc in each of the next 4 ch *, repeat from *-* until 3-4-5-2 ch remain, skip 1 ch, work 1 dc in each of the next 2-3-4-1 ch = 78-83-88-93 dc.

ROW 1 (= RS): 4 ch (= 1 dtr), 1 dtr in each of the next 32 dc (= 33 dtr for band) NOTE: Work band with every other row dtr and triple tr. Then work 1 ch, skip 4 dc, 2 dtr + 2 ch + 2 dtr in next dc, then work A.1a 6-7-8-9 times in total, finish with A.1c 1 time.
ROW 2 (= WS): Turn piece and work A.1c 1 time, A.1a 6-7-8-9 times, 2 dtr + 2 ch + 2 dtr in next dtr-group, 1 ch, work 1 triple tr in each of the next 33 dtr.
ROW 3 (= RS): 4 ch (= 1 dtr), 1 dtr in each of the next 32 triple tr (= 33 dtr), 1 ch, 2 dtr + 2 ch + 2 dtr in first dtr-group, then work A.1a 6-7-8-9 times in total, finish with A.1c 1 time.
Repeat 2nd and 3rd row until piece measures 46-50-54-58 cm. Adjust to finish after 3rd row (= RS). Fasten off.

Work 30-25-25-20 loose ch, beg from WS and then work A.1 and triple tr over band as before, turn piece.

Continue to work as follows:
ROW 1 (= RS): 4 ch (= 1 dtr), 1 dtr in each of the next 32 dtr (= 33 dtr), 1 ch, 2 dtr + 2 ch + 2 dtr in ch-space in next dtr-group, work A.1a until 1 dtr remains on front piece, work 2 dtr + 2 ch + 2 dtr in dtr, then work over the last 30-25-25-20 ch as follows: A.1a 4-3-3-2 times in total and then A.1c 1 time.
ROW 2 (= WS): Turn piece and work A.1c 1 time, A.1a 11-11-12-12 times, 2 dtr + 2 ch + 2 dtr in next dtr-group, 1 ch, then 1 triple tr in each of the last 33 dtr.
ROW 3 (= RS): 4 ch (= 1 dtr), 1 dtr in each of the next 32 dtr (= 33 dtr), 1 ch, 2 dtr + 2 ch + 2 dtr in first dtr-group, then work A.1a 11-11-12-12 times in total, finish with A.1c 1 time.
Repeat 2nd and 3rd row until piece measures 72-78-83-88 cm. Finish with 2nd row.

SHAWL COLLAR:
When piece measures 72-78-83-88 cm, only work over band sts (= 32 dtr/triple tr).
Then work short rows over band sts as follows:
ROW 1 (RS): 32 dtr, turn piece.
ROW 2 (WS): 11 dc, 5 htr, 5 tr, 11 dtr, turn piece.
Repeat these 2 rows until piece measures 10-10-11-11 cm on the most narrow part – adjust to finish with 1st row (RS).

LEFT FRONT PIECE:
Work as right but reversed.
NOTE: When piece measures approx. 46-50-54-58 cm (adjust so that last row is from RS), work next row from WS as follows: 33 triple tr, work dtr-groups as before over front piece and finish with 34-29-29-24 ch, turn piece and beg row as on back piece.
Work band sts as on right front piece, finish shawl collar with 1st row (from WS instead of RS).

ASSEMBLY:
Work collar tog mid back as follows: 1 dc, *1 ch, 1 dc* in next st, repeat *-*.
Place front piece on top of back piece and work the shoulders and band sts tog for neckline at the back as follows: * 1 dc through both layers, 3 ch, skip 2 tr *, repeat *-*.
Work the sides tog as follows: 1 dc, *3 ch, 1 dc in ch on next row*, repeat *-*.
Work tog under sleeves as follows: * 1 dc in next ch with dtr-group, 3 ch*, repeat *-* and end with 1 dc.

Diagram

symbols = 1 sl st
symbols = 1 ch
symbols = 1 dc
symbols = 1 dtr
diagram
diagram
Do you have a question? See a list of frequently asked questions (FAQ)

Knitting tension is what determines the final measurements of your work, and is usually measured per 10 x 10 cm. It is provided like so: number of stitches in width x number of rows in height - eg: 19 stitches x 26 rows = 10 x 10 cm.

The knitting tension is very individual; some people knit/crochet loosely while others work tightly. You adjust the knitting tension with the needle size, which is why the suggested needle size is only meant as a guide! You need to adjust this (up or down) to ensure that YOUR knitting tension matches the knitting tension provided in the pattern. If you work with a different knitting tension than provided you will have a different yarn consumption, and your work will have different measurements than what the pattern suggests.

The knitting tension also determines which yarns can replace each other. As long as you achieve the same knitting tension you can replace one yarn with another.

See DROPS lesson: How to measure your tension/gauge

See DROPS video: How to make a gauge tension swatch

The required amount of yarn is provided in grams, eg: 450 g. To calculate how many balls you’ll need you first need to know how many grams are in 1 ball (25g, 50g or 100g). This information is available if you click on the individual yarn quality on our pages. Divide the amount required with the amount of each ball. For example, if each ball is 50g (the most common amount), the calculation will be as follows: 450 / 50 = 9 balls.

The important thing when changing from one yarn to another is that the knitting/crochet tension remains the same. This is so that the measurements of the finished piece will be the same as on the sketch provided. It is easier to achieve the same knitting tension using yarns from the same yarn group. It is also possible to work with multiple strands of a thinner yarn to achieve the knitting tension of a thicker one. Please try our yarn converter. We recommend you to always work a test swatch.

Please NOTE: when changing yarn the garment might have a different look and feel to the garment in the photo, due to individual properties and qualities of each yarn.

See DROPS lesson: Can I use a different yarn than the one mentioned in the pattern?

All our yarns are categorised into yarn groups (from A to F) according to thickness and knitting tension – group A contains the thinnest yarns and group F the thickest. This makes it easier for you to find alternative yarns to our patterns, should you wish to switch yarn. All yarns within the same group have a similar knitting tension and can easily replace each other. However, different yarn qualities have different structures and properties which will give the finished work a unique look and feel.

Click here for an overview of the yarns in each yarn group

At the top of all our patterns you’ll find a link to our yarn calculator, which is a helpful tool should you wish to use a different yarn than suggested. By filling in the yarn quality you wish to replace, the amount (in your size) and number of strands, the calculator will present good alternative yarns with the same knitting tension. Additionally it will tell you how much you’ll require in the new qualities and whether you’ll need to work with multiple strands. Most skeins are 50g (some are 25g or 100g).

If the pattern is worked with multiple colours, every colour will have to be calculated separately. Similarly, if the pattern is worked with several strands of different yarns (for example 1 strand Alpaca and 1 strand Kid-Silk) you will have to find alternatives for each, individually.

Click here to see our yarn calculator

Since different yarns have different qualities and textures we have chosen to keep the original yarn in our patterns. However, you can easily find options among our available qualities by using our yarn calculator, or simply pick a yarn from the same yarn group.

It is possible that some retailers still have discontinued yarns in stock, or that someone has a few skeins at home that they would like to find patterns for.

The yarn calculator will provide both alternative yarn as well as required amount in the new quality.

If you think it's hard to decide what size to make, it can be a good idea to measure a garment you own already and like the size of. Then you can pick the size by comparing those measures with the ones available in the pattern's size chart.

You'll find the size chart at the bottom of the pattern.

See DROPS lesson: How to read size chart

The needle size provided in the pattern serves only as a guide, the important thing is to follow the knitting tension. And since knitting tension is very individual, you will have to adjust the needle size to ensure that YOUR tension is the same as in the pattern – maybe you’ll have to adjust 1, or even 2 needle sizes, up or down to achieve the correct tension. For this, we recommend that you work test swatches.

Should you work with a different knitting tension than the one provided, the measurements of the finished garment might deviate from the measurement sketch.

See DROPS lesson: How to measure your tension/gauge

See DROPS video: How to make a tension/gauge swatch

Working a garment top-down provides more flexibility and room for personal adjustment. For example it is easier to try the garment on while working, as well as making adjustments to length of yoke and shoulder caps.

The instructions are carefully explaining every step, in the correct order. Diagrams are adjusted to the knitting direction and are worked as usual.

The diagram depicts all rows/rounds, and every stitch seen from the right side. It is read from bottom to top, from right to left. 1 square = 1 stitch.

When working back and forth, every other row is worked from the right side and every other row is worked from the wrong side. When working from the wrong side, the diagram will have to be worked reversed: from left to right, knit stitches are purled, purl stitches are knit etc.

When working in the round every round is worked from the right side and the diagram are worked from right to left on all rounds.

See DROPS lesson: How to read knitting diagrams

The diagram depicts all rows/rounds, and every stitch seen from the right side. It is worked from bottom to top, from right to left.

When working back and forth every other row is worked from the right side: from right to left and every other row is worked from the wrong side: from left to right.

When working in the round, every row in the diagram are worked from the right side, from right to left.

When working a circular diagram you start in the middle and work your way outwards, counter clockwise, row by row.

The rows usually start with a given number of chain stitches (equivalent to the height of the following stitch), this will either be depicted in the diagram or explained in the pattern.

See DROPS lesson: How to read crochet diagrams

Instructions for working several diagrams after each other on the same row/round, will often be written like so: “work A.1, A.2, A.3 a total of 0-0-2-3-4 times". This means you work A.1 once, then A.2 is worked once, and A.3 is repeated (in width) the number of times provided for your size – in this case like so: S = 0 times, M = 0 times, L=2 times, XL= 3 times and XXL = 4 times.

The diagrams are worked as usual: begin with the first row in A.1, then work the first row in A.2 etc.

See DROPS lesson: How to read knitting diagrams

See DROPS lesson: How to read crochet diagrams

The total width of the garment (from wrist-to-wrist) will be larger in the larger sizes, despite the actual sleeves being shorter. The larger sizes have longer sleeve caps and wider shoulders, so there will be a good fit in all sizes.

The measurement sketch/schematic drawing provides information regarding the full length of the garment. If it’s a jumper or a jacket the length is measured from the highest point on the shoulder closest to the neckline, and straight down to the bottom of the garment. It is NOT measured from the tip of shoulder. Similarly, the length of yoke is measured from the highest point on the shoulder and down to where yoke is split into body and sleeves.

On a jacket measures are never taken along bands, unless specifically stated. Always measure inside band stitches when measuring the length.

See DROPS lesson: How to read a schematic drawing

Diagrams are often repeated on the round or in height. 1 repeat is the diagram the way it appears in the pattern. If it says to work 5 repeats of A.1 in the round, then you work A.1 a total of 5 times after/next to each other in the round. If it says to work 2 repeats of A.1 vertically/in height you work the entire diagram once, then begin again at the start and work the entire diagram one more time.

Chain stitches are slightly narrower than other stitches and to avoid working the cast-on edge too tight, we simply chain more stitches to begin with. The stitch count will be adjusted on the following row to fit the pattern and measurement sketch.

The rib edge is more elastic and will contract slightly compared to, for example, stocking stitch. By increasing before the rib edge, you avoid a visible difference in width between the rib edge and the rest of the body.

It’s very easy to cast off too tightly, and by making yarn overs while casting off (and simultaneously casting these off) you avoid a too tight cast off edge.

See DROPS video: How to bind off with yarn overs (yo)

To achieve an even increase (or decrease) you can increase on, for example: every 3rd and 4th row alternately, like so: work 2 rows and increase on the 3rd row, work 3 rows and increase on the 4th. Repeat this until the increase is complete.

See DROPS lesson: Increase or decrease 1 st on every 3rd and 4th row alternately

Should you prefer to work in the round instead of back and forth, you may of course adjust the pattern. You’ll need to add steeks mid-front (usually 5 stitches), and follow the instructions. When you would normally turn and work from the wrong side, simply work across the steek and continue in the round. At the end you’ll cut the piece open, pick up stitches to work bands, and cover the cut edges.

See DROPS video: How to knit steeks and cut open

Should you prefer to work back and forth instead of in the round, you may of course adjust the pattern so you work the pieces separately and then assemble them at the end. Divide the stitches for the body in 2, add 1 edge stitch in each side (for sewing) and work the front and back pieces separately.

See DROPS lesson: Can I adapt a pattern for circular needles into straight needles?

Pattern repeats can vary slightly in the different sizes, in order to get the correct proportions. If you’re not working the exact same size as the garment in the photo, yours might deviate slightly. This has been carefully developed and adjusted so that the complete impression of the garment is the same in all sizes.

Make sure to follow instructions and diagrams for your size!

If you have found a pattern you like which is available in women’s size it’s not very difficult to convert it to men’s size. The biggest difference will be the length of sleeves and body. Start working on the women size that you think would fit across the chest. The additional length will be worked right before you cast off for the armhole/sleeve cap. If the pattern is worked top-down you can add the length right after the armhole or before the first decrease on sleeve.

Regarding additional yarn amount, this will depend on how much length you add, but it is better with a skein too many than too few.

All yarns will have excess fibres (from production) that might come off as lint or shedding. Brushed yarns (ie hairier yarns) have more of these loose, excess fibres, causing more shedding.

Shedding also depends on what is worn under or over the garment, and whether this pulls at the yarn fibres. It’s therefore not possible to guarantee that there will be no shedding

Below are some tips on how to get the best result when working with hairier yarns:

1. When the garment is finished (before you wash it) shake it vigorously so the looser hairs come off. NOTE: do NOT use a lint roller, brush or any method that pulls at the yarn.

2. Place the garment in a plastic bag and put it in your freezer - the temperature will cause the fibres to become less attached to each other, and excess fibres will come off easier.

3. Leave in the freezer for a few hours before taking it out and shaking it again.

4. Wash the garment according to the instructions on the yarn label.

Pilling is a natural process that happens to even the most exclusive of fibers. It's a natural sign of wear and tear that is hard to avoid, and that is most visible in high friction areas of your garment like a sweater's arms and cuffs.

You can make your garment look as new by removing the pilling, using a fabric comb or a pill/lint remover.

Still can't find the answer you need? Then scroll down and leave your question so one of our experts can try to help you. This will be done normally within 5 to 10 working days.
In the meantime, you can read the questions and answers that others have left to this pattern or join the DROPS Workshop on Facebook to get help from fellow knitters/crocheters!

You might also like...

Post a comment to pattern DROPS 149-37

We would love to hear what you have to say about this pattern!

If you want to leave a question, please make sure you select the correct category in the form below, to speed up the answering process. Required fields are marked *.

Comments / Questions (85)

country flag Kellee Hulton wrote:

Thank you for the help on March 7. I juse want to claify if I could that working A.1b would be 5sc, 2tr,2ch,2tr AND A.1a 5sc,2tr,2ch,2tr AND A.1c 4sc,2tr,2ch,2tr,5sc Would this be correct based on the crochet diagram?? Thank you again Kellee

25.03.2016 - 04:15

DROPS Design answered:

Dear Mrs Hulton, you won't crochet any sc in A.1 - the first sc row has already been done. On first row in A.1 work: 5 ch (4ch = 1st tr), skip 4 ch, in next ch work (2tr,2ch, 2tr) ==> A.1b, then work A.1a: (skip 4 sc, (2tr,2ch,2tr) in next ch) repeat from (to) until 10 sc remains and work A.1c: skip 4 sc, (2tr,2ch,2tr) in next sc, skip 4sc, 1tr in last sc. Then continue on next row with (2tr,2ch,2tr) in each 2-ch-spaces - see also this video. Happy crocheting!

25.03.2016 - 11:06

Kellee Hulton wrote:

I don't understand A1 a b or c how to read the pattern. I've never had to read a diagram to follow a pattern..can someone please help me Thank you

06.03.2016 - 06:51

DROPS Design answered:

Dear Mrs Hulton, Work from RS as follows: diagram A.1b will be worked over the first 6 sts, then repeat the 5 sts in A.1a until 10 sts remain at the end of row, and work A.1c over the last 10 sts. From WS, work A.1c, then repeat A.1a accross and finish with A.1b. Each stitch is represented by 1 symbol - see diagram text. Happy crocheting!

07.03.2016 - 10:01

country flag Linda Sirois wrote:

Bonjour, je suis en train de faire ce modèle. J'ai fait le dos et tout va bien. Ma question c'est les explications après ceux du dos, c'est pourquoi au juste? Est-ce que c'est vraiment un morceau qu'on fait à part du dos? Merci de prendre le temps de me répondre.

04.02.2016 - 01:50

DROPS Design answered:

Bonjour Mme Sirois, le dernier paragraphe du dos concerne les épaules: quand l'ouvrage mesure 70-86 cm (cf taille), on crochète d'abord la 1ère épaule et on coupe le fil, on saute 2 groupes de DB du dernier rang fait sur toute la largeur du dos, et on crochète la 2ème épaule. Bon crochet!

04.02.2016 - 09:58

country flag Wendy Childs wrote:

I'm making this pattern for a friend but cannot find anywhere in the pattern where it mentions the length of the garment. I would be grateful for some help please. My friend wants it 38in in length - I'm making the XXXL size. I need to know how long to shaping the armhole. Many thanks

20.01.2016 - 15:10

DROPS Design answered:

Dear Mrs Childs, you will find at the bottom of the pattern a measurement chart with all finished measurements in cm for each size taken flat from side to side - convert here into inches. Happy crocheting!

20.01.2016 - 17:47

country flag Anne Sloane wrote:

I am confused about the end of the rows for #2 and 3 of back piece. Should I chain 4 at end of row #2 , after A 1b, as shown in the diagram even though it does not say so in the text. Also should I end with a dtr at the end of row 3? Thanks

29.12.2015 - 02:31

DROPS Design answered:

Dear Mrs Sloane, read row 2 in diagram from the left towards the right starting with A.1c (= 4+1ch) and ending with A.1b (1 dtr in the 4th ch at beg of row 1). Read row 3 in diagram from the right towards the left:A.1b (starting with 4+1 ch), and ending with A.1c (= 1 dtr in 4th ch at beg of previous row). Happy crocheting!

02.01.2016 - 15:11

country flag Martha Van Dam wrote:

Hallo,wil aan dit vest beginnen maar snap het voorbeeld niet,ik ben beginnent.als ik A.1b pak is dat dan 3 losse dan dubbel stokje en 1 losse? Neem ik A.1a 1losse 2xdubbelstokje 1losse?Neem ik A1c 1losse 2 keer dubbelstokje 2 losse 1 dubbelstokje en 1 losse.Graag u antwoord

18.12.2015 - 14:25

DROPS Design answered:

Hoi Martha. A.1B begint met 3 l (ter vervaning van het eerste st), dan haak je nog 1 l, 2 dstk, 2 l, 2 dstk. Dan begint begint A.1A: sla 4 v over van vorige toer, 2 dstk, 2 l, 2 dstk, en A.1C begint: sla 4 v over, 2 dstk, 2 l, 2 dstk, 1 l, 4 v overslaan, 1 stk enzovoort. Lees ook hier hoe je onze telpatronen moet lezen

18.12.2015 - 15:40

Avishan wrote:

Hi dear you, I try to follow the pattern step by step. But now I have some problem with assembling. I've worked small size and now I have 11 A1.pattern for each back shoulder while there are 13 A1.pattern for front piece shoulder. If I consider band sts tog for neckline at back piece, 2 extra A1. pattern remain. Could you tell me what's wrong? What should I do now? Thanks a lot for your lovely patterns and Precise instructions.

17.12.2015 - 18:28

country flag Carmen wrote:

Ciao a tutte e grazie per questo bel modello. Sto ultimando il retro ma ho un problema con la chiusura. Non capisco cosa significhi "Lavorare 11 (nel mio caso) gruppi di m.a.d., finire con 1 cat. e 1 m.a.d ..fino a....poi lavorare 5 cat. Lavorare 11 gruppi di m.a.d.. Chiudere". Non mi porta il numero delle maglie! Se riusciste ad aiutarmi sarei molto contenta! Grazie!

10.10.2015 - 17:05

DROPS Design answered:

Buongiorno Carmen. Nella riga, dovrebbe avere 26 gruppi di m.a.d (2 m.a.d +2 cat +2 m.a.d). Lavora, come fatto fino ad adesso, sui primi 11 gruppi di m.a.d, poi avvia 1 cat e lavora 1 m.a.d intorno alle 2 cat del gruppo di m.a.d successivo. Taglia il filo. Non lavora nei due gruppi di m.a.d successive della stessa riga (sono lo scollo). Lavora poi 1 m.bss nell'arco di cat del 15.mo gruppo di m.a.d, avvia 5 cat e poi lavora negli ultimi 11 gruppi di m.a.d come prima. Buon lavoro!

11.10.2015 - 15:38

country flag ELSA wrote:

Please help with the following instruction on Collar section meaning of abbreviation 11p.b, 5p.m.a. , 5p.a. , 11 p.a.d. Thanks

17.08.2015 - 19:12

DROPS Design answered:

Dear Elsa, on row 2 to shawl collar right front piece (from WS), work 11 sc, 5 hdc, 5 dc, 11 tr (US-English terminology - see also here. Happy crocheting!

18.08.2015 - 09:27

country flag Hetty Letmaath wrote:

Is het linkervoorpand een exact spiegelbeeld van het rechtervoorpand, dus inclusief het gedeelte van de kraag? Lijkt me dan niet in de halsopening van het achterpand te passen of vergis ik mij daarin?!

23.06.2015 - 13:49

DROPS Design answered:

Hoi Hetty. Ja, je haakt exact in spiegelbeeld zoals beschreven in het patroon tot ongeveer 46-50-54-58 cm. Dan maak je de mouwen zoals beschreven en eindigt met de kraag.

24.06.2015 - 16:34