
Popular categories
Looking for a yarn?


|
||||||||||||||||
Leona |
||||||||||||||||
 |
 |
|||||||||||||||
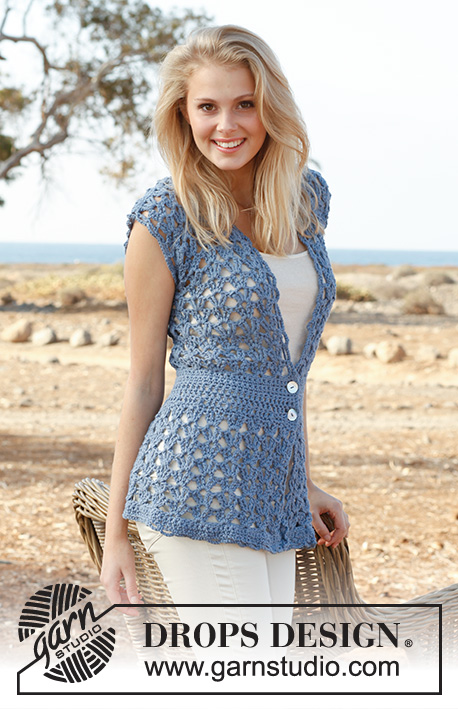
Crochet DROPS vest with fan pattern in ”Paris”. Size S-XXXL.
DROPS 145-4 |
||||||||||||||||
|
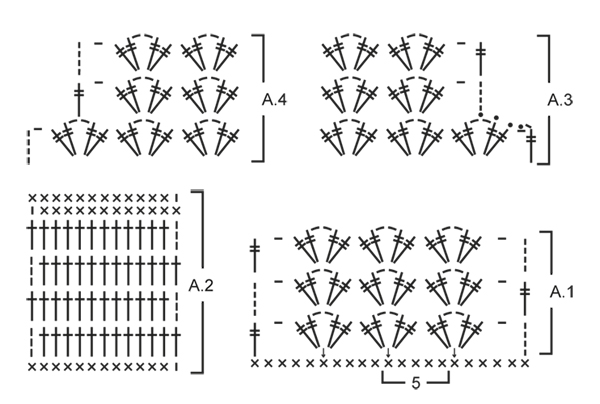
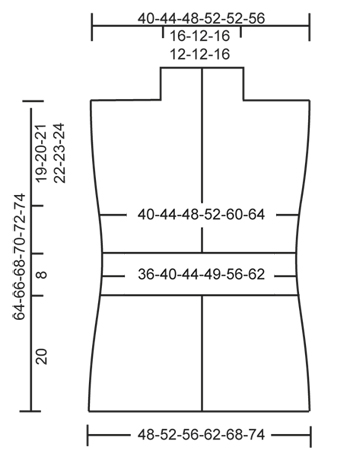
PATTERN: See diagrams A.1 and A.2 (diagrams A.3 and A.4 show dec for armhole in size XXL + XXXL). INCREASE TIP: Inc 1 sc by working 2 sc in same st. DECREASE TIP (dec 1 sc): Work 1 sc but wait with last pull through (= 2 sts on hook), then work next sc but on last pull through, pull yarn through all sts on hook = 1 sc dec. ---------------------------------------------------------- VEST: Read US/UK above! Worked back and forth from mid front. With Paris ch 189-204-219-242-264-287 on hook size 6 mm / J/10, turn. ROW 1: 1 sc in 2nd ch from hook, * skip ch 1, 1 sc in each of the next 2 ch *, repeat from *-* until 4-4-4-3-4-3 ch remain, skip next ch and finish with 1 sc in each of the last 3-3-3-2-3-2 ch = 126-136-146-161-176-191 sc on row, turn piece. ROW 2: ch 1, then work 1 sc in every sc from previous row = 126-136-146-161-176-191 sc, turn piece. ROW 3: Work as 2nd row. ROW 4: Then work pattern according to diagram A.1, i.e. ch 5 (= 1 tr + 1 ch), * skip 4 sc, in next sc work 2 tr + ch 2 + 2 tr *, repeat from *-* until 5 sc remain, skip 4 sc and finish with ch 1 and 1 tr in last sc = 24-26-28-31-34-37 tr-groups, turn piece. ROW 5: ch 5, in ch-space in every tr-group work 2 tr + ch 2 + 2 tr, finish row with 1 ch and 1 tr in 4th ch on beg of previous row = 24-26-28-31-34-37 tr-groups, turn piece. Repeat 5th row until piece measures approx. 16 cm / 6¼". Work next row as follows: ch 4 (= 1 tr), in ch-space in the middle of every tr-group work 2 tr + ch 1 (instead of 2 ch) + 2 tr, finish row with 1 tr in 4th ch from beg of previous row = 24-26-28-31-34-37 tr-groups, turn piece. Ch 1, 1 sc in same st, then work 1 sc in every tr the entire row, finish with 1 sc in 4th ch from beg of previous row, turn piece = 98-106-114-126-138-150 sc. Continue to work as follows: ROW 1: Work pattern according to diagram A.2, i.e. work ch 1, then work 1 sc in every sc the entire row AT THE SAME TIME dec 18-18-18-18-14-14 sc evenly – READ DECREASE TIP = 80-88-96-108-124-136 sc, turn piece. ROW 2: 3 ch (= 1 dc), then work 1 dc in every sc the entire row = 80-88-96-108-124-136 dc on row. ROW 3-5: Work as 2nd row = 80-88-96-108-124-136 dc. ROW 6: Work 1 sc in every dc AT THE SAME TIME adjust no of sts as follows: Size S + M + L + XL + XXL: Inc 5-9-5-5-5 sc evenly – READ INCREASE TIP. Size XXXL: Dec 3 sts evenly – READ DECREASE TIP = 85-97-101-113-129-133 sc, turn piece. ROW 7: ch 1, 1 sc in same st, then work 1 sc in every sc from previous row = 85-97-101-113-129-133 sc, turn piece. ROW 8: ch 5, * skip 3 sc, in next sc work 2 tr + ch 2 + 2 tr *, repeat from *-* until 4 sc remain on row, skip 3 sc and finish with 1 ch and 1 tr in last sc on row = 20-23-24-27-31-32 tr-groups on row, turn piece. ROW 9: Then work pattern according to diagram A.1 again, i.e. ch 5, in ch-space in the middle of every tr-group work 2 tr + ch 2 + 2 tr, finish row with ch 1 and 1 tr in 4th ch on beg of previous row = 20-23-24-27-31-32 tr-group. Repeat 9th row upwards. AT THE SAME TIME when piece measures 45-46-47-48-49-50 cm / 17¾"-18"-18½"-19"-19¼"-19¾", divide for markers as follows: Insert 1 marker after 5-6-6-7-8-8 tr-groups in from each side (= 10-11-12-13-15-16 tr-groups between markers on back piece). Finish each part separately. BACK PIECE: = 10-11-12-13-15-16 tr-groups. Continue back and forth with tr-groups as shown in A.1. AT THE SAME TIME on 1st row dec for armholes in each side in size XXL + XXXL as follows: Dec 1 tr-group on beg of row as shown in A.3, work as before until 1 tr-group remains on row, finish row as shown in A.4 (do not dec in the other sizes) = 10-11-12-13-13-14 tr-groups remain on row. Continue pattern back and forth until 1 row remains before piece measures 64-66-68-70-72-74 cm / 25¼"-26"-26¾"-27½"-28⅜"-29⅛". Now work 1 row with tr-groups only over the outermost 3-4-4-5-5-5 tr-groups in the one side of piece: ch 5, * in ch-space in the middle of next tr-group work 2 tr + ch 2 + 2 tr *, repeat from *-* 3-4-4-5-5-5 times in total, finish with 1 tr in last tr in same tr-group, turn piece. Now work 1 row sc as follows: ch 1, 1 sc in same st, * 1 sc in each of the first 2 tr, 1 sc in ch-space in the middle of tr-group, 1 sc in each of the next 2 tr *, repeat from *-* 3-4-4-5-5-5 times in total, finish with 1 sc in last ch and 1 sc in 4th ch from beg of previous row = 18-23-23-28-28-28 sc on row. Fasten off. Repeat on the other shoulder (i.e. do not work over the middle 4-3-4-3-3-4 tr-groups = neck.) RIGHT FRONT PIECE: = 5-6-6-7-8-8 tr-groups. Continue back and forth with tr-groups as on back piece. AT THE SAME TIME on 1st row dec for armhole in the side in size XXL + XXXL as shown in A.4 (do not dec in the other sizes) = 5-6-6-7-7-7 tr-groups. Continue pattern back and forth until piece measures approx. 64-66-68-70-72-74 cm / 25¼"-26"-26¾"-27½"-28⅜"-29⅛" - make sure that same no of rows with tr-groups has been worked as on back piece. Now work 1 row sc as on back piece only over the outermost 3-4-4-5-5-5 tr-groups on shoulder (i.e. do not work over the 2 tr-groups towards the neck = collar) = 18-23-23-28-28-28 sc. Fasten off. Insert 1 marker on the shoulder. Now work tr-groups back and forth over collar as follows: ch 5, in ch-space in first tr-group work 2 tr + ch 2 + 2 tr, in ch-space in next tr-group work 2 tr + ch 2 + 2 tr, ch 1 and finish with 1 tr in last tr in same tr-group. Continue back and forth like this until collar measures approx. 10-8-10-8-8-10 cm / 4"-3⅛"-4"-3⅛"-3⅛"-4" from marker on shoulder. Then work 1 row sc as follows: ch 1, 1 sc in same st, 1 sc in next ch, 1 sc in each of the first 2 tr, 1 sc in ch-space in the middle of tr-group, 1 sc in each of the next 2 tr *, repeat from *-* 2 times in total, finish with 1 sc in last ch and 1 sc in 4th ch from beg of previous row = 14 sc, cut the yarn. LEFT FRONT PIECE: Work as right front piece but reversed. When dec for armhole in size XXL + XXXL, dec 1 tr-group as shown in A.3. ASSEMBLY: Sew shoulder seams edge to edge to avoid a chunky seam. Sew collar tog mid back (sew edge to edge) and sew it on to neck line at the back of neck. Sew on buttons on right front piece – see picture. Button through the crochet edge explained below. CROCHET EDGE: Work a finishing edge around the entire opening on vest and around both armholes as follows: 1 sc in first st, * ch 5, skip approx. 2½ cm / ⅞", 1 sc in next st/ch-space *, repeat from *-* the entire round and finish with ch 5 and 1 sl st in sc from beg of round. |
||||||||||||||||
Diagram explanations |
||||||||||||||||
|
||||||||||||||||
|
||||||||||||||||
|
||||||||||||||||
|
Have you made this or any other of our designs? Tag your pictures in social media with #dropsdesign so we can see them! Do you need help with this pattern?You'll find tutorial videos, a Comments/Questions area and more by visiting the pattern on garnstudio.com. © 1982-2024 DROPS Design A/S. We reserve all rights. This document, including all its sub-sections, has copyrights. Read more about what you can do with our patterns at the bottom of each pattern on our site. |
||||||||||||||||


With over 40 years in knitting and crochet design, DROPS Design offers one of the most extensive collections of free patterns on the internet - translated to 17 languages. As of today we count 304 catalogs and 11422 patterns - 11417 of which are translated into English (US/in).
We work hard to bring you the best knitting and crochet have to offer, inspiration and advice as well as great quality yarns at incredible prices! Would you like to use our patterns for other than personal use? You can read what you are allowed to do in the Copyright text at the bottom of all our patterns. Happy crafting!
Comments / Questions (189)
Ik gebruik paris recycled denim en heb 600 gram. Met naald 6 ben ik maat L aan het haken en heb minder steken opgezet omdat het anders veel te groot werd. Maar nu heb ik 2 rijen dubbele stokjes af en het eerste bolletje is al op. Klopt het aantal bolletjes en grammen wel?
15.07.2017 - 23:52DROPS Design answered:
Hallo Ellen, Het aangegeven garen in het patroon klopt. Heb je de stekenverhouding gecontroleerd? En nagemeten hoe je uitkomt met de maten, nu je de eerste rijen dubbele stokjes hebt gemaakt? Als dit allemaal klopt kun je gewoon verder haken. Het lijkt nu alsof het garen snel op gaat, maar straks bij het open patroon heb je minder garen nodig.
16.07.2017 - 13:18Sarah Davies wrote:
When starting the back do I cut the wool then start with five chains before continuing with the pattern as in a1? Thanks
25.02.2017 - 15:12DROPS Design answered:
Dear Mrs Davis, that's right. Happy crocheting!
27.02.2017 - 09:49Liebes Drops-Team, ich liebe eure Anleitungen und Garne und bedanke mich herzlich für die kostenlos zu Verfügung gestellten Anleitungen der Designer! Leider musste ich auf crazypatterns. net (Häkelanleitung für eine taillierte Weste, Cardigan in Gr. 36-46) feststellen, dass man dort offensichtlich ihre kostenlose Anleitung verkauft, was ich nicht in Ordnung finde! Grüße aus Deutschland
28.12.2016 - 18:27Hallo, ich bin in der Anleitung jetzt an der Stelle, wo Vorder- und Rückenteil getrennt werden. Ich frage mich, wie ich die einzelnen Teile beginne bzw. beende und zwar, ob ich mit 4 oder 5 Luftmaschen beginne und ob ich mit einer Luftmasche + DSt abschließe oder nur mit einem Doppelstäbchen. Ich habe es erstmal ohne die Luftmasche probiert, dann kommt mir die Arbeit aber sehr stramm vor, so dass ich mich frage, ob mein Arm dann überhaupt dadurch passen wird. Danke für eine Antwort.
29.10.2016 - 10:02DROPS Design answered:
Liebe Frau Inka, jede R muss mit 4+1 Lm anfangen und mit 1 Lm, 1 DbStb enden, ie wie im A.3 und A.4 gezeigt (passen Sie mal auf, keine Abnahmen in den ersten Größen).
31.10.2016 - 09:46Guten Abend, bei mir passte die Maschenprobe von der Größe zur Wolle und Häkelhaken. Jetzt habe ich die ersten 3 Reihen fertiggehäkelt und komme bei Größe S auf eine Länge von 125 cm, was ja viel zu lang ist. Eigentlich dürften es ja nur 96 cm sein, oder? Wie kann das sein? Und was kann ich jetzt tun? Vielen Dank! MFG Inka W
14.10.2016 - 23:07DROPS Design answered:
Liebe Frau Winka, Die Maschenprobe ist: 2,5 Doppelstäbchen-Gruppen im Muster A.1 = 10 cm in der Breite. Mit 24 Doppelstäbchen-Gruppen in der Grösse S, sollen Sie dann 96 cm bekommen. Wenn Ihre Maschenprobe stimmt, bekommen Sie die richtigen Maßen.
17.10.2016 - 08:52Is the amount of yarn needed for the pattern accurate? I bought the type of yarn the pattern required and one 50g skein only worked up to 4 1/2 rows,
25.09.2016 - 04:21DROPS Design answered:
Dear Mrs Todd, Remember to check and keep the given tension, you should have enough yarn following instructions. Happy crocheting!
26.09.2016 - 10:30Wendy Counsell wrote:
Hi I can not under stand what you mean by tr groups only over the outermost tr what does this mean
26.06.2016 - 09:34DROPS Design answered:
Dear Mrs Counsell, you are now shaping neckline, work now shoulder separately working the first 3-4-5 tr-groups (see size) on one size, leaving remaining sts on row unworked. For 2nd shoulder on back piece you will then work on the first 3-4-5 tr-groups on the other side for 2nd shoulder, leaving the middle tr-groups unworked for neckline. Happy crocheting!
27.06.2016 - 09:52Hej. Tak for svaret. Jeg har sat de to mærker til ærmegab, men nu hvor jeg skal hækle videre på rygstykket, har jeg lidt svært ved at komme videre. Jeg er jo endt ude ved siden. Hvis jeg skal ind og hækle ved rygstykket, skal jeg så bryde garnet? Og skal jeg i så fald starte med Diag. A3? For ud fra det, kan jeg ikke få det til at give mening? :-) Jeg hækler størrelse XXL.
26.05.2016 - 14:16DROPS Design answered:
Hej Katja. Ja, du skal bryde garnet og starte op igen paa rygstykket. Du fortsaetter med naeste omg som du slap med rygstykket. Du haekler frem og tilbage som A.1 og lukker af som vist i A.3 og A.4 i siderne.
26.05.2016 - 16:06Hejsa. Super flot vest, jeg er helt vild med den. Jeg har dog problemer med at forstå overgangen til hækling af rygstykket. Jeg håber meget på, at I kan hjælpe mig. Jeg glæder mig helt vildt til at blive færdig! 😊 Mvh Katja
24.05.2016 - 14:24DROPS Design answered:
Hej Katja. Du har delt dit arbejde op i 2 forstk og 1 rygstk. Du har 10 til 16 dbl-st grupper til rygstk (afhaengigt af hvilken str du laver). Men f.eks. S har du saa 10 grupper. Du hekler nu videre iflg A.1 som du gjorde för over de 10 grupper (frem og tilbage kun over rygstk). Og samtidig tager du ind i hver side til aermegab som beskrevet. Hvis dette ikke hjaelper, sig til hvor praecist du er og hvilken str du laver, saa kan jeg kigge med lidt nemmere :-)
25.05.2016 - 15:45Oke, daarom kwam ik er niet uit. Ik heb de vaste dus aan de verkeerde zijde zitten.
26.04.2016 - 14:23