Ocelot by DROPS Design

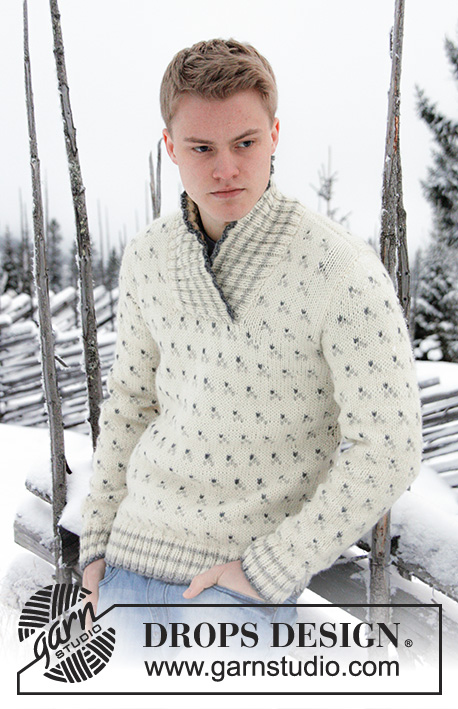
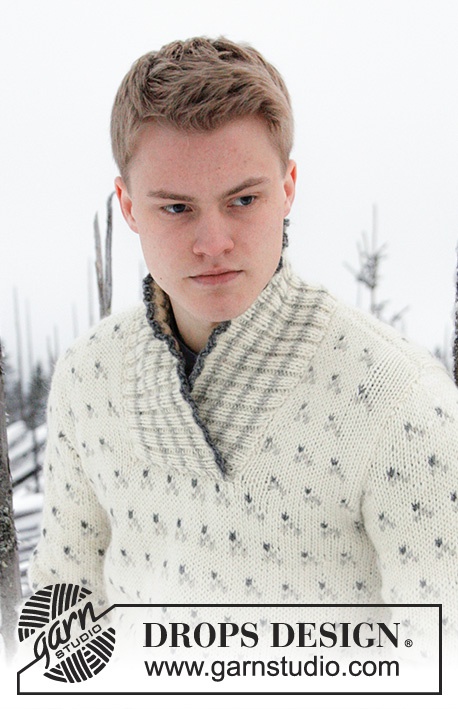
Pletený DROPS pánský svetr se vzorem a šálovým límcem z příze „Nepal“. Velikost S – XXXL.

DROPS Extra 0-808
DROPS design: Návod č. NE-078
Skupina přízí: C
-------------------------------------------------------

Velikost: S - M - L - XL - XXL - XXXL

Materiál: DROPS NEPAL firmy Garnstudio
550-650-700-750-800-900 g, barva č. 0100, přírodní
150-150-150-150-200-200 g, barva č. 0500m, světle šedá
100-100-100-100-100-100 g, barva č. 0517m, středně šedá

SADA DROPS PONOŽKOVÝCH JEHLIC a DROPS KRUHOVÁ JEHLICE č. 5 (40 a 80 cm) - nebo velikosti potřebné k upletení zkušebního vzorku o rozměrech 17 ok x 22 řad lícovým žerzejem = 10 x 10 cm.
DROPS KRUHOVÁ JEHLICE č. 4 (80 cm) – na patent

-------------------------------------------------------

Zkušební vzorek – Podívejte se, jak ho měřit a proč
Náhradní příze – Podívejte se, jak změnit přízi
Skupina přízí A až F – Neměňte návod, změňte přízi
Spotřeba příze při použití náhradní příze – Využijte náš převodník

-------------------------------------------------------


65% vlna, 35% alpaka
od 50.00 Kč /50g
DROPS Nepal uni colour DROPS Nepal uni colour 50.00 Kč /50g
Příze a Jehlice
Objednat
DROPS Nepal mix DROPS Nepal mix 54.00 Kč /50g
Příze a Jehlice
Objednat
needles Jehlice a háčky
Přízi na tento model můžete mít už za 800Kč. Více zde.

Návod

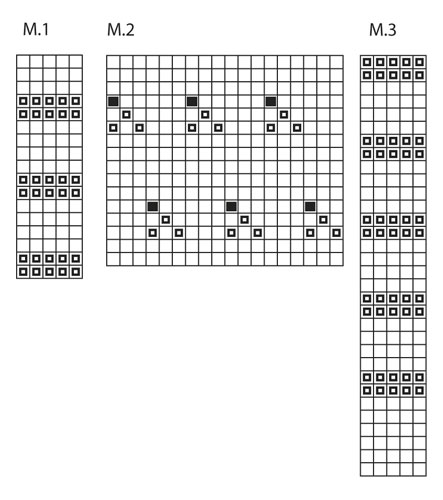
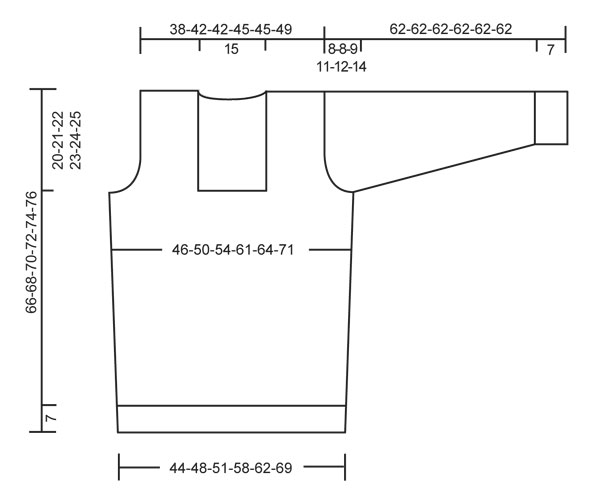
VZOR:
Viz schéma M. 1 až M. 3 – schéma pleteme lícovým žerzejem.
----------------------------------------------------------------------

TĚLO:
Pleteme v řadách dokola na kruhové jehlici.
Na kruhovou jehlici č. 4 nahodíme přízí Nepal středně šedou barvou 196-212-228-256-272-304 ok. Změníme barvu na světle šedou a pleteme patentem = 2 hladce/2 obrace, podle vzoru M. 1. Po dokončení vzoru M. 1 1x na výšku, změníme velikost kruhové jehlice na č. 5. Upleteme 1 kruhovou řadu přírodní barvou a SOUČASNĚ rovnoměrně ujmeme 46-50-54-58-62-70 ok = 150-162-174-198-210-234 ok. PAMATUJTE NA SPRÁVNÉ NAPĚTÍ PŘÍZE! Ve výšce 15 cm přidáme z každé strany obou značek 1 oko – přidávaná oka pleteme přírodní barvou. Přidávání opakujeme ještě ve výšce 30 cm = 158-170-182-206-218-242 ok. Ve výšce 46-47-48-49-50-51 cm - řady přidáme tak, aby byla nad vzorem upletena nejméně jedna řada přírodní barvou – pleteme následující kruhovou řadu: pro průramek uzavřeme 3 oka, pleteme 24-27-30-36-39-45 ok, pro průkrčník uzavřeme 25 ok, pleteme 24-27-30-36-39-45 ok, pro průramek uzavřeme 6 ok, pleteme 73-79-85-97-103-115 ok (= zadní díl) a poslední 3 oka uzavřeme pro průramek. Díly dokončíme samostatně.

ZADNÍ DÍL:
= 73-79-85-97-103-115 ok. Pokračujeme vzorem M. 2 – SOUČASNĚ uzavřeme pro průramky na začátku každé řady z každé strany: 0-0-0-0-1-1x 3 oka, 1-1-2-3-3-4x 2 oka 2-2-3-4-4-5x 1 oko = 65-71-71-77-77-83 ok. Ve výšce 64-66-68-70-72-74 cm uzavřeme pro průkrčník středových 23 ok. Náramenice dokončíme odděleně. V následující řadě uzavřeme pro průkrčník 1 oko = 20-23-23-26-26-29 ok zbývá na náramenici. Oka uzavřeme ve výšce 66-68-70-72-74-76 cm.

PRAVÝ PŘEDNÍ DÍL:
= 24-27-30-36-39-45 ok. Průramky tvarujeme stejně jako na zadním díle = 20-23-23-26-26-29 ok. Oka uzavřeme ve výšce 66-68-70-72-74-76 cm – POZN: oka uzavřeme ve stejné řadě vzoru jako na zadním díle.

LEVÝ PŘEDNÍ DÍL:
Pleteme stejně jako pravý přední díl – zrcadlově.

RUKÁV:
Pleteme na krátkých ponožkových jehlicích v řadách dokola. Při větším poču ok převedem práci na kruhovou jehlici.
Na ponožkové jehlice č. 4 nahodíme středně šedou barvou 48-52-56-56-60-60 ok. Po upletení vzoru M. 1 1krát na výšku, změníme velikost jehlic na č. 5. Upleteme jednu kruhovou řadu hladce přírodní barvou, SOUČASNĚ rovnoměrně ujmeme 9-7-11-11-9-9 ok = 39-45-45-45-51-51 ok. Značkou označíme začátek řady (= střed spodní strany rukávu) a upleteme vzor M. 2 – POZN. Vzor začíná a končí stejně, souměrně podle středu spodní strany rukávu. SOUČASNĚ ve výšce 8-8-8-8-10-10 cm, přidáme kolem značky 1 oko – přidávaná oka zapracováváme do vzoru. Přidávání opakujeme každých 4½-5-4-3-3-2½ cm celkem 11-10-12-14-13-15krát = 61-65-69-73-77-81 ok. Ve výšce 54-54-53-51-50-48 cm (nižší vzdálenost u větších velikostí odpovídá adekvátním proporcím rukávové hlavice, která je u širšího rukávu delší), uzavřeme kolem značky 6 ok (tj. 3 oka z akždé strany značky). Díl dokončíme v lícových a rubových řadách – SOUČASNĚ tvarujeme rukávovou hlavici – na začátku a na konci každé řady uzavřeme z každé strany 2-2-2-3-3-4krát 2 oka a 3-3-3-4-4-5krát 1 oko. Dále z každé strany uzavřeme 2 oka a to, až do výšky 61 cm. Na závěr uzavřeme z každé strany 1krát 3 oka. Zbylá oka uzavřeme ve výšce 62 cm.

DOKONČENÍ:
Sešijeme náramenice.

ŠÁLOVÝ LÍMEC:
Límec začínáme na levé straně předního dílu, na konci uzavřených ok. Na kruhovou jehlici č. 4 nabereme podél levé strany dílu přírodní barvou 34 až 44 ok, ze zadního průkrčníku nabereme 24 až 26 ok a na závěr nabereme podél druhé strany předního dílu 34 až 44 ok = 92 až 114 ok (oka nenabíráme v předním průkrčníku, kde jsou uzavřená oka). Rubovou řadu upleteme hladce a SOUČASNĚ rovnoměrně přidáme oka na celkový počet 126-130-134-138-142-146 ok. Pleteme vzorem M. 3 a následně (lícová řada): 2 krajní oka jsou ve všech řadách pletená hladce, *2 hladce, 2 obrace*, mezi *-* opakujeme, až zbývají 4 oka, řadu končíme 2 oky hladce a 2 krajními oky hladce. Takto pleteme do výšky 6 cm. Uprostřed každého žebra pleteného 12 oky obrace přidáme 1 oko, nahlížíme z lícové strany (= zadní díl průkrčníku) = 138-142-146-150-154-158 ok. Dopleteme vzor M. 3 1krát na výšku, změníme barvu příze na středně šedou a oka VOLNĚ uzavřeme jak se jeví. Límec měří asi 15 cm. Límec přeložíme přes sebe (pravou stranu přes levou), přeložený límec všijeme do průkrčníku.
Všijeme rukávy.

Schéma

symbols = přírodní
symbols = světle šedá
symbols = středně šedá
diagram
diagram

Potřebujete poradit s tímto návodem?

Děkujeme, že jste si vybrali návod DROPS Design. Zakládáme si na tom, že dáváme k dispozici návody ověřené a snadno srozumitelné. Všechny návody jsou přeložené z norského originálu a tak si můžete kdykoli srovnat rozměry a počty s původním návodem (DROPS Extra 0-808) .

Máte s návodem potíže? Níže najdete seznam odkazů, které vám pomohou dokončit vaše dílo co nejdříve - nebo se třeba přiučit něco nového.

signature-image signature

Máte s návodem potíže? Níže najdete seznam odkazů, které vám pomohou dokončit vaše dílo co nejdříve - nebo se třeba přiučit něco nového.

Každý náš návod je doprovázen speciálními video-ukázkami, které vás navedou.

Máme takopodrobné rozpisy různých technik a postupů krok za krokem - najdete je zde.

1) Why is the knitting/crochet tension so important?

Knitting tension is what determines the final measurements of your work, and is usually measured per 10 x 10 cm. It is provided like so: number of stitches in width x number of rows in height - eg: 19 stitches x 26 rows = 10 x 10 cm.

The knitting tension is very individual; some people knit/crochet loosely while others work tightly. You adjust the knitting tension with the needle size, which is why the suggested needle size only serve as a guide! You need to adjust this (up or down) to ensure that YOUR knitting tension matches the knitting tension provided in the pattern. If you work with a different knitting tension than provided you will have a different yarn consumption, and your work will have different measurements than what the pattern suggests.

The knitting tension also determines which yarns can replace each other. As long as you achieve the same knitting tension you can replace one yarn with another.

See DROPS lesson: How to measure your tension/gauge

See DROPS video: How to make a gauge tension swatch

nahoru

2) What are the yarn groups?

All our yarns are categorised into yarn groups (from A to F) according to thickness and knitting tension – group A contains the thinnest yarns and group F the thickest. This makes it easier for you to find alternative yarns to our patterns, should you wish to switch yarn. All yarns within the same group have a similar knitting tension and can easily replace each other. However, different yarn qualities have different structures and properties which will give the finished work a unique look and feel.

Click here for an overview of the yarns in each yarn group

nahoru

3) Can I use a different yarn than what the pattern suggests?

The important thing when changing from one yarn to another is that the knitting/crochet tension remains the same. This is so that the measurements of the finished piece will be the same as on the sketch provided. It is easier to achieve the same knitting tension using yarns from the same yarn group. It is also possible to work with multiple strands of a thinner yarn to achieve the knitting tension of a thicker one. Please try our yarn converter. We recommend you to always work a test swatch.

Please NOTE: when changing yarn the garment might have a different look and feel to the garment in the photo, due to individual properties and qualities of each yarn.

See DROPS lesson: Can I use a different yarn than the one mentioned in the pattern?

nahoru

4) How do I use the yarn converter?

At the top of all our patterns you’ll find a link to our yarn converter, which is a helpful tool should you wish to use a different yarn than suggested. By filling in the yarn quality you wish to replace, the amount (in your size) and number of strands, the converter will present good alternative yarns with the same knitting tension. Additionally it will tell you how much you’ll require in the new qualities and whether you’ll need to work with multiple strands. Most skeins are 50g (some are 25g or 100g).

If the pattern is worked with multiple colours, every colour will have to be converted separately. Similarly, if the pattern is worked with several strands of different yarns (for example 1 strand Alpaca and 1 strand Kid-Silk) you will have to find alternatives for each, individually.

Click here to see our yarn converter

nahoru

5) Why do I get the wrong knitting tension with the suggested needle size?

The needle size provided in the pattern serves only as a guide, the important thing is to follow the knitting tension. And since knitting tension is very individual, you will have to adjust the needle size to ensure that YOUR tension is the same as in the pattern – maybe you’ll have to adjust 1, or even 2 needle sizes, up or down to achieve the correct tension. For this, we recommend that you work test swatches.

Should you work with a different knitting tension than the one provided, the measurements of the finished garment might deviate from the measurement sketch.

See DROPS lesson: How to measure your tension/gauge

See DROPS video: How to make a gauge tension swatch

nahoru

6) Why is the pattern worked top-down?

Working a garment top-down provides more flexibility and room for personal adjustment. For example it is easier to try the garment on while working, as well as making adjustments to length of yoke and shoulder caps.

The instructions are carefully explaining every step, in the correct order. Diagrams are adjusted to the knitting direction and are worked as usual.

nahoru

7) Why are the sleeves shorter in larger sizes?

The total width of the garment (from wrist-to-wrist) will be larger in the larger sizes, despite the actual sleeves being shorter. The larger sizes have longer sleeve caps and wider shoulders, so there will be a good fit in all sizes.

nahoru

8) What is a repeat?

Diagrams are often repeated on the round or in height. 1 repeat is the diagram the way it appears in the pattern. If it says to work 5 repeats of A.1 in the round, then you work A.1 a total of 5 times after/next to each other in the round. If it says to work 2 repeats of A.1 vertically/in height you work the entire diagram once, then begin again at the start and work the entire diagram one more time.

nahoru

9) How do I work according to a knitting diagram?

The diagram depicts all rows/rounds, and every stitch seen from the right side. It is read from bottom to top, from right to left. 1 square = 1 stitch.

When working back and forth, every other row is worked from the right side and every other row is worked from the wrong side. When working from the wrong side, the diagram will have to be worked reversed: from left to right, knit stitches are purled, purl stitches are knit etc.

When working in the round every round is worked from the right side and the diagram are worked from right to left on all rounds.

See DROPS lesson: How to read knitting diagrams

nahoru

10) How do I work according to a crochet diagram?

The diagram depicts all rows/rounds, and every stitch seen from the right side. It is worked from bottom to top, from right to left.

When working back and forth every other row is worked from the right side: from right to left and every other row is worked from the wrong side: from left to right.

When working in the round, every row in the diagram are worked from the right side, from right to left.

When working a circular diagram you start in the middle and work your way outwards, counter clockwise, row by row.

The rows usually start with a given number of chain stitches (equivalent to the height of the following stitch), this will either be depicted in the diagram or explained in the pattern.

See DROPS lesson: How to read crochet diagrams

nahoru

11) How do I work several diagrams simultaneously on the same row/round?

Instructions for working several diagrams after each other on the same row/round, will often be written like so: “work A.1, A.2, A.3 a total of 0-0-2-3-4 times". This means you work A.1 once, then A.2 is worked once, and A.3 is repeated (in width) the number of times provided for your size – in this case like so: S = 0 times, M = 0 times, L=2 times, XL= 3 times and XXL = 4 times.

The diagrams are worked as usual: begin with the first row in A.1, then work the first row in A.2 etc.

See DROPS lesson: How to read knitting diagrams

See DROPS lesson: How to read crochet diagrams

nahoru

12) Why does the piece start with more chain stitches than it’s worked with?

Chain stitches are slightly narrower than other stitches and to avoid working the cast-on edge too tight, we simply chain more stitches to begin with. The stitch count will be adjusted on the following row to fit the pattern and measurement sketch.

nahoru

13) Why increase before the rib edge when the piece is worked top-down?

The rib edge is more elastic and will contract slightly compared to, for example, stocking stitch. By increasing before the rib edge, you avoid a visible difference in width between the rib edge and the rest of the body.

nahoru

14) Why increase in the cast-off edge?

It’s very easy to cast off too tightly, and by making yarn overs while casting off (and simultaneously casting these off) you avoid a too tight cast off edge.

See DROPS video: How to bind off with yarn overs (yo)

nahoru

15) How do I increase/decrease on every 3rd and 4th row/round alternately?

To achieve an even increase (or decrease) you can increase on, for example: every 3rd and 4th row alternately, like so: work 2 rows and increase on the 3rd row, work 3 rows and increase on the 4th. Repeat this until the increase is complete.

See DROPS lesson: Increase or decrease 1 st on every 3rd and 4th row alternately

nahoru

16) Why is the pattern slightly different than what I see in the photo?

Pattern repeats can vary slightly in the different sizes, in order to get the correct proportions. If you’re not working the exact same size as the garment in the photo, yours might deviate slightly. This has been carefully developed and adjusted so that the complete impression of the garment is the same in all sizes.

Make sure to follow instructions and diagrams for your size!

nahoru

17) How can I work a jacket in the round instead of back and forth?

Should you prefer to work in the round instead of back and forth, you may of course adjust the pattern. You’ll need to add steeks mid-front (usually 5 stitches), and follow the instructions. When you would normally turn and work from the wrong side, simply work across the steek and continue in the round. At the end you’ll cut the piece open, pick up stitches to work bands, and cover the cut edges.

See DROPS video: How to knit steeks and cut open

nahoru

18) Can I work a jumper back and forth instead of in the round?

Should you prefer to work back and forth instead of in the round, you may of course adjust the pattern so you work the pieces separately and then assemble them at the end. Divide the stitches for the body in 2, add 1 edge stitch in each side (for sewing) and work the front and back pieces separately.

See DROPS lesson: Can I adapt a pattern for circular needles into straight needles?

nahoru

19) Why do you show discontinued yarns in the patterns?

Since different yarns have different qualities and textures we have chosen to keep the original yarn in our patterns. However, you can easily find options among our available qualities by using our yarn converter, or simply pick a yarn from the same yarn group.

It is possible that some retailers still have discontinued yarns in stock, or that someone has a few skeins at home that they would like to find patterns for.

The yarn converter will provide both alternative yarn as well as required amount in the new quality.

nahoru

20) How do I make a women’s size garment into a men’s size one?

If you have found a pattern you like which is available in women’s size it’s not very difficult to convert it to men’s size. The biggest difference will be the length of sleeves and body. Start working on the women size that you think would fit across the chest. The additional length will be worked right before you cast off for the armhole/sleeve cap. If the pattern is worked top-down you can add the length right after the armhole or before the first decrease on sleeve.

Regarding additional yarn amount, this will depend on how much length you add, but it is better with a skein too many than too few.

nahoru

21) How do I prevent a hairy garment from shedding?

All yarns will have excess fibres (from production) that might come off as lint or shedding. Brushed yarns (ie hairier yarns) have more of these loose, excess fibres, causing more shedding.

Shedding also depends on what is worn under or over the garment, and whether this pulls at the yarn fibres. It’s therefore not possible to guarantee that there will be no shedding

Below are some tips on how to get the best result when working with hairier yarns:

1. When the garment is finished (before you wash it) shake it vigorously so the looser hairs come off. NOTE: do NOT use a lint roller, brush or any method that pulls at the yarn.

2. Place the garment in a plastic bag and put it in your freezer - the temperature will cause the fibres to become less attached to each other, and excess fibres will come off easier.

3. Leave in the freezer for a few hours before taking it out and shaking it again.

4. Wash the garment according to the instructions on the yarn label.

nahoru

22) Where on the garment is the length measured?

The measurement sketch/schematic drawing provides information regarding the full length of the garment. If it’s a jumper or a jacket the length is measured from the highest point on the shoulder closest to the neckline, and straight down to the bottom of the garment. It is NOT measured from the tip of shoulder. Similarly, the length of yoke is measured from the highest point on the shoulder and down to where yoke is split into body and sleeves.

On a jacket measures are never taken along bands, unless specifically stated. Always measure inside band stitches when measuring the length.

See DROPS lesson: How to read a schematic drawing

nahoru

23) How do I know how many balls of yarn I need?

The required amount of yarn is provided in grams, eg: 450 g. To calculate how many balls you’ll need you first need to know how many grams are in 1 ball (25g, 50g or 100g). This information is available if you click on the individual yarn quality on our pages. Divide the amount required with the amount of each ball. For example, if each ball is 50g (the most common amount), the calculation will be as follows: 450 / 50 = 9 balls.

nahoru

Pořídili jste si přízi DROPS na tento model? Pak máte taky právo žádat po svém prodejci, u něhož jste nakoupili, pomoc a rady. Seznam DROPS obchodů najdete tady!
Pořád se nemůžete dobrat odpovědi, kterou hledáte? Pak posuňte stránku dolů a napište nám svůj dotaz, naši specialisté se vám pokusí poradit. Obvykle to zvládneme během 5 až 10 pracovních dnů.. Mezitím si můžete pročíst otázky a odpovědi, které k tomuto modelu položili ostatní, nebo navštívit skupinu DROPS Workshop na Facebooku, kde vám může poradit některá spřízněná duše!

Komentáře / Otázky (23)

country flag Stefania wrote:

Buongiorno, quanto filato serve per fare questa maglia in tinta unita in tg.M? Grazie

13.11.2023 - 08:27

DROPS Design answered:

Buonasera Stefania, per un aiuto così personalizzato può rivolgersi al suo rivenditore DROPS di fiducia. Buon lavoro!

16.11.2023 - 20:49

country flag Guillermo wrote:

Qué tal! Los números en el esquema de la prenda, ¿son centímetros? Muchas gracias

14.05.2022 - 06:16

DROPS Design answered:

Hola Guillermo, sí, las medidas son centímetros.

15.05.2022 - 23:56

country flag Sebastian wrote:

I have noticed that the Ocelot sweater sleeve cap is not aligning sleeves are too big and I'm knitting a small. Sleeves are buckling when trying to seam in the in set sleeves. Are there any tutorial to assist

12.05.2022 - 19:25

DROPS Design answered:

Dear Sebastian, if you kept the correct tension for the sleeves, they should nicely fit in the armhole; this video might help you, you can first baste the sleeve if it helps. Happy knitting!

13.05.2022 - 08:07

country flag Kathrin wrote:

Frage bzgl Ocelot Pullover, Abschnitt Rücken, da heißt es für Gr XL: "Nach 68 cm die mittleren 23 M. für den Halsausschnitt abk. Weiter bei der nächsten R. 1 M. gegen den Halsausschnitt abk. = 23 M. Nach 70 cm abk. " Was heißt hier 1M gegen den Ausschnitt abketten? 23x 1M jeweils auf der Halsseite abketten? Dann wären das aber 23 eihen und entspricht nicht 2cm bis Ende der Rückenarbeit. ich verstehe hier die Anleitung nicht. Kann mit hier jmd helfen?

29.03.2022 - 20:44

DROPS Design answered:

Liebe Kathrin, in XL werden Sie die 23 Maschen für den Halsausschnitt bei einer Länge von 70 cm (68 cm in L); dann ketten Sie 1 Masche am Anfang der nächsten Reihe ab Hals (= Rückreihe bei der rechten Schulter/Hinreihe bei der linken Schulter). Viel Spaß beim stricken!

30.03.2022 - 07:37

country flag BritishKoala wrote:

Hi, I'm confused on the measurements given for which size. How do you work it out for the pattern? As in measuring it the person in relation to the numbers in the diagram. Thank you

19.06.2020 - 21:56

DROPS Design answered:

Dear BritishKoala, rather measure a similar garment he has and likes the shape to compare them in those in the measurement - read more here. Happy knitting!

22.06.2020 - 07:26

country flag Antje Dumrath wrote:

Ich habe schon viele Ihrer Anleitungen mit Erfolg gestrickt, aber bei dieser Anleitung komme ich mit der Anweisung für den Kragen nicht klar. Wie strickt man 2 Randm? Und folgenden Satz verstehe ich gar nicht: Nach ca. 6 cm in den mittleren 12 li.- Partiene je 1 M. aufnehmen... usw. Für eine zügige Antwort bin ich sehr dankbar. Fröhliche Grüße Antje Dumrath

10.06.2020 - 18:19

DROPS Design answered:

Liebe Frau Dumrath, Kragen wird hier in Reihen gestrickt, mit 2 Randmaschen krausrechts (und 2 rechte Maschen) beidseitig. Nach 6 cm werden Sie 1 Maschen in den mittleren 12 linke-Partien (von der Vorderseite gesehen) zunehmen, so daß der Kragen so aussieht: 2 M kraus rechts, Bündchen 2 M re/2 M li (Seite Vorderteil), dann 12 Mal (2 M re, 3 M li) (ca gegen Hals Rückenteil), und dann wieder 2 M re/2 M li (Seite Vorderteil) und 2 M kraus rechts. Viel Spaß beim stricken!

11.06.2020 - 08:15

country flag Nicole wrote:

EN MÊME TEMPS, à 8-8-8-8-10-10 cm de hauteur totale, augmenter 1 m de chaque côté du marqueur milieu sous la manche – tricoter les augmentations en jacquard. Répéter ces augmentations 11-10-12-14-13-15 fois au total tous les 4½-5-4-3-3-2½ = 61-65-69-73-77-81 m. Est-ce au total tous les 41/2 rang ou cm. Merci

23.07.2019 - 19:18

DROPS Design answered:

Bonjour Nicole, il s'agit de cm. Bon tricot!

23.07.2019 - 19:30

country flag Mandy Gibbon wrote:

Did all that. Sleeve did not fit nicely, it was far too small. I have now followed the length of the sleeve on pattern 'Limestone', i.e. to length 66 cm rather than 62 - finished it last night, and it fits perfectly!!

18.01.2019 - 10:23

country flag Mandy Gibbon wrote:

I am knitting the XL size. Following the instructions and the lengths there is no way the sleeve fits the space I have for the armhole there is about 3 ins difference. Tension OK, Length measurements are OK, but the sizing you give is way out. My chest size is 51cm and your diagram says 61. I'm struggling to know what to do as the sleeve just wont fit although the length of the body from armhole to shoulder is exact, I have reknitted decreasing part of sleeve and still nowhere near.

17.01.2019 - 19:03

DROPS Design answered:

Dear Mrs Gibbon, in size XL, the armholes should be 23 cm. When all inc in sleeves are done there are 73 sts (= approx. 43 cm), then you continue sleeve cap from 51 cm to 62 cm = 11 cm length casting off sts on each side for sleeve cap as explained in the pattern. Sew first the shoulders, then pin sleeve around the armhole, it should fit nicely. Should do need any further assistance, please show your work to your store - even sending them a picture per Email- they will have a better overview. Happy knitting!

18.01.2019 - 08:29

country flag Cable Girl wrote:

I’m working on the sleeve for this pattern right now. I’m unsure what “pattern begins and ends same way” refers to regarding diagram M2. It shows 18 stitches in the diagram and since I’m knitting a large size I currently have 45 stitches. Do I do the diagram 2.5 times and start over at the marker? If so, how do I accommodate the increases into the pattern?

17.07.2018 - 03:47

DROPS Design answered:

Dear Gable Girl, it simply means that the pattern is symmetric on the both sides of the sleeve. So when you start knitting the pattern you should first center it over the the middle stitch, and take care that it is symmetric, after the increases as well. Happy Knitting!

17.07.2018 - 07:50

Přidejte komentář k návodu DROPS Extra 0-808

Rádi bychom věděli, co si o tomto modelu myslíte!

Pokud se chcete na něco zeptat, dbejte prosím na to, abyste ve formuláři níže vybrali správnou kategorii - díky tomu se dříve dozvíte, co potřebujete vědět. Povinná pole jsou označena *.