
Popular categories
Looking for a yarn?


Comments / Questions (25)
![]() Ann-Charlotte Nilsson wrote:
Ann-Charlotte Nilsson wrote:
Tänkte sticka denna poncho men garnet puddel verkar utgått ? Kan jag ersätta det med ett annat garn i samma tjocklek? Vill helst inte ha fler än 2 trådar.
11.03.2025 - 12:36DROPS Design answered:
Hej Ann-Charlotte. Du kan ersätta garnet med 2 trådar i ett garn ur garngrupp C. Alpaca Boucle är det garn som ger mest likt uttryck som Puddel. Mvh DROPS Design
13.03.2025 - 13:38
![]() Mette Kofod wrote:
Mette Kofod wrote:
Hvor meget Alpaca bouclé skal der bruges? Opskriften er jo på Puddel, der er udgået…
05.10.2022 - 13:32DROPS Design answered:
Hej Mette, vores garnomregner siger 300 g DROPS Alpaca Boucle (2 tråde) når jeg spørger på 400 gram - prøv selv :)
07.10.2022 - 11:39
![]() Pimprenelle wrote:
Pimprenelle wrote:
Pouvez vous donner les dimensions des rectangles.\r\nLongueur Et largeur .\r\nMerci
26.07.2022 - 17:22DROPS Design answered:
Bonjour Pimprenelle, si votre tension est exacte en largeur, vos 38-44-50 mailles doivent faire 35-40-45 cm de large environ, et chaque rectangle mesure environ 64-70-76 cm de long. Bon tricot!
01.08.2022 - 16:58Trudy wrote:
Puddel unavailable is there a substitue
06.05.2018 - 03:24DROPS Design answered:
Dear Trudy, sure there are some, you can replace Puddel with Brushed Alpaca Silk und Alpaca Bouclé or with 07.05.2018 - 09:44
![]() Shila Duedahl wrote:
Shila Duedahl wrote:
Der må forlige en fejl i opskriften på antal pinde i puddel. Det bliver ikke som på foto?. Jeg har dB antal pinde i puddel til 8, da den ellers forsvinder i den tykke eskimo. Umiddelbart ser det også ud til på foto at der er flere pinde puddel.
07.04.2018 - 13:07
![]() Susanne wrote:
Susanne wrote:
Ich habe jetzt mit dem Poncho begonnen und er misst in der Länge 27 cm. Müsste ja theoretisch ausreichend sein wenn der Poncho in Größe S nur 34 cm misst. Ich finde das aber tatsächlich kurz, kann mir nicht vorstellen, dass er ohne Zunahme die Größe erreicht. Kommt das hin?
25.08.2016 - 07:50DROPS Design answered:
Liebe Susanne, die 35 cm in Grösse S ist die Breite bzw damit auch die Länge an der Naht. Die Länge vom Ausschnitt bis zur vorderen Spitze ist entsprechend länger, aber in der Anleitung nicht spezifiert (ergibt sich, wenn Sie die Teile nach Anleitung stricken).
25.08.2016 - 17:32
![]() Susanne wrote:
Susanne wrote:
Hallo, Ich möchte den Poncho für meine Tochter in Größe 140 stricken. Meine Maschenprobe hat ergeben 11 x 15 Maschen sind 7 cm. Wie lang ist denn die Größe S in der Länge? Nach meiner Rechnung 34cm?
24.08.2016 - 21:42DROPS Design answered:
siehe Antwort oben.
25.08.2016 - 17:33
![]() Anjubault wrote:
Anjubault wrote:
Merci de m,avoir répondu
25.07.2016 - 15:33
![]() Anjubault wrote:
Anjubault wrote:
J'aimerais savoir combien les rectangle font en cm en largeur et en hauteur j'aimerais le faire merci de me repondre
23.07.2016 - 23:33DROPS Design answered:
Bonjour Mme Anjubault, sur la base de 11 m = 10 cm, chacune des bandes du poncho fera approx. 34.5-40-47.5 cm de large sur 64-70-76 cm de long. Bon tricot!
25.07.2016 - 09:17
![]() Nardie Harperink wrote:
Nardie Harperink wrote:
Kun u mij ook vertellen waar xxxl voor staat welke maat dat is is dat 50 of groter
07.01.2015 - 18:36DROPS Design answered:
Hoi Nardie. XXXL is ongeveer 46+.
08.01.2015 - 15:23
|
|
DROPS 110-15 |
|
|
|
|
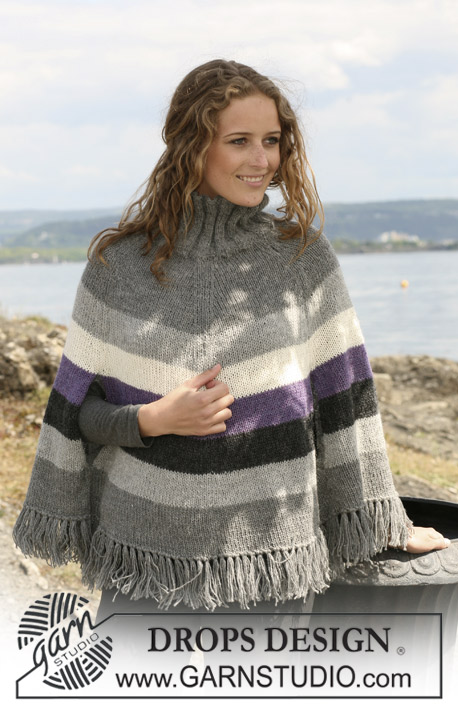
DROPS Poncho in ”Snow” and ”Puddel”. Size: S/M - XXL/XXXL.
DROPS 110-15 |
|
|
Garter st, back and forth on needle: K all rows. Changing colours: Do not cut the threads, but let them follow the piece and make sure they are not too tight on WS. In order not to have long threads of Puddel on WS when working Snow, twist Puddel thread round Snow on every 2 rows. Poncho: Worked in 2 parts, back and forth on needle, and sewn tog afterwards. Part 1: Cast on 38-44-50 sts on needle size 8 mm with 2 threads Puddel and continue as follows - see Changing colours: * 4 rows garter st in Puddel, change to 1 thread Snow and work 4 rows stocking st with 2 sts each side in garter st * repeat from *-*. When piece measures 64-70-76 cm cast off. Part 2: Like part 1. Assembly: Sew parts tog with Puddel. Place cast off row on part 1 against the longer right side of part 2 – from bottom of cast on row and up 35-40-45 cm. Sew the 2 parts tog with neat sts. Now sew tog cast off row on part 2 to part 1 in the same way, but to the longer left side. |
|
Have you finished this pattern?Tag your pictures with #dropspattern or submit them to the #dropsfan gallery. Do you need help with this pattern?You'll find 9 tutorial videos, a Comments/Questions area and more by visiting the pattern on garnstudio.com. © 1982-2025 DROPS Design A/S. We reserve all rights. This document, including all its sub-sections, has copyrights. Read more about what you can do with our patterns at the bottom of each pattern on our site. |


With over 40 years in knitting and crochet design, DROPS Design offers one of the most extensive collections of free patterns on the internet - translated to 17 languages. As of today we count 314 catalogues and 11822 patterns translated into English (UK/cm).
We work hard to bring you the best knitting and crochet have to offer, inspiration and advice as well as great quality yarns at incredible prices! Would you like to use our patterns for other than personal use? You can read what you are allowed to do in the Copyright text at the bottom of all our patterns. Happy crafting!
Post a comment to pattern DROPS 110-15
We would love to hear what you have to say about this pattern!
If you want to leave a question, please make sure you select the correct category in the form below, to speed up the answering process. Required fields are marked *.