
Popular categories
Looking for a yarn?


|
|
DROPS 50-5 |
|
|
|
|
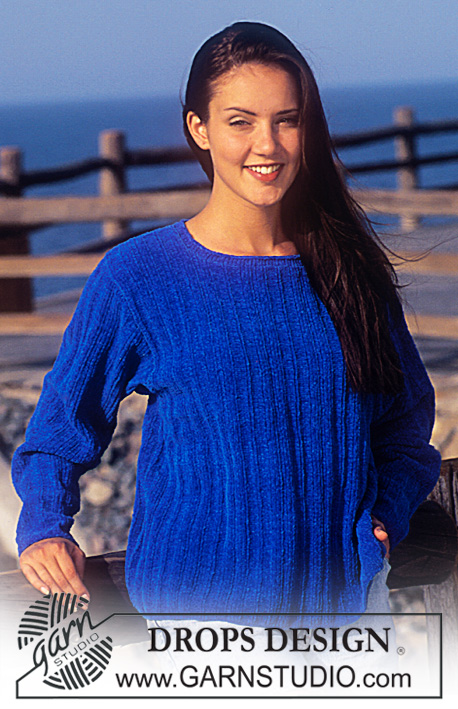
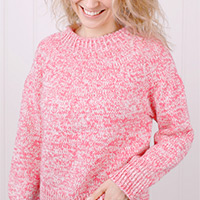
DROPS Cardigan in Tynn Chenille
DROPS 50-5 |
|
|
Gauge: Tynn Chenille: 20 sts and 32 rows on needle US 1 in stockinette stitch = 10 x 10 cm [4»x4»]. (Cotton Chenille: 14 sts x 26 rows on needle US 4 in stockinette stitch = 10 x 10 cm [4»x4»]. Seed stitch (on an even number of sts): 1st row: *K1, P1* 2nd row: *P1, K1* Seed stitch (on an odd numbers of sts): all rows: K1, *P1, K1* Left front: Cast on 56-58-60 (40-42-43) sts (includes1 edge st at the side and 5 (4) sts for the button band) and knit in seed stitch (see instructions above) . At the same time inc 1 st at the side edge every 20-21-21 (22-23-23) rows 4 (3) times. 60-62-64 (43-45-46) sts remain. When the work measures 30-31-31 cm [11.75"-12.25"-12.25"], bind off for armholes every other row: 3 sts 1-1-1 (0-0-0) time, then 2 sts 1-1-1 (1-1-1) time, and 1 st 1-1-3 (2-3-4) times. 54-56-56 (39-40-40) sts remain. When the work measures [55 - 56 - 57 cm [21⅝"-22» - 22.5], bind off 35-36-36 (25-25-25) sts from the shoulder to the neck. Then knit 7 - 7.5 - 7.5 cm [2.75"-3»-3»] before again binding off from the shoulder to the middle front every other row: 3 sts 4 (3) times, 7-8-8 (5-6-6) sts 1 time. All sts should now have been bound off. Right front: Cast on and knit as for the left front, but reversed all shaping. Knit buttonholes on the button band. When the work measures 1-1-1 cm [3/8»] 10,-9.5-10 cm [3 7/8»-3 5/8»- 3 7/8»], 18.5-18-18.5 cm [7.25"-7-⅛"-7.25"], 27-26.5-27 cm [10-⅝"-10-⅜"-10-⅝"] and 36-35-36 cm [14-⅛"-13.75"-14-⅛"], bind off for buttonholes on the right front as follows: Bind off the 3rd, 4th and 5th (3rd and 4th) sts and cast on 3 (2) new sts over the bound-off sts on the next row. Back: Cast on 102-106-110 (72-76-78) sts (includes 2 edge sts for seam) and knit in seed stitch. At the same time inc 1 st on each side every 20-21-21 (22-23-23) rows: 4 (3) times. 110-114-118 (78-82-84) sts. When the work measures 30-31-31 cm [11.75"-12.25"-12.25"], bind off for armholes as on the front. 98-102-102 (70-72-72) sts. When the work measures 53-54-55 cm [20-⅞"-21.25"-21-⅝"], bind off the center 24-26-26 (16-18-18) sts for the back neck. Then bind off 2 (2) sts on each side of the neck edge on the next row. 35-36-36 (25-25-25) sts. Bind off when the work measures 55-56-57 cm [21-⅝"-22»-22.5»]. Sleeves: Cast on 50-52-52 (36-38-38) sts (includes 2 edge sts for seam) and knit in Seed stitch for 10 cm [3-⅞"]. Continue to knit in stockinette stitch and at the same time inc 1 st on each side 25-24-26 (18-17-18) times. Size S: every 4th (5th) row. Size M: Alternately every 4th and 5th (every 5th) row. Size L: every 4th (5th) row. 100-100-104 (72-72-74) sts. When the work measures 47 cm [18.5»], bind off on each side on sleeve caps every other row: 4-4-3 (3-3-3) sts 8-8-10 (7-7-8) times. Bind off all sts. The work measures approximately 52-52-53 cm [20.5»-20.5»- 20-⅞"]. Assembly: Sew shoulder seams. Sew the collar together at the middle back and sew the collar to the neck at the back. Sew on the sleeves and sew the sleeve seam and side seam in one. Sew on the buttons. |
|

|
|
|
Have you made this or any other of our designs? Tag your pictures in social media with #dropsdesign so we can see them! Do you need help with this pattern?You'll find tutorial videos, a Comments/Questions area and more by visiting the pattern on garnstudio.com. © 1982-2024 DROPS Design A/S. We reserve all rights. This document, including all its sub-sections, has copyrights. Read more about what you can do with our patterns at the bottom of each pattern on our site. |
With over 40 years in knitting and crochet design, DROPS Design offers one of the most extensive collections of free patterns on the internet - translated to 17 languages. As of today we count 304 catalogs and 11422 patterns - 11417 of which are translated into English (US/in).
We work hard to bring you the best knitting and crochet have to offer, inspiration and advice as well as great quality yarns at incredible prices! Would you like to use our patterns for other than personal use? You can read what you are allowed to do in the Copyright text at the bottom of all our patterns. Happy crafting!
Comments / Questions (12)
Mir gefällt das Modell ganz besonders gut. Sicher ist diese Jacke gar nicht schwer zu stricken. Leider stricke ich nicht so oft, und nach dieser Anleitung kann ich die Jacke nicht anfertigen. Ich würde vorschlagen, die Anleitung noch einmal völlig neu zu schreiben - ausführlicher und verständlicher und gleich mit einem Garn, was es zur Zeit noch zu kaufen gibt. Sicher würden sich noch mehr Strickerinnen darüber freuen.
11.08.2022 - 17:00Vielen Dank nochmal 🌻 Jetzt schaue ich die ganze Zeit, wo der Kragen beschrieben wird. Und das Blendmuster sehe ich auch nicht!!! Können Sie mir bitte noch einmal helfen? Herzlichen Dank 😊
04.12.2021 - 22:49DROPS Design answered:
Liebe Anita, die Blende-Maschen werden im Perlmuster dh wie die anderen Maschen gestrickt, es gibt keinen richtigen Unterschied aber diese 5 bzw 4 Maschen sind für die Blende. Nachdem die Maschen für den Schulter abgekettet sind stricken Sie die Kragenmaschen weiter und nach 7-7.5 cm ketten Sie die Maschen am Anfang jeder Reihe vom Schulter (von der Seite wo die Maschen abgekettet wurden). Beim anderen Vorderteil genauso stricken, die abgekettenen Maschen von beiden Kragen nähen Sie dann zusammen und dann die Seiten vom Kragen wird entlang Halsausschnitt am Rückenteil genäht. Viel Spaß beim stricken!
06.12.2021 - 08:06Auf der Seite bei jeder 2. R. für das Armloch abk.: 3 M. x 1-1-1 (0-0-0), 2 M. x 1-1-1 (1-1-1), 1 M. x 1-1-3 (2-3-4) Was bedeutet das? 2 Maschen 1x abnehmen ist klar, aber 1 Masche x (3)?
29.11.2021 - 20:41DROPS Design answered:
- es bedeutet 1 Masche 3 Mal, so 1 M wird am Anfang jeder der nächsten 3 Hinreihen (link. Vorderteil) abgekettet. Viel Spaß beim stricken!
30.11.2021 - 08:27Hallo , danke für die Info. Dir 2 Maschen verstehe ich. Das danach verstehe ich nicht. Sind es 3 Maschen die ich auf einmal abnehmen muss oder muss ich 1 Masche jede zweite Reihe abnehmen bis ich dann 3 Maschen abgenommen habe?
29.11.2021 - 20:36DROPS Design answered:
Liebe Anita, sorry es ist 1 Masche 3 Mal, so beim linken Vorderteil ketten Sie so am Anfang jeder Hin-Reihe für das Armloch (in M - unter Klammern) ab: 2 Maschen 1 x (= am Anfang der nächste Hinreihe) und 1 Masche 3 Mal (= am Anfang der nächsten 3 Hinreihen) - kann das Ihnen helfen?
30.11.2021 - 08:27Die Abnahmen für das Armloch meine ich 😊
28.11.2021 - 19:09DROPS Design answered:
Liebe Anita, also ja genau; für das linke Vorderteil werden Sie am Anfang jeder Reihe von der Seite/Armloch: 2 Maschen einmal und 3 (in die 2. Größe) einmal abketten. Viel Spaß beim stricken!
29.11.2021 - 08:07Hallo, ich verstehe die Abnahmen nicht. Ich stricke die Jacke mit den in Klammern stehenden Maschen. Da heißt es zum Beispiel 2 Maschen x (1), dann 1 Masche x (3) ???wie ist es richtig? Die Angaben kann ich nicht verstehen. Vielen Dank für deine Hilfe. Anita
28.11.2021 - 19:07Brei 7.5 cm verder over de overgebleven st. en kant tegelijkertijd af, dit moet zijn: kant nu af enz. (bovenkant voorpand)
18.01.2018 - 12:17Ik heb een proeflapje gemaakt met Baby Merino, pen 3 mm. De afmeting was nu 7 x 10 cm. Hoe nu te breien?
13.11.2017 - 12:12DROPS Design answered:
Hallo D. Shuring, Probeer of je met een dikkere naald wel op de goede stekenverhouding komt. De steken in de breedte zijn belangrijker dan de steken in de hoogte (want de hoogte meet je steeds na met een cm.) Bij het maken van een proeflapje is het verder verstandig om een wat groter lapje te maken, en binnen dat lapje een stukje van 10 cm af te meten en de steken te tellen.
13.11.2017 - 21:00Hallo, ik wil heel graag dit vestje breien, maar welke combinatie zou goed zijn? je weet nooit hoe een combinatie van 2 verschillende garens zal worden. Ik vind bijv. merino extra fijn nr.28 met karisma nr. 50 een leuke combi, heb je een andere idee?
05.10.2017 - 12:13DROPS Design answered:
Hallo Carmella, Welke kleur(combinatie) je kiest is natuurlijk heel persoonlijk, maar houd er rekening mee dat dit vest gemaakt is met garen uit Garencategorie B. Dus als je karisma met Merino extra fine combineert, krijg je een dikker garen. Je kunt ook altijd je verkooppunt vragen om advies.
03.11.2017 - 12:44Les explications pour l'encolure et le col de ce modèle ne correspondent pas a la photo. Pouvez-vous m'aider? Merci et bonne journée. Julie
07.12.2013 - 21:01DROPS Design answered:
Bonjour Julie, quand vous avez rabattu les mailles de l'épaule, vous continuez pendant 7-7.5 cm au point de riz en rabattant côté épaule (partie ensuite assemblée à l'encolure dos):4 (3) fois 3 m et 1 fois 7-8-8 (5-6-6) m (cf vidéo ci-dessous avec les diminutions à faire en plus). Bon tricot!
08.12.2013 - 20:53