
Popular categories
Looking for a yarn?


|
||||||||||||||||
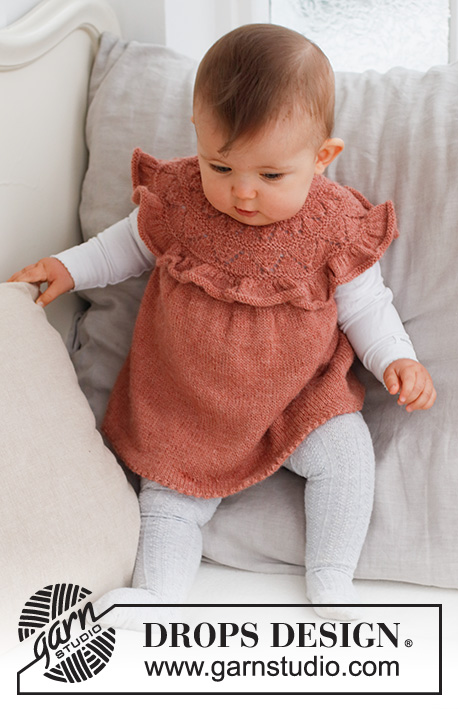
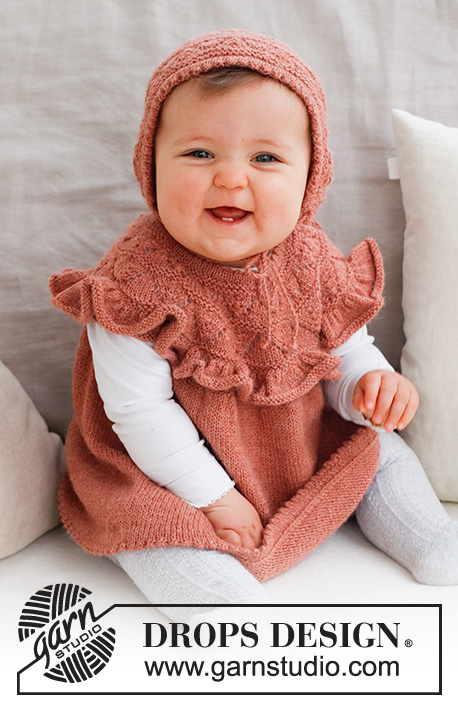
Sweet Primrose Dress |
||||||||||||||||
 |
 |
|||||||||||||||
Knitted dress for babies and children in DROPS Alpaca. The piece is worked top down with round yoke, lace pattern and flounce on the yoke. Sizes 0 – 6 years.
DROPS Baby 43-15 |
||||||||||||||||
|
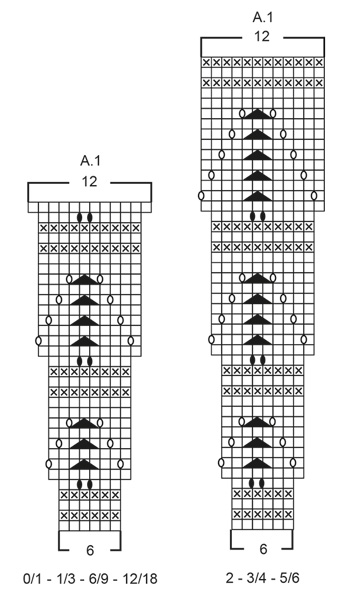
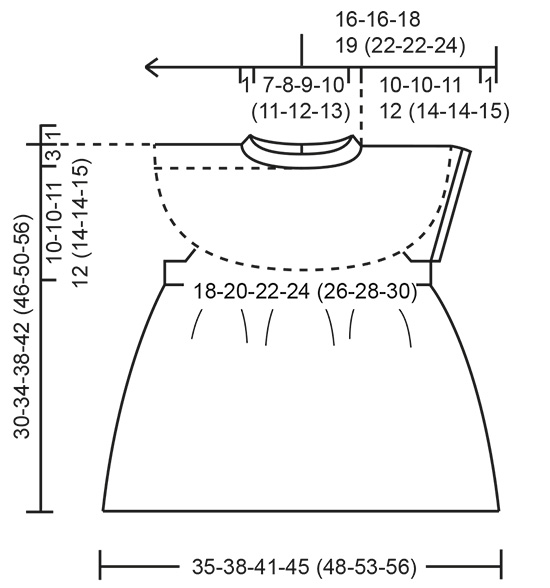
------------------------------------------------------- EXPLANATIONS FOR THE PATTERN: ------------------------------------------------------- RIDGE/GARTER STITCH (worked back and forth): Knit all rows. 1 ridge = knit 2 rows. RIDGE/GARTER STITCH (worked in the round): 1 ridge in height = 2 rounds; Knit 1 round and purl 1 round. PATTERN: See diagram A.1. Choose diagram for your size. The diagram shows all rows in the pattern from the right side. BUTTONHOLES (mid-back): Work the buttonholes from the right side when there are 2 stitches left as follows: Make 1 yarn over, knit 2 together. On the next row (wrong side) knit the yarn over to leave a hole. The first buttonhole is worked when the yoke measures ½ cm = ⅛" from the marker on the neck. Then work the next 2 buttonholes with 3-3-3-4 (4-4½-5) cm = 1⅛"-1⅛"-1⅛"-1½" (1½"-1⅝"-2") between each one. ------------------------------------------------------- START THE PIECE HERE: ------------------------------------------------------- DRESS – SHORT OVERVIEW OF THE PIECE: The neck and yoke are worked back and forth with circular needle, from mid-back and top down. When the yoke is finished the piece is continued in the round. The yoke is divided for the skirt and sleeve-edges. The skirt is worked in the round and the sleeve-edges are worked in the round with double pointed needles. The flounce is worked on the yoke to finish. NECK: Cast on 66-72-76-82 (86-90-96) stitches with circular needle size 3 MM = US 2.5 and DROPS Alpaca. Change to circular needle size 2.5 MM = US 1.5. Work 4 rows of stockinette stitch with 2 stitches in GARTER STITCH on each side – read description above. Work the next row from the right side as follows: 2 stitches in garter stitch, * knit 2 together, 1 yarn over *, work from *-* until there are 2 stitches left and 2 stitches in garter stitch (folding edge). Work 5 rows of stockinette stitch with 2 stitches in garter stitch on each side – AT THE SAME TIME, on the last row increase 5-11-13-13 (15-17-23) stitches evenly spaced (do not increase over the 2 edge stitches on each side) = 71-83-89-95 (101-107-119) stitches. Insert 1 marker after the first 2 edge stitches on the row; the yoke is measured from this marker. YOKE: Change to circular needle size 3 MM = US 2.5 and work as follows from the right side: 2 stitches in garter stitch, work A.1, 11-13-14-15 (16-17-19) times, work the first stitch in A.1 so the pattern is symmetrical and 2 stitches in garter stitch. Continue this pattern back and forth. REMEMBER THE KNITTING GAUGE and the BUTTONHOLES mid-back – read description above! When A.1 is finished there are 137-161-173-185 (197-209-233) stitches and the yoke measures approx. 9-9-9-9 (13-13-13) cm = 3½"-3½"-3½"-3½" (5⅛"-5⅛"-5⅛") from the marker on the neck. Knit 1 row from the right side where you adjust the number of stitches to 142-162-178-194 (196-218-234) stitches (do not increase/decrease over the edge stitches). Continue with stockinette stitch and 2 edge stitches in garter stitch on each side until the piece measures 10-10-11-12 (14-14-15) cm = 4"-4"-4⅜"-4¾" (5½"-5½"-6"), adjusting so the last row is worked from the right side, then place the 2 last edge stitches on the row on an extra needle in front of the piece. Now join the piece as follows: Place the 2 edge stitches on the extra needle on top of the 2 edge stitches at the beginning of the row and knit them together, 2 and 2, so the bands are fastened together (2 stitches decreased and the band with the buttonholes is on top), knit 18-20-22-25 (26-29-31) stitches (½ back piece), place the next 32-38-42-44 (44-48-52) stitches on a thread for the sleeve-edge and cast on 6-6-6-6 (8-8-8) stitches (in side under sleeve), knit 38-42-46-52 (54-60-64) stitches (front piece), place the next 32-38-42-44 (44-48-52) stitches on a thread for the sleeve-edge and cast on 6-6-6-6 (8-8-8) stitches (in side under sleeve), knit the remaining 18-20-22-25 (26-29-31) stitches (½ back piece). SKIRT: = 88-96-104-116 (124-136-144) stitches. Insert 1 marker in the middle of the 6-6-6-6 (8-8-8) cast-on stitches under one sleeve. Work stockinette stitch as far as the marker – the round now starts here. Knit 1 round. Work the next round as follows: * Knit 2, pick up the strand before the next stitch and knit it twisted (1 stitch increased) *, work from *-* to the end of the round = 132-144-156-174 (186-204-216) stitches. Knit 1 round. Work the next round as follows: * Knit 6, pick up the strand before the next stitch and knit it twisted (1 stitch increased) *, work from *-* to the end of the round = 154-168-182-203 (217-238-252) stitches. Continue with stockinette stitch until the skirt measures 2 cm = ¾" from the division. Work the next round as follows: * Knit 14, pick up the strand before the next stitch and knit it twisted (1 stitch increased) *, work from *-* until there are 0-0-0-7 (7-0-0) stitches left, knit 0-0-0-7 (7-0-0) = 165-180-195-217 (232-255-270) stitches. Continue with stockinette stitch until the skirt measures 17-21-24-27 (29-33-38) cm = 6¾"-8¼"-9½"-10⅝" (11⅜"-13"-15") from the division – AT THE SAME TIME on the last round increase 1-0-1-1 (0-1-0) stitch = 166-180-196-218 (232-256-270) stitches. Work the next round as follows: * Knit 2 together, make 1 yarn over *, work from *-* to the end of the round (folding-edge). Work stockinette stitch for 2 cm = ¾". Bind off a little loosely. SLEEVE-EDGES: Place the stitches from the thread on the one side of the piece on circular needle size 2.5 MM = US 1.5 and knit up 1 stitch in each of the 6-6-6-6 (8-8-8) stitches cast on under the sleeve = 38-44-48-50 (52-56-60) stitches. Work 2 RIDGES in the round – read description above. Bind off a little loosely. Work the other sleeve-edge in the same way. ASSEMBLY: Fold the top of the neck at the folding-edge and sew down to the wrong side. To avoid the neck being tight and rolling outwards, it is important that the seam is elastic. Sew the openings at each end of the neck with small stitches. Fold the bottom of the skirt and sew down in the same way. Sew the buttons onto the band mid-back. FLOUNCE: Pick up stitches from the last purled row (seen from the right side) in A.1. Hold the piece upside-down, with the neck towards you. Use circular needle size 2.5 MM = US 1.5 and DROPS Alpaca. Start mid-back, after the 2 edge stitches, pick up 1 stitch in the top loop of each purled stitch, until there are 2 stitches left on the row = approx. 111-131-141-151 (193-205-229) stitches. Purl 1 row from the wrong side with 1 edge stitch in garter stitch on each side. Work the next round as follows: 1 stitch in garter stitch, * knit 1, pick up the strand before the next stitch and knit it twisted *, work from *-* until there are 2 stitches left, knit 1 and 1 stitch in garter stitch = 219-259-279-299 (383-407-455) stitches. Purl 1 row from the wrong side with 1 stitch in garter stitch on each side. Work the next round as follows: 1 stitch in garter stitch, * knit 2, pick up the strand before the next stitch and knit it twisted *, work from *-* until there are 2 stitches left, knit 1 and 1 stitch in garter stitch = 327-387-417-447 (573-609-681) stitches. Work stockinette stitch back and forth without further increases, and with 1 stitch in garter stitch on each side, until the flounce measures 3-3-3½-4 (4-5-5) cm = 1⅛"-1⅛"-1¼"-1½" (1½"-2"-2"). Change to circular needle size 3 MM = US 2.5. Bind off a little loosely with knit from the right side. |
||||||||||||||||
Diagram explanations |
||||||||||||||||
|
||||||||||||||||
|
||||||||||||||||
|
||||||||||||||||
|
Have you made this or any other of our designs? Tag your pictures in social media with #dropsdesign so we can see them! Do you need help with this pattern?You'll find tutorial videos, a Comments/Questions area and more by visiting the pattern on garnstudio.com. © 1982-2024 DROPS Design A/S. We reserve all rights. This document, including all its sub-sections, has copyrights. Read more about what you can do with our patterns at the bottom of each pattern on our site. |
||||||||||||||||


With over 40 years in knitting and crochet design, DROPS Design offers one of the most extensive collections of free patterns on the internet - translated to 17 languages. As of today we count 304 catalogs and 11422 patterns - 11417 of which are translated into English (US/in).
We work hard to bring you the best knitting and crochet have to offer, inspiration and advice as well as great quality yarns at incredible prices! Would you like to use our patterns for other than personal use? You can read what you are allowed to do in the Copyright text at the bottom of all our patterns. Happy crafting!
Comments / Questions (29)
Hi, I’m knitting #43.15 and there is a line at the start of the charted yoke - work the first stitch in A.1 so the pattern is symmetrical and 2 stitches in garter stitch. Can you advise what “so the pattern is symmetrical” means, please and thanks.
23.04.2024 - 23:22DROPS Design answered:
Hi Kim, Working the first stitch in A.1 before the 2 garter stitches at the end of the row, means the pattern begins and ends in the same way on the row. Happy knitting!
24.04.2024 - 06:38Moin aus Hamburg. Leider verstehe ich den Übergang von der Halsblende zur Passe nicht. Wenn ich die Passe ab der Markierung messen, was mache ich mit den zwei ersten Maschen weiter? Liebe Grüße Ina
19.03.2024 - 10:56DROPS Design answered:
Liebe Ina, die Markierung wird hier eingesetzt, damit man von hier die Arbeit misst. Diese Maschen stricken Sie krausrechts wie später beschrieben. Viel Spaß beim Stricken!
19.03.2024 - 11:32Les explications sont assez claires pour les tricoteuses confirmées. Par contre ERREUR dans la légende du diagramme!!! Les jetés NOIRS sont à tricoter en envers torse. Les jetés CREUX doivent former le motif ajouré.
05.03.2024 - 20:10DROPS Design answered:
Bonjour Mme Basilic et merci pour votre retour, la légende avait effectivement été inversée, tout est juste désormais. Bon tricot!
06.03.2024 - 08:33Merci beaucoup de votre réponse, en fait c'était plus simple que ce que je pensais cordialement
12.02.2024 - 10:00Bonjour, je fais la 2° taille, à la fin de l'empiècement j'ai 162 mailles, je joins les deux mailles de bordure, j'ai donc 160 mailles, où se trouve les deux diminutions pour avoir 158 mailles comme sur le modèle et comment les faire? merci de m'aider
11.02.2024 - 10:32Bonjour, je suis arrivée à l'empiècement (2° taille), j'ai 162 mailles, je joins les mailles de bordure pour tricoter en rond, j'ai 160 mailles, où se trouve les deux diminutions et comment les faire, car je dois avoir en principe 158 mailles avant de laisser de côté les mailles qui serviront pour les manches. pouvez vous m'aider, merci d'avance
11.02.2024 - 10:28DROPS Design answered:
Bonjour Mme Devauchelle, vous devez bien avoir 160 mailles: les 2 m de bordure tricotées au début du tour + 20 m pour le 1/2 dos + 38 m de la manche + 42 m pour le devant + 38 m pour la manche + 20 m pour le demi-dos = 160 mailles. Bon tricot!
12.02.2024 - 07:39Bonjour, je ne comprends pas ce qu'est le rang de cassure, ni où il se trouve. Je ne comprends pas non plus pourquoi coudre le haut du col.je suis également complétement perdue pour le volant, comment relever les mailles, faut il le faire sur l'envers de la robe et comment repérer le rang à partir duquel il faut relever les mailles. J'ai commencé un essai en réduction, mais je bloque . merci de votre aide
26.01.2024 - 17:18DROPS Design answered:
Bonjour Mme Devauchelle, le rang de cassure est celui indiqué au milieu do col (quand on tricote (2 m ens à l'end, 1 jeté), autrement dit, on plie pour former un ourlet picot (cf vidéo. Pour le volant, prenez la robe sur l'endroit, encolure face à vous et relevez les mailles dans le dernier rang envers de A.1: 1 maille dans chacune de ces mailles envers tout du long, après les 2 m de la bordure dos. Bon tricot!
29.01.2024 - 11:24Hi, I have a question about the length. When we knit skirt 17-21-24-27 (29-33-38) cm and 2 cm after the "k2tog, yo", skirt measures like diagram say; 20-24-27-30 (32-36-41). But after sewing the bottom of skirt, it means almost −2cm at all sizes and it's different from the diagram. Which is right, "diagram−2cm is the final results" or "knit more 2cm so that final results will became the same as the diagram"?
07.10.2023 - 14:27DROPS Design answered:
Dear Mizuki, take into account in the measurements schematic 30 cm is the total length, which includes the 10cm of the upper part of the dress, and the 3+1 of the neck. So you would have 30-10-3-1 = 16 cm left for the skirt. Since you have 19cm for the skirt and you turn approx. 2 or 3 cm for the folding edge at the end, you will have a true skirt length of approx. 16 or 17 cm, as stated in the measurements schematic. Happy knitting!
09.10.2023 - 01:07Danke, was ist gemeint mit. ….die erste Masche von A.1.. ..? Gruß Elke
12.09.2023 - 15:23DROPS Design answered:
Liebe Elke, damit das Muster symmetrisch wird, wird man mit der 1. Masche in A.1 (vor den 2 Maschen kraus rechts) enden , dh diese letzte Masche wird entweder rechts oder links wie alle Maschen von A.1 gestrickt - bei den Rückreihen beginnen Sie mit dieser Masche (entweder rechts oder links wie bei dem Diagram gezeigt), dann stricken Sie A.1 bis zur Ende. Viel Spaß beim stricken!
12.09.2023 - 17:21Hallo, ich verstehe nicht wo hierMaschen zugenommen werden. Mit der Anleitung bei Beginn der Passe komme ich nicht klar.. Gruß Elke
10.09.2023 - 20:16DROPS Design answered:
Liebe Elke, bei A.1 werden Maschen zugenommen werden, z.B. in die 4 ersten Größe beginnt A.1 mit 6 Maschen aber endet mit 12 Maschen, so wird die Passe zugenommen (mit Umschläge im Diagram). Viel Spaß beim stricken!
11.09.2023 - 09:29