


Komentáře / Otázky (68)
![]() Amelia napsala:
Amelia napsala:
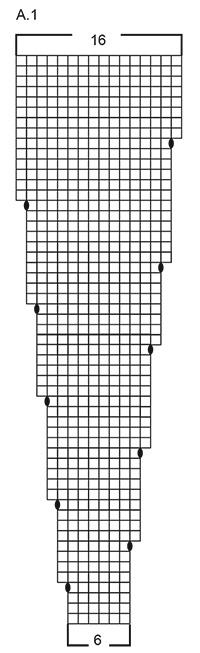
I realised my question wasn't that clear. I don't understand what "work a1 over all stitches (19 repeats of 6 stitches) means. I don't understand the diagram and what the a1 pattern is. Thank you !
17.06.2025 - 03:04Odpověď DROPS Design :
Hi Amelia, Diagram A.1 is at the bottom of the pattern, above the measurements chart. The diagram is read and worked from bottom right to left and upwards. So the first round of A.1 (worked after the knitted round on the yoke) consists of 6 knitted stitches stitches repeated 19 times on the round, across all stitches. A.1 shows you how and where increases are worked on the yoke - the yarn overs for the increases are the black dots. Above the diagram you have explanations for the symbols in the diagram. Hope this helps. Regards, Drops Team.
17.06.2025 - 06:38
![]() Amelia napsala:
Amelia napsala:
Hi ! I'm new to knitting. I don't understand what A1 is. Can somenone explain please ? Thank you.
17.06.2025 - 02:43Odpověď DROPS Design :
Dear Amelia, A.1 is the name of the diagram you will find at the bottom of the page, after written pattern/diagram text and just above measurement chart. Read more about diagrams here. Happy knitting!
19.06.2025 - 10:55
![]() Inge Andersen napsala:
Inge Andersen napsala:
Der står slå 120m op til halskanten og efter 12 cm skift til p5 og strik ret tag 30m ud derefter er der 126m efter min udregning giver 120+30=150 m
26.05.2025 - 17:49Odpověď DROPS Design :
Hej Inge, du har hoppet over det stykke hvor man tager 1 maske ind i hvert vrangparti, det kommer allerede efter de første 4 cm :)
28.05.2025 - 07:55
![]() Lot napsala:
Lot napsala:
Ik brei nu de mouwen in maat m. Ik begin met 64 steken en minder er 8 in totaal. Dan kom ik uit op 56 steken terwijl in het patroon staat dat ik op 48 steken moet uitkomen. Wat is nu correct. Groet Lot
18.05.2025 - 07:20Odpověď DROPS Design :
Dag Lot,
Je begint met 64 steken en je mindert aan beide kanten 8 steken, dus je mindert 16 steken i totaal. Dan kom je op 48 steken.
18.05.2025 - 08:52
![]() Tine napsala:
Tine napsala:
Er det mulig å legge inn German short rows eller lignende på ryggen, slik at den blir litt lenger i ryggen? Hvor anbefaler dere å gjøre det?
27.03.2025 - 11:04Odpověď DROPS Design :
Hej Tine, ja det kan du gøre, da gør du det samtidigt som du strikker de første pinde efter halsen :)
27.03.2025 - 14:07
![]() Åse Kongsvik napsala:
Åse Kongsvik napsala:
Hei. Det blir hull ved økemaskene, selv om de strikkes vridd på neste omgang. Hvordan unngår jeg dette?
23.03.2025 - 12:57Odpověď DROPS Design :
Hei Åse. Det vil alltid bli et lite hull, prøv evnt. å stram tråden mer. mvh DROPS Design
24.03.2025 - 13:37
![]() Aurelia napsala:
Aurelia napsala:
Dostosowałam sobie próbkę i liczbę oczek do potrzebnego rozmiaru, zastanawiam się tylko nad długością w cm, od ściągacza do rozdzielenia rekawów, jest tam 35 cm. w rozmiarze XL. Wydaje mi sie sporo, chyba, ze te 35 cm mają byc razem z długością ściągacza.
22.03.2025 - 10:16Odpověď DROPS Design :
Witaj Aurelio, mierzysz tak jak jak na zdjęciu, czyli układasz sweter na płasko (przód na tyle)i rękawy pod kątek 90 stopni do tułowia. Mierzysz tak jak pokazuje przerywana linia, czyli za ściągaczem dekoltu do dołu w linii prostej. Jeśli 35 cm wydaje ci się za dużo, to możesz rękawy odciąć wcześniej. Najlepiej przełóż wszystkie oczka na żyłką pomocniczą/nitkę i zmierz sweter na właścicielu. Pozdrawiamy!
25.03.2025 - 10:09
![]() Aurelia napsala:
Aurelia napsala:
Dzień dobry, zaczęłam sweter w rozmiarze XL, mam ściągacz i po przymiarce okazuje się że jeśli zrobię karczek długości 33 cm to rozdzielenie przypadnie na wysokości łokcia. Tak ma być czy coś źle zrozumiałam?
16.03.2025 - 09:49Odpověď DROPS Design :
Witaj Aurelio, czy Twoja próbka była zgodna na wysokość? Drugie pytanie: czy szerokość swetra po odłożeniu rękawów będzie odpowiednia? Proszę o odpowiedzi, z nimi będzie mi łatwiej zdiagnozować problem. Pozdrawiam!
18.03.2025 - 08:43
![]() Åse napsala:
Åse napsala:
Hei. Er det enten pinner i str 4 eller 5 avhengig av strikkefasthet, eller må det brukes både nr 4 og 5 ?
03.03.2025 - 10:02Odpověď DROPS Design :
Hei Åse, Du må ha begge størrelser pinner, nr 4 til vrangbord og nr 5 til resten av genseren (og pinnestørrelsen kan endres, avhengig av strikkefastheten din). God fornøyelse!
04.03.2025 - 06:50
![]() Päivi Slotteborn napsala:
Päivi Slotteborn napsala:
Är det ena mönstret där mn stickar nedifrån upp och alla delar stickas var för sig?
02.03.2025 - 13:40Odpověď DROPS Design :
Hej, Her finder du opskrifter som strikkes nedefra og op: Herr tröjor - nerifrån och upp
06.03.2025 - 15:00
|
|||||||
Lucky Wish#luckywishsweater |
|||||||
 |
 |
||||||
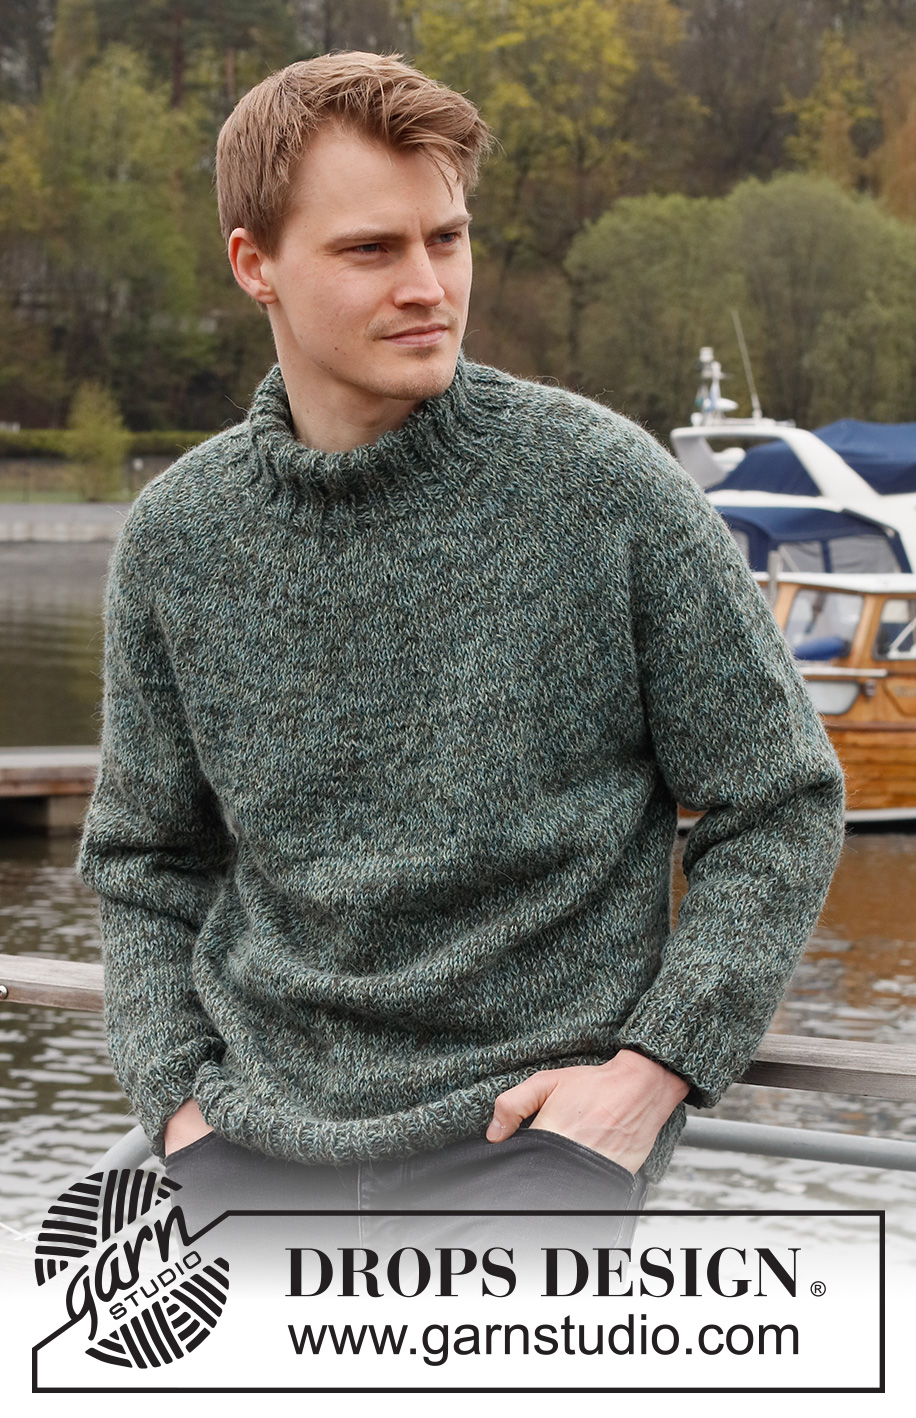
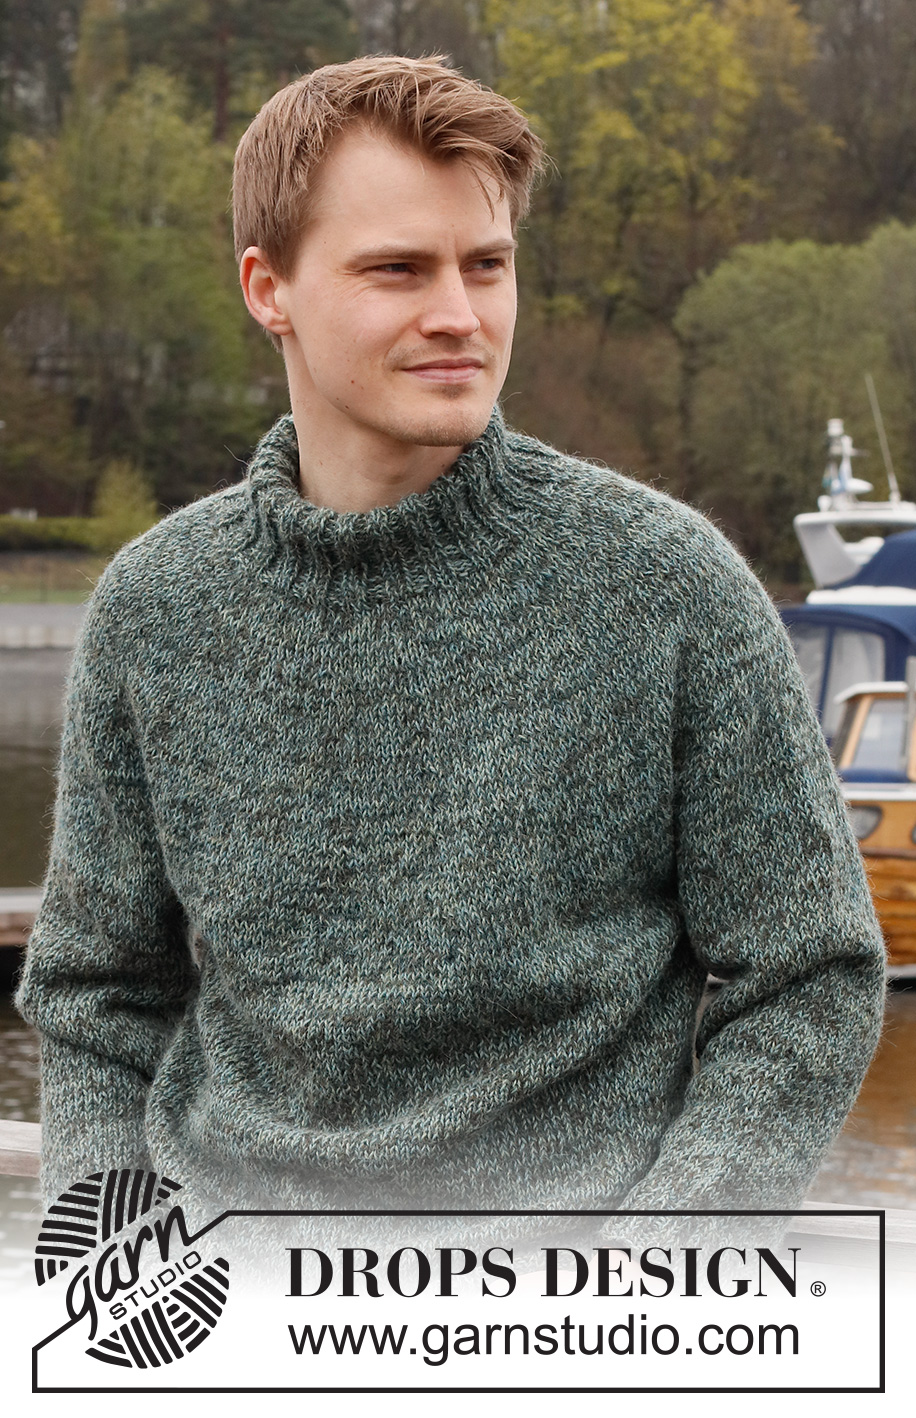
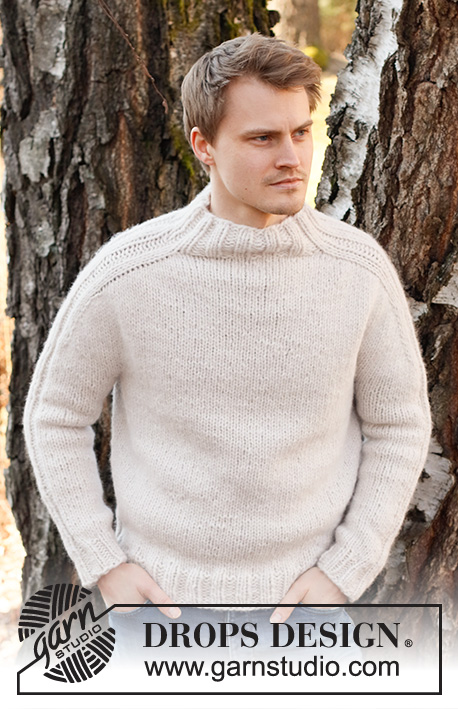
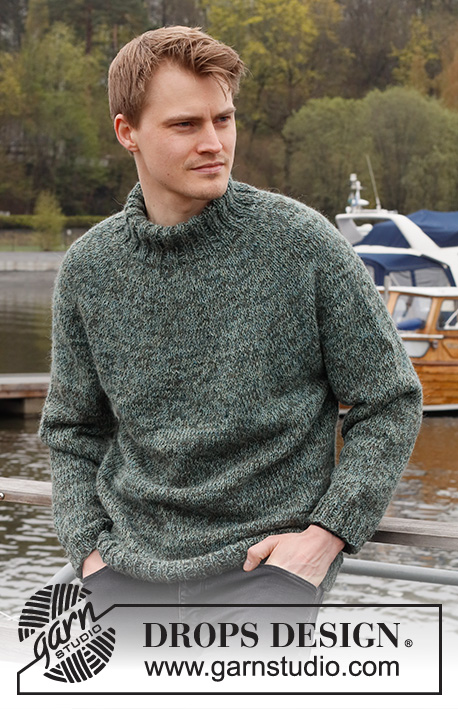
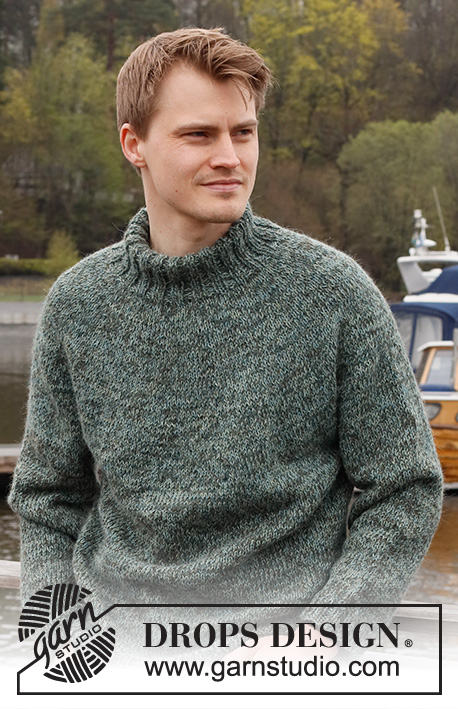
Pánský pulovr s kruhovým sedlem a stojáčkem pletený shora dolů z dvojité příze DROPS Alpaca. Velikost S - XXXL.
DROPS 224-21 |
|||||||
|
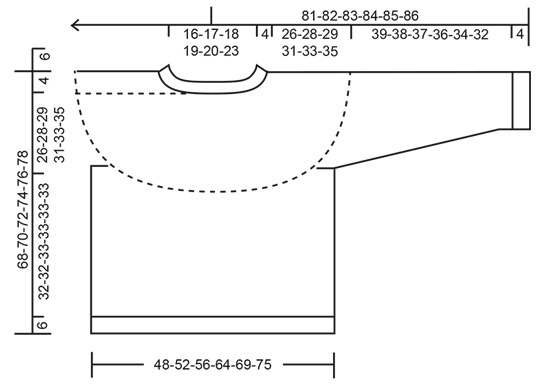
------------------------------------------------------- VYSVĚTLIVKY: ------------------------------------------------------- VZOR: Viz schéma A.1. Celý vzor pleteme lícovým žerzejem. TIP – PŘIDÁVÁNÍ: Abychom vypočítali, v jakých rozestupech máme přidávat, vydělíme celkový počet ok na jehlici (např. 80 ok) počtem ok, která potřebujeme přidat (tj. 16), takže 80 : 16 = 5. V tomto případě tedy 1x nahodíme za každým 5. okem. V následující kruhové řadě pleteme nahození za zadní nit, aby se v pletenině netvořily dírky. TIP - UJÍMÁNÍ (rukávy): Ujímáme 1 oko na každé straně značky, takto – začínáme 3 oka před značkou: 2 oka spleteme hladce, 2 oka upleteme hladce (značka leží mez nimi), 1 oko sejmeme hladce, 1 upleteme hladce a sejmuté přes ně přetáhneme (= 2 oka jsme ujmuli). TIP - UZAVÍRÁNÍ: Abychom neměli uzavřený okraj moc stažený, můžeme na uzavírání ok použít silnější jehlice nebo za každým zhruba 4. okem 1x nahodíme – nahození hned uzavřeme jako běžné oko. ------------------------------------------------------- POPIS PRÁCE: ------------------------------------------------------- PULOVR – JAK BUDEME POSTUPOVAT: Lem průkrčníku a sedlo pleteme v kruhových řadách na kruhové jehlici, od středu zadního průkrčníku a shora dolů. Od sedla pak oddělíme rukávy a trup dopleteme v kruhových řadách. Rukávy upleteme v kruhových řadách na ponožkových jehlicích, shora dolů. DVOJITÝ LEM PRŮKRČNÍKU - STOJÁČEK: Na krátkou kruhovou jehlici č.4 nahodíme 1 vláknem každé barvy příze DROPS Alpaca (= dvojitou přízí) 100-105-110-115-120-130 a upleteme 1 kruhovou řadu hladce. Pak pleteme v kruhových řadách pružným vzorem 2/3 (tj. střídáme 2 oka hladce, 3 obrace). Ve výši 4 cm ujmeme 1 oko v každé skupince („žebru“) obrace pletených ok – ujímáme spletením 2 ok obrace = 80-84-88-92-96-104 ok. Pak pokračujeme pružným vzorem 2/2 (tj. střídáme 2 oka hladce, 2 obrace) do výše 12 cm. Pleteninu převedeme na kruhovou jehlici č.5. SEDLO: Označíme si začátek kruhové řady (= střed zadního průkrčníku) – SEDLO NYNÍ MĚŘÍME OD TOHOTO MÍSTA. Pleteme 1 kruhovou řadu hladce a SOUČASNĚ přidáme rovnoměrně 16-18-26-28-30-34 ok – viz TIP - PŘIDÁVÁNÍ = 96-102-114-120-126-138 ok. Nyní pleteme vzor A.1 (= 16-17-19-20-21-23 sekvencí vzoru po 6 okách). Po dokončení celé sekvence vzoru A.1 (na výšku) máme v kruhové řadě 256-272-304-320-336-368 ok. Upleteme 1 kruhovou řadu hladce a SOUČASNĚ přidáme rovnoměrně 0-0-0-4-8-0 ok = 256-272-304-324-344-368 ok. Pokračujeme a pleteme až do výše 26-28-29-31-33-35 cm od značky. V další kruhové řadě oddělíme trup a rukávy: 38-40-44-49-53-58 ok upleteme jako dříve (= polovina zadního dílu), následujících 52-56-64-64-66-68 ok odložíme na pomocnou jehlici (= rukáv), nahodíme 6-8-8-10-12-12 nových ok (= podpaží), 76-80-88-98-106-116 ok upleteme jako dříve (= přední díl), dalších 52-56-64-64-66-68 ok odložíme na pomocnou jehlici (= rukáv), nahodíme 6-8-8-10-12-12 nových ok (= podpaží) a zbylých 38-40-44-49-53-58 okupleteme jako dříve (= polovina zadního dílu). Trup a rukávy dokončíme odděleně. DÍL NYNÍ MĚŘÍME OD TOHOTO MÍSTA! TRUP: V kruhové řadě teď máme 164-176-192-216-236-256 ok. Pokračujeme lícovým žerzejem v kruhových řadách - upleteme 32-32-33-33-33-33 cm výšky (ppř. pleteme do libovolných rozměrů; do ukončení práce nám zbývá dopést asi 6 cm výšky – pulovr teď můžete vyzkoušet a míry upravit). Pleteninu převedeme na kruhovou jehlici č.4 a pleteme lem pružným vzorem 2/2. Když je lem vysoký 6 cm, všechna oka volně dle vzoru uzavřeme – viz TIP - UZAVÍRÁNÍ! Pulovr měří asi 68-70-72-74-76-78 cm (od ramene). RUKÁV: Odložených 52-56-64-64-66-68 ok jednoho rukávu vrátíme z pomocné jehlice zpět na ponožkové jehlice/krátkou kruhovou jehlici č.5 a navíc k nim nabereme po 1 oku z každého z 6-8-8-10-12-12 nových ok v podpaží = 58-64-72-74-78-80 ok. Doprostřed těchto 6-8-8-10-12-12 nových ok vložíme značku. Značku během práce snímáme vždy do aktuálně pletené kruhové řady – využijeme ji při ujímání. Pleteme v kruhových řadách lícovým žerzejem – kruhová řada začíná u značky. Ve výši 3 cm od podpaží ujmeme na každé straně značky 1 oko – viz TIP - UJÍMÁNÍ; toto ujímání opakujeme vždy po 6-4-3-2,5-2,5-2,5 cm výšky, celkem 6-8-11-11-12-12x = 46-48-50-52-54-56 ok. Pokračujeme do výše 39-38-37-36-34-32 cm od podpaží (do ukončení práce nám zbývá doplést asi 4 cm výšky – pulovr teď můžete vyzkoušet a míry upravit). Pleteme 1 kruhovou řadu hladce a SOUČASNĚ přidáme rovnoměrně 2-4-2-4-2-4 oka = 48-52-52-56-56-60 ok. Pleteninu převedeme na ponožkové jehlice č.4 a upleteme 4 cm výšky pružným vzorem 2/2. Pak všechna oka dle vzoru volně uzavřeme – viz TIP - UZAVÍRÁNÍ. Rukáv měří asi 43-42-41-40-38-36 cm. Stejným způsobem upleteme i druhý rukáv. DOKONČENÍ: Lem průkrčníku přeložíme napolovic, zahneme do rubu a přišijeme. Dbáme na to, aby byl šev volný, měkký a pružný - jinak se bude lem kroutit a ohýbat na lícovou stranu. |
|||||||
Vysvětlivky ke schématu |
|||||||
|
|||||||
|
|||||||
|
|||||||
Dokončili jste tento model?Pak označte své fotky tagem #dropspattern #luckywishsweater nebo je pošlete do galerie #dropsfan. Potřebujete s tímto návodem poradit?Otevřete-li si návod na stránce garnstudio.com, najdete tam 27 výukových video-ukázek, Komentáře/Dotazy a další užitečné informace. © 1982-2025 DROPS Design A/S. Vyhrazujeme si veškerá práva. Tento dokument, včetně všech jeho dílčích částí, podléhá autorským právům. Podrobnější komentář k možnostem užití našich návodů najdete dole pod každým návodem na našich stránkách. |
|||||||


V oblasti pletené a háčkované módy působí DROPS Design více než 40 let. Díky tomu vám můžeme nabídnout jednu z nejrozsáhlejších kolekcí modelů s bezplatnými návody dostupnými na internetu - navíc v 17 jazycích. K dnešnímu dni máme na 314 katalogů a 11822 návodů celkem - z nich je už 7048 dostupných v [češtině].
Přidejte komentář k návodu DROPS 224-21
Rádi bychom věděli, co si o tomto modelu myslíte!
Pokud se chcete na něco zeptat, dbejte prosím na to, abyste ve formuláři níže vybrali správnou kategorii - díky tomu se dříve dozvíte, co potřebujete vědět. Povinná pole jsou označena *.