
Catégories populaires
Vous cherchez un fil?


Commentaires / Questions (80)
![]() Sharon Hunt a écrit:
Sharon Hunt a écrit:
Hello, how do you measure for length? My gauge is fine. But I cannot decide how to measure for length. If I lay flat I get 10 inches. If I hold up the project and measure the length is 11 inches. How does drops do this? Thanks
29.03.2026 - 11:18DROPS Design a répondu:
Dear Mrs Hunt, then you might have to hang up your work to measure it to avoid getting the piece becoming too long when worn. Happy knitting!
07.04.2026 - 11:38
![]() Sharon Hunt a écrit:
Sharon Hunt a écrit:
H! In regards to my last question it appears that I figured it out. Thanks for all your help so far on all questions I post here.
22.03.2026 - 19:19
![]() Sharon Hunt a écrit:
Sharon Hunt a écrit:
Hello, Making XXXL, 120 sts on my needles after rib. Worked the first p2, yo k1 yo p2. When working the next set of sts in this round am I supposed to start with a k1 then p2. Just not working out if I follow pattern after working the first set of 5 sts. Starting over again after completing this section in XXL. Cannot recall having this problem. Thanks as always for your help.
22.03.2026 - 11:39DROPS Design a répondu:
Dear Mrs Hunt, when working A.1 first row A.1 should fit over rib P2, K1 as you work on first round {P2, (YO), K1, (YO), P2, K1} so that you will increase ine very other K section of the rib you worked before. And you repeat the 6 sts repeat all the round. Can this help? Happy knitting!
23.03.2026 - 09:12
![]() Sharon Hunt a écrit:
Sharon Hunt a écrit:
Hi after working and completing the round with the misplaced stitch. The round above begins with knit st. Where as on my work the beg. starts with a purl. Thanks for your help with this problem. Not sure what am doing wrong.
10.03.2026 - 17:05DROPS Design a répondu:
Dear Mrs Hunt, when displacing the round 1 st, this is done at the beginning of the round as this first stitch of the round will be worked together with the last stitch last repeat in the round; and as you work the last stitch each A.1 is worked together with the first stitch next A.1 = this stitch (the decrease), is now the first stitch next repeat, so the next round starts with the decrease, then P1, the round is displaced just there where there is the black square at the beg of the row, afterwards, you just start the rounds as before. Happy knitting!
11.03.2026 - 07:27
![]() Sharon Hunt a écrit:
Sharon Hunt a écrit:
Hi worked the increase from one to 2 stitches. Thinking back because it seems like this is a hole from the base of the stitch. Are the inc. sts knitted twisted. Thanks
09.03.2026 - 06:52DROPS Design a répondu:
Hi Sharon, Yes, the yarn overs are worked twisted on the next round as described in the Increase Tip at the top of the pattern. Regards, Drops Team.
09.03.2026 - 06:58
![]() Lene a écrit:
Lene a écrit:
Har læst kommentarerne vedr. pind 23 og 24 og forstår at jeg skal strikke den sidste maske og den første maske som er taget løst af. Men nu er spørgsmålet så er denne maske nu den først på næste pind og ses som retmasken på pind 24? Og betyder det at vrangmaskerne stadigvæk skal følge hinanden ? Jeg strikker størrelse xxl
15.02.2026 - 10:08DROPS Design a répondu:
Hei Lene. Ja, vrangmaskerne skal stadigvæk skal følge hinanden. Om du forstørrer bildet av toppen, ser du det også tydelig :) mvh DROPS Design
16.02.2026 - 11:07
![]() Christine a écrit:
Christine a écrit:
I hope you can assist. We do not have access to Drops Yarn in South Africa. I would like to knit this with a cotton/acrylic blend with a gauge of about 24sts on 4mm.....which size should I knit? On a lucky note, a friend brought me some Belle yarn and I am looking forward to trying the patterns using Belle.
02.11.2025 - 20:45
![]() Josette a écrit:
Josette a écrit:
In het telpatoon staan er maar vijf steken en in de beschrijving staat dat je zes steken moet breien, sorry dat versta ik niet, graag een antwoord groeten Josette
04.10.2025 - 16:17
![]() Diana Follett a écrit:
Diana Follett a écrit:
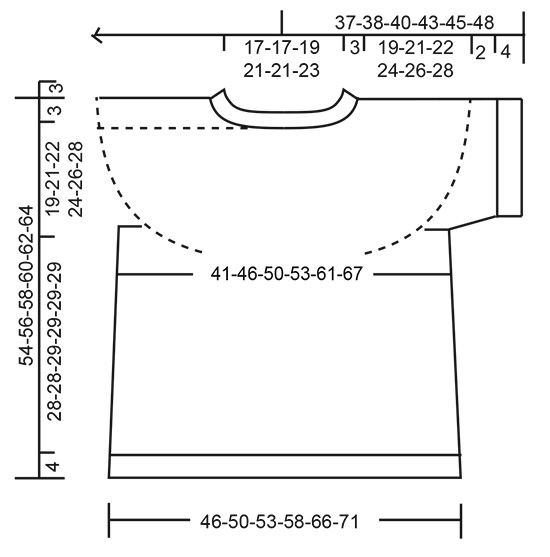
I could not find measurements for the sizes. Am I just overlooking them? Thank you and I love the patterns and can't wait to try your yarn.
29.09.2025 - 16:55DROPS Design a répondu:
Hi Diana, There is a size chart at the bottom of the pattern, with all the measurements for the different sizes. Regards, Drops team.
30.09.2025 - 06:39
![]() Luhaib a écrit:
Luhaib a écrit:
I am not understanding this (on the first repeat of A.1, the round is displaced by 1 stitch as follows: Slip the first stitch onto the right needle without working it, then work A.1 in the round). Does it mean we do this slip stitch only on the first stitch at the beginning of the round or always when we reach the first stitch of the repeated round? I have worked this round with only the first stitch to be slipped then didn’t repeat it again but afterwards the stitches don’t align.
22.08.2025 - 19:00DROPS Design a répondu:
Dear Mme Luhaib, this round should be displaced by 1 stitch as follows: slip the first stitch onto the right needle without working it, then work A.1 in the round, at the end of round knit the last stitch together with the first stitch in this round. You have to slip 1 stitch only once, at the beginning of the round. Happy knitting!
22.10.2025 - 09:57
|
|||||||||||||||||||||||||||||||
Lavender Charm Top#lavendercharmtop |
|||||||||||||||||||||||||||||||
 |
 |
||||||||||||||||||||||||||||||
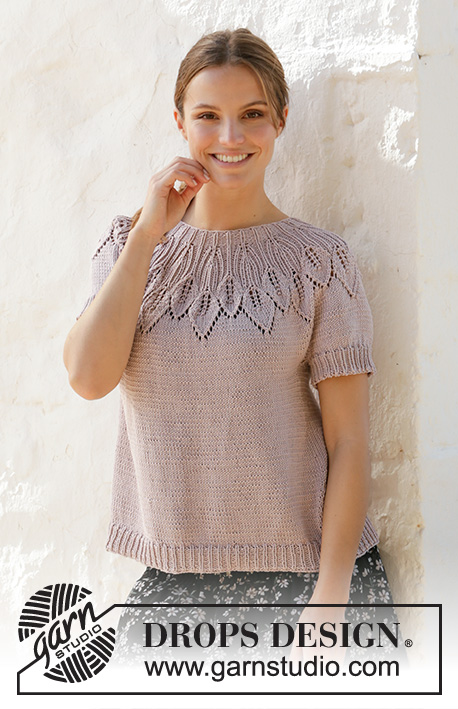
Top tricoté de haut en bas en DROPS Muskat, avec empiècement arrondi, point de feuilles et point ajouré. Du S au XXXL.
DROPS 213-22 |
|||||||||||||||||||||||||||||||
|
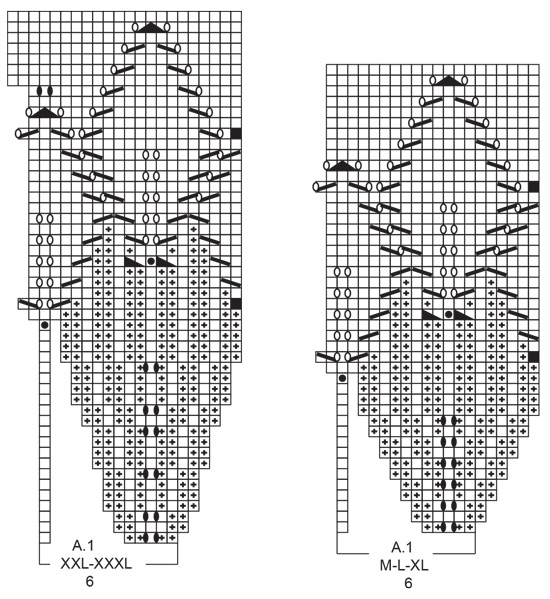
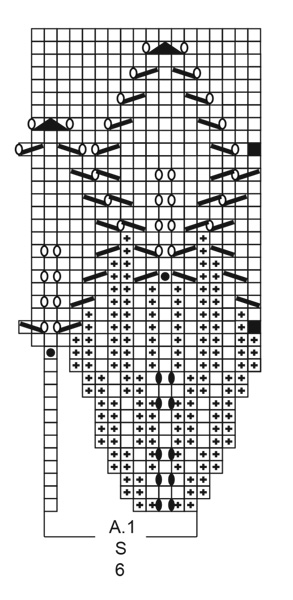
------------------------------------------------------- TECHNIQUES EMPLOYÉES: ------------------------------------------------------- POINT FANTAISIE: Voir diagramme A.1. Voir diagramme approprié à la taille. AUGMENTATIONS (côtés top): Tricoter jusqu'à ce qu'il reste 2 mailles avant le fil marqueur, faire 1 jeté, tricoter 4 mailles endroit (le fil marqueur se trouve entre ces 4 mailles) faire 1 jeté. Au tour suivant, tricoter les jetés torse à l'endroit pour éviter les trous. Tricoter ensuite les nouvelles mailles en jersey. DIMINUTIONS (manches): Diminuer 1 maille de chaque côté du fil marqueur ainsi: Tricoter jusqu'à ce qu'il reste 3 mailles avant le fil marqueur, tricoter 2 mailles ensemble à l'endroit, 2 mailles endroit (le fil marqueur se trouve entre ces 2 mailles), glisser 1 maille à l'endroit, 1 maille endroit et passer la maille glissée par-dessus la maille tricotée. ASTUCE POUR RABATTRE: Pour éviter que les mailles rabattues ne soient serrées, on peut rabattre avec une aiguille d'une taille au-dessus. Si les mailles rabattues sont toujours trop serrées, faire 1 jeté après environ chaque 4ème maille et rabattre les jetés comme des mailles normales. ------------------------------------------------------- L'OUVRAGE COMMENCE ICI: ------------------------------------------------------- TOP – PETIT APERÇU DE L'OUVRAGE: Le col et l'empiècement se tricotent de haut en bas, en rond sur aiguille circulaire, à partir du milieu dos. On divise l'empiècement pour le dos/le devant et les bordures des manches et on continue le dos/le devant en rond sur aiguille circulaire. Les bordures des manches se tricotent en rond avec les aiguilles doubles pointes, de haut en bas. COL: Monter 96-96-102-114-114-120 mailles avec l'aiguille circulaire 3 en Muskat. Tricoter 1 tour endroit. Tricoter en côtes (= 2 mailles envers / 1 maille endroit). Quand l'ouvrage mesure 3 cm, continuer avec l'aiguille circulaire 4. Placer 1 marqueur au début du tour, au milieu dos; on va mesurer l'empiècement à partir de ce marqueur! EMPIÈCEMENT: Tricoter A.1 (= 6 mailles) en rond sur toutes les mailles (= 16-16-17-19-19-20 fois en largeur). BIEN CONSERVER LA MÊME TENSION QUE POUR L'ÉCHANTILLON! Quand A.1 a été tricoté 1 fois en hauteur, on a 288-320-340-380-418-440 mailles et l'ouvrage mesure environ 14-16-16-16-18-18 cm depuis le marqueur. Tricoter en rond, à l'endroit, jusqu'à ce que l'ouvrage mesure 19-21-22-24-26-28 cm depuis le marqueur. Diviser maintenant l'ouvrage pour le dos/le devant et les manches ainsi: Tricoter les 40-45-49-53-60-65 premières mailles (= demi-dos), glisser les 63-69-72-84-89-90 mailles suivantes en attente sur un fil pour la bordure de la manche et monter 6-6-6-6-8-10 nouvelles mailles sous la manche, tricoter les 81-91-98-106-120-130 mailles suivantes (= devant), glisser les 63-69-72-84-89-90 mailles suivantes en attente sur un fil pour la bordure de la manche et monter 6-6-6-6-8-10 nouvelles mailles sous la manche, tricoter les 41-46-49-53-60-65 dernières mailles (= demi-dos). DOS & DEVANT: = 174-194-208-224-256-280 mailles. Placer 1 fil marqueur au milieu des 6-6-6-6-8-10 mailles sous chaque manche (= côtés du top). On a 87-97-104-112-128-140 mailles entre les fils pour le devant et le dos. Faire suivre les fils au fur et à mesure; ils vont servir aux augmentations sur les côtés. Tricoter à l'endroit. Quand l'ouvrage mesure 4 cm depuis la séparation, augmenter 1 maille de chaque côté des 2 fils marqueurs – voir AUGMENTATIONS (= on augmente 4 mailles). Augmenter ainsi 5-4-4-5-5-5 fois au total tous les 4 cm = 194-210-224-244-276-300 mailles. Quand l'ouvrage mesure 28-28-29-29-29-29 cm depuis la séparation, augmenter 13-12-13-14-15-15 mailles à intervalles réguliers = 207-222-237-258-291-315 mailles. Changer pour l'aiguille circulaire 3 en côtes (= 1 maille endroit / 2 mailles envers) pendant 4 cm. Rabattre à l'endroit – voir ASTUCE POUR RABATTRE. L'ouvrage mesure 32-32-33-33-33-33 cm depuis la séparation. BORDURE DES MANCHES: Reprendre les 63-69-72-84-89-90 mailles en attente sur un des côtés de l'ouvrage sur les aiguilles doubles pointes 4 et relever 1 maille dans chacune des 6-6-6-6-8-10 mailles montées sous la manche = 69-75-78-90-97-100 mailles. Tricoter en jersey en rond pendant 2 cm. Continuer avec les aiguilles doubles pointes 3 en côtes (= 1 maille endroit / 2 mailles envers) en diminuant EN MÊME TEMPS, au premier tour, 0-0-0-0-1-1 maille = 69-75-78-90-96-99 mailles. Rabattre quand les côtes mesurent 4 cm, en tricotant les mailles endroit à l'endroit et les mailles envers à l'envers. Tricoter la bordure de l'autre manche de la même façon. |
|||||||||||||||||||||||||||||||
Légende diagramme(s) |
|||||||||||||||||||||||||||||||
|
|||||||||||||||||||||||||||||||
 |
|||||||||||||||||||||||||||||||
 |
|||||||||||||||||||||||||||||||
 |
|||||||||||||||||||||||||||||||
Vous avez terminé ce modèle?Alors taguez vos photos avec #dropspattern #lavendercharmtop ou bien présentez-les dans la galerie #dropsfan Vous avez besoin d'aide pour ce modèle ?Vous trouverez 28 tutoriels vidéo, une rubrique commentaires/questions et plus encore en vous rendant sur la page du modèle sur garnstudio.com © 1982-2026 DROPS Design A/S. Tous droits réservés. Ce document, y compris ces sous-sections, est protégé par les droits d'auteur (copyright). Apprenez-en davantage sur ce que vous pouvez faire avec nos modèles en bas de chacune des pages de notre site. |
|||||||||||||||||||||||||||||||


Avec plus de 40 ans dans la conception de modèles tricot et crochet, DROPS Design offre l'une des plus vastes collections de modèles gratuits sur internet - traduits dans 17 langues. À ce jour, on compte 324 catalogues et 12290 modèles en français.
Nous nous efforçons de vous apporter le meilleur de ce que le tricot et le crochet peuvent vous offrir, inspiration et conseils mais également des fils de haute qualité à des prix incroyables! Vous souhaiteriez utiliser nos modèles autrement que pour un usage personnel? Vous pouvez lire ce que vous êtes autorisés à faire dans le Copyright en bas de page de chacun de nos modèles. Bon tricot!
Poster un commentaire sur le modèle DROPS 213-22
Nous aimerions connaître votre avis sur ce modèle !
Si vous souhaitez poser une question, merci de bien vouloir vérifier que vous avez choisi la bonne catégorie dans le formulaire ci-dessous afin d'accélérer la réponse. Les champs obligatoires sont indiqués par une *.