
Catégories populaires
Vous cherchez un fil?


Commentaires / Questions (44)
![]() Margarita a écrit:
Margarita a écrit:
Moin, ich verstehe die Maschenprobe nicht richtig. Bedeutet 24 Maschen in der Breite auch, dass nur die rechten Maschen gezählt werden? Also i. Wirklichkeit 48 Maschen auf der Nadel sind und 10 cm ergeben?
23.07.2025 - 18:01DROPS Design a répondu:
Liebe Margarita, die Maschenprobe soll 24 Maschen auf der Nadel 10 cm messen und 48 Reihen in der Höhe = 24 sichtbare rechte Maschen 10 cm messen. Viel Spaß beim Stricken!
24.07.2025 - 16:31
![]() Catharina a écrit:
Catharina a écrit:
Jeg strikkede nederdelen i uld i efteråret og har først lige færdigmontet den. Superflot og så lækker at have på. Vil nu strikke den i flere nuancer. 🤗
13.01.2025 - 20:13
![]() Ghita Forelius a écrit:
Ghita Forelius a écrit:
Förstår ej ur stickas varv A1
03.12.2024 - 15:33DROPS Design a répondu:
Hej, du börjar nederst till höger i diagrammet och stickar första varvet så här: *2 aviga maskor tillsammans, 1 omslag, lyft 1 maska som om den skulle stickas avig*, upprepa *-* (= de tre rutorna i diagrammet) hela varvet runt. Fortsätt sedan med följande varv i diagrammet (läs diagrammet från höger till vänster).
03.12.2024 - 18:18
![]() Cecilie a écrit:
Cecilie a écrit:
Der er en video om hvordan man folder kanten og syr den, men hvad gør man, når den foldede kant skal sys på noget, der er meget mere elastisk? Lige efter kanten tager man jo ud og begynder at strikke rib - hvordan undgår man at miste elasticiteten, når der kommer sting på tværs af ribbene?
14.09.2022 - 12:29DROPS Design a répondu:
Hej Cecilie, ja du har helt ret, da er det vigtigt at du syr løst, så kanten ikke mister elasticiteten :)
15.09.2022 - 15:46
![]() Elvira Eger a écrit:
Elvira Eger a écrit:
Guten Tag, ich bin gerade dabei, den Rock zu stricken und hätte da eine Frage zu dem Muster Diagramm. Es gibt das Muster A. 1 mit der ersten Reihe mit Abnahme und dann noch das Muster A. 1a, das bis zum Ende gestrickt werden soll. Ich sehe aber keinen Unterschied zwischen A. 1 und A.. 1a. Bitte melden Sie sich bald, damit ich weiter machen kann. Vielen Dank für die Bemühungen Elvira Eger
17.02.2022 - 13:16DROPS Design a répondu:
Liebe Frau Eger, bei der 1. Reihe in A.1a stricken Sie *2 Maschen links zusammen, 1 Umschlag, 1 Maschen wie zum Linksstricken abheben*, und diese 3 Maschen von *bis* wiederholen (Umschläge werden nicht als Maschen gezählt), so haben Sie abgenommen. Dann stricken Sie die 2. und 3. Reihe in A.1 und stricken Sie so weiter, dh die 2 Reihen in A.1a sind die gleichen als die 2. und die 3. Reihe in A.1. Kann das Ihnen helfen?
17.02.2022 - 13:42
![]() Carol MacDonald a écrit:
Carol MacDonald a écrit:
Hi I have pattern Drops 196-37. Can you please tell me what the measurements are for the sizes
16.10.2021 - 07:37DROPS Design a répondu:
Dear Carol, you can find all the relevant measurements of the finished piece on the shcematic drawing just below the pattern description. Happy Stitching!
17.10.2021 - 00:23
![]() Lara a écrit:
Lara a écrit:
Does anyone else find A1 not working for them? It works when I do rows, and does not when I try in rounds. Shouldn't it be "purl in one round, then knit in the next?" I watched a few videos of false English rib, it usually starts with "knit one " - not purl. Could this be an issue?
02.01.2021 - 05:50
![]() Lara a écrit:
Lara a écrit:
Dear Drops Design, Kristen seems to be right, the pattern appears to give the wrong side as "right side" when switching to false English rib. I looked up a video explaining false English rib, it appears that A1 diagram is somehow wrong, I am still trying to figure out what exactly the problem is. Maybe it has something to do with translation from Norwegian? Was anyone able to get it right using this pattern? Thank you.
01.01.2021 - 05:36
![]() Emma a écrit:
Emma a écrit:
Jeg har svært ved at forstå overgangen fra de 8 cm rib til det nye mønster. Bliver forvirret over strikkediagrammet og den vejledende video for falsk patent. Prøver de at forklare den samme ting?
18.11.2020 - 23:30DROPS Design a répondu:
Hej Emma, første pind i diagrammet er anderledes end i videoen da du strikker 2 masker vrang sammen, men herefter strikkes de to omgange skiftevis som i videoen. God fornøjelse!
23.11.2020 - 16:00
![]() Lisia a écrit:
Lisia a écrit:
Dit was de eerste keer dat ik in aanraking kwam met valse patentsteek en patentsteken überhaupt, na veel gepuzzel en googlen ontdekte ik een fout in het telpatroon. De averechtste steken in de tour van de dichte bolletjes (de toer met de extra omslagen) moeten rechtste steken zijn!
14.11.2020 - 16:42
|
||||||||||||||||
See You In Dublin#seeyouindublinskirt |
||||||||||||||||
 |
 |
|||||||||||||||
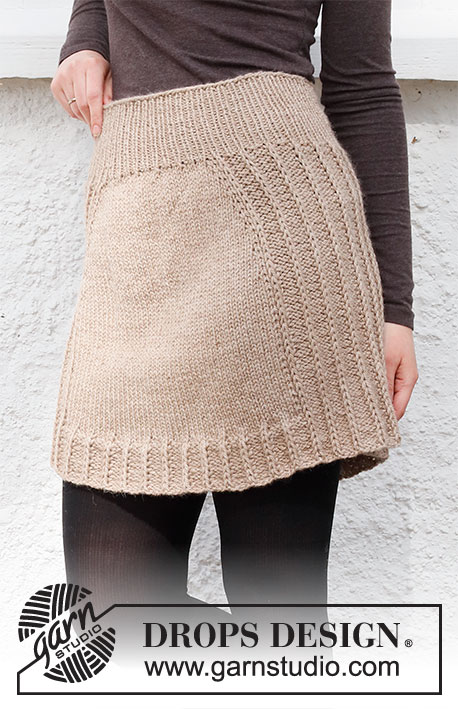
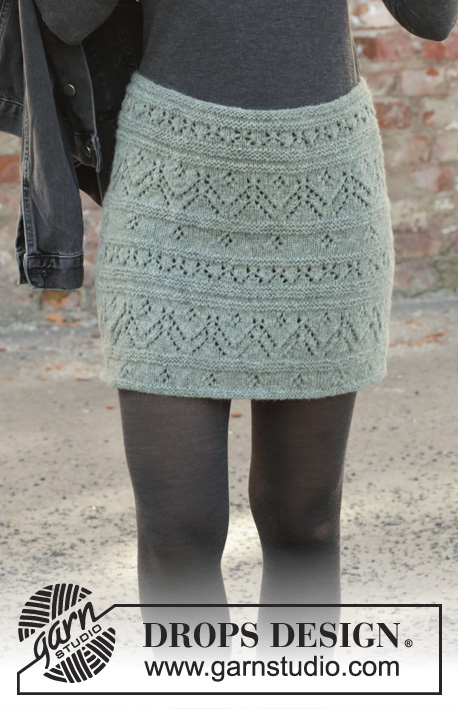
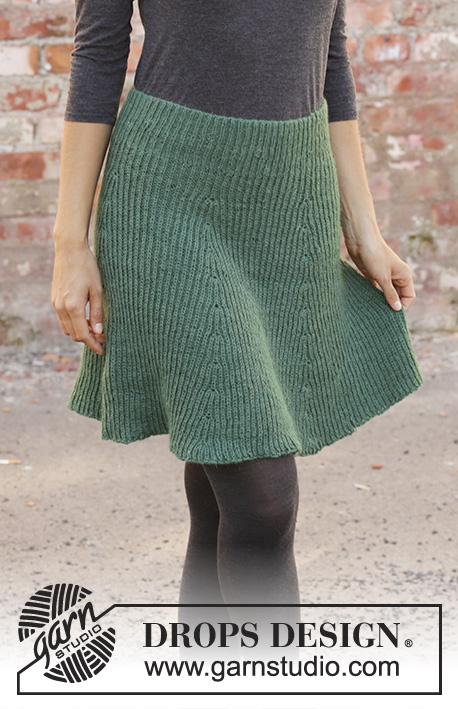
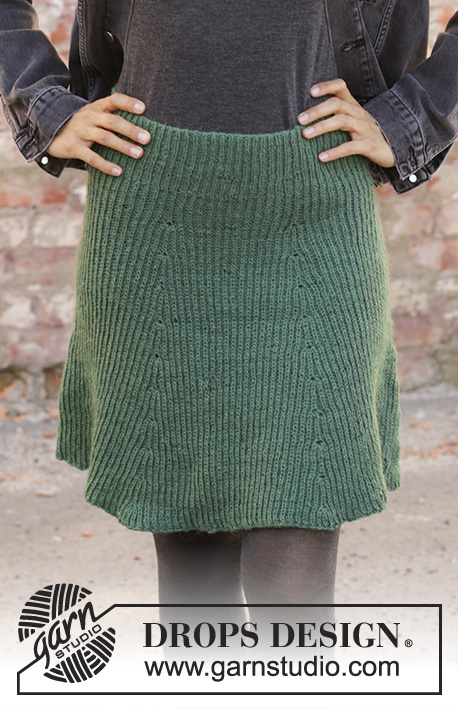
Jupe tricotée en DROPS Nord, de haut en bas, en fausses côtes anglaises. Du S au XXXL
DROPS 196-37 |
||||||||||||||||
|
TECHNIQUES EMPLOYÉES: ---------------------------------------------------------- ÉCHANTILLONS: La texture de la jupe va s’étirer quand on la porte et a ainsi 2 types d’échantillons. Tension-1: quand on tricote la jupe et qu’on la mesure à plat. La jupe doit ainsi avoir cette tension quand on la fait. Tension-2 : tension mesurée à la taille quand on porte la jupe. La tension en hauteur est indiquée en suivant les mailles endroit, qui se tricotent sur 1 tour de moins que les mailles envers, car les mailles endroit sont glissées souplement tous les 2 tours. C'est-à-dire que 24 rangs en hauteur comptées dans les mailles endroit pour 10 cm = 48 rangs comptés dans les mailles envers pour 10 de hauteur. Les mesures du schéma sont indiquées en cm, quand on porte la jupe. AUGMENTATIONS-1 (à intervalles réguliers): Pour calculer quand augmenter, prendre le nombre total de mailles (par ex. 172 mailles) et le diviser par le nombre d'augmentations à faire (par ex. 26) = 6.6. Dans cet exemple, on va augmenter en faisant 1 jeté après alternativement chaque 6ème et 7ème maille environ. Au tour suivant, tricoter les jetés torse pour éviter un trou. AUGMENTATIONS-2: Toutes les augmentations se font sur un tour où le jeté et la maille endroit sont tricotés ensemble à l’endroit. Tricoter 5 fois la maille endroit et le jeté ainsi: Tricoter ensemble à l'endroit le jeté et la maille endroit mais garder la maille et le jeté sur l’aiguille gauche, *faire 1 jeté sur l'aiguille droite et tricoter ensemble à l’endroit le jeté et la maille endroit*, répéter de *-* 2 fois au total = 5 mailles (= on augmente 4 mailles) POINT FANTAISIE: Voir diagramme A.1. ---------------------------------------------------------- L'OUVRAGE COMMENCE ICI: ---------------------------------------------------------- JUPE – PETIT APERÇU DE L'OUVRAGE: Se tricote de haut en bas, en rond sur aiguille circulaire. Tricoter d'abord un ourlet pour y glisser l’élastique de la taille. Continuer ensuite en côtes et fausses côtes anglaises. La texture de la jupe va être différente quand on la porte – cf ÉCHANTILLON. OURLET: Monter 172-188-202-228-250-292 mailles avec l'aiguille circulaire 2,5 en Nord. Tricoter 1 tour en mailles envers. Tricoter ensuite 4 tours jersey. Tricoter 1 tour en mailles envers en augmentant 26-28-32-36-38-44 mailles à intervalles réguliers (= rang de cassure) – voir AUGMENTATIONS-1 = 198-216-234-264-288-336 mailles. Placer 1 fil marqueur. MESURER DÉSORMAIS À PARTIR D'ICI! JUPE: Tricoter en côtes (2 mailles envers/1 maille endroit) pendant 8 cm. Continuer avec l'aiguille circulaire 3 et tricoter A.1 sur toutes les mailles (= 66-72-78-88-96-112 fois tout le tour). Quand le 1er tour de A.1 a été tricoté, on a 132-144-156-176-192-224 mailles – ne pas compter les jetés comme des mailles. Quand A.1 a été tricoté 1 fois en hauteur, répéter A.1a jusqu'à la fin. BIEN CONSERVER LA MÊME TENSION QUE POUR L'ÉCHANTILLON! Quand l'ouvrage mesure 10 cm depuis le fil marqueur, placer 1 marqueur dans chaque 11ème-12ème-13ème-11ème-12ème-14ème maille endroit (= 6-6-6-8-8-8 marqueurs). Augmenter ensuite 4 mailles dans chacune des mailles avec un marqueur – voir AUGMENTATIONS-2 (= on augmente 24-24-24-32-32-32 mailles). Continuer en rond en point fantaisie et tricoter les augmentations en point fantaisie. Augmenter ainsi tous les 4-4-4-4½-4½-4½ cm jusqu'à ce que l'ouvrage mesure 48-50-52-54-56-58 cm depuis le fil marqueur – on a environ 348-384-396-464-512-544 mailles – ajuster pour que le dernier tour soit un tour avec des jetés. Rabattre ensuite les mailles endroit à l'endroit et les mailles envers à l’envers, MAIS rabattre les jetés comme des mailles endroit pour éviter que les mailles rabattues ne soient trop serrées. ASSEMBLAGE: Plier l’ourlet sur l’envers et coudre en laissant une petite ouverture pour y passer l’élastique. |
||||||||||||||||
Légende diagramme(s) |
||||||||||||||||
|
||||||||||||||||
 |
||||||||||||||||
Vous avez terminé ce modèle?Alors taguez vos photos avec #dropspattern #seeyouindublinskirt ou bien présentez-les dans la galerie #dropsfan Vous avez besoin d'aide pour ce modèle ?Vous trouverez 18 tutoriels vidéo, une rubrique commentaires/questions et plus encore en vous rendant sur la page du modèle sur garnstudio.com © 1982-2026 DROPS Design A/S. Tous droits réservés. Ce document, y compris ces sous-sections, est protégé par les droits d'auteur (copyright). Apprenez-en davantage sur ce que vous pouvez faire avec nos modèles en bas de chacune des pages de notre site. |
||||||||||||||||


Avec plus de 40 ans dans la conception de modèles tricot et crochet, DROPS Design offre l'une des plus vastes collections de modèles gratuits sur internet - traduits dans 17 langues. À ce jour, on compte 324 catalogues et 12290 modèles en français.
Nous nous efforçons de vous apporter le meilleur de ce que le tricot et le crochet peuvent vous offrir, inspiration et conseils mais également des fils de haute qualité à des prix incroyables! Vous souhaiteriez utiliser nos modèles autrement que pour un usage personnel? Vous pouvez lire ce que vous êtes autorisés à faire dans le Copyright en bas de page de chacun de nos modèles. Bon tricot!
Poster un commentaire sur le modèle DROPS 196-37
Nous aimerions connaître votre avis sur ce modèle !
Si vous souhaitez poser une question, merci de bien vouloir vérifier que vous avez choisi la bonne catégorie dans le formulaire ci-dessous afin d'accélérer la réponse. Les champs obligatoires sont indiqués par une *.