
Catégories populaires
Vous cherchez un fil?


Commentaires / Questions (75)
![]() Ana a écrit:
Ana a écrit:
I've just finished knitting the 10cm on the mid back, but I fear I may have done it wrong, as now there's a 10 cm height difference between one side of the work and the other, which doesn't make sense as we're not casting off just yet. Should I have been knitting all the stitches and not just the 28+62?
22.10.2022 - 15:28DROPS Design a répondu:
Boa tarde, Now divide the piece mid back to work back and forth from mid back (this is done so that the seam is mid back). Work in garter stitch back and forth until piece measures 10 cm from the 28 stitches cast on mid front. Deve dividir as 152 malhas em 2 partes que tricota separadamente. até ter 10 cm medidos a partir da carreira em que montou a28 malhas, Bons tricôs!
23.10.2022 - 17:21
![]() Ana a écrit:
Ana a écrit:
I've just finished knitting the first 24cm and I'm already confused, what do you mean "cast on 1 stitch 2 times and 2 stitches 5 times"? I need a better explanation, please!
09.10.2022 - 16:36DROPS Design a répondu:
Dear Ana, cast on 1 stitch at the end of each row from each side. Cast on 1 stitch at the end of the first row from the RS and WS. Repeat this once more on the next row from the RS and WS. Then, cast on 2 stitches at the end of each row from each side, but repeat this 5 times (so you increase 2 stitches at the end of the next 5 rows from the RS and 5 rows from the WS). Happy knitting!
09.10.2022 - 19:48
![]() Anna a écrit:
Anna a écrit:
Dzień dobry, czy jest dostępny szkic/schemat do tego projektu?
09.10.2022 - 11:54DROPS Design a répondu:
Witaj Aniu, niestety nie. Napisz jeśli masz jakiś problem. Pozdrawiamy!
10.10.2022 - 10:09
![]() Jutta a écrit:
Jutta a écrit:
Hallo, wir haben mit der Anleitung angefangen, befinden uns aber grade in einer Sackgasse und kommen auch mit vereinten Denkkräften nicht weiter...Nach dem einseitige Anschlagen der 28 Maschen und dem Teilen an der hinteren Mitte können wir uns so langsam nicht mehr vorstellen wie es weiter geht und wie daraus die Kapuze entstehen soll. Hat jemand vielleicht eine Zeichnung? Was genau ist die hintere / vordere Mitte? Wie wird alles zusammengenäht? Ich hoffe jemand kann helfen
06.08.2022 - 15:54DROPS Design a répondu:
Liebe Jutta, die Arbeit wird zuerst in Reihen von der vorderen Mitte gestrickt, dann wenn die neuen Maschen für die Öffnung für Gesicht angeschlagen wurden, soll die Arbeit von der hinteren Mitte gestrickt werden (so gibt es keine Naht an der vorderen Mitte). Am Ende nähen Sie die Kapuze oben zusammen und die unteren Reihen in der hinteren Mitte (ab den neuen Maschen bis zur Abketterand). Viel Spaß beim stricken!
08.08.2022 - 08:07
![]() Tiko a écrit:
Tiko a écrit:
First time I got confused with your pattern 😊1. the whole piece is in gaeter stitch except for the 158 stitches around face? 2. Is the piece worked inthe round at any stage? 3. Is it possible to send or add to the pattern a drawing fo what the finished piece looks like prior to been assambled? Thanks for the answerrs 💚
13.03.2022 - 19:12DROPS Design a répondu:
Dear Tiko, 1. correct, only the ribbing edge around face is worked in rib, the whole work is then worked in garter stitch. 2. Piece is only worked in rows, but first from mid front (until opening for face is done), then from mid back (after you have increased/cast on the stitches for under face). 3. we have no chart for this sorry. Happy knitting!
14.03.2022 - 12:06
![]() Ana a écrit:
Ana a écrit:
Could I do the whole pattern in rib instead of garter stitch? How could I adapt from one to the other? Thank you so much!
24.02.2022 - 19:10DROPS Design a répondu:
Dear Ana, your tension would be then different and your would have to re-calculate the whole pattern. You might find another pattern among these ones. Happy knitting!
25.02.2022 - 08:59
![]() Ayra a écrit:
Ayra a écrit:
Plz explain when you pick up 158 stitches around face opening do you have to pick up all of the stitches or you have to pick up 3 and skip one. Thanks
13.02.2022 - 20:44DROPS Design a répondu:
Hi Ayra, you have to distribute new stitches evenly to have 158 stitches around face opening in total. Happy knitting!
14.02.2022 - 08:18
![]() Ayra a écrit:
Ayra a écrit:
Plz explain for mid back seam after working on 28 new cast on stitches and 62 stitches when you turn your work do you have to do the purl stitch from that side and also you have to work on 28 stitches.again so the mid back seam is done. Now you have to do garter stitch for all of the stitches. Thanks
04.02.2022 - 01:51DROPS Design a répondu:
Dear Ayra, when you cut the yarn after the hood part, you start again piece from mid back (= approx. middle of previous rows), and will then cast on new stitches for face opening, ending rows on mid back. The seam on mid back will start here and will be sewn to the bottom edge; the 28 sts are cast on on mid front, there won't be any seam here. Hope it will help. Happy knitting!
04.02.2022 - 09:16
![]() Ayra a écrit:
Ayra a écrit:
Plz explain how you sew the hood in the end? Thanks
03.02.2022 - 02:10DROPS Design a répondu:
Dear Ayra, fold the cast on edge double and sew cast on sts together; and then sew on mid back from the beginning of row worked from mid back (after face opening) towards the cast off edge. Happy knitting!
03.02.2022 - 08:47
![]() Marta a écrit:
Marta a écrit:
One follow up if I may. If there is a seam mid-back, where is the face opening. I'm really confused as you can tell.
02.02.2022 - 14:18DROPS Design a répondu:
Dear Marta, you first work the hood, back and forth from mid front, then cut the yarn and start on mid back to work now from the mid back, increasing stitches on mid front and working the 2nd half of sts to mid back. The seam will be on mid back from this part. Hope it will help. Happy knitting!
02.02.2022 - 14:29
|
|
Lawless#lawlesshood |
|
 |
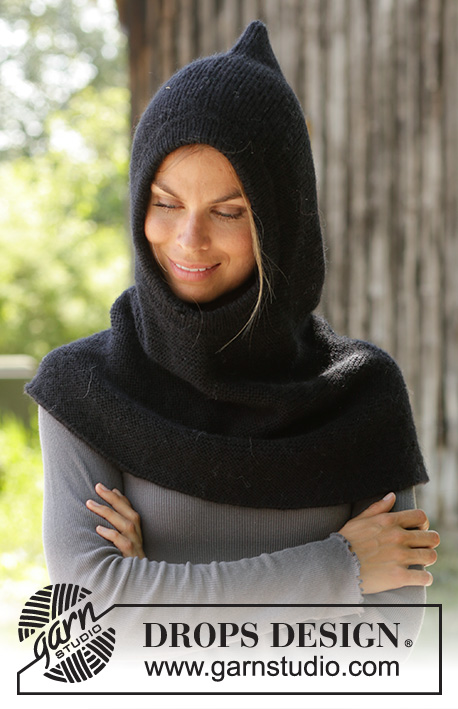 |
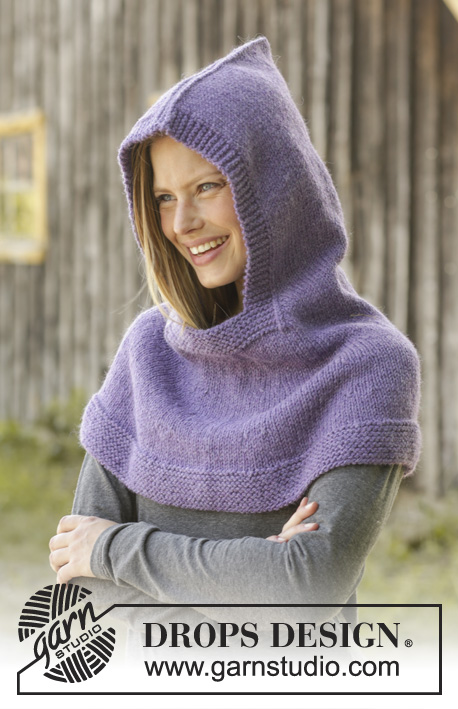
Col capuche tricoté en DROPS Merino Extra Fine ou DROPS Karisma. Se tricote de haut en bas, au point mousse. Du S au XXXL
DROPS 192-2 |
|
|
TECHNIQUES EMPLOYÉES: ---------------------------------------------------------- POINT MOUSSE (en allers et retours): 1 côte mousse = tricoter 2 rangs endroit. AUGMENTATIONS: Tricoter jusqu'à ce qu'il reste 1 maille avant le fil marqueur, 1 jeté, tricoter 2 mailles endroit (le fil marqueur est au milieu de ces mailles), 1 jeté. Au tour suivant, tricoter les jetés torse pour éviter les trous. ---------------------------------------------------------- L'OUVRAGE COMMENCE ICI: ---------------------------------------------------------- COL CAPUCHE – PETIT APERÇU DE L'OUVRAGE: Se tricote en allers et retours sur aiguille circulaire, de haut en bas, avec une couture dans le dos et en haut de la capuche à la fin. COL CAPUCHE: Monter 100 mailles avec l’aiguille circulaire 3 en Merino Extra Fine ou Karisma. Tricoter au POINT MOUSSE – voir ci-dessus, en allers et retours, à partir du milieu devant. BIEN CONSERVER LA MÊME TENSION QUE POUR L'ÉCHANTILLON! Quand l'ouvrage mesure 24 cm, monter à la fin de chaque rang de chaque côté (côté devant / visage) ainsi: 2 fois 1 maille et 5 fois 2 mailles (= on a augmenté 12 mailles de chaque côté) = 124 mailles. À la fin du rang suivant, monter 28 mailles (côté devant / sous l'ouverture pour le visage)= 152 mailles. Tricoter à l'endroit jusqu'au milieu dos: tricoter 62 mailles endroit après les 28 mailles montées au milieu devant. Diviser maintenant l'ouvrage et tricoter en allers et retours à partir d'ici - milieu dos (on procède ainsi pour que la couture se trouve au milieu dos). Tricoter au point mousse en allers et retours jusqu'à ce que l'ouvrage mesure 10 cm depuis les 28 mailles montées au milieu devant. Placer maintenant 8 fils marqueurs ainsi: En commençant au milieu dos, placer le 1er fil marqueur après 10 mailles, espacer les 7 autres fils marqueurs de 19 mailles, il reste maintenant 9 mailles après le dernier fil marqueur. Continuer au point mousse. Au rang suivant, sur l'endroit, augmenter 1 maille de chaque côté de chaque fil marqueur - voir AUGMENTATIONS. Augmenter ainsi 6-7-8 fois au total tous les 3 cm environ = 248-264-280 mailles. Tricoter jusqu'à ce que l'ouvrage mesure 58-60-62 cm de hauteur totale. Rabattre avec 2 fils. ASSEMBLAGE: Faire la couture au milieu dos et assembler les mailles du montage en haut de la capuche dans le brin le plus à l’extérieur des mailles. BORDURE AUTOUR DU VISAGE: Relever sur l'endroit 158 mailles autour de l’ouverture pour le visage avec la petite aiguille circulaire 2.5. Tricoter 1 tour envers, 1 tour endroit, 1 tour envers, 1 tour endroit. Continuer ensuite en côtes (= 1 maille endroit/1 maille envers) pendant 6 cm. Rabattre les mailles comme elles se présentent. Plier la bordure en double sur l’envers et la coudre. |
|
Vous avez terminé ce modèle?Alors taguez vos photos avec #dropspattern #lawlesshood ou bien présentez-les dans la galerie #dropsfan Vous avez besoin d'aide pour ce modèle ?Vous trouverez 17 tutoriels vidéo, une rubrique commentaires/questions et plus encore en vous rendant sur la page du modèle sur garnstudio.com © 1982-2026 DROPS Design A/S. Tous droits réservés. Ce document, y compris ces sous-sections, est protégé par les droits d'auteur (copyright). Apprenez-en davantage sur ce que vous pouvez faire avec nos modèles en bas de chacune des pages de notre site. |
|


Avec plus de 40 ans dans la conception de modèles tricot et crochet, DROPS Design offre l'une des plus vastes collections de modèles gratuits sur internet - traduits dans 17 langues. À ce jour, on compte 324 catalogues et 12290 modèles en français.
Nous nous efforçons de vous apporter le meilleur de ce que le tricot et le crochet peuvent vous offrir, inspiration et conseils mais également des fils de haute qualité à des prix incroyables! Vous souhaiteriez utiliser nos modèles autrement que pour un usage personnel? Vous pouvez lire ce que vous êtes autorisés à faire dans le Copyright en bas de page de chacun de nos modèles. Bon tricot!
Poster un commentaire sur le modèle DROPS 192-2
Nous aimerions connaître votre avis sur ce modèle !
Si vous souhaitez poser une question, merci de bien vouloir vérifier que vous avez choisi la bonne catégorie dans le formulaire ci-dessous afin d'accélérer la réponse. Les champs obligatoires sont indiqués par une *.