
Catégories populaires
Vous cherchez un fil?


Commentaires / Questions (27)
![]() María Gonzalez a écrit:
María Gonzalez a écrit:
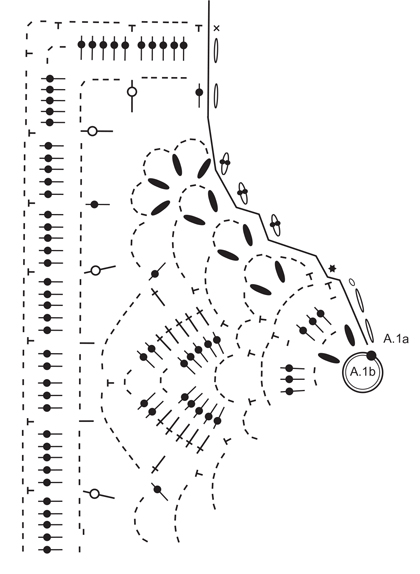
"Comenzar en el 4º punto bajo y trabajar a partir de la 3ª vuelta de los diagramas de la manera siguiente: Trabajar A.2a en el punto bajo..." me quedé aauí porque no se como identificar ese 4to punto bajo, desde donde se empieza a contar? con el video me fue muy bien y entiendo basicamente el gráfico pero esto no lo entendí, gracias por su ayuda
25.10.2020 - 20:45DROPS Design a répondu:
Hola Maria! Debes contar el 4º punto bajo antes de la esquina (hay 3 arcos de cadenas antes de la esquina) y comenzar aqui. Buen trabajo!
19.11.2020 - 09:16
![]() Sharon Beck a écrit:
Sharon Beck a écrit:
I have written out the instructions for this pattern. Would you be willing to publish them on your website? I see that several people have requested them.
05.06.2020 - 00:40DROPS Design a répondu:
Dear Mrs Beck, thanks for your feedback, there are already 2 videos to this pattern so that it is very easy to follow them. Happy crocheting!
05.06.2020 - 12:01
![]() Deborah Baxter a écrit:
Deborah Baxter a écrit:
Is there a written pattern somewhere? I don’t understand diagrams. It’s a beautiful blanket and I would love to crochet this but unfortunately diagrams aren’t my thing. I think there’s probably a lot of people who don’t understand diagrams.
28.06.2019 - 18:10DROPS Design a répondu:
Dear Deborah, unfortunately we cannot accomondate every wish about pattern writing. Our patterns are available in many languages, and we found the best way to give the pattern to everyone in chart forms. Charts do have their advantages, you can see not only a row (and what comes right after a stitch), but you can also see the relations of stitches to each other, and how rows should follow one another. It is not that difficult to memorize the explanation of the stitches (after a few repeats the mind remembers almost automatically). If you are still stuck, remember, you can always ask for help in person in the store where you bought your DROPS yarn from. Happy Crafting!
28.06.2019 - 21:25
![]() Sarah a écrit:
Sarah a écrit:
Het derde symbool werd verkeerd vertaald vanuit het Engels: " 1 double crochet around chain stitch space/between 2 trebles". Dit werd vertaald naar halve vaste, maar moet een vaste zijn rond de lossenlus. Ook in het filmpje is te zien dat de persoon een vaste haakt....
30.04.2019 - 14:09
![]() Olga Jaén Pareja a écrit:
Olga Jaén Pareja a écrit:
Ustedes dicen que la lana que hay que utilizar es una del grupo C, pero luego indican utilizar una aguja del 3,5mm. ¿Es correcto esto?
30.03.2019 - 12:55DROPS Design a répondu:
Hola Olga. Lo importante es la tensión del tejido, en este caso 18 puntos altos x 10.5 filas = 10 cm x 10 cm. El tamaño de la aguja es orientativo.
02.04.2019 - 14:56
![]() Diane a écrit:
Diane a écrit:
I've been crocheting for several decades, and I have no issues reading standard charts, but the instructions here are about as incomprehensible as they come and very confusing. As far as I can tell, round 1 ring is 4 chains, but then what? What stitches and how many in the ring?? If I can't even get it started, then I may just have to find another pattern, this is a Christmas project, I don't have a lot of time to waste deciphering this :-/ Thanks
08.10.2017 - 22:26DROPS Design a répondu:
Dear Diane, after the initial circle made from 4 chain stitch, and closed with a slip stitch, you do 3 treble (UK)/ double (US) (this is ahown in A.1a). [*Then two treble (UK) / double (US) crocheted together, 2 chain stitch.* Repeat *-* one more time (this is A.1b)]. Then repeat [-] 4 times, then close the round with a lip stitch. And so on. A.1 only shows the stitches that are used in order to raise the row to the next level. A1.b is repeated 4 times in the round. I hope this helps. Happy Crocheting!
08.10.2017 - 23:09
![]() Kathleen a écrit:
Kathleen a écrit:
The diagrams are fine as far as they go, however they don't go nearly far enough. In fact, after following the first snippet of diagram shown, it's nearly impossible to figure out where you are. Those who are having problems with the diagrams (and I've followed diagrams for years), it's not you, it's the creator of the diagram.
26.03.2017 - 17:00DROPS Design a répondu:
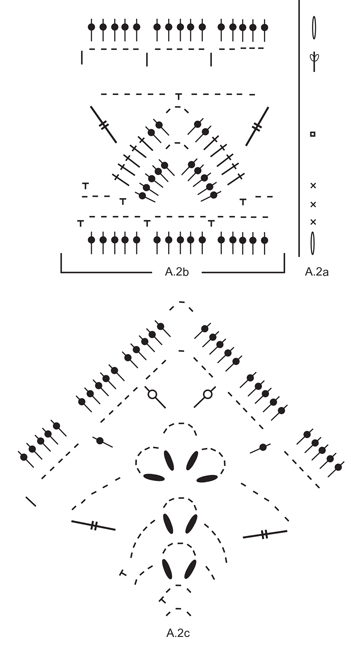
Dear kathleen, in A.1 you just repeat 4 times A.1b in the round, in A.2a-A.2c work A.2b along the sides and A.2c in the corner, A.2a is only showing how to start/finish the round. Happy crocheting!
27.03.2017 - 10:17
![]() Michelle Achee a écrit:
Michelle Achee a écrit:
Is there a written pattern for this? I bought the wool thinking it would have a regular written pattern, but all I see is a diagram which I cannot understand. Very frustrated.
22.02.2017 - 20:32DROPS Design a répondu:
Dear Mrs Achee, there is only diagram to this pattern, each symbol is matching a st/group of sts and is explaining under diagram text. For any further personnal assistance you are welcome to contact the DROPS store where you bought your yarn, they would be able to assist you, even per mail or telephone. Happy crocheting!
23.02.2017 - 09:51
![]() Naty Gagnon a écrit:
Naty Gagnon a écrit:
Merci, pas nécessairement en vidéo mais comme le tutoriel de drops children 24-6, tour par tour par écrit pas en diagramme. Merci.
30.01.2017 - 19:54
![]() Naty Gagnon a écrit:
Naty Gagnon a écrit:
Bonjour, je viens de commencer ce modèle et j'ai un peu de difficulté avec les diagrammes, auriez-vous les explications tour après tour comme pour le patron DROPS children 24-6 (Lovely Lily) que j'ai réussi avec succès. En passant votre site est merveilleux.
30.01.2017 - 03:46DROPS Design a répondu:
Bonjour Mme Gagnon, votre demande a bien été enregistrée, en attendant la vidéo, vous pouvez suivre le diagramme en vérifiant bien la légende de chaque symbole: A.1a = début/fin de chaque tour, A.1b = à répéter pour former le carré. Bon crochet!
30.01.2017 - 12:08
|
|||||||||||||||||||||||||||||||||||||||||||||||||
Orient Dream#orientdreamblanket |
|||||||||||||||||||||||||||||||||||||||||||||||||
 |
 |
||||||||||||||||||||||||||||||||||||||||||||||||
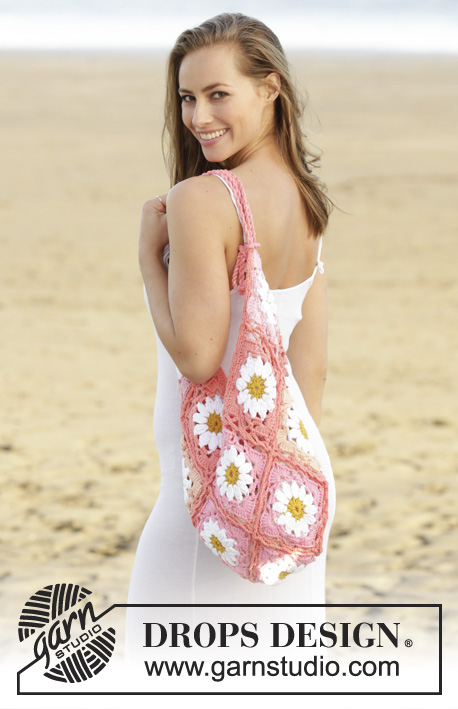
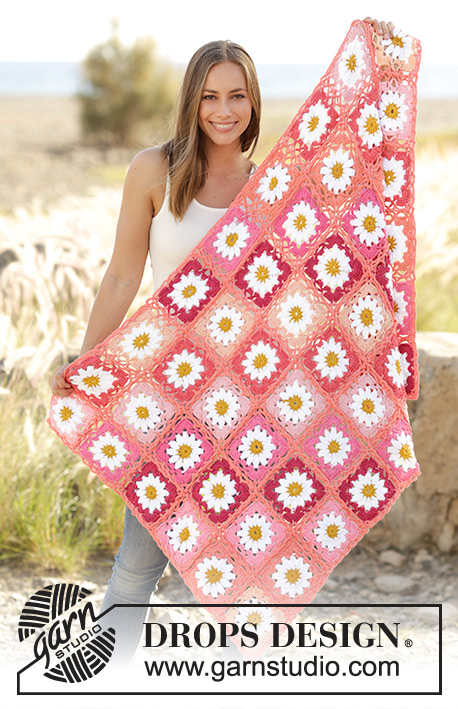
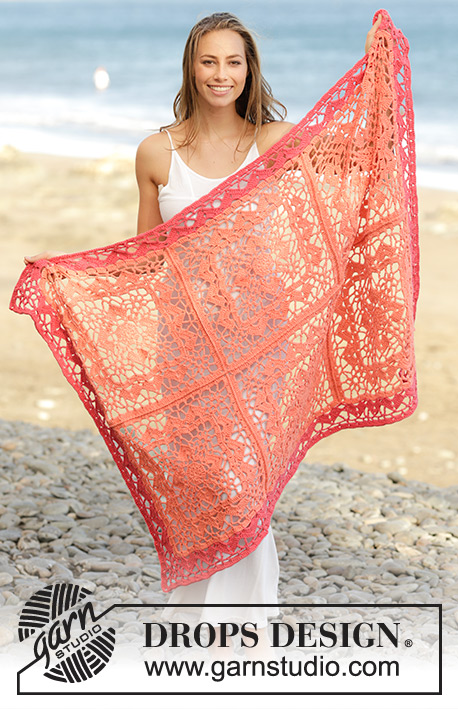
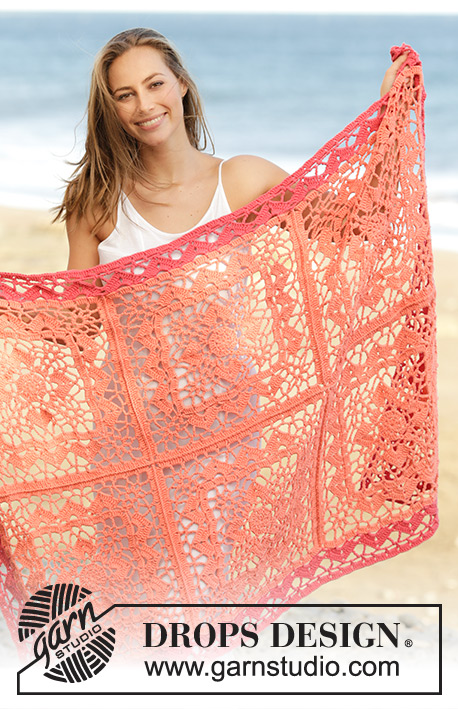
Couverture avec carrés au crochet et point ajouré, crochetée en DROPS Paris.
DROPS 175-10 |
|||||||||||||||||||||||||||||||||||||||||||||||||
|
POINT FANTAISIE: Voir diagrammes A.1 et A.2. ---------------------------------------------------------- COUVERTURE: Réaliser 6 carrés, crochetés entre eux, et crocheter ensuite une bordure tout autour de la couverture. CARRÉ AU CROCHET: Avec le crochet 3,5 en abricot, crocheter en suivant le diagramme A.1b, 4 fois au total tout le tour - Le diagramme A.1a montre comment commencer et terminer les tours et se crochète en plus de A.1b. PENSER À BIEN CONSERVER LA MÊME TENSION QUE POUR L'ÉCHANTILLON! Quand les diagrammes A.1a et A.1b ont été crochetés 1 fois en hauteur, le carré au crochet mesure environ 24 x 24 cm. Couper le fil. En commençant dans la 4ème maille serrée avant un coin, crocheter à partir du 3ème tour des diagrammes ainsi: A.2a dans la maille serrée (A.2a montre comment commencer et terminer les tours), A.2b au-dessus des 3 premiers arceaux, *A.2c (= coin), A.2b au-dessus des 9 arceaux suivants (= 3 motifs)*, répéter de *-* encore 2 fois, crocheter A.2c dans le coin et terminer par A.2b au-dessus des 6 derniers arceaux (= 2 motifs). Quand le dernier tour des diagrammes A.2a à A.2c a été crocheté, arrêter. Le carré au crochet mesure environ 39 x 39 cm. Crocheter 5 autres carrés au crochet de la même façon = 6 carrés au total. ASSEMBLAGE: Assembler maintenant les 6 carrés ensemble, en les crochetant dans les 2 épaisseurs en abricot ainsi: Placer 2 carrés au crochet l'un contre l'autre sur l'envers, joindre avec 1 maille serrée autour de l'arceau dans un coin, *1 maille serrée, dans les 2 épaisseurs, de la bride suivante, 2 mailles en l'air, sauter 1 bride*, répéter de *-* jusqu'à ce que tout le côté ait été crocheté, crocheter 1 maille serrée autour de l'arceau. Répéter avec les autres carrés pour qu'il y ait 2 bandes de 3 carrés en longueur. Crocheter ensuite les 2 bandes entre elles pour avoir 2 carrés en largeur et 3 carrés en longueur. Voir schéma des mesures. BORDURE: Réaliser la bordure suivante tout autour de l'ouvrage, en corail. En commençant par 1 maille serrée autour de l'arceau dans un coin, crocheter à partir du 2ème tour des diagrammes ainsi: NOTE: Au 2ème tour des diagrammes, crocheter 1 maille serrée à la transition entre 2 carrés au crochet (c'est-à-dire au niveau où ils ont été crochetés entre eux) au lieu d'1 maille serrée autour de l'arceau des coins pour chaque carré. Il y a maintenant 15 arceaux le long des côtés des carrés, Crocheter A.2a (montre comment commencer et terminer les tours), *A.2b jusqu'au coin suivant de la couverture, A.2c (= coin)*, répéter de *-* encore 3 fois. Quand tous les tours de A.2a-A.2c sont faits, arrêter. |
|||||||||||||||||||||||||||||||||||||||||||||||||
Légende diagramme(s) |
|||||||||||||||||||||||||||||||||||||||||||||||||
|
|||||||||||||||||||||||||||||||||||||||||||||||||
 |
|||||||||||||||||||||||||||||||||||||||||||||||||
 |
|||||||||||||||||||||||||||||||||||||||||||||||||
 |
|||||||||||||||||||||||||||||||||||||||||||||||||
Vous avez terminé ce modèle?Alors taguez vos photos avec #dropspattern #orientdreamblanket ou bien présentez-les dans la galerie #dropsfan Vous avez besoin d'aide pour ce modèle ?Vous trouverez 12 tutoriels vidéo, une rubrique commentaires/questions et plus encore en vous rendant sur la page du modèle sur garnstudio.com © 1982-2026 DROPS Design A/S. Tous droits réservés. Ce document, y compris ces sous-sections, est protégé par les droits d'auteur (copyright). Apprenez-en davantage sur ce que vous pouvez faire avec nos modèles en bas de chacune des pages de notre site. |
|||||||||||||||||||||||||||||||||||||||||||||||||


Avec plus de 40 ans dans la conception de modèles tricot et crochet, DROPS Design offre l'une des plus vastes collections de modèles gratuits sur internet - traduits dans 17 langues. À ce jour, on compte 324 catalogues et 12290 modèles en français.
Nous nous efforçons de vous apporter le meilleur de ce que le tricot et le crochet peuvent vous offrir, inspiration et conseils mais également des fils de haute qualité à des prix incroyables! Vous souhaiteriez utiliser nos modèles autrement que pour un usage personnel? Vous pouvez lire ce que vous êtes autorisés à faire dans le Copyright en bas de page de chacun de nos modèles. Bon tricot!
Poster un commentaire sur le modèle DROPS 175-10
Nous aimerions connaître votre avis sur ce modèle !
Si vous souhaitez poser une question, merci de bien vouloir vérifier que vous avez choisi la bonne catégorie dans le formulaire ci-dessous afin d'accélérer la réponse. Les champs obligatoires sont indiqués par une *.