
Catégories populaires
Vous cherchez un fil?


Commentaires / Questions (56)
![]() Patrizia a écrit:
Patrizia a écrit:
Buonasera, non riesco a capire perché da 160 maglie si passa a lavorare su 80m + 2 cat. Dopo aver finito lo schema A2 mi potete spiegare meglio cosa devo fare per realizzare gli scaldi? Grazie mille. Patrizia
29.06.2023 - 00:47
![]() Aziza a écrit:
Aziza a écrit:
Hi, I finished A1 than went to A2 which completed the big round design on the last picture..how many times do I do A2..it says 7 repitions?.do i keep doing all the rows of A2 than go back to A1 starting at row 5?..this pattern not clear.. thank you
04.06.2023 - 10:30DROPS Design a répondu:
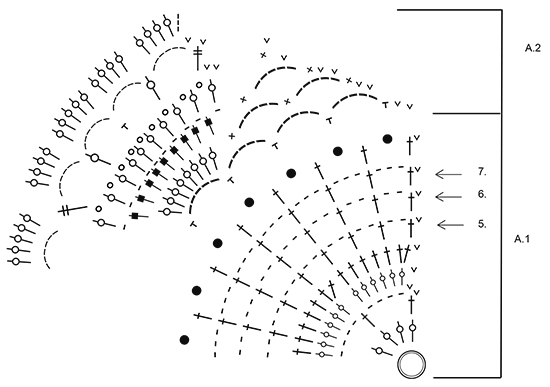
Dear Aziza, you have 7 repeats of A.2 on the round. That is, to work over all of the stitches of A.1 in the previous round, you need to repeat the first round of A.2 7 times in the same round. Continue working the chart. When you finish working A.2 once, work A.1 again, now starting on the 5th round of the chart (marked with an arrow). Happy crocheting!
04.06.2023 - 17:39
![]() Susan Richardson a écrit:
Susan Richardson a écrit:
Hello! Me again! Thanks for earlier reply, now clear regarding slip stitches at beginning of rounds. I am now nearly at :Work 7th Round 1-3-5 times, AT THE SAME TIME inc 2 tr evenly on every row, i.e. two times on every row. Is there a best place to put these increases? I assume NOT in the arm hole areas, as this would alter the stitches for the arms? Or it may not! This pattern is challenging me, but with your help I will finish it ! Thank you.
26.02.2023 - 14:35DROPS Design a répondu:
Dear Susan, as long as they are not adjacent/next to each other you can work the increases anywhere in the row, even in the armhole areas. Happy crocheting!
26.02.2023 - 23:55
![]() Susan Richardson a écrit:
Susan Richardson a écrit:
Thanks for answering my 1st question. I have now started this pattern & it is the first time I have used a diagram pattern. I can work out the stitches needed from the key, but am struggling with working out which stitches in the diagram are in which row at the beginning of the rows, mainly slip stitches in A2. Did row 3 of A2 OK, but when I started row 5 found I had got row 4 wrong 1 extra picot put in. Can you give me written instructions for rows 4 and 5, is start row 4 sl st, dc,sl st,tr?
22.02.2023 - 19:32DROPS Design a répondu:
Dear Mrs Richardson, the slip stitches at the beginning of A.2 helps at the beg of round to start on correct place - at the beg of row 4 start with 1 slip st in first ch-space, *1 dc around ch-space, then (1 tr, 1 picot) x 9, 1 tr = 9 picots (10 tr with 1 picot between each), then repeat from * all the round - you should have 7 repeats of A.2 in total. Finish 4th round with 1 slip st in the first dc, then sl st to the first picot (= 3 sl sts), and start with 1 tr (= 4ch) + 6 chains, etc... Happy crocheting!
23.02.2023 - 13:30
![]() Susan Richardson a écrit:
Susan Richardson a écrit:
I am using Bomull lin for this pattern. Checked & believe it is an equivalent weight yarn. I am crocheting tension squares to check tension. 1st square made with 5.5 mm hook gives measurement of 9cm wide x 13 cm high, 13tr x 8 rows. 2nd square with 5 mm hook gives measurement of 8cm wide x 12cm high , 13tr x 8 rows. So neither correct. I am unsure what to do. I f I use smaller hook, I will end up with an even narrower width, & maybe reach 11 cm height. My tension is not giving a Square!
18.02.2023 - 17:44DROPS Design a répondu:
Dear Susan, in these cases, it's more important the width (with the right amount of stitches) than the height (the amount of rows), since you could always work a few less rows, but it's more difficult to adjust the number of stitches. Therefore, you can work with a 5.5mm hook or even try if the width will match with a 6mm hook. Then, you will need to adjust the amount of rows to work (making rules of 3 of the length indicated for your size in a specific point in the pattern and the rows you have worked and have yet to work). Happy crocheting!
19.02.2023 - 19:27
![]() Denise a écrit:
Denise a écrit:
Looking at the picture, it looks like the last 2 rounds of A2 were not completed. According to the picture, the last round completed was the picot between dc around chain space. Am I correct?
23.09.2021 - 06:12DROPS Design a répondu:
Hi Denise, All the rounds in A.2 are completed. Happy crocheting!
28.09.2021 - 14:48
![]() Patricia P a écrit:
Patricia P a écrit:
Hello, What size is this pattern making? How do you adjust to make S or XXXL? Does the hook size determine the size of the finished jacket? Thank you!
10.04.2019 - 20:15DROPS Design a répondu:
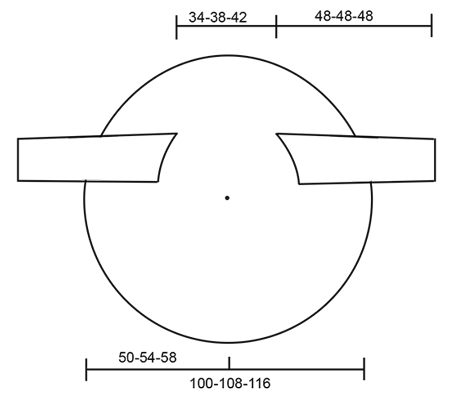
Dear Patricia, for the finished size, please refer to the scematics at the bottom of the pattern. And yes, the sice of the hook does change the size of the finished item (the crocheted fabric will be thighter and the piece will be smaller with a smaller hook, and it will be looser and bigger with a bigger hook). Happy Crafting!
11.04.2019 - 08:57
![]() Julia Kaufmann a écrit:
Julia Kaufmann a écrit:
Hallo! Ich würde diese Kreisjacke gerne mit einem Farbwechsel-Bobbel häkeln. Sind da 750 m Lauflänge (3-fädig, 150 g) ausreichend? Danke.
17.07.2018 - 07:59DROPS Design a répondu:
Liebe Frau Kaufmann, wir bitten um Verständnis, dass wir nicht Produkte unserer Konkurrenz empfehlen können und dass der Kauf des Materials uns hilft, weiterhin kostenlose Anleitungen zur Verfügung stellen zu können.
17.07.2018 - 09:28
![]() Gilda a écrit:
Gilda a écrit:
Salve, vorrei un chiarimento sul punto, dopo gli scalfi, non ho capito bene cosa si intende in verticale; mi viene da pensare che devo lavorare fin sopra gli scalfi, ma non lavorare il collo; qualcuno può aiutarmi per favore?
26.04.2018 - 13:59DROPS Design a répondu:
Buongiorno Gilda. Abbiamo corretto il testo. Deve ripetere il giro 7 il numero di volte indicato per la sua taglia. Buon lavoro!
26.04.2018 - 14:10
![]() Chou-coulate a écrit:
Chou-coulate a écrit:
Bonjour, Je viens de terminer le dernier rang de A2 et je ne comprends pas lorsqu'il est écrit " au dernier tour de A.2 diminuer 1 B = 160 B". Je dois effectuer des diminutions avant d'entamer la partie disant de reprendre A1 au 5eme rang ?
19.01.2018 - 16:17DROPS Design a répondu:
Bonjour Chou-coulate, au dernier rang de A.2, vous avez 23 brides dans chaque A.2 x 7 A.2 = 161 brides, diminuez 1 m (crochetez par ex 4 brides au lieu de 5 autour d'un arceau) pour que vous ayez bien 160 brides à la fin de A.2. Bon crochet!
22.01.2018 - 08:44
|
||||||||||||||||||||||||||||||||||
Evening Tide#eveningtidejacket |
||||||||||||||||||||||||||||||||||
 |
 |
|||||||||||||||||||||||||||||||||
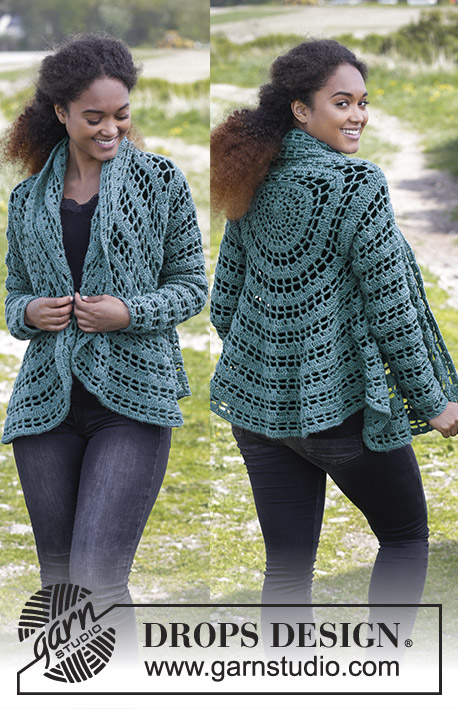
Gilet ajouré DROPS en rond, au crochet, en "Big Delight". Du S au XXXL.
DROPS 168-27 |
||||||||||||||||||||||||||||||||||
|
ROND MAGIQUE: Commencer avec cette technique permet d'éviter un trou au milieu: Tenir l'extrémité du fil avec la main gauche et faire une boucle autour de l'index gauche (de gauche à droite). Tenir la boucle avec le pouce et l'index gauche. Piquer le crochet dans la boucle, attraper le fil de pelote, ramener une boucle, faire 1 jeté et écouler le jeté dans la m sur le crochet = 1 ms, crocheter 3 ml, puis 15 B autour de la boule, terminer par 1 mc dans la 3ème ml = 16 B. Continuer comme expliqué ci-dessous – EN MÊME TEMPS, tirer l’extrémité du fil pour que le boucle se resserre et le trou disparaît. POINT FANTAISIE: Voir diagrammes A.1 et A.2. INFO CROCHET: Remplacer la 1ère B du début du tour par 3 ml. Terminer le tour par 1 mc dans la 3ème ml du début du tour. Remplacer la 1ère DB du tour par 4 ml. Terminer le tour par 1 mc dans la 4ème ml du début du tour. ---------------------------------------------------------- GILET AJOURÉ: Réaliser un ROND MAGIQUE – voir ci-dessus, avec le crochet 5.5 en Big Delight. Crocheter ensuite le diagramme A.1 - NOTE: Le 1er tour de A.1 est expliqué sous le rond magique, crocheter 4 fois A.1 en largeur. Les mc au début de A.1 se font seulement au début du tour. VOIR INFO CROCHET! PENSER À BIEN CONSERVER LA MÊME TENSION QUE POUR L'ÉCHANTILLON! Quand A.1 a été crocheté, continuer en suivant A.2, crocheter 7 fois A.2 en largeur, au dernier tour de A.2 diminuer 1 B = 160 B. Continuer en suivant A.1, mais commencer maintenant au 5ème - voir flèche. Crocheter 1-2-3 tours comme le 5ème tour de A.1 (= 80 B + 2 ml), crocheter ensuite les emmanchures ainsi: *1 B + 2 ml dans la 1ère B *, répéter de *-* sur les 20 premières B, crocheter 22-24-26 ml, sauter 10-11-12 B (= 1ère emmanchure), crocheter *1 B + 2 ml dans la B suivante*, répéter de *-* au-dessus des 40-38-36 B suivantes, crocheter 22-24-26 ml, sauter 10-11-12 B (= 2ème emmanchure), terminer par 1 mc au début du tour. Crocheter ensuite comme le 6ème tour du diagramme ainsi: 1 B + 2 ml dans chaque B jusqu'à la 1ère emmanchure, *crocheter 1 B + 2 ml autour de la chaînette*, répéter de *-* encore 10-11-12 fois, continuer avec 1 B + 2 ml jusqu'à la 2ème emmanchure, *1 B + 2 ml autour de la chaînette*, répéter de *-* encore 10-11-12 fois = 82 B espacées de 2 ml. Répéter ensuite 8-7-6 fois le 7ème tour. Crocheter encore 1-3-5 fois le 7ème tour, EN MÊME TEMPS, augmenter 2 B à intervalles réguliers tous les rangs, c'est-à-dire 2 fois tous les tours crocheter ainsi: 1 B + 3 ml + 1 B + 3 ml dans 1 B = 84-88-92 B espacées de 3 ml. L'ouvrage mesure environ 80-88-96 cm de diamètre (= 40-44-48 cm depuis le centre du cercle). Crocheter le dernier tour de A.1, puis continuer ensuite en suivant A.2 (= 21-22-23 fois en largeur). Arrêter. MANCHES: Se crochètent en rond de haut en bas, depuis les emmanchures. Crocheter 1 B + 2 ml dans chaque B sautée côté cercle, et 1 B + 2 ml en bas de chaque B de la chaînette = 21-23-25 B espacées de 2 ml. Placer 1 marqueur au milieu sous la manche. Continuer avec 1 B + 2 ml dans chaque B. À 4 cm, diminuer 1 B + 2 ml au milieu sous la manche ainsi: Crocheter la dernière B avant le marqueur mais ne pas faire le dernier jeté, crocheter la B suivante (ne pas crocheter les 2 ml), au dernier jeté, écouler les 3 boucles sur le crochet (= on a diminué 1 B + 2 ml). Diminuer encore 7 fois tous les 5 cm, alternativement avant et après le marqueur = 13-15-17 B espacées de 2 ml. Continuer jusqu'à ce que l'ouvrage mesure 48 cm pour toutes les tailles, arrêter. Crocheter la 2ème manche de la même façon. |
||||||||||||||||||||||||||||||||||
Légende diagramme(s) |
||||||||||||||||||||||||||||||||||
|
||||||||||||||||||||||||||||||||||
 |
||||||||||||||||||||||||||||||||||
 |
||||||||||||||||||||||||||||||||||
Vous avez terminé ce modèle?Alors taguez vos photos avec #dropspattern #eveningtidejacket ou bien présentez-les dans la galerie #dropsfan Vous avez besoin d'aide pour ce modèle ?Vous trouverez 8 tutoriels vidéo, une rubrique commentaires/questions et plus encore en vous rendant sur la page du modèle sur garnstudio.com © 1982-2026 DROPS Design A/S. Tous droits réservés. Ce document, y compris ces sous-sections, est protégé par les droits d'auteur (copyright). Apprenez-en davantage sur ce que vous pouvez faire avec nos modèles en bas de chacune des pages de notre site. |
||||||||||||||||||||||||||||||||||


Avec plus de 40 ans dans la conception de modèles tricot et crochet, DROPS Design offre l'une des plus vastes collections de modèles gratuits sur internet - traduits dans 17 langues. À ce jour, on compte 325 catalogues et 12298 modèles en français.
Nous nous efforçons de vous apporter le meilleur de ce que le tricot et le crochet peuvent vous offrir, inspiration et conseils mais également des fils de haute qualité à des prix incroyables! Vous souhaiteriez utiliser nos modèles autrement que pour un usage personnel? Vous pouvez lire ce que vous êtes autorisés à faire dans le Copyright en bas de page de chacun de nos modèles. Bon tricot!
Poster un commentaire sur le modèle DROPS 168-27
Nous aimerions connaître votre avis sur ce modèle !
Si vous souhaitez poser une question, merci de bien vouloir vérifier que vous avez choisi la bonne catégorie dans le formulaire ci-dessous afin d'accélérer la réponse. Les champs obligatoires sont indiqués par une *.