
Catégories populaires
Vous cherchez un fil?


Commentaires / Questions (69)
![]() KTY a écrit:
KTY a écrit:
Bonsoir, très joli modèle. Est-il possible de rallonger les manches de quelques centimètres sans avoir à recalculer? Merci pour votre réponse
23.03.2021 - 21:29DROPS Design a répondu:
Bonjour Kty, probablement, vous trouverez ici d'autres hauts tricotés en fils du groupe B, avec des longueurs de manches différentes; vous pourrez vous en inspirer pour trouver la longueur/la méthode qui vous convient. Bon tricot!
24.03.2021 - 07:52
![]() Louise Ojén a écrit:
Louise Ojén a écrit:
Jeg er lidt over halvvejs i bærestykket med A2. Og det går nu op for mig at mønsteret er skævt. I opskriften står der at jeg skal strikke 14 m ret, A2 osv. Men hvornår starter de 14 masker ret? For starter de altid lige efter raglan mærket så vil mønstret jo ikke ende midt på...? Hvordan sikrer jeg mig at mønstret bliver på midten af forstykket, når der i opskriften står jeg skal strikke 14 masker derefter A2 osv? Vh. Louise.
05.01.2020 - 21:54
![]() Eva a écrit:
Eva a écrit:
Dobrý den, prosím jak na to raglánové skosení při Velikosti XL. NEMOHU SE V TOM VYZNAT. Děkuji
30.06.2019 - 13:05DROPS Design a répondu:
Dobrý den, Evo, text návodu je upravený a přeformulovaný, podívejte se, prosím, na odstavec RAGLÁNOVÉ ZKOSENÍ a pak rozpis pro SEDLO - věřím, že teď bude postup srozumitelnější a jasnější. Příjemné letní pletení! Hana
01.07.2019 - 08:43
![]() Deb From Nova Scotia a écrit:
Deb From Nova Scotia a écrit:
I mad this sweater in Belle navy blue, hand washed with Eucalan delicate soap, blocked and let it dry. Love the yarn; drapes nicely & has a nice weight and shine to it. I like the fit of the sweater, but, like a few others, I find the neck too wide. I’m a fairly new knitter and don’t know what to do to make the neck opening smaller. What do you suggest? I’d like to make another sweater from this pattern. I’m guessing that I should cast on fewer stitches, and knit extra rows. Correct?
20.02.2019 - 02:58DROPS Design a répondu:
Dear Deb From Nova Scotia, this pattern has a quite large neck as shown in the picture. We are unfortunately not able to adapt every pattern to every single request but please contact your DROPS store - even per mail or telephone - for any individual assistance. Happy knitting!
20.02.2019 - 09:36
![]() Dk a écrit:
Dk a écrit:
Hello, I finished the a2 and done all the 17 raglan repetitions for size small. However, instead of finding 294 stitches I only have 286. Which actually makes sense since 17 repetitions times 8 stitches is actually 136, plus the previous 150 totals 286. Is this a mistake on the pattern? Thank you !
04.11.2018 - 17:19DROPS Design a répondu:
Dear Dk, you increase for the raglan a total of 18 times (= 17 more times = 18 times), so that you will have 150 sts + (8 sts inc x 18 times = 144)= 294 sts. Happy knitting!
05.11.2018 - 09:44
![]() Kathy Fae a écrit:
Kathy Fae a écrit:
Thank you for the help. Another question regarding A2 section. I’m making a large. I have 50 sts on that section. (Instructions were knit 49, knit 1, then place a marker) So I have 50. I’ll work raglan increase, 4 sts, knit 16, work chart, (17 sts), that’s a total of 37 sts that only leaves 13 sts until marker. The A2 design will not be centered on the chest. What am I doing wrong?
21.06.2018 - 18:19DROPS Design a répondu:
Dear Mrs Fae, A.2 should be centered over the 49 sts on front piece = K16, work A.2, K14, inc for raglan = YO, K1, YO, K1fb, K1 (= st with marker), K1fb, YO, K1, YO and continue working inc at each raglan, at the end of round you will work the increase on each side of first marker (= at the end of round + at the beg of next round). Happy knitting!
22.06.2018 - 07:54
![]() Kathy Fae a écrit:
Kathy Fae a écrit:
I’m unsure about A2 section. I’ve placed all my raglan markers. I’m making a Large. Is this correct: Row 1, work raglan increases (4 sts), knit 16, work row 1 of chart, then continue on with knit and regular increases to end. Row 2, knit all, twisted knit ay certain YOs. Row 3, work raglan increases, then knit 16 again, then row 3 of chart. I’m uncertain because the charted area moves over two stitches due to the two raglan increases. Am I doing this right?
21.06.2018 - 09:18DROPS Design a répondu:
Dear Mrs Fae, when you will work row 3 in A.2 you should line it up over the row 1 in A.2, ie over the same 17 sts as on row 1 (you can insert a marker before and after these 17 sts to mark where A.2 should be worked). The number of sts on each side of A.2 will increase due to the raglan increases. Happy knitting!
21.06.2018 - 15:24
![]() Julie a écrit:
Julie a écrit:
Right now i have 294 stitches when i separate the stitches for the sleeves and the front and back on my needles i will only have 162 stitches when it written that i should have 174 the extra 12 stitches is that what i'm adding to the sleeves and counts for the 174? where does a person put the stitch markers?
28.05.2018 - 02:53DROPS Design a répondu:
Dear Julie, the new markers will be inserted in the middle of the new 6 sts cast on under sleeve: 81 sts (= front piece), 6 sts (= 3 sts, 1 marker, 3 sts), 81 sts (= back piece), 6 sts (= 3 sts, 1 marker, 3 sts) = 174 sts (there are now 66 sts on each side on thread/st holders). Happy knitting!
28.05.2018 - 09:48
![]() Julie a écrit:
Julie a écrit:
Hi I have another question the A 2 design how many stitches are between the holes? I really don’t understand the directions so any kind of help you could give would be much appreciated
18.05.2018 - 05:39DROPS Design a répondu:
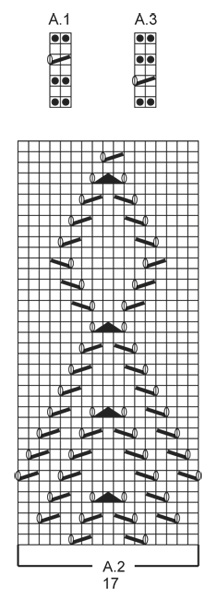
Dear Julie, diagram A.2 is showing the 17 sts you have to work on mid front. Start reading diagram from the bottom corner on the right side towards the left on every round. Inserting a marker at the beg and another marker at the end of A.2 to mark these 17 sts can help. Happy knitting!
18.05.2018 - 09:05
![]() Julie a écrit:
Julie a écrit:
Could you please explain to me on the yoke part of the pattern when i switch the needles to size 4 i increased the 16 stitches on the next round it says it wants to set 4 markers than i knitted the 45 stitches and knitted one more stitch and put the 2nd marker on this stitch is this stitch is to be the dividing stitch between front and the sleeve?jploog
17.05.2018 - 03:30DROPS Design a répondu:
Dear Julie, that's right the stitch with the 2nd marker is the st on raglan line between front and sleeve, the st with 3rd marker is between sleeve and back piece, the st with 4th marker is between back piece and sleeve (first st on round is the one between sleeve and front piece). Happy knitting!
17.05.2018 - 09:02
|
|||||||||||||||||||
Serene Spring |
|||||||||||||||||||
 |
 |
||||||||||||||||||
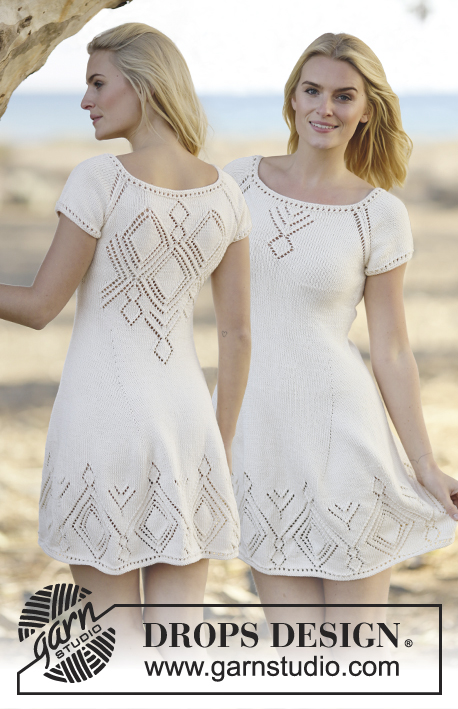
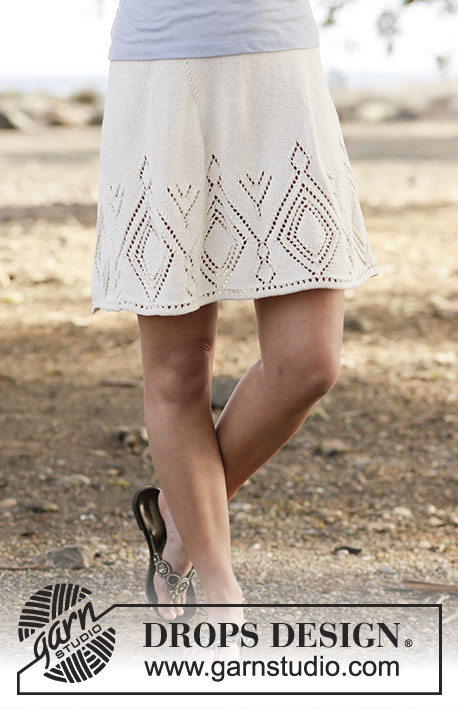
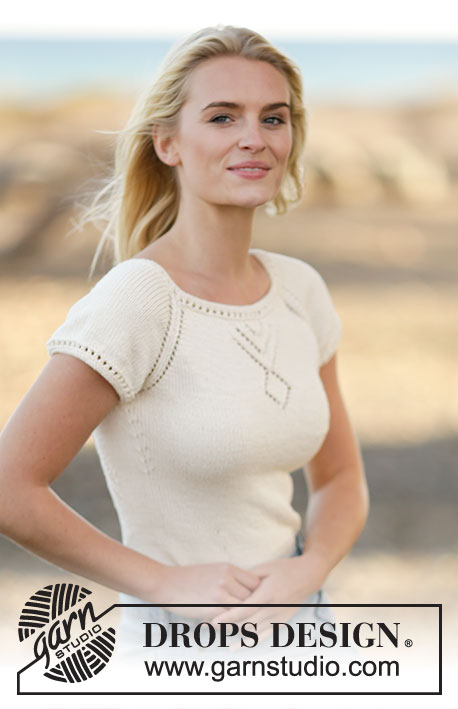
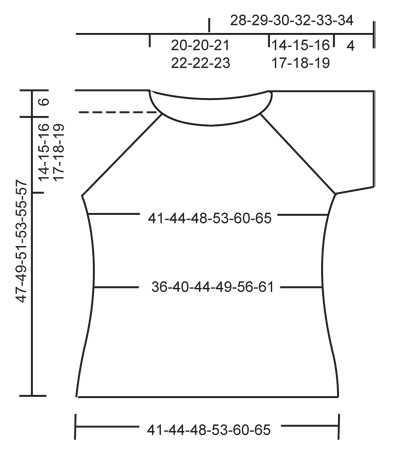
Top raglan ajouré DROPS, en ”Belle”. Se tricote de haut en bas (top down). Du S au XXXL.
DROPS Extra 0-1104 |
|||||||||||||||||||
|
POINT FANTAISIE: Voir les diagrammes A.1 à A.3. DIMINUTIONS: Diminuer 1 m avant le marqueur ainsi: Tricoter jusqu'à ce qu'il reste 2 m avant le marqueur, glisser 1 m à l'end, 1 m end, passer la m glissée par-dessus la m tricotée. Diminuer 1 m après le marqueur ainsi: 2 m ens à l'end. RAGLAN: On augmente différemment dans chaque taille pour le raglan: TAILLE S-M: Augmenter 1 m de chaque côté de à chaque marqueur (= 8 augmentations) ainsi: 1 jeté, 1 m torse à l'end, 1 m end (= m avec le marqueur), 1 m torse à l'end, 1 jeté. Ne pas tricoter les jetés torse au tour suivant, ils doivent former des jours, répéter ces augmentations encore 17-19 fois tous les 2 tours. NOTE: tricoter les augmentations de chaque côté du 1er marqueur (= dans la dernière maille du tour) ainsi: en début de tour: 1 m torse à l'end, 1 jeté. En fin de tour: 1 jeté, 1 m torse à l'end, 1 m end (= la m avec le marqueur). TAILLE L-XL-XXL-XXXL: Augmenter 2 m de chaque côté de chaque marqueur (= 16 augmentations au total) ainsi: 1 jeté, 1 m end, 1 jeté, 1 m torse à l'end, 1 m end (= m avec le marqueur), 1 m torse à l'end, 1 jeté, 1 m end, 1 jeté (tricoter le 1er et le dernier jeté torse à l'env au tour suivant, ils ne doivent pas faire de trous, mais tricoter les 2 jetés du milieu à l'envers, ils doivent former des jours), répéter ces augmentations encore 1-1-1-3 fois tous les 2 tours. NOTE: tricoter les augmentations de chaque côté du 1er marqueur (= dans la dernière m du tour) ainsi: en début de tour: 1 m torse à l'end, 1 m end, 1 jeté, 1 m end, 1 jeté. En fin de tour: 1 jeté, 1 m end, 1 jeté, 1 m torse à l'end, 1 m end (= m avec le marqueur). Augmenter ensuite 1 m de chaque côté de chaque marqueur (= 8 augmentations au total) ainsi: 1 jeté, 1 m torse à l'end, 1 m end (= m avec le marqueur), 1 m torse à l'end, 1 jeté. Ne pas tricoter les jetés torse à l'env au rang suivant, ils doivent former des jours. Répéter ces augmentations encore 19-20-22-21 fois tous les 2 tours. AUGMENTATIONS: Commencer 1 m avant le marqueur et augmenter ainsi: 1 jeté, 2 m end (le marqueur se trouve entre ces 2 m), 1 jeté. Au tour suivant, tricoter les jetés torse à l'end pour éviter les trous. ---------------------------------------------------------- TOP: Se tricote en rond sur aiguille circulaire, de haut en bas. EMPIÈCEMENT: Monter 134-134-140-144-144-148 m avec l'aiguille circulaire 3.5 en Belle. Tricoter A.1 (= 2 m) sur toutes les mailles. Quand A.1 a été tricoté 1 fois en hauteur, continuer avec l'aiguille circulaire 4, et, au tour suivant, tricoter toutes les mailles à l'end en répartissant 16-20-14-22-42-46 augmentations = 150-154-154-166-186-194 m. Au tour suivant, placer 4 marqueurs ainsi: Placer le 1er marqueur dans la dernière m du dernier tour, 45-47-49-55-65-71 m end (= devant), tricoter 1 m end et placer le 2ème marqueur dans cette m, 28-28-26-26-26-24 m end (= manche), tricoter 1 m end et placer le 3ème marqueur dans cette m, 45-47-49-55-65-71 m end (= dos), tricoter 1 m end et placer le 4ème marqueur dans cette m, 28-28-26-26-26-24 m end (= manche). PENSER À BIEN CONSERVER LA MÊME TENSION QUE POUR L'ÉCHANTILLON! Tricoter ensuite ainsi - EN MÊME TEMPS, augmenter pour le RAGLAN - voir ci-dessus. On tricote la moitié des augmentations du raglan au 1er marqueur (voir ci-dessus) Tricoter 14-15-16-19-24-27 m end, A.2 (= 17 m), tricoter à l'end jusqu'à ce qu'il reste 1-1-2-2-2-2 m avant le 2ème marqueur, tricoter le RAGLAN - voir ci-dessus, tricoter à l'end jusqu'à ce qu'il reste 1-1-2-2-2-2 m avant le 3ème marqueur, tricoter le raglan, tricoter à l'end jusqu'à ce qu'il reste 1-1-2-2-2-2 m avant le 4ème marqueur, tricoter le raglan, tricoter à l'end jusqu'à ce qu'il reste 1-1-2-2-2-2 m avant le 1er marqueur, tricoter le raglan. Tricoter les augmentations en jersey. Quand A.2 a été tricoté 1 fois en hauteur, tricoter toutes ces mailles en jersey. Quand toutes les augmentations sont faites, on a 294-314-338-358-394-426 m. L'ouvrage mesure environ 14-15-16-17-18-19 cm. Continuer en jersey ainsi: Tricoter les 81-87-95-103-117-129 premières m (= devant), glisser les 66-70-74-76-80-84 m suivantes sur un arrêt de mailles pour la manche, monter 6-6-6-8-8-8 m sous la manche (placer un marqueur au milieu des nouvelles m), tricoter les 81-87-95-103-117-129 m suivantes (= dos), glisser les 66-70-74-76-80-84 m suivantes sur un arrêt de mailles pour la manche, monter 6-6-6-8-8-8 m sous la manche (placer un marqueur au milieu des nouvelles m) = il reste 174-186-202-222-250-274 m. Placer 1 marqueur, MESURER MAINTENANT À PARTIR D'ICI. DOS & DEVANT: Continuer en jersey. À 3 cm, diminuer 1 m de chaque côté de chacun des marqueurs sur les côtés (= 4 diminutions) - VOIR DIMINUTIONS! Répéter ces diminutions encore 5-3-3-3-3-3 fois tous les 2½-4-4-4-4-4 cm = 150-170-186-206-234-258 m. À 20 cm dans toutes les tailles, augmenter 1 m de chaque côté de chacun des marqueurs sur les côtés (= 4 augmentations) - VOIR AUGMENTATIONS. Répéter ces augmentations encore 5-3-3-3-3-3 fois tous les 2-4-4-4-4-4 cm = 174-186-202-222-250-274 m. À 31-32-33-34-35-36 cm, continuer avec l'aiguille circulaire 3.5 et tricoter A.3 (= 2 m) sur toutes les mailles. Rabattre. MANCHES: Se tricotent en rond sur aiguilles doubles pointes. Reprendre les mailles en attente sur les aiguilles doubles pointes 4 et monter 6-6-6-8-8-8 m sous la manche = 72-76-80-84-88-92 m. Tricoter en jersey pendant 2 cm, au tour suivant, répartir 8 diminutions = 64-68-72-76-80-84 m. Changer pour les aiguilles doubles pointes 3,5 et tricoter A.3 sur toutes les mailles. Rabattre. Tricoter l'autre manche de la même façon. ASSEMBLAGE: Fermer l'ouverture sous les manches par une couture. |
|||||||||||||||||||
Légende diagramme(s) |
|||||||||||||||||||
|
|||||||||||||||||||
 |
|||||||||||||||||||
 |
|||||||||||||||||||
Vous avez terminé ce modèle?Alors taguez vos photos avec #dropspattern ou bien présentez-les dans la galerie #dropsfan Vous avez besoin d'aide pour ce modèle ?Vous trouverez 21 tutoriels vidéo, une rubrique commentaires/questions et plus encore en vous rendant sur la page du modèle sur garnstudio.com © 1982-2026 DROPS Design A/S. Tous droits réservés. Ce document, y compris ces sous-sections, est protégé par les droits d'auteur (copyright). Apprenez-en davantage sur ce que vous pouvez faire avec nos modèles en bas de chacune des pages de notre site. |
|||||||||||||||||||


Avec plus de 40 ans dans la conception de modèles tricot et crochet, DROPS Design offre l'une des plus vastes collections de modèles gratuits sur internet - traduits dans 17 langues. À ce jour, on compte 324 catalogues et 12290 modèles en français.
Nous nous efforçons de vous apporter le meilleur de ce que le tricot et le crochet peuvent vous offrir, inspiration et conseils mais également des fils de haute qualité à des prix incroyables! Vous souhaiteriez utiliser nos modèles autrement que pour un usage personnel? Vous pouvez lire ce que vous êtes autorisés à faire dans le Copyright en bas de page de chacun de nos modèles. Bon tricot!
Poster un commentaire sur le modèle DROPS Extra 0-1104
Nous aimerions connaître votre avis sur ce modèle !
Si vous souhaitez poser une question, merci de bien vouloir vérifier que vous avez choisi la bonne catégorie dans le formulaire ci-dessous afin d'accélérer la réponse. Les champs obligatoires sont indiqués par une *.