
Catégories populaires
Vous cherchez un fil?


Commentaires / Questions (107)
![]() Susanne Altenburg a écrit:
Susanne Altenburg a écrit:
Hallo hab mal eine Frage. Ich muss ja bei meiner Größe 74 lm für die Ärmel nehmen.aber die 12 luft maschen für die Verbindung zählen die dann später zu den 74 luftmachen ? Dann hätte ich ja wenn ich alles ein mal rum häkel dann ins gesamt 86 Stäbchen für die ärmel were es richtig? Gruß Frau Altenburg
22.02.2021 - 17:49DROPS Design a répondu:
Liebe Frau Altenburg, ja so stimmt es, und dann bei der 1. Runde bei den Ärmeln häkeln Sie noch 2 Stäbchen dazu und zwar jet 1 Stäbchen um das Stäbchen der Stäbchen Reihe an der Stelle, wo die Luftmaschen unter den Arm gehäkelt werden (-= also beidseitig, vor den 12 und nach den 12) = 86 + 2 = 88 Stäbchen. Viel Spaß beim häkeln!
23.02.2021 - 09:34
![]() Cloudy a écrit:
Cloudy a écrit:
Hi there I’m up to the finishing touch on the sleeve edge. It says for size L to do the A2 diagram 11 times but then it says to do it once vertically. Can you please explain which it is.
16.12.2020 - 05:11DROPS Design a répondu:
Dear Cloudy, you have 88 sts around sleeve edge and can repeat a total of 11 times the 8 stitches in A.2. After you have worked the 2 rows of A.2, diagram is finished (and has been worked one time in height = vertically). Edge is finished. Cut and fasten the yarn. Happy crocheting!
16.12.2020 - 07:10
![]() Erin a écrit:
Erin a écrit:
Hello! I am working on this in XXL and I am confused on the marker placement portion. I have (23+4+4+20+4+4+46+4+4+23+4+4=144) with each + being a marker, but I need 164 stitches? Any clarification provided would be much appreciated. Thank you!
15.10.2020 - 18:31DROPS Design a répondu:
Dear Erin, it looks like you have forgotten 20 one time after the 46+4+4, ie: 23+4+4+20 +4+4+ 46 + 4+4+20+4+4+23=164. Happy crocheting!
16.10.2020 - 08:54
![]() Cloudy a écrit:
Cloudy a écrit:
The garment on the model looks fitted coming in at the waist and flaring out towards the hem. Another reader said hers looks like a dress and so does mine. Very disappointed in this pattern.
09.10.2020 - 03:16DROPS Design a répondu:
Dear Cloudy, did you check and kept correct tension as explained in the pattern? remember to check your size with the measurement chart - read more about charts here. Happy crocheting!
09.10.2020 - 08:08
![]() Moira a écrit:
Moira a écrit:
One more thing that’s confusing. It says in A1 to work 1st-3rd rounds 40 times (XL) size and then 3rd round until work measures 33cm. It looks like the 1st round is only done once like a set up row, is that correct? If it is and the 3rd is repeated then why are there two instructions, to repeat 40 times and to repeat until work measures 33cm? One would assume that 1st and 3rd rounds are repeated 40 times just by the way it’s written.i must admit these patterns are not easy to work out.
08.10.2020 - 19:28DROPS Design a répondu:
Dear Moira, you repeat 40 times A.1 in the round in size XL (= the row with the arrow 1 to the row with the 3. on the right side) - then after these 3 rows have been worked, you repeat row 3 until piece measures 33 cm, then work row/repeat 4. in A.1 until piece measures 45 cm. Happy crocheting!
09.10.2020 - 07:39
![]() Moira a écrit:
Moira a écrit:
Hi there, the A1 diagram does not make any sense in your explanation to a previous knitter. According to your abbreviations, the first row is a sc, then skip 2 and 4 ch, but the next sc is not in any particular dc from the previous row, it is in the middle of two dc. I don’t understand that. Then row 2 (which doesn’t say it’s row 2) starts off with a dc in the chain space. Can you please clarify as your diagram and abbreviations are very confusing.
08.10.2020 - 17:44DROPS Design a répondu:
Dear Moira, you repeat the diagram in widht, ie (1 sc in next dc, 4 chains, skip 2 dc, 1 sc in next dc, 4 chains, skip 2 dc) and repeat from (to). Row 2 just starts wit 3 ch (see CROCHET INFO-1) ie crochet: 3 chains (= 1st dc), 3 dc+2ch+3dc in next ch-space, and repeat with 1 dc in next ch-space. If you like the first dc of 2nd row being in the middle of the first ch-space, you can crochet some sl st in the first ch-space. Happy crocheting!
09.10.2020 - 07:27
![]() Johanna a écrit:
Johanna a écrit:
Erg mooi patroon! Ik heb een vraag over de markeerders. Ik ben nu bij de toer gekomen waar ik aan elke kant van de markeerders moet meerderen, maar wat moet ik met de markeerders doen wanneer ik naar de volgende toer ga? Moet ik ze laten zitten en dan op dezelfde hoogte in de volgende goede kant weer meerderen, of neem ik ze steeds mee naar de volgende toer? ( het is de eerste keer dat ik een ronde pas haak...😅) Alvast bedankt!
29.09.2020 - 01:23DROPS Design a répondu:
Dag Johanna,
Je kunt de markeerders inderdaad laten zitten en meenemen in de hoogte, zodat je weet waar je de volgende keer moet meerderen.
21.10.2020 - 12:20
![]() Debbie Zaayman a écrit:
Debbie Zaayman a écrit:
I have started with this pattern and have started the first four rows of the fan pattern. Can i please give you my email address and then you can forward me your email address. I want to send you a picture so you can see if looks right before i continue. Currently it looks like a dress and dont know if it is suppose to look like that.\r
24.08.2020 - 16:44
![]() Debbie Zaayman a écrit:
Debbie Zaayman a écrit:
Can you please clarify for me with regrds to the first fan patter row..... do i understand it correctly: A1 the first row, is it three trebles in one chain, two chains(skip 2 chains) three treble in next chain and one treble in next chain
16.08.2020 - 16:46DROPS Design a répondu:
Dear Mrs Zaayman, start A.1 with 1 double crochet (= UK Engish), then 4 chains, skip 2 stitches, then repeat (1 dc in next st, 4 chains, skip 2 sts) around. on 2nd row work 3 ch (at the beg of round only to replace 1st treble), then crochet around next ch-space: 3 tr, 2 ch, 3 tr, and repeat (1 tr around next ch-space, 3tr +2 ch+3 tr around next ch-space). Happy crocheting!
17.08.2020 - 08:51
![]() Anna a écrit:
Anna a écrit:
Bei den Zunahmen vor und nach, bzw. dann nur noch vor dem Markier steht, dass diese in den Hinreihen gearbeitet werden. Ist hiermit tatsächlich nur jede zweite Reihe gemeint und die Rückreihen finden ohne Zunahmen statt?
20.07.2020 - 09:19DROPS Design a répondu:
Liebe Anna, wenn Sie in jede Hinreihe zunehmen sollen, dann nehmen Sie in jeder 2. Reihe, dh nur bei den Hinreihen, bei den Rückreihen werden Sie nicht zunehmen. Viel Spaß beim häkeln!
20.07.2020 - 10:01
|
||||||||||||||||||||||||||||
Lady Ascot#ladyascottop |
||||||||||||||||||||||||||||
 |
 |
|||||||||||||||||||||||||||
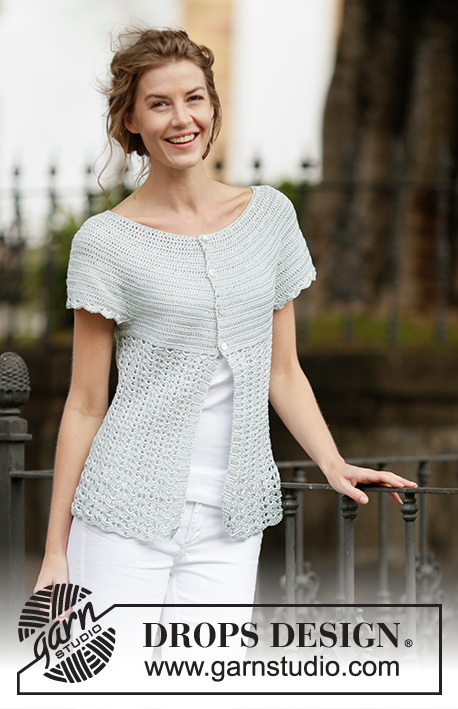
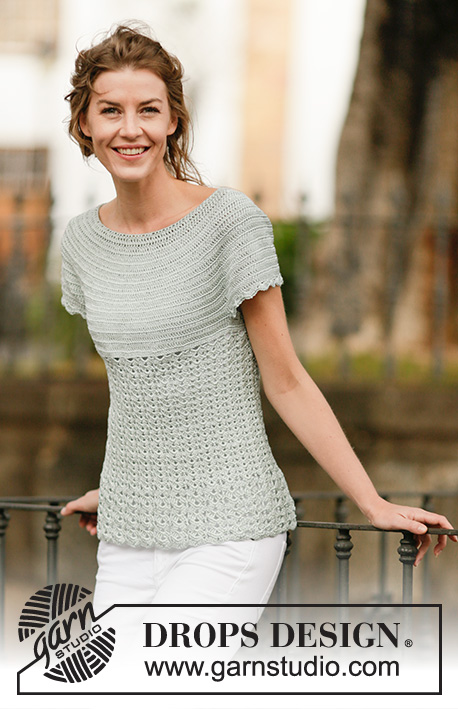
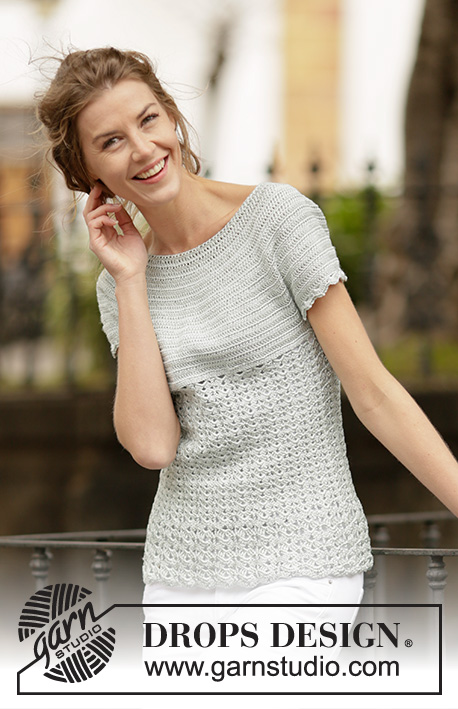
Top DROPS au crochet avec point d'éventails et empiècement arrondi, crocheté de haut en bas (top down), en ”Cotton Viscose”. Du S au XXXL.
DROPS 162-26 |
||||||||||||||||||||||||||||
|
POINT FANTAISIE: Voir diagrammes A.1-A.2. INFO CROCHET-1: Remplacer la 1ère B de chaque rang de B par 3 ml, terminer le rang par 1 mc dans la 3e ml. INFO CROCHET-2: Commencer tous les tours par 3 ml et terminer tour par 1 mc dans la 3e ml. AUGMENTATIONS: Pour augmenter 1 B, crocheter 2 B dans 1 B. ---------------------------------------------------------- TOP: Se crochète de haut en bas à partir du milieu dos. Monter une chaînette de 133-137-142-147-152-157 ml avec le crochet 3.5 en Cotton Viscose et joindre en rond avec 1 mc dans la 1ère ml. Crocheter le tour suivant ainsi: 3 ml (= 1 B), 1 B dans la 1ère ml du rond de ml, *sauter 1 ml, 1 B dans chacune des 5 ml suivantes*, répéter de *-* jusqu'à ce qu'il reste 0-4-3-2-1-0 ml, 1 B dans chacune des 0-4-3-2-1-0 dernières ml = 112-116-120-124-128-132 B. Continuer ensuite en allers et retours, en terminant chaque rang par 1 mc dans la 1ère ml du début du rang - VOIR INFO CROCHET-1. Tourner. Crocheter 1 rang de B (= 1 B dans chaque B), EN MÊME TEMPS, augmenter 28 B à intervalles réguliers (c'est-à-dire augmenter 1 B après environ tous les 4e B) – VOIR AUGMENTATIONS = 140-144-148-152-156-160 B. Placer 12 marqueurs ainsi: Crocheter 17-18-19-20-21-22 B (= demi-dos) EN MÊME TEMPS, augmenter 1-0-0-2-2-1 B à intervalles réguliers, placer le 1er marqueur, *crocheter 4 B, placer le marqueur suivant*, répéter de *-* encore 1 fois, crocheter 20 B, placer le marqueur suivant, *crocheter 4 B, placer le marqueur suivant*, répéter de *-* encore 1 fois, crocheter 34-36-38-40-42-44 B (= devant) EN MÊME TEMPS, augmenter 2-0-0-4-4-2 B à intervalles réguliers, placer le marqueur suivant, *crocheter 4 B, placer le marqueur suivant*, répéter de *-* encore 1 fois, crocheter 20 B, placer le marqueur suivant, *crocheter 4 B, placer le marqueur suivant*, répéter de *-* encore 1 fois, crocheter 17-18-19-20-21-22 B (= demi-dos) EN MÊME TEMPS, augmenter 1-0-0-2-2-1 B à intervalles réguliers = 144-144-148-160-164-164 B. PENSER À BIEN CONSERVER LA MÊME TENSION QUE POUR L'ÉCHANTILLON! Au rang suivant sur l'endroit, augmenter 1 B de chaque côté de chaque marqueur (= 24 B augmentées), répéter ces augmentations 1-4-5-7-8-10 fois au total tous les rangs sur l'endroit, puis augmenter avant chaque marqueur (= 12 B augmentées), répéter ces augmentations 9-6-6-4-4-3 fois au total tous les rangs sur l'endroit = 276-312-340-376-404-440 B. L'ouvrage mesure environ 18-18-20-20-22-23 cm. Crocheter le rang suivant ainsi: 36-43-48-54-59-66 B (= demi-dos), crocheter 12 ml (placer 1 marqueur au milieu de ces nouvelles ml = sous la manche), sauter 66-70-74-80-84-88 B du rang précédent (= manche), crocheter 72-86-96-108-118-132 B (= devant), 12 ml (placer 1 marqueur au milieu de ces nouvelles ml = sous la manche), sauter 66-70-74-80-84-88 B du rang précédent et crocheter 36-43-48-54-59-66 B (= demi-dos) = 168-196-216-240-260-288 B/ml (= 84-98-108-120-130-144 B/ml pour le dos et devant). Placer 1 marqueur. MESURER MAINTENANT L'OUVRAGE À PARTIR D'ICI! Crocheter 1 rang de B (= 1 B dans chaque B et 1 B dans chaque ml sous la manche), EN MÊME TEMPS, augmenter 18-8-6-0-10-6 B à intervalles réguliers = 186-204-222-240-270-294 B. Crocheter 1 rang de B et continuer maintenant en rond, mais sans tourner. POINT D'ÉVENTAILS: Crocheter 31-34-37-40-45-49 fois les tours 1 -3 de A.1 - VOIR INFO CROCHET-2. Répéter ensuite le 3e tour jusqu'à ce que l'ouvrage mesure environ 29-31-31-33-31-31 cm. Crocheter maintenant le 4e tour jusqu'à ce que l'ouvrage mesure environ 40-42-43-45-45-45 cm. Arrêter. BORDURE DES MANCHES: Commencer au milieu sous la manche ainsi: 1 ms dans la 6e des 12 ml de l'emmanchure, 3 ml (= 1 B), 1 B dans chacune des 6 ml suivantes, 1 B dans le rang de B où la chaînette de l'emmanchure a été crochetée, 1 B dans chacune des 66-70-74-80-84-88 B suivantes (= manche) EN MÊME TEMPS, augmenter 0-4-0-2-6-2 B à intervalles réguliers, 1 B dans le rang de B où la chaînette de l'emmanchure a été crochetée, 1 B dans chacune des 5 ml restant sous la manche = 80-88-88-96-104-104 B. Crocheter ensuite 10-11-11-12-13-13 fois A.2 au total. Arrêter quand A.2 a été crocheté 1 fois en hauteur. Crocheter l'autre bordure de manche de la même façon. |
||||||||||||||||||||||||||||
Légende diagramme(s) |
||||||||||||||||||||||||||||
|
||||||||||||||||||||||||||||
 |
||||||||||||||||||||||||||||
 |
||||||||||||||||||||||||||||
Vous avez terminé ce modèle?Alors taguez vos photos avec #dropspattern #ladyascottop ou bien présentez-les dans la galerie #dropsfan Vous avez besoin d'aide pour ce modèle ?Vous trouverez 13 tutoriels vidéo, une rubrique commentaires/questions et plus encore en vous rendant sur la page du modèle sur garnstudio.com © 1982-2026 DROPS Design A/S. Tous droits réservés. Ce document, y compris ces sous-sections, est protégé par les droits d'auteur (copyright). Apprenez-en davantage sur ce que vous pouvez faire avec nos modèles en bas de chacune des pages de notre site. |
||||||||||||||||||||||||||||


Avec plus de 40 ans dans la conception de modèles tricot et crochet, DROPS Design offre l'une des plus vastes collections de modèles gratuits sur internet - traduits dans 17 langues. À ce jour, on compte 324 catalogues et 12290 modèles en français.
Nous nous efforçons de vous apporter le meilleur de ce que le tricot et le crochet peuvent vous offrir, inspiration et conseils mais également des fils de haute qualité à des prix incroyables! Vous souhaiteriez utiliser nos modèles autrement que pour un usage personnel? Vous pouvez lire ce que vous êtes autorisés à faire dans le Copyright en bas de page de chacun de nos modèles. Bon tricot!
Poster un commentaire sur le modèle DROPS 162-26
Nous aimerions connaître votre avis sur ce modèle !
Si vous souhaitez poser une question, merci de bien vouloir vérifier que vous avez choisi la bonne catégorie dans le formulaire ci-dessous afin d'accélérer la réponse. Les champs obligatoires sont indiqués par une *.