
Catégories populaires
Vous cherchez un fil?


Commentaires / Questions (91)
![]() Knitting Well Done a écrit:
Knitting Well Done a écrit:
Hello , I don't understand how to centered the diagram even if I follow the lesson... do you have a video that show exactly what to do to center it and make the sleeve? Thank you 👱🏻♀️
13.03.2022 - 11:29
![]() Vale a écrit:
Vale a écrit:
I'm so sorry to have to ask again but I don't understand: how can I decrease every 2,5 cm if there's a pattern? With 2 tog decrease, it will be deformed the pattern motif... I'm so confused .. I'm referring to this "When A.2 has been worked, continue with A.3. NOTE: Adjust pattern so that the middle st in diagram (see arrow) is one of the 2 middle sts on sleeve, AT THE SAME TIME beg dec under sleeve - remember DECREASE TIP" The decrease tip mean to knit just 2 stitches together?
20.02.2022 - 00:33DROPS Design a répondu:
Dear Vale, if your tension is right in height, you should decrease approx. on every 7th round in size M = ca on every 2,5 cm; decrease as explained under DECREASE TIP , ie work until 3 sts remain before marker and decrease as shown in this video - the pattern will not match anymore at the transitions between rounds, that's just okay. Happy knitting!
21.02.2022 - 09:58
![]() Vale a écrit:
Vale a écrit:
I'm sorry to ask but: I don't understand how to decrease every 2,5 cm, if I have a pattern? If I decrease, the pattern will be deformed... also, what decrease I should do? (2 tog?) how? This is the pattern I'm referring: "When A.2 has been worked, continue with A.3. NOTE: Adjust pattern so that the middle st in diagram (see arrow) is one of the 2 middle sts on sleeve, AT THE SAME TIME beg dec under sleeve - remember DECREASE TIP" Thank you...seems difficult without a chart.
20.02.2022 - 00:29
![]() Vale a écrit:
Vale a écrit:
Sorry, I have problems again in the instructions " When A.2 has been worked, continue with A.3. NOTE: Adjust pattern so that the middle st in diagram (see arrow) is one of the 2 middle sts on sleeve, AT THE SAME TIME beg dec under sleeve - remember DECREASE TIP. Repeat dec every 3-2½-2½-2½-2½-2½ cm / 1 1/8"-7/8"-7/8"-7/8"-7/8"-7/8" 9-12-12" etc . I don't also understand how to adjust "pattern so that the middle st in diagram is one of the 2 middle". what mean? Please..help...
19.02.2022 - 15:30DROPS Design a répondu:
Dear Vale, this lesson will explain you how to center a diagram. Happy knitting!
21.02.2022 - 09:17
![]() Pattern a écrit:
Pattern a écrit:
Sorry again but I don't understand the previously answer, in your comment says "you should increase a total of 60 sts in size L and get so 228", but I don't know what increase of 60 stitches is it exactly? Thank you again....
01.02.2022 - 17:29DROPS Design a répondu:
Oops sorry, I mistyped, I meant you have 204 sts on the needle in size L - you now increase 24 sts evenly (this lesson explains how to increase evenly on a round), there are now 228 sts and you will repeat K2, P2 all the round - US-pattern will be edited asap. Happy knitting!
02.02.2022 - 07:34
![]() Patterns Difficult a écrit:
Patterns Difficult a écrit:
Hello, this pattern have a mistake in the Body instructions. Yesterday I had to try and try. I have 230 stitches and it says to "Continue to work rib as follows: * K 2, P 2 *, repeat from *-* until 2 sts remain, K 2. When rib has been worked for 4 cm / 1½'', bind off with K over K and P over P." But with 230 stitches, it will end with 2Kand start with 2K so I will have 4 K between the others 2k p2 2k p2 etc. What happened? Why 230 stitches?It's not an Even number to do ribbing...Thanks..
01.02.2022 - 12:22DROPS Design a répondu:
Hi, it looks like there is a mistake in the US-English pattern, you should increase a total of 60 sts in size L and get so 228 sts and work K2 P2 over these 228 sts (= 57 times (K2,P2). thanks for noticing. Happy knitting!
01.02.2022 - 16:13
![]() Karine a écrit:
Karine a écrit:
Koon L suurust. Siis kui on vaja kududa varrukale mustrit A4 (5silmust) on silmuseid 48 3 simust jääb üle kuidas neid kududa?
03.01.2022 - 19:49DROPS Design a répondu:
Tere Karine! Koo nii palju silmuseid mustrisse, kui mahub, ülejäänud nii, kuidas ilusam jääb. Head kudumist!
07.01.2022 - 21:55
![]() Val a écrit:
Val a écrit:
Sorry , I have to ask again, is it sure that decrease is "work until 3 sts remain before the marker this: K2 tog, K1, slip marker, K1, slip 1 as if to K, K1, psso, and work until 3 sts remain before next marker on the other side of the jumper and repeat the decrease.”" I see that in the psso passage, Should not be simply : slip marker, K1, slip 1 as if to K , and psso? Why K1 is repeated 2 times? the video tutorial says this only (not 2 times k2) : K1, slip 1 psso
14.12.2021 - 18:16DROPS Design a répondu:
Dear Val, when working body you will decrease a total of 4 stitches on the round (= 2 sts decreased at each marker) / when working sleeve you will decrease that way only 2 sts (only 1 marker, mid under sleeve). Happy knitting!
15.12.2021 - 08:25
![]() Val a écrit:
Val a écrit:
Sorry >
14.12.2021 - 18:13
![]() Val a écrit:
Val a écrit:
Hello,I was able to adjust everything.I'm now again the beginning of the round, before start the dec tip. So, I hope this time I 've understood well: So I have to: knit the first 12 stitches, but before reach the first stitch marker of the round, 3 stitches before, I have to “work until 3 sts remain before the marker, K2 tog, K1, slip marker, K1, slip 1 as if to K, K1, psso, and work until 3 sts remain before next marker on the other side of the jumper and repeat. Right? Thank you again!
14.12.2021 - 17:43DROPS Design a répondu:
Dear Val, looks right, I'm just wondering about the first 12 stitches, rounds were worked on yoke from mid back, so that you continue from mid back towards the side, and then work until 3 sts remain before 1st marker on the side and decrease etc.. But if you could find the sides of the jumper, it looks then fine, as the decreases are worked on each side (below sleeves). Happy knitting!
15.12.2021 - 07:55
|
||||||||||
Silver Stag#silverstagsweater |
||||||||||
 |
 |
|||||||||
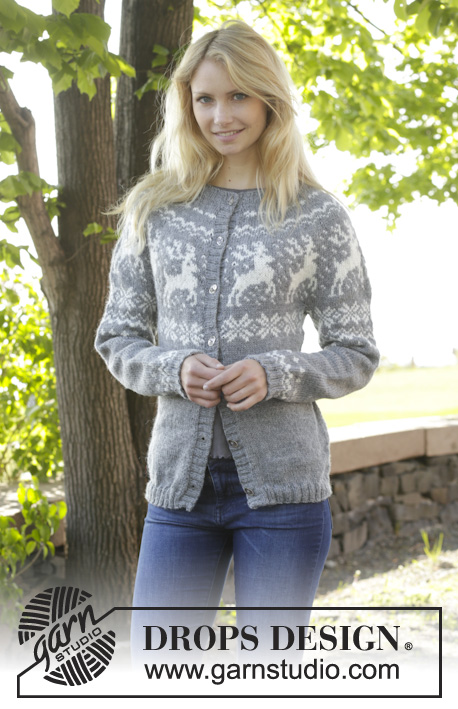
Pull de Noël DROPS avec empiècement arrondi, jacquard rennes, tricoté de haut en bas (ʺ top down ʺ), en ”Karisma”. Du S au XXXL.
DROPS 157-23 |
||||||||||
|
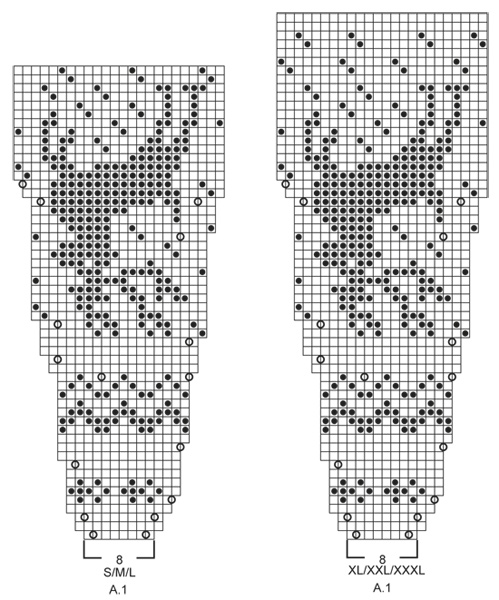
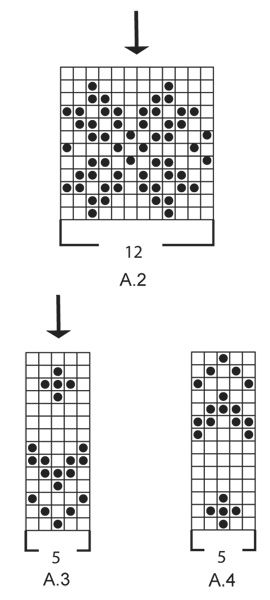
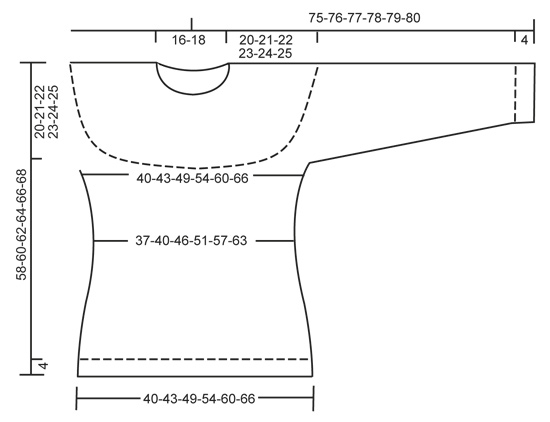
JACQUARD: Voir les diagrammes A.1 à A.4. Les diagrammes montrent tous les rangs du jacquard, vus sur l'endroit. Tricoter les diagrammes en jersey. DIMINUTIONS (côtés et manches): Diminuer avant le marqueur et 1 m end ainsi: 2 m ens à l'end. Diminuer après le marqueur et 1 m end ainsi: Glisser 1 m à l'end, 1 m end, passer la m glissée par-dessus la m tricotée. AUGMENTATIONS (côtés): Augmenter 4 m au total par tour. Tricoter jusqu'à ce qu'il reste 1 m avant le marqueur, 1 jeté, 2 m jersey, 1 jeté = 2 augmentations. Au tour suivant, tricoter le jeté torse à l'end (c'est-à-dire tricoter le brin arrière du jeté au lieu du brin avant) pour éviter les trous. ---------------------------------------------------------- PULL: Se tricote en rond sur aiguille circulaire, de haut en bas. Les manches se tricotent en rond sur aiguilles doubles pointes. EMPIÈCEMENT: Monter 88-92-96-100-104-108 m avec l'aiguille circulaire 3 en gris moyen et tricoter en côtes 2 m env/2 m end jusqu'à ce que l'ouvrage mesure 3 cm. Continuer maintenant avec l'aiguille circulaire 4 et tricoter 1 tour en jersey, EN MÊME TEMPS, répartir 0-4-8-20-24-28 augmentations = 88-96-104-120-128-136 m. Tricoter maintenant ainsi: 11-12-13-15-16-17 fois A.1 (= 8 m) en largeur. PENSER À BIEN CONSERVER LA MÊME TENSION QUE POUR L'ÉCHANTILLON! Quand A.1 a été tricoté 1 fois en hauteur, on a 264-288-312-360-384-408 m. Tricoter 3-5-9-5-7-11 tours jersey en gris moyen. NOTE: En taille S, L, XL, XXXL arrêter 24 m (= 1 fois le diagramme) avant la dernière m du tour, c'est désormais le début des tour suivants. Le motif est maintenant placé correctement quand les mailles sont réparties pour les manches, le dos et le devant. Tricoter le tour suivant ainsi: Tricoter les 37-40-46-52-58-64 m premières (= demi-dos), glisser les 58-64-64-76-76-76 m suivantes sur un arrêt de mailles (= manche), monter 10 m sous la manche, placer un marqueur au milieu de ces 10 m, tricoter les 74-80-92-104-116-128 m suivantes (= devant), glisser les 58-64-64-76-76-76 m suivantes sur un arrêt de mailles (= manche), monter 10 m sous la manche, placer un marqueur au milieu de ces 10 m, tricoter les 37-40-46-52-58-64 m restantes (= demi-dos). DOS & DEVANT: On a maintenant 168-180-204-228-252-276 m pour le dos et le devant. Tricoter maintenant A.2 (= 12 m) sur toutes les mailles. Continuer ainsi jusqu'à ce que A.2 a été tricoté 1 fois en hauteur. Continuer maintenant en jersey, en gris moyen. Au tour suivant, diminuer 1 m de chaque côté de chaque marqueur sur les côtés - voir DIMINUTIONS. Répéter ces diminutions encore 2 fois tous les 2 cm = 156-168-192-216-240-264 m. À 12-13-14-15-16-17 cm à partir du marqueur sous les manches, augmenter 1 m de chaque côté des marqueurs sur les côtés – voir AUGMENTATIONS. Répéter ces augmentations encore 2 fois tous les 2 cm = 168-180-204-228-252-276 m. À 56-58-60-62-64-66 cm de hauteur totale, continuer avec l'aiguille circulaire 3 et répartir 20-24-24-28-28-32 augmentations = 188-204-228-256-280-308 m. Continuer en côtes *2 m end, 2 m env*. Quand les côtes ont été tricotées pendant 4 cm, rabattre les mailles comme elles se présentent. MANCHES: Tricoter d'abord en jacquard, puis continuer en jersey, en gris moyen. Reprendre les mailles en attente sur les aiguilles doubles pointes 4. On a 58-64-64-76-76-76 m pour la manche. Tricoter 1 rang jersey et monter 10 m pour le dessous de la manche = 68-74-74-86-86-86 m. Placer un marqueur au milieu de ces nouvelles m. Tricoter ensuite en rond. Tricoter maintenant A.2. NOTE: Ajuster pour que les 2 m du milieu du diagramme (voir flèche) soient les 2 mailles au milieu sur la manche. Après A.2, tricoter A.3. NOTE: Ajuster pour que la m centrale du diagramme (voir flèche) soit l'une des 2 m au milieu sur la manche, EN MÊME TEMPS, commencer à diminuer sous la manche - voir DIMINUTIONS. Répéter ces diminutions encore 9-12-12-12-12-12 fois tous les 3-2½-2½-2½-2½-2½ cm = 48-48-48-60-60-60 m. Quand la manche mesure 38 cm, tricoter A.4. NOTE: Ajuster pour que la m centrale du diagramme (voir flèche) soit l'une des 2 m au milieu sur la manche. Après A.4, changer pour les aiguilles doubles pointes 3 et répartir 4-8-8-0-4-4 augmentations = 52-56-56-60-64-64 m. Continuer ensuite en côtes (= 2 m end/2 m env) pendant 3 cm. Rabattre les mailles comme elles se présentent. ASSEMBLAGE: Fermer l'ouverture sous les manches par une couture. |
||||||||||
Légende diagramme(s) |
||||||||||
|
||||||||||
 |
||||||||||
 |
||||||||||
 |
||||||||||
Vous avez terminé ce modèle?Alors taguez vos photos avec #dropspattern #silverstagsweater ou bien présentez-les dans la galerie #dropsfan Vous avez besoin d'aide pour ce modèle ?Vous trouverez 25 tutoriels vidéo, une rubrique commentaires/questions et plus encore en vous rendant sur la page du modèle sur garnstudio.com © 1982-2026 DROPS Design A/S. Tous droits réservés. Ce document, y compris ces sous-sections, est protégé par les droits d'auteur (copyright). Apprenez-en davantage sur ce que vous pouvez faire avec nos modèles en bas de chacune des pages de notre site. |
||||||||||


Avec plus de 40 ans dans la conception de modèles tricot et crochet, DROPS Design offre l'une des plus vastes collections de modèles gratuits sur internet - traduits dans 17 langues. À ce jour, on compte 324 catalogues et 12290 modèles en français.
Nous nous efforçons de vous apporter le meilleur de ce que le tricot et le crochet peuvent vous offrir, inspiration et conseils mais également des fils de haute qualité à des prix incroyables! Vous souhaiteriez utiliser nos modèles autrement que pour un usage personnel? Vous pouvez lire ce que vous êtes autorisés à faire dans le Copyright en bas de page de chacun de nos modèles. Bon tricot!
Poster un commentaire sur le modèle DROPS 157-23
Nous aimerions connaître votre avis sur ce modèle !
Si vous souhaitez poser une question, merci de bien vouloir vérifier que vous avez choisi la bonne catégorie dans le formulaire ci-dessous afin d'accélérer la réponse. Les champs obligatoires sont indiqués par une *.