
Catégories populaires
Vous cherchez un fil?


Commentaires / Questions (44)
![]() Dzana a écrit:
Dzana a écrit:
Hvordan settes hette sammen med halsdelen? Jeg finner ikke ut av det Mvh Dzana
18.11.2025 - 13:13DROPS Design a répondu:
Hei Dzana, Hetta og halsdelen er sydd sammen. Hilsen Drops team.
19.11.2025 - 07:16
![]() Victoria a écrit:
Victoria a écrit:
Jeg har nu strikket 58cm til skuldrene i str s/m og den er ikke i nærheden af at kunne nå rundt, ikke engang om brystet. Jeg bruger normalt str s/m. Det virker som om der nærmest skal strikkes dobbelt så meget mere for at det kan nå rundt. Hvordan kan det være?
02.08.2025 - 15:45DROPS Design a répondu:
Hei Victoria. Arbeidet vil strekke seg, men har du nok garn kan du strikke den litt lengre. mvh DROPS Design
25.08.2025 - 13:39
![]() Ivana a écrit:
Ivana a écrit:
Per lo scaldacollo non ci sono spiegazioni: quali le misure finali?
02.01.2024 - 13:51DROPS Design a répondu:
Buonasera Ivana, il modello è unico e le misure sono riportate nello schema in fondo alla pagina. Buon lavoro!
02.01.2024 - 19:29
![]() Laura a écrit:
Laura a écrit:
Non è specificato che nel 2 ferro dopo aver lavorato insieme m gettata e m passata segue 1 maglia a diritto Ferro 2: 1 m dir, * lavorare insieme a rov la m gettata e la m passata *, ripetere da *-* fino alla fine del ferro.
08.11.2021 - 12:10DROPS Design a répondu:
Buonasera Laura, abbiamo corretto il testo: grazie per la segnalazione. Buon lavoro!
10.11.2021 - 22:52
![]() Maria a écrit:
Maria a écrit:
La taille pour fille de 8 ans s.v.p. merci
02.11.2021 - 14:45DROPS Design a répondu:
Bonjour Maria, ce modèle n'est disponible que pour femme, retrouvez ici nos modèles capuche/cagoule enfant. Bon tricot!
03.11.2021 - 08:09
![]() Simone a écrit:
Simone a écrit:
Jeg er forvirret over størrelserne her - jeg har altid været en XS-S, nogle gange endda XXS. Men jeg synes at 29 cm fra skulder til skulder er meget kort, er det meningen? For jeg tvivler på at jeg kan passe den over skuldrene.
06.01.2021 - 15:13DROPS Design a répondu:
Hej Simone, jeg synes du skal prøve at måle arbejdet rundt om dine skuldre inden du lukker af, så ser du om du er nødt til at strikke nogle flere cm. God fornøjelse!
08.01.2021 - 10:38
![]() Elisa a écrit:
Elisa a écrit:
Buongiorno. Cosa si intende per "imbastire un filo" nella confezione del collo? A cosa serve il filo imbastito? Grazie
05.12.2020 - 09:22DROPS Design a répondu:
Buongiorno Elisa, per imbastire deve passare dentro e fuori il capo con un filo, le può essere di aiuto per la cucitura. Buon lavoro!
05.12.2020 - 20:24
![]() Gabrielle a écrit:
Gabrielle a écrit:
Me again... Even more confused. I was following the instruction written on the pattern ok. I watched the video on false english ribs and on the video, it is Row 1: 1 edge st in garter st, * K 1, 1 YO, slip 1 st as if to P (with yarn behind piece) *, repeat from *-* until 2 sts remain, finish with K 1 and 1 edge st in garter st. Would that be why I cannot make it go straight as it is a K instead of a P?
16.03.2020 - 08:39DROPS Design a répondu:
Dear Gabrielle, follow the pattern as explained, ie work on row 1: 1 edge st in garter st, * P 1, 1 YO, slip 1 st as if to P *, repeat from *-* until 1 st remains, finish with P 1, 1 edge st in garter stitch. Row 2: 1 edge stitch in garter stitch, K.1 * P tog YO and slipped st, K 1 *, repeat from *-* until the end of row, 1 edge stitch in garter stitch. Hope this can help, but it might be quite easier for your store to help you when seeing what you worked. Happy knitting!
16.03.2020 - 10:12
![]() Gabrielle a écrit:
Gabrielle a écrit:
What do you mean when talking about twisting the stitches? When I knit on the WS and purl together the yarn over and the slipped stitch, the slipped stitch comes first... Would that change anything?
16.03.2020 - 08:06
![]() Gabrielle a écrit:
Gabrielle a écrit:
It seems to me that I am following the pattern to the letter. I start and finish my row with a garter stich and follow the instructions for inbetween but one side of my work is 10 cm longer that the other side.
16.03.2020 - 07:59DROPS Design a répondu:
Dear Gabrielle, it's a bit tricky to answer you what's going on there, please show your work to your store (even per mail) so that they can see what might happen and help you further. Happy knitting!
16.03.2020 - 10:08
|
|||||||
Maid Marian#maidmarianbalaclava |
|||||||
|
|
|||||||
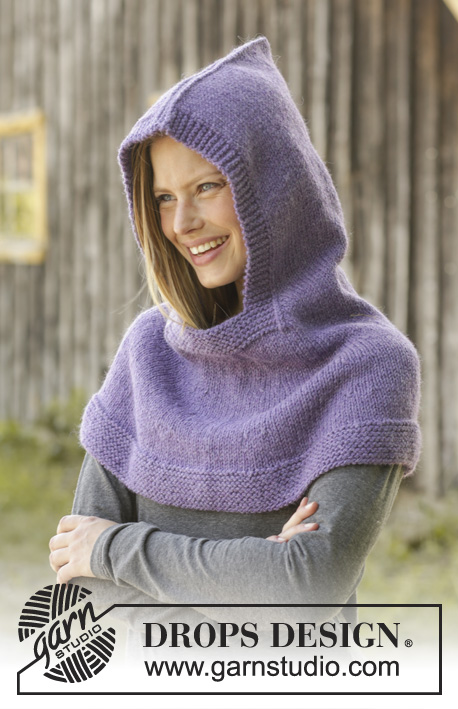
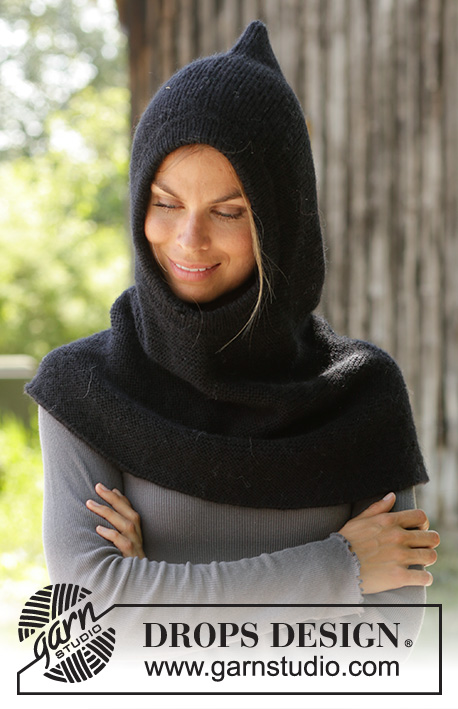
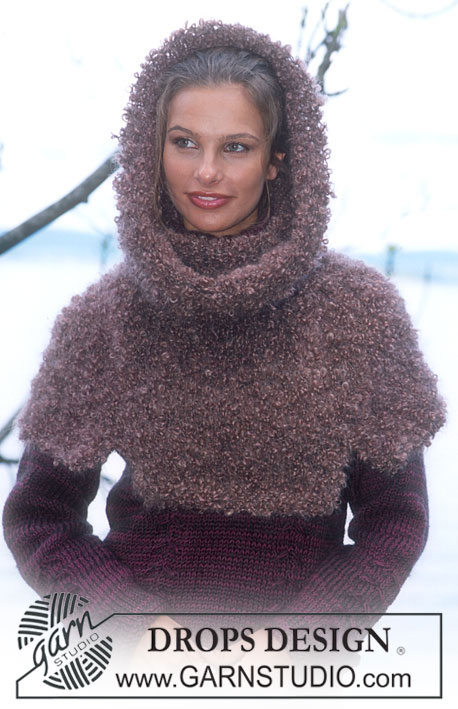
Tour de cou avec capuchon DROPS, en fausses côtes anglaises, avec 2 fils ”Brushed Alpaca Silk” tricotés ensemble.
DROPS 158-33 |
|||||||
|
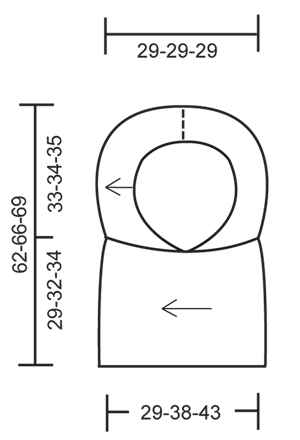
POINT MOUSSE (en allers et retours): Tricoter tous les rangs à l'endroit. 1 côte mousse = 2 rangs end. FAUSSES CÔTES ANGLAISES (en allers et retours): Rang 1: *1 m env, 1 jeté, glisser 1 m à l'env*, répéter de *-* jusqu'à ce qu'il reste 1 m, terminer par 1 m env. Rang 2: 1 m end *Tricoter ens à l'env le jeté et la m glissée, 1 m end*, répéter de *-* jusqu'à la fin du rang. Répéter les rangs 1 et 2. ---------------------------------------------------------- TOUR DE COU : Se tricote en 2 parties assemblées entre elles à la fin. CAPUCHE : Se tricote en allers et retours. Monter SOUPLEMENT 35-37-39 m (y compris 1 m lis de chaque côté) avec les aiguilles 9 et 2 fils Brushed Alpaca Silk tricotés ensemble. Tricoter 2 côtes au POINT MOUSSE - voir ci-dessus. Continuer ensuite en FAUSSES CÔTES ANGLAISES - voir ci-dessus – avec 1 m lis au point mousse de chaque côté - PENSER À BIEN CONSERVER LA MÊME TENSION QUE POUR L'ÉCHANTILLON. Quand l'ouvrage mesure 56-56-56 cm, tricoter 2 côtes mousse, rabattre SOUPLEMENT. TOUR DE COU : Se tricote en allers et retours. Monter SOUPLEMENT 31-33-35 m (y compris 1 m lis de chaque côté) avec les aiguilles 9 et 2 fils Brushed Alpaca Silk tricotés ensemble. Tricoter 1 rang env puis continuer en fausses côtes anglaises avec 1 m lis au point mousse de chaque côté - PENSER À BIEN CONSERVER LA MÊME TENSION QUE POUR L'ÉCHANTILLON. Quand l'ouvrage mesure 58-72-86 cm, tricoter 1 rang env et rabattre SOUPLEMENT. ASSEMBLAGE : Plier la capuche en double, et assembler une des longueurs, à partir du milieu devant jusqu'au milieu dos – voir schéma. Plier le tour de cou en double et coudre les petits côtés entre eux pour former un anneau. En taille L/XL et XXL/XXXL: passer 1 fil de faufilage le long de l'ouverture du tour de cou, retirer le fil après l'assemblage. Coudre la capuche au tour du cou (la couture du tour du cou doit être du côté opposé à l'ouverture de la capuche) à 1 m lis des bords. |
|||||||
Légende diagramme(s) |
|||||||
|
|||||||
 |
|||||||
Vous avez terminé ce modèle?Alors taguez vos photos avec #dropspattern #maidmarianbalaclava ou bien présentez-les dans la galerie #dropsfan Vous avez besoin d'aide pour ce modèle ?Vous trouverez 12 tutoriels vidéo, une rubrique commentaires/questions et plus encore en vous rendant sur la page du modèle sur garnstudio.com © 1982-2026 DROPS Design A/S. Tous droits réservés. Ce document, y compris ces sous-sections, est protégé par les droits d'auteur (copyright). Apprenez-en davantage sur ce que vous pouvez faire avec nos modèles en bas de chacune des pages de notre site. |
|||||||


Avec plus de 40 ans dans la conception de modèles tricot et crochet, DROPS Design offre l'une des plus vastes collections de modèles gratuits sur internet - traduits dans 17 langues. À ce jour, on compte 324 catalogues et 12290 modèles en français.
Nous nous efforçons de vous apporter le meilleur de ce que le tricot et le crochet peuvent vous offrir, inspiration et conseils mais également des fils de haute qualité à des prix incroyables! Vous souhaiteriez utiliser nos modèles autrement que pour un usage personnel? Vous pouvez lire ce que vous êtes autorisés à faire dans le Copyright en bas de page de chacun de nos modèles. Bon tricot!
Poster un commentaire sur le modèle DROPS 158-33
Nous aimerions connaître votre avis sur ce modèle !
Si vous souhaitez poser une question, merci de bien vouloir vérifier que vous avez choisi la bonne catégorie dans le formulaire ci-dessous afin d'accélérer la réponse. Les champs obligatoires sont indiqués par une *.