
Catégories populaires
Vous cherchez un fil?


Commentaires / Questions (208)
![]() Tanya a écrit:
Tanya a écrit:
Hi im struggleing to understand the dec for button holes and it says increase. Am i to understand this pattern works up to the neck or from bottom. Am i to read it as work to 10 cm then increase stitches across my 132 stitches then and dec at the same time
23.04.2026 - 20:32
![]() Tanya a écrit:
Tanya a écrit:
Hi im struggleing to understand the dec for button holes and it says increase. Am i to understand this pattern works up to the neck or from bottom. Am i to read it as work to 10 cm then increase stitches across my 132 stitches then and dec at the same time
23.04.2026 - 17:54DROPS Design a répondu:
Dear Tanya, piece is worked top down, from neck down to the bottom. You will increase evenly to get the requested width and at the same time work the buttonholes, first one after 2 cm, 2nd one after 10 cm (from cast on edge, ie 8 cm after the first buttonhole) and so on for your size, don't forget to increase evenly as stated in the pattern every 2 cm 5 times 9 sts, then every 4 cm 2 times 8 sts and finally 5 cm after last increase 7 sts one more time. Happy knitting!
24.04.2026 - 08:15
![]() Evelien Gout a écrit:
Evelien Gout a écrit:
Moet het voorpand niet smaller zijn dan het achterpand ? Het achterpand gaat over de schouders heen, en heeft, denk ik, meer steken nodig dan het voorpand. Of is het de bedoeling dat het een beetje asymmetrisch valt? Dank bij voorbaat voor uw antwoord.
31.05.2025 - 19:01DROPS Design a répondu:
Dag Evelien,
De splitten moeten op hetzelfde punt zitten, vandaar dat de steken voor het voor- en achterpand hetzelfde zijn vanaf dat punt.
01.06.2025 - 10:04
![]() Yvonne a écrit:
Yvonne a écrit:
This pattern has different number of stiches to cast on and increase in english version than the hungarian. I guess that there has been some mistake. It seems that the only version which has different numbers is the hungarian one. The number of stiches are the same in every other languages I checked.
11.04.2025 - 18:31DROPS Design a répondu:
Dear Yvonne, thank you for your note, the pattern has been corrected to the correct starting stitchnumber. Happy Knitting!
06.05.2025 - 13:00
![]() Christina Ström a écrit:
Christina Ström a écrit:
Är det ett stycke, eller stickar man två (fram och bak?)
24.03.2025 - 13:35DROPS Design a répondu:
Hei Christina. Ett stycke. Slik står det under fram - och bakstk: Arb stickas fram och tillbaka på rundst, från mitt fram. mvh DROPS Design
24.03.2025 - 13:53
![]() Ramona a écrit:
Ramona a écrit:
Buongiorno, vorrei sapere se questo modello si può fare anche il alpaca bouclé. Grazie
21.08.2024 - 14:17DROPS Design a répondu:
Buonasera Ramona, i due filati appartengono allo stesso gruppo, quindi se il suo campione corrisponde può seguire le indicazioni riportate. L'effetto finale sarò ovviamente diverso. Buon lavoro!
21.08.2024 - 19:27
![]() Cindylee a écrit:
Cindylee a écrit:
Pattern “First Date” where do I find measurements for each size? I am a 38” bust, is that a medium or large? Thanks!
27.09.2023 - 02:51DROPS Design a répondu:
Hi Cindylee, The measurements chart is at the bottom of the pattern. Happy crafting!
27.09.2023 - 06:54
![]() Andrea a écrit:
Andrea a écrit:
Kedves Válaszadó! Amit nem értek, az az, hogy a fotón úgy tűnik, hogy a poncsó derékrésze rásimul a modell derekára, ugyanakkor a leírás szerint nem kell összevarrni a derékrészt. Sajnos nincs hátulról készült fotó, hogy egyértelmű legyen számomra ez a rész. A második kérdésem pedig az, hogy ehhez a vastagságú fonalhoz valóban 7 mm-es tűt kell használni? Előre is köszönöm a választ. Üdvözlettel: Andrea
26.01.2023 - 18:46DROPS Design a répondu:
Kedves Andrea! A poncsót valóban nem kell összevarrni, csak a modell kéztartása miatt tűnik úgy, mintha a derekára simulna. A szokásosnál nagyobb tűt azért hazsnáljuk, mert így a kötött darabunk puha, lágy lesz. Mindig készítsen próbadarabot, a szem- és sorszámokat hasonlítsa össze a leírással, és ha szükséges, használjon kisebb vagy nagyobb kötőtűt. Sikeres kézimunkázást!
21.03.2023 - 18:07
![]() Nancy a écrit:
Nancy a écrit:
Do you have any comments in English? (I chose English for the pattern, but the comments are not translated)
06.01.2023 - 22:51DROPS Design a répondu:
Dear Nancy, the comments stay in the language they were published in, regardless of the version you are browsing. You could use a translation add-on or webpage to check other comments. Take into account that some mistakes or comments might only matter for the language of the original comment and not affect the version you are browsing. Happy knitting!
07.01.2023 - 18:15
![]() MARIE Anne CANTIN a écrit:
MARIE Anne CANTIN a écrit:
Bonjour je suis maintenant en Bretagne et plus à Lyon ... ce modèle est bien tricoté avec un seul fil ? Ma belle-fille se marie et veut un modèle très simple d'étole pour son mariage !
19.04.2022 - 00:17DROPS Design a répondu:
Bonjour Mme Cantin, tout à fait, vous tricotez ce modèle avec 1 seul fil DROPS Brushed Alpaca Silk - pensez à bien vérifier votre échantillon auparavant. Bon tricot!
19.04.2022 - 11:54
|
|
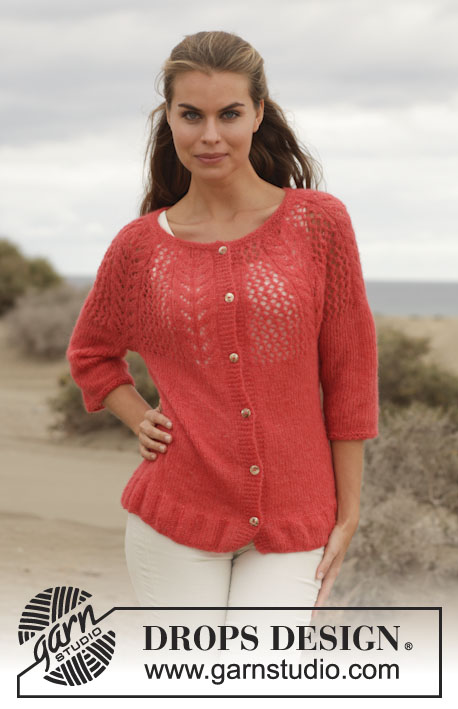
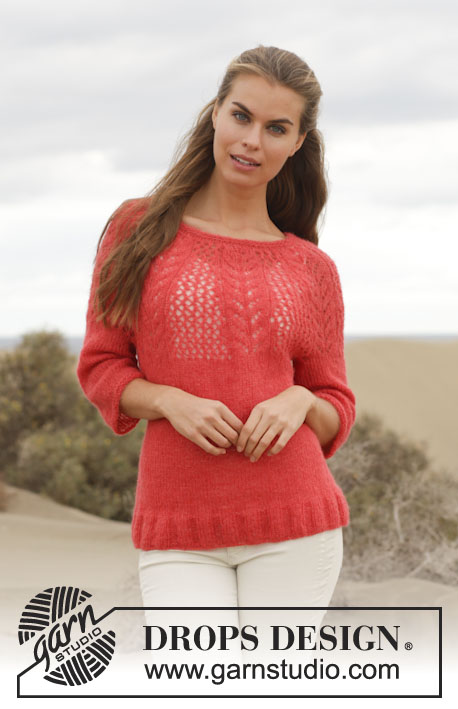
First date#firstdateponcho |
|
|
|
|
Poncho DROPS au point mousse avec fentes côtés, en ”Brushed Alpaca Silk”. Du S au XXXL.
DROPS 154-4 |
|
|
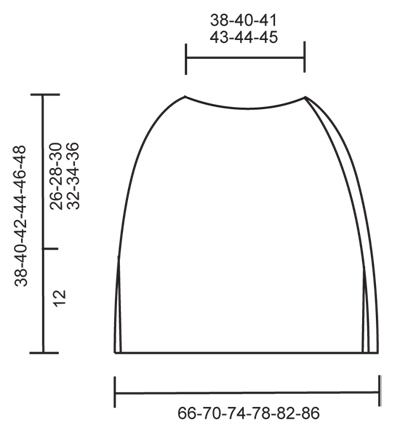
POINT MOUSSE (en allers et retours) : Tricoter tous les rangs à l'endroit. 1 côte mousse = 2 rangs end. AUGMENTATIONS: Pour augmenter 1 m, relever le fil entre 2 m du rang précédent - tricoter cette m torse à l'end, c'est-à-dire tricoter le brin arrière au lieu du brin avant pour éviter les trous. BOUTONNIÈRES: Ouvrir les boutonnières à droite de l'ouvrage, vu sur l'endroit. 1 boutonnière = tricoter ens à l'end la 3ème et la 4ème m à partir du bord et faire 1 jeté. Mesurer à partir de l'encolure et ouvrir les boutonnières à (en cm de hauteur totale): TAILLE S: 2, 10, 18 et 26 cm TAILLE M: 2, 10, 18 et 26 cm TAILLE L: 2, 10, 18 et 26 cm TAILLE XL: 2, 11, 20 et 29 cm TAILLE XXL: 2, 11, 20 et 29 cm TAILLE XXXL: 2, 11, 20 et 29 cm ---------------------------------------------------------- PONCHO : Se tricote en allers et retours sur aiguille circulaire, de haut en bas. Monter souplement 106-111-115-119-123-126 m en Brushed Alpaca Silk avec l'aiguille circulaire 7. Tricoter 1 côte au POINT MOUSSE - voir ci-dessus. Au rang suivant sur l'endroit, répartir 20-21-23-23-25-24 augmentations = 126-132-138-142-148-150 m - VOIR AUGMENTATIONS. Continuer en allers et retours au point mousse jusqu'à la fin. EN MÊME TEMPS, ouvrir les BOUTONNIÈRES et augmenter à intervalles réguliers ainsi: Augmenter 5-5-6-6-6-7 fois 8-9-10-10-10-10 m tous les 2 cm, puis 2 fois pour toutes les tailles 8-8-6-7-9-9 m tous les 4 cm et 1 fois 8-7-0-6-8-8 m après encore 5 cm (= 64-68-72-80-86-96 augmentations) = 190-200-210-222-234-246 m. Continuer jusqu'à ce que l'ouvrage mesure 26-28-30-32-34-36 cm de hauteur totale. Placer ensuite un marqueur pour la fente sur le côté, on doit avoir 95-100-105-111-117-123 m de chaque côté du marqueur. Terminer ensuite le devant et le dos séparément. DEVANT : Continuer en allers et retours au point mousse sur les 95-100-105-111-117-123 m du devant. Rabattre souplement toutes les mailles sur l'envers à 38-40-42-44-46-48 cm de hauteur totale. DOS : Tricoter comme pour le devant et rabattre souplement sur l'envers. ASSEMBLAGE : Rentrer tous les fils et coudre les boutons sur la bordure devant gauche, c'est-à-dire à gauche de l'ouvrage, vu sur l'endroit. |
|
 |
|
Vous avez terminé ce modèle?Alors taguez vos photos avec #dropspattern #firstdateponcho ou bien présentez-les dans la galerie #dropsfan Vous avez besoin d'aide pour ce modèle ?Vous trouverez 12 tutoriels vidéo, une rubrique commentaires/questions et plus encore en vous rendant sur la page du modèle sur garnstudio.com © 1982-2026 DROPS Design A/S. Tous droits réservés. Ce document, y compris ces sous-sections, est protégé par les droits d'auteur (copyright). Apprenez-en davantage sur ce que vous pouvez faire avec nos modèles en bas de chacune des pages de notre site. |


Avec plus de 40 ans dans la conception de modèles tricot et crochet, DROPS Design offre l'une des plus vastes collections de modèles gratuits sur internet - traduits dans 17 langues. À ce jour, on compte 324 catalogues et 12290 modèles en français.
Nous nous efforçons de vous apporter le meilleur de ce que le tricot et le crochet peuvent vous offrir, inspiration et conseils mais également des fils de haute qualité à des prix incroyables! Vous souhaiteriez utiliser nos modèles autrement que pour un usage personnel? Vous pouvez lire ce que vous êtes autorisés à faire dans le Copyright en bas de page de chacun de nos modèles. Bon tricot!
Poster un commentaire sur le modèle DROPS 154-4
Nous aimerions connaître votre avis sur ce modèle !
Si vous souhaitez poser une question, merci de bien vouloir vérifier que vous avez choisi la bonne catégorie dans le formulaire ci-dessous afin d'accélérer la réponse. Les champs obligatoires sont indiqués par une *.