
Catégories populaires
Vous cherchez un fil?


Commentaires / Questions (80)
![]() DROPS Design a écrit:
DROPS Design a écrit:
R2 : K1, *place yarn in front of work, slip next st as if to P, K tog yo + sl st from previous row (the yarn will wrap the right needle = yo)*, end with placing yarn in front of work, sl 1 as if to P, K1. R3: K1, *K tog yo + sl st from previous row, place yarn in front of work, slip next st as if to P (yarn will wrap the right needle)*, end with K tog yo and sl st, K1. Happy knitting!
10.01.2013 - 10:58
![]() DROPS Design a écrit:
DROPS Design a écrit:
This is how to work English ribs with yarn in the right hand and yos : R1 : K1, *K1, place yarn in front work, slip next st as if to P* (the yarn will wrap the right needle and you'll get the yo), end with K2. (set up row)
10.01.2013 - 10:58Renée a écrit:
I checked the video before I sent my first question to you & it's very confusing. Furthermore, it is not English/Fisherman's rib that's being knitted in the video. As previously stated, no k1b (knit 1 into stitch below) is being performed in the video, so I do not see how this is English/Fisherman's rib. Also, I knit in the English not continental style, so your videos can be hard to follow for English style knitters. Also, I do not see the function of the YO in English/Fisherman's rib?
10.01.2013 - 10:07DROPS Design a répondu:
Dear Renée, English ribs can be worked different ways, either with K1b, or with yos. We use that method with yos, and I'll explain you row after row in the comments. Hope it will help you ! Happy knitting !
10.01.2013 - 10:54Renée a écrit:
This pattern states English/Fisherman's rib. These are 2 different types of knitting that use p1, k1 and k1b stitches in different alternating formats. This pattern does not resemble either of these and does not use the classic k1b stitch which forms both English and Fisherman's rib. Can you please explain what type of stitch you are advocating here and why it does not include the k1b stitch? Thank you!
09.01.2013 - 16:52DROPS Design a répondu:
Dear Renée, there is a video linked at the very bottom of the pattern explaining how to work this kind of English rib. It should help you to figure out how to work this pattern. Happy Knitting !
09.01.2013 - 17:50Renée a écrit:
On row 1 of the pattern it states: 1 garter stitch. I am assuming this mean to do 1 knit stitch, as garter stitch is not an actual type of stitch but a type of knitting composed of only knit stitches. Your patterns though quite creative and beautiful are unfortunately very vague and often quite poorly translated into English and consequentially often difficult to follow. Therefore, clarification would be greatly appreciated. Thank you.
09.01.2013 - 16:21DROPS Design a répondu:
Dear Renée, 1 garter st means actually K1 from RS and from WS. Please have a look on the video linked if it can help. Happy knitting !
09.01.2013 - 17:42
![]() Caro-H a écrit:
Caro-H a écrit:
P.S.: Das Patentmuster kommt wunderbar fluffig raus, ist nur insgesamt zu eng. Werde es mit ein paar Maschen mehr versuchen.
04.01.2013 - 13:29
![]() Caro-H a écrit:
Caro-H a écrit:
...nein, nicht rundgestrickt. Anschlag auf 2 Nadeln Nr. 3. Keine Ahnung warum das bei mir nicht richtig rauskommt. Aber danke für deine Mühe.
04.01.2013 - 13:00
![]() Marion a écrit:
Marion a écrit:
Caro,hast du das doch rundgestrickt? Da würde das Muster nicht fluffig rauskommen u.nicht stimmen. Habs eben ausprobiert---Anschlag auf 2 Nadeln?
03.01.2013 - 13:48
![]() Caro-H a écrit:
Caro-H a écrit:
Danke Marion! Bei mir hat das Bündchen - ungedehnt - leider nur 30cm und der Patentteil ca. 46cm. Werde ich wohl noch mal aufmachen müssen, sitzt sehr stramm. Ich versteh trotzdem nicht, warum die Maschenprobe bei mir ok war...
03.01.2013 - 12:25
![]() Caro-H a écrit:
Caro-H a écrit:
Danke für die rasche Info, dann werde ich erst mal weitermachen, obwohl ein Rest Skepsis bleibt, optisch und rechnerisch: Bei 21M=10cm lande ich mit 95M nur bei 45cm und in der Anleitung für das Modell Nr. U-605 (das ich mir zunächst ausgesucht hatte) schlägt man immerhin bei gleicher Maschenprobe 117-129M an. Ziehen sich die Muster so verschieden in die Breite?
02.01.2013 - 19:14DROPS Design a répondu:
Liebe Caro, da haben Sie natürlich recht! Dennoch dehnt sich das Patentmuster enorm und die Maschenprobe wird ungedehnt gemessen. Ich habe diese Mütze selbst schon nachgearbeitet und sie sitzt sehr gut – das Bündchen liegt an und der obere Teil hat Volumen durch das Patentmuster.
03.01.2013 - 10:35
|
|
Cathrine#cathrinehat |
|
|
|
|
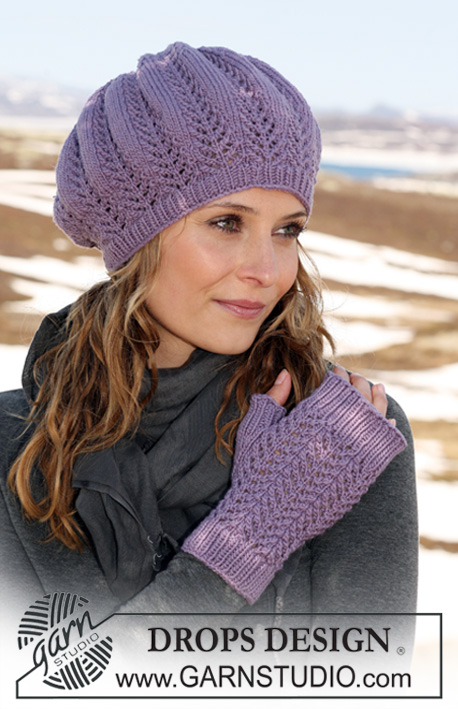
Bonnet DROPS rayé tricoté en côtes anglaises en « Karisma » ou ♥ You #3.
DROPS 114-30 |
|
|
POINT MOUSSE (en allers retours) : Tricoter tous les rangs à l'endroit CÔTES ANGLAISES (en allers retours) : Rang 1 : 1 m point mousse, *1 m end, 1 jeté, glisser la m suiv à l'env *, répéter de *à* jusqu'à ce qu'il reste 2 m, 1 m end, 1 m au point mousse. Rang 2 : 1 m point mousse, *1 jeté, glisser la m suiv à l'env, tricoter ens à l'end le jeté et la m glissée *, répéter de *à* jusqu'à ce qu'il reste 2 m, terminer par 1 jeté, glisser 1 m à l'end, 1 m point mousse. Rang 3 : 1 m point mousse, *tricoter ens à l'end le jeté et la m glissée, 1 jeté, glisser la m suiv à l'env *, répéter de *à* jusqu'à ce qu'il reste 3 m, tricoter ens à l'end le jeté et la m glissée, 1 m point mousse. Répéter les rangs 2 et 3 . ------------------------------------------------------------- ------------------------------------------------------------- BONNET : Se tricote en allers retours sur l'aiguille circulaire. Avec le fil Karisma beige mix et l'aiguille circulaire 3 monter 89-95 m. Tricoter 1 rang env sur l'envers et continuer ainsi sur l'endroit : 1 m POINT MOUSSE – voir ci-dessus – , côtes 1 m end / 1 m env jusqu'à ce qu'il reste 2 m, terminer par 1 m end, 1 m point mousse. À 3 cm de hauteur de côtes, changer pour le fil écru. À 6 cm de côtes (ajuster après un rang sur l'envers), continuer avec l'aiguille circulaire 4 et le fil beige mix. Continuer en CÔTES ANGLAISES – voir ci-dessus – au rang suivant sur l'endroit, EN MÊME TEMPS, changer de couleur tous les 3 cm jusqu'à la fin (ajuster pour changer de couleur sur l'endroit); PENSER À BIEN CONSERVER LA MÊME TENSION QUE POUR L'ÉCHANTILLON ! À 24 cm de hauteur totale (ajuster après une rayure), changer de couleur, EN MÊME TEMPS, continuer en côtes 1 m end/ 1 m env avec 1 m point mousse de chaque côté. Continuer en côtes pendant 3 cm. Tricoter ensuite 1 rang jersey dans la même couleur, EN MÊME TEMPS, tricoter toutes les mailles ensemble 2 par 2 à l'endroit tout le rang. Le bonnet mesure environ 28 cm de hauteur totale. Couper le fil et le passer dans les mailles restantes, et faire la couture du bonnet, bord à bord. |
|
Vous avez terminé ce modèle?Alors taguez vos photos avec #dropspattern #cathrinehat ou bien présentez-les dans la galerie #dropsfan Vous avez besoin d'aide pour ce modèle ?Vous trouverez 11 tutoriels vidéo, une rubrique commentaires/questions et plus encore en vous rendant sur la page du modèle sur garnstudio.com © 1982-2026 DROPS Design A/S. Tous droits réservés. Ce document, y compris ces sous-sections, est protégé par les droits d'auteur (copyright). Apprenez-en davantage sur ce que vous pouvez faire avec nos modèles en bas de chacune des pages de notre site. |


Avec plus de 40 ans dans la conception de modèles tricot et crochet, DROPS Design offre l'une des plus vastes collections de modèles gratuits sur internet - traduits dans 17 langues. À ce jour, on compte 324 catalogues et 12290 modèles en français.
Nous nous efforçons de vous apporter le meilleur de ce que le tricot et le crochet peuvent vous offrir, inspiration et conseils mais également des fils de haute qualité à des prix incroyables! Vous souhaiteriez utiliser nos modèles autrement que pour un usage personnel? Vous pouvez lire ce que vous êtes autorisés à faire dans le Copyright en bas de page de chacun de nos modèles. Bon tricot!
Poster un commentaire sur le modèle DROPS 114-30
Nous aimerions connaître votre avis sur ce modèle !
Si vous souhaitez poser une question, merci de bien vouloir vérifier que vous avez choisi la bonne catégorie dans le formulaire ci-dessous afin d'accélérer la réponse. Les champs obligatoires sont indiqués par une *.