
Catégories populaires
Vous cherchez un fil?


Commentaires / Questions (238)
![]() Andrea a écrit:
Andrea a écrit:
Hallo, eine Frage: Wenn ich mit den verkürzten Reihen fertig bin, muss ich dann direkt wieder über alle 124M (Gr.xxl) stricken, oder nach dem selben Schema wie beim verkürzen die Reihen wieder verlängern? LG
23.02.2026 - 16:37DROPS Design a répondu:
Liebe Andrea, Sie beginnen erneut mit den verkürzten Reihen (die ersten 2 Runden stricken Sie über alle Maschen) , um den Kreis weiter zu erweitern. Viel Spaß beim Stricken!
24.02.2026 - 09:02
![]() Lotta a écrit:
Lotta a écrit:
Äh glöm min fråga, repar upp & använder ett för mig mer begripligt mönster.
27.11.2025 - 17:23
![]() Lotta a écrit:
Lotta a écrit:
Hej igen! Storlek XL/XXL totalt antal maskor 124 st och märktråden sitter på maska 73. Just nu är stickningen bananformad, maska 73 sitter närmare innercirkeln och fattar att det är från den jag ska mäta. Men hur ska jag mäta, mot vad? Ska fortsätta med att minska med 8 maskor för första gången. Vi hörs!
25.11.2025 - 16:04DROPS Design a répondu:
Hei Lotta. Da har vi "glemt" ditt spørsmål og ønsker deg lykke til på ditt neste prosjekt :) mvh DROPS Design
01.12.2025 - 11:27
![]() Lotta a écrit:
Lotta a écrit:
Begriper inte hur jag ska mäta från märktråden för ärmhål!? Skickar gärna en bild men det går ju inte i detta formulär. Kontakta gärna mig via e-post. Tack på förhand!
24.11.2025 - 18:29DROPS Design a répondu:
Hej Lotta, skriv hvilken størrelse du strikker. Skriv hvor mange masker og cm du har og skriv den sætning du ikke forstår, så skal vi prøve at hjælpe dig her :)
25.11.2025 - 13:58
![]() Lisa a écrit:
Lisa a écrit:
Hi, Just trying to clarify; on the second row, do I leave 2 stitches on needle and turn, work 14 stitches then turn and work 16 stitches? Then repeat row 1 and do I leave 4 stitches unworked or just 2 again?
11.11.2025 - 19:16
![]() Lisa a écrit:
Lisa a écrit:
Pattern instructions far too difficult. I love the jacket and I love a challenge but this? What happened to row 1 all the way through to last row with specific instructions such as ask or dec or s1k1. Etc? I give up😞
27.07.2025 - 20:09
![]() Lisa a écrit:
Lisa a écrit:
So, am I leaving the the uncorked stitches on the needle or just not knitting them?
27.07.2025 - 19:38DROPS Design a répondu:
Dear Lisa, work the first 2 rows over all 112 stitches. In the 3rd row work only over the first 16 sts of the row. Now, start working the next row over all stitches but turn when you have worked 110 stitches. Work the next row back over all stitches, but turn when you have worked 108; so you work 2 less stitches on each side. Repeat rows 3 and 4 exactly as before. Continue working 2 less stitches on each side on the "long" rows 9 more times, then 4 less stitches 9 times and 8 less stitches 5 times. The stitches are simply left unworked until we "start at the beginning" the short rows technique. Happy knitting!
27.07.2025 - 20:36
![]() Lisa a écrit:
Lisa a écrit:
Where do I start the pattern? At the top of page or where it says circle? Also, what does it mean under the short row section to start again from beginning over all stitches? How many sections is this piece? I’m reading cast on 112 sts. Twice and under short row section start over from beginning? So, cast on another 112sts?
27.07.2025 - 19:06DROPS Design a répondu:
Dear Lisa, yes, the written instructions start at "Circle"; all of the instructions above are tips for when you are crochetting. In the short rows you work by turning the piece (but not decreasing) in order to get the correct circle shape. After reaching the remaining 18-16-20-20 outermost sts of circle, you will now work over all stitches again (not the pattern from the beginning); they were not decreased, just left behind. You work a single circle: you cast on 112 stitches, over which you will work the chart and short rows. Then you work the armholes, and continue working the other half-circle on the other side. Then you work the sleeves. Happy knitting!
27.07.2025 - 19:25
![]() Lisa a écrit:
Lisa a écrit:
Is there a row by row instruction for this pattern (ie, row 1, row 2 etc)? I find this really confusing
27.07.2025 - 15:44DROPS Design a répondu:
Dear Lisa, this is the only version of the pattern available, with both charts and written instructions. If you have any doubts as you read and work the pattern you can write us a comment here and we will try to answer all of your questions as clearly as possible. Happy knitting!
27.07.2025 - 18:59
![]() Patricia Alexandra Caruso Reis a écrit:
Patricia Alexandra Caruso Reis a écrit:
Caros, os diagramas M1 já não estão nítidos. Existe alguma nova versão desses diagramas que possam ser melhor vistos? Está tudo opaco, talvez pelo tempo. Grata
07.06.2024 - 03:36DROPS Design a répondu:
Bom dia, Vamos comunicar à equipa de web design. Obrigado!
07.06.2024 - 09:17
|
||||||||||||||||
Blue Moon |
||||||||||||||||
 |
 |
|||||||||||||||
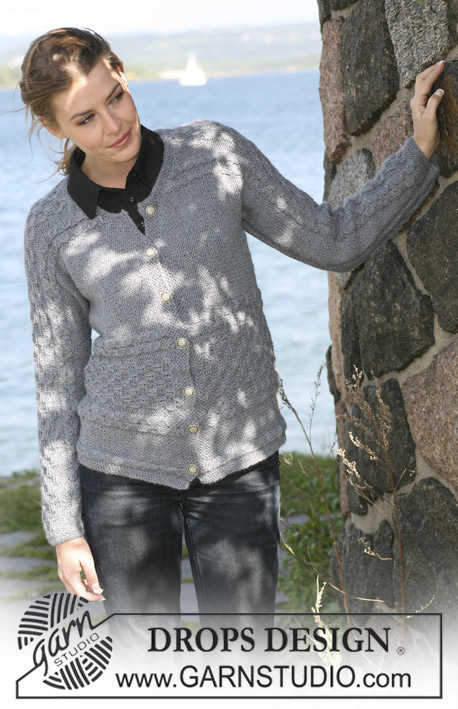
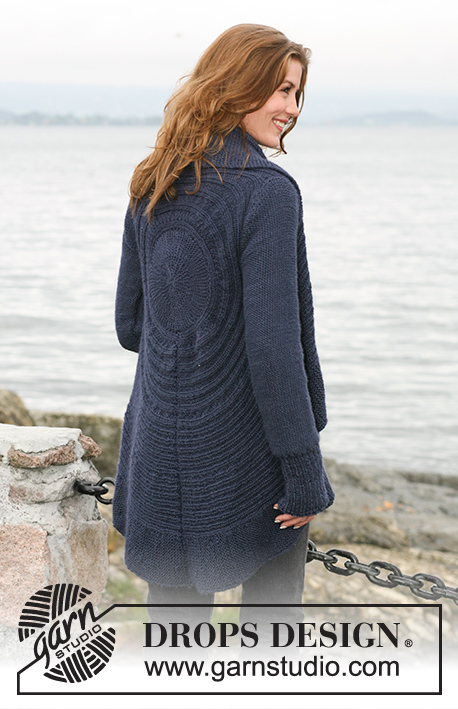
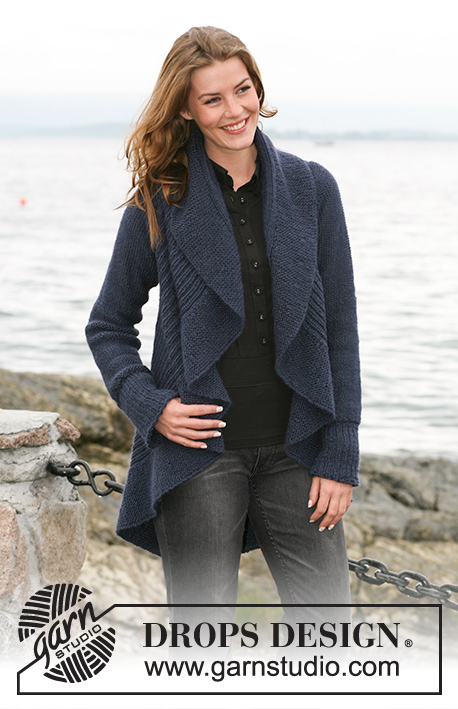
Gilet DROPS tricoté en rond en "Silke-Alpaca" ou "Air". Du S au XXXL.
DROPS 102-6 |
||||||||||||||||
|
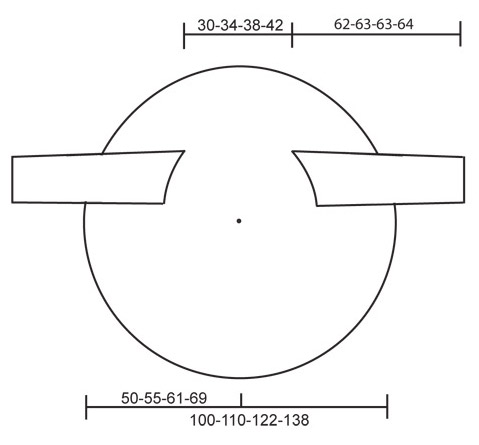
ÉCHANTILLON : 17 x 22 rangs = 10 x 10 cm POINT FANTAISIE : voir diagramme M1 ci dessous. Les diagrammes montrent le point fantaisie sur l'endroit. NOTE : chaque taille a son propre diagramme RANGS RACCOURCIS : pour assurer la forme circulaire de l'ouvrage, tourner de la façon suivante : 1er / 2ème rang : tricoter 102-112-124-140 m , tourner et tricoter le rang suivant 3ème / 4ème rang : tricoter 1 aller retour (=2 rangs) sur les 18-16-20-20 premières mailles (= mailles les plus à l'extérieur du cercle) – lire astuce tricot 1 ci dessous. Répéter les rangs 1 à 4, mais, à chaque répétition des 1er/2ème rang, tricoter 2 m en moins avant de tourner – répéter 10-10-12-12 fois au total, puis tricoter 4 m en moins avant de tourner : 6-9-8-12 fois au total. Tricoter ensuite 8 m en moins avant de tourner : 5-5-6-6 fois au total, jusqu'à ce qu'il ne reste que les 18-16-20-20 m de l'extérieur du tour du cercle. Commencer de nouveau à partir du début sur toutes les mailles. - lire astuce tricot 2 ci dessous. ASTUCE TRICOT 1 : quand on tourne l'ouvrage, glisser la 1ère m et serrer le fil avant de continuer. Ceci évite d'avoir un trou au niveau des transitions. Ceci ne s'appliquent pas aux 20-20-24-24 m de l'intérieur du cercle – quand l'ouvrage est tourné et toutes les mailles tricotées. ASTUCE TRICOT 2 : pour les rangs où toutes les mailles sont tricotées, tricoter à l'envers les 20-20-24-24 m de l'intérieur du cercle (vu sur l'endroit). Puis continuer M1 comme avant ASTUCE pour MESURER : toutes les mesures du cercle sont prise à plat. Ne pas mesurer la diagonale. Les mesures suivent la courbe jusqu'à la 63ème-69ème-73ème-81 ème m. RÉALISATION CERCLE Étant donné le nombre important de mailles, le cercle se tricote en allers retours sur l'aiguille circulaire. Monter 102-112-124-140 m avec l'aiguille circulaire 4,5 en Silke Alpaca. Placer 1 marqueur après la 63-69-73-81ème m. Prendre toutes les mesures à partir de ce point. Tricoter en suivant M1 -voir diagramme approprié à chaque taille- de droite à gauche (c'est à dire de l'extérieur du cercle vers l'intérieur) – 1er rang = endroit. EN MÊME TEMPS que M1, tricoter les rangs raccourcis – voir ci dessus – pour donner la forme circulaire. A 37-40-49-57 cm de hauteur du marqueur – voir astuce pour mesurer- tricoter les emmanchures. EMMANCHURES : glisser les 63-69-73-81 m de l'extérieur du cercle sur une autre aiguille circulaire 4,5 (l'aiguille circulaire est utilisée pour plus de facilité à tricoter étant donné le nombre de mailles). Continuer en rabattant les 2 m suivante (= emmanchure). Placer 1 marqueur entre les 2 m rabattues. Garder les mailles restantes sur l'aiguille. Continuer en tricotant les 2 parties (les mailles avant et après l'emmanchure) séparément, mais les tricoter en même temps sur les 2 aiguilles circulaires avec 2 pelotes différentes. Ceci permet que les rangs raccourcis soient corrects de chaque côté de l'emmanchure. Continuer en point fantaisie avec les rangs raccourcis comme avant. A 18-21-23-25 cm de hauteur d'emmanchure, monter 2 m au dessus de l'emmanchure (= entre les 2 parties). Continuer, glisser toutes les mailles sur une aiguille de nouveau = 102-112-124-140 m. Placer un marqueur après les 63-69-73-81ème. Continuer en mesurant à partir de ce nouveau marqueur. Tricoter ensuite M1 et les rangs raccourcis sur toutes les mailles. Continuer ainsi jusqu'à environ 15-17-19-21 cm de hauteur du marqueur, on doit avoir un demi-cercle. Continuer jusqu'à ce que l'ouvrage mesure environ 30-34-38-42 cm depuis le marqueur – voir astuce pour mesurer. Faire ensuite l'emmanchure de la même façon. Quand toutes les mailles sont de nouveau sur l'aiguille, placer un marqueur après la 63-69-73-81ème m. Continuer en mesurant à partir de ce marqueur. Continuer en M1 et rangs raccourcis jusqu'à environ 37-40-49-57 cm du marqueur (ajuster après 1 motif entier du point fantaisie avec les rangs raccourcis) . Rabattre souplement. MANCHES Se tricotent en allers retours sur l'aiguille circulaire. Monter 56-59-65-68 m (y compris 1 m lis de chaque côté) en Silke Alpaca avec les aiguilles 4,5. Tricoter 1 rang envers sur l'envers. Continuer en côtes 2 m end / 1 m env avec 1 m lis de chaque côté. A 13-13-14-14 cm de hauteur totale, tricoter 1 rang endroit sur l'envers, en répartissant 10-11-13-14 diminutions = 46-48-52-54 m. Continuer en jersey envers jusqu'à la fin. A 16 cm de hauteur totale, augmenter 1 m de chaque côté 5-9-11-13 fois tous les 9-4,5-3,5-3 cm = 56-66-74-80 m. A 56 cm de hauteur totale, rabat de chaque côté tous les 2 rangs : 1-2-2-2 fois 4 m, puis 2 m jusqu'à environ 61-62-62-63 cm de hauteur totale, puis 1 fois 4 m. La manche mesure environ 62-63-63-64 cm, rabattre toutes les mailles. ASSEMBLAGE : fermer le cercle dans les brins extérieurs des mailles du rang de montage et du dernier rang. Assembler les manches de sorte que la couture sous la manche se situe au niveau du marqueur placé en bas de l'emmanchure et le haut de la manche au niveau du marqueur placé en haut de l'emmanchure. Coudre les manches. |
||||||||||||||||
Légende diagramme(s) |
||||||||||||||||
|
||||||||||||||||
 |
||||||||||||||||
 |
||||||||||||||||
Vous avez terminé ce modèle?Alors taguez vos photos avec #dropspattern ou bien présentez-les dans la galerie #dropsfan Vous avez besoin d'aide pour ce modèle ?Vous trouverez 15 tutoriels vidéo, une rubrique commentaires/questions et plus encore en vous rendant sur la page du modèle sur garnstudio.com © 1982-2026 DROPS Design A/S. Tous droits réservés. Ce document, y compris ces sous-sections, est protégé par les droits d'auteur (copyright). Apprenez-en davantage sur ce que vous pouvez faire avec nos modèles en bas de chacune des pages de notre site. |
||||||||||||||||


Avec plus de 40 ans dans la conception de modèles tricot et crochet, DROPS Design offre l'une des plus vastes collections de modèles gratuits sur internet - traduits dans 17 langues. À ce jour, on compte 324 catalogues et 12290 modèles en français.
Nous nous efforçons de vous apporter le meilleur de ce que le tricot et le crochet peuvent vous offrir, inspiration et conseils mais également des fils de haute qualité à des prix incroyables! Vous souhaiteriez utiliser nos modèles autrement que pour un usage personnel? Vous pouvez lire ce que vous êtes autorisés à faire dans le Copyright en bas de page de chacun de nos modèles. Bon tricot!
Poster un commentaire sur le modèle DROPS 102-6
Nous aimerions connaître votre avis sur ce modèle !
Si vous souhaitez poser une question, merci de bien vouloir vérifier que vous avez choisi la bonne catégorie dans le formulaire ci-dessous afin d'accélérer la réponse. Les champs obligatoires sont indiqués par une *.