
Catégories populaires
Vous cherchez un fil?


Commentaires / Questions (180)
![]() Marlies a écrit:
Marlies a écrit:
Ik begrijp het nog steeds niet. Als ik op elk stokje een stokje moet doen dan heb ik 115 stokjes (101+14). Dan kom ik niet uit met toer 1 van M2. Wat doe ik verkeerd?
16.06.2015 - 20:45DROPS Design a répondu:
Hoi Marlies. Nu weet ik niet welke maat je maakt, maar bijvoorbeeld maat S heb je 144 stk/l. 1 herhaling loopt over 18 st = 8 herhalingen van M.2 in de rondte.
19.06.2015 - 14:48
![]() Marlies a écrit:
Marlies a écrit:
Ik ben aangekomen bij M2. Die begint met stokje - losse-stokje-losse enz. Maakt het uit waar de stokjes komen? Op een stokje van de vorige toer of om een losse van de vorige toer. En hoe gaat dat met de plekken waar er gemeerderd moest worden?. Hoeveel stokjes/lossen moet je hebben in de eerste toer? Bedankt alvast
15.06.2015 - 19:40DROPS Design a répondu:
Hoi Marlies. Je haakt de stokjes in het stokje van de vorige toer - zoals te zien is op het telpatroon. Zo te zien meerder je niet tijdens het haken van M.2
16.06.2015 - 15:47Susan a écrit:
I live in California and think that the alpaca may be too warm for the summer here. Is there an alternate non-wool you can suggest using rather than the alpaca?
29.05.2015 - 18:19DROPS Design a répondu:
Dear Susan, you can use any other similar yarn from group A - calculate here new yarn amount - and remember you can get help from your DROPS store. Happy knitting!
30.05.2015 - 14:36
![]() Gitte a écrit:
Gitte a écrit:
Skal inden muslingemønstret hækle luftmaskebuer til det når midt på brystet. Men, man skal tage 2 stangmasker ud (2 stangmasker i 1 stangmaske uden luftmaske imellem) Så er det jo ikke en bue? Hvad gør jeg i de efterfølgende rækker? Er det lidt ligegyldig, bare jeg har det rette antal masker? Venlig hilsen.....
20.05.2015 - 16:39DROPS Design a répondu:
Hej Gitte, Ja det stemmer, du tager bare ud ifølge Udtagningstips-2 altså uden 1 lm imellem. God fornøjelse!
22.05.2015 - 15:29
![]() Jacqueline a écrit:
Jacqueline a écrit:
Als ik dit patroon wil maken met ander katoen, kan ik dan ook gewoon alles met 1 draad haken?
03.05.2015 - 17:35DROPS Design a répondu:
Hoi Jacqueline. Je kan vervangen door 1 draad van categorie C - zoals bijvoorbeeld Paris. Kijk hier voor het overzicht. Vergeet niet om de hoeveelheid goed te berekenen en altijd een proeflapje te haken.
04.05.2015 - 11:46
![]() Sarah Dixon a écrit:
Sarah Dixon a écrit:
I am loving this pattern, but have got a little confused. I have increased each side of the MT up to 101 ch-loops. The next section says to increase 14 in next row to make it 216. Do I keep increasing each row until I have 216 or should this say 116?
29.04.2015 - 11:27DROPS Design a répondu:
Dear Mrs Dixon, when you inc 14 tr, you only work tr (no ch in between - see Increasing tip 2), so that you have 101 tr + 101 ch + 14 tr = 216 tr/ch on this round. Happy crocheting!
29.04.2015 - 14:38Ashley a écrit:
When starting row 2, it shows the first dc as being stitched into the first ch-loop. But, at the end of row 1, I had slip stitched into the final dc of row 1. Per the crochet info, the first dc of a row should be 3 ch stitches. When I follow that to begin row 2, the 3-ch stitches are aligned with the previous row's dc stitches (the place where I just slip stitched), not the ch-loop. How do I make it so the first dc of the row (3 ch) is coming out of the ch-loop?
14.04.2015 - 23:39DROPS Design a répondu:
Dear Ashley, if you like your first row to start from the ch-loop of previous row, you can sl st to this ch-loop, then start with 3 ch to replace 1st dc. Happy crocheting!
15.04.2015 - 08:52
![]() Josephine Gioia a écrit:
Josephine Gioia a écrit:
I love this tunic. I am down to the final mussel pattern, & am confused again how to start the start row. There is a double crochet before the start of the 18 stitches in the diagram, and then a CH over stitch 1. Does it start with. DC and then ch, dc, ch, dc, etc?
14.04.2015 - 14:11DROPS Design a répondu:
Dear Mrs Gioia, start at the arrow "start" in M.2, ie with 1 dc, 1 ch, 1 dc, etc.. Happy crocheting!
14.04.2015 - 16:10
![]() Deb a écrit:
Deb a écrit:
Breath of summer graph M1 - is there a sc between the 2dc in 1 ch? I keep ending up with way too many stitches
31.03.2015 - 22:24DROPS Design a répondu:
Dear Deb, start M.1 on the arrow "start" in the diagram and repeat around on 1st round *1 dc in next sc, ch 1, skip 1 sc, 1 dc in next sc, ch 1*, on 2nd round (in both sizes), work : *1 dc in next ch-space, 1 ch, 2 dc in next ch space, ch1* around. Continue that way repeating the sts in diagram around. Happy crocheting!
01.04.2015 - 09:26
![]() Franca a écrit:
Franca a écrit:
Ho iniziato questo bellissimo modello ma avviando le 83 catenelle iniziali ho il dubbio che non siano esatte. Troppo piccolo il cerchio che ottengo. Vi ringrazio in anticipo e faccio i complimenti per i vostri modelli. Ho già realizzato molti modelli e sono stupendi.
31.03.2015 - 20:42DROPS Design a répondu:
Buongiorno Franca. Verifichi la correttezza del suo campione con quello indicato nel modello. Inoltre, il capo viene lavorato dall’alto verso il basso: una volta chiusa in cerchio la cat di base (che quindi corrisponde al collo) dovrebbe riuscire ad individuare abbastanza facilmente se le m avviate sono sufficienti o meno. Buon lavoro!
01.04.2015 - 13:26
|
||||||||||||||||||||||
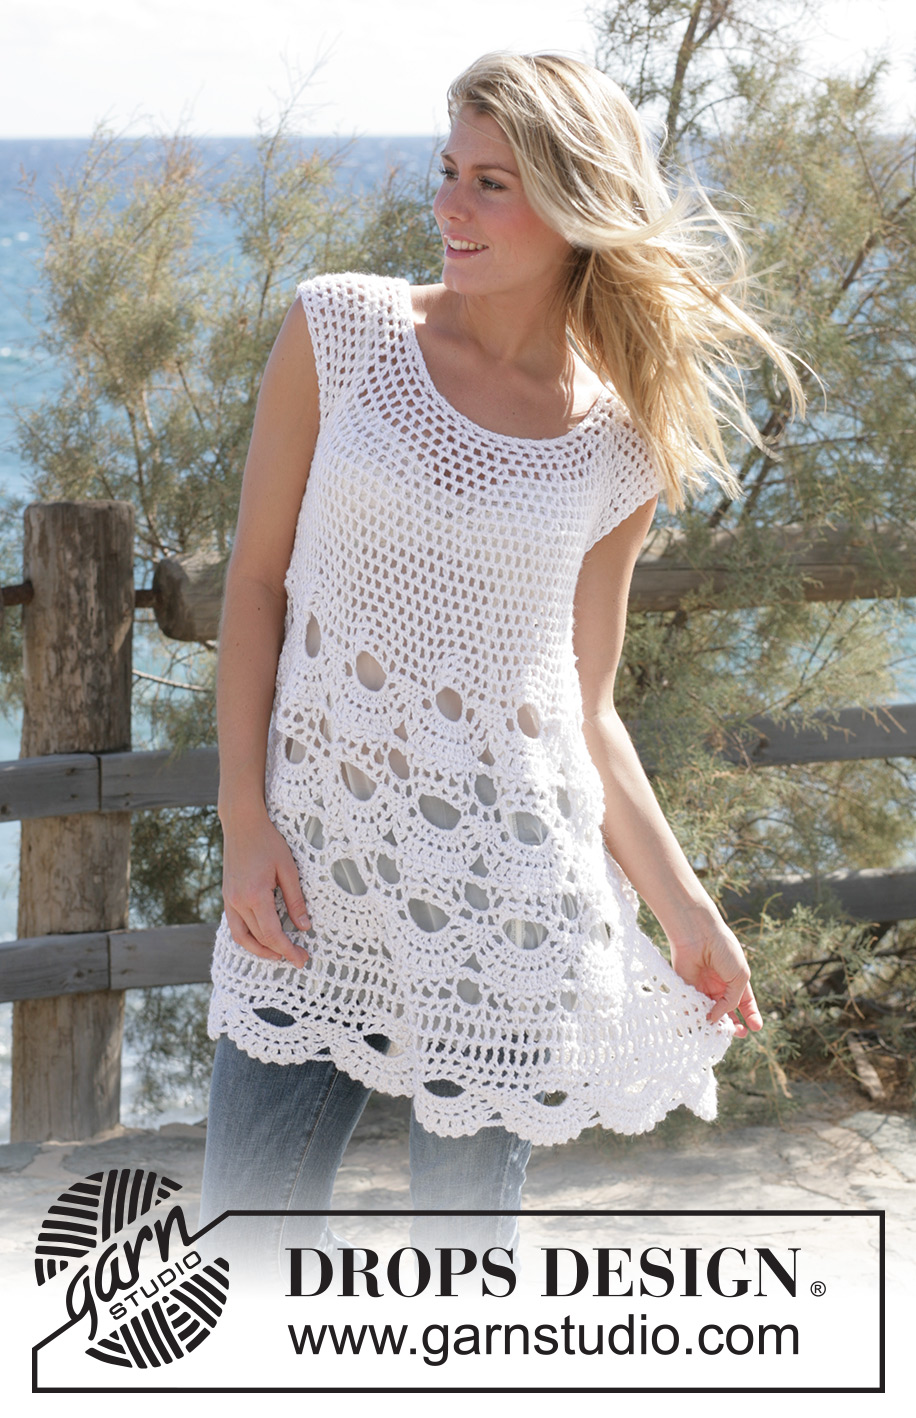
Breath of Summer#breathofsummertunic |
||||||||||||||||||||||
|
|
||||||||||||||||||||||
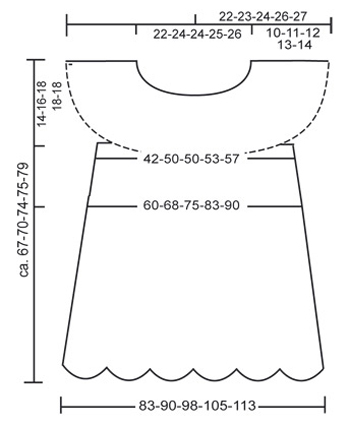
Tunique crochetée au point d’Eventail avec 1 fil DROPS Alpaca et 1 fil DROPS Coton Viscose ou 1 fil DROPS Bomull-Lin. Du S au XXL
DROPS 99-4 |
||||||||||||||||||||||
|
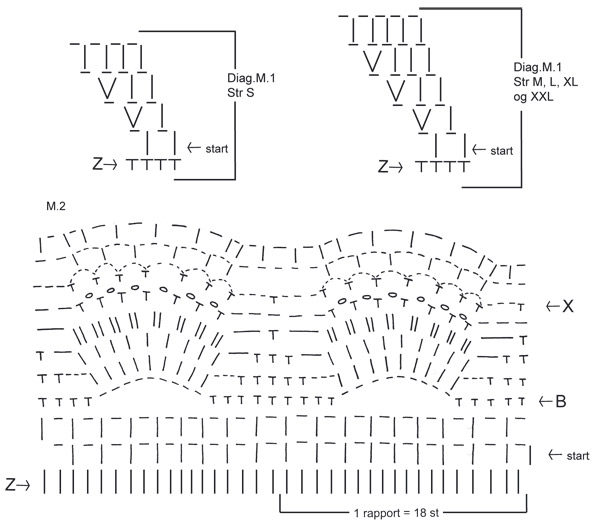
ECHANTILLON 12 B x 7 rangs = 10 x 10 cm avec 1 fil Alpaca + 1 fil Cotton Viscose ou 1 fil Bomull-Lin 1 motif au point d’éventail = 12 cm de large env. AUGMENTATIONS 1 : augmenter 1 ms : faire 2 ms dans 1 ms AUGMENTATIONS 2 : augmenter 1 B : faire 2 B dans 1 B (pas dans les ml entre) AUGMENTATIONS 3 : augmenter 1 arceau : faire 2 arceaux dans la même maille INFO CROCHET En début de rang, remplacer la 1ère B par 3 ml, remplacer la 1ère DB par 4 ml En fin de rang, joindre avec 1 mc dans la 3ème / 4ème ml du début du rang POINT EMPLOYE Voir diagramme M1 et M2. Les diagrammes montrent le point fantaisie sur l’endroit. ASTUCES pour MESURER Etant donné le poids de la laine, il est recommandé de prendre toutes les mesures quand l’ouvrage est suspendu REALISATION DOS et DEVANT La tunique se réalise en rond à partir du haut vers le bas. Avec le crochet 5 et 1 fil Drops Alpaca et 1 fil Drops Coton Viscose (= 2 fils ensemble) ou 1 fil Bomull-Lin monter souplement 71-75-75-79-83 ml. Former un rond avec 1 mc dans la 1ère ml. Faire le 1er rang ainsi : 1 ms dans chacune des 3 premières ml, *sauter 1 ml, 1ms dans chacune des 3 ml suiv* répéter de *à* = 54-57-57-60-63 ms. Faire ensuite 1 rang de ms, en même temps, répartir 22-15-19-20-21 ms – voir Augmentations 1 = 76-72-76-80-84 ms. Continuer en suivant M1 (voir info crochet). Après M1, il y a 76-90-95-100-105 arceaux (1arceau = 1 B + 1 ml). Continuer en faisant des B dans les ml et des ml au dessus des B jusqu’à 10-11-12-13-14 cm. Faire le rang suivant ainsi : Sauter 17-19-21-22-22 arceaux du rang précédent (= manche droite), faire 8 ml (=dessous de bras), faire 21-26-26-28-30 arceaux (= devant), sauter 17-19-21-22-22 arceaux du rang précédent (= manche gauche), monter 8 ml (=dessous de bras), faire 21-26-27-28-31 arceaux (=dos). Mettre un marqueur de chaque côté entre les 8 ml de sous le bras. Continuer en arceaux. NB : sur le 1er rang, dans les 8 ml sous les bras faire ainsi : 1B dans la 1ère ml, 1 ml, sauter 1 ml, 1B dans la ml suiv, 1 ml, 1B dans la même ml, 1 ml, sauter 1 ml, 1B dans la ml suiv, 1 ml, 1B dans la même ml, 1 ml, sauter 1 ml, 1B dans la m l suiv, 1 ml, sauter 1 ml (=6 arceaux sous chaque bras) = 54-64-65-68-73 arceaux. Continuer en arceaux, en même temps, augmenter 1 arceau –voir augmentations 3- de chaque côté des 2 marqueurs 4-4-6-6-7 fois tous les 2 rangs = 70-80-89-92-101 arceaux. Quand toutes les augmentations sont faites, l’ouvrage mesure env. 19-20-23-24-27 cm à partir de la chaînette de base à l’encolure (vous en êtes maintenant à mi-buste, si vous souhaitez ajuster, vous pouvez faire des rangs supplémentaires d’arceaux après les augmentations). Ensuite, faire 1 rang d’arceaux, en même temps, augmenter en répartissant 4-2-2-14-14 B supplémentaires –voir augmentations 2 = 144-162-180-198-216 B/ml Continuer ensuite en suivant M2 (commencer par la flèche start dans le diagramme) = 8-9-10-11-12 motifs sur le rang. Faire 3 motifs de M2 en hauteur, mais commencer le 2ème et le 3ème par 1a flèche B du diagramme. Après M2, faire 2-3-3-3-4 tours de DB ainsi : R 1 : Lire info crochet : Faire 1 DB dans chaque arceau, avec 1 ml entre chaque DB, finir par 1DB dans la dernière DB = 72-81-90-99-108 DB R 2 : 1 DB dans chaque DB du rang précédent, avec 2 ml entre chaque DB (au lieu d’1ml). Taille S : arrêter ici avant le dernier motif éventail = 72DB R 3 : 1 DB dans chaque DB du rang précédent, avec 3 ml entre chaque DB Taille M, L et XL : arrêter ici avant le dernier motif éventail : 81-90-99 DB R 4 : faire 1DB dans chaque DB du rang précédent avec 3 ml entre chaque DB Taille XXL : arrêter ici avant le dernier motif éventail : 108 DB Faire ensuite un rang d’arceau : 1 B et 1 ml (=1 arceau) dans chaque DB du rang précédent, en même temps, augmenter 1 arceau –voir augmentations 3 – toutes les 3-3-4-4-4 DB NB : pour les tailles L et XL, finir par 1 B et 1 ml dans chacune des 2-3 dernières DB = 96-108-112-123-135 arceaux. Faire 1 rang d’arceau, en même temps, augmenter 6-0-10-6-0 B –voir augmentations 2= 198-216-234-252-270 B/ml. Puis, continuer en suivant M2 de nouveau (commencer à la flèche start sur le diagramme), mais arrêter après le rang 7. |
||||||||||||||||||||||
Légende diagramme(s) |
||||||||||||||||||||||
|
||||||||||||||||||||||
 |
||||||||||||||||||||||
 |
||||||||||||||||||||||
Vous avez terminé ce modèle?Alors taguez vos photos avec #dropspattern #breathofsummertunic ou bien présentez-les dans la galerie #dropsfan Vous avez besoin d'aide pour ce modèle ?Vous trouverez 7 tutoriels vidéo, une rubrique commentaires/questions et plus encore en vous rendant sur la page du modèle sur garnstudio.com © 1982-2026 DROPS Design A/S. Tous droits réservés. Ce document, y compris ces sous-sections, est protégé par les droits d'auteur (copyright). Apprenez-en davantage sur ce que vous pouvez faire avec nos modèles en bas de chacune des pages de notre site. |
||||||||||||||||||||||


Avec plus de 40 ans dans la conception de modèles tricot et crochet, DROPS Design offre l'une des plus vastes collections de modèles gratuits sur internet - traduits dans 17 langues. À ce jour, on compte 324 catalogues et 12290 modèles en français.
Nous nous efforçons de vous apporter le meilleur de ce que le tricot et le crochet peuvent vous offrir, inspiration et conseils mais également des fils de haute qualité à des prix incroyables! Vous souhaiteriez utiliser nos modèles autrement que pour un usage personnel? Vous pouvez lire ce que vous êtes autorisés à faire dans le Copyright en bas de page de chacun de nos modèles. Bon tricot!
Poster un commentaire sur le modèle DROPS 99-4
Nous aimerions connaître votre avis sur ce modèle !
Si vous souhaitez poser une question, merci de bien vouloir vérifier que vous avez choisi la bonne catégorie dans le formulaire ci-dessous afin d'accélérer la réponse. Les champs obligatoires sont indiqués par une *.