
Catégories populaires
Vous cherchez un fil?


Commentaires / Questions (180)
![]() Suzie De Feijter a écrit:
Suzie De Feijter a écrit:
Wat doe ik verkeerd? Ik heb na M1 44 lboogjes ipv 105
20.04.2017 - 21:22DROPS Design a répondu:
Hallo Suzie, Vanaf hier kan ik helaas niet goed meekijken wat er bij jou precies verkeerd is gegaan. Misschien kun je nog een keer heel goed het patroon door lezen. Heb je ook de meerderingen gemaakt die beschreven zijn in de tekst? En heb je telpatroon M1 voor jouw maat genomen?
24.04.2017 - 16:06Janice a écrit:
Thanks for the reply on my question regarding increasing in this pattern at the beginning. I had figured out the part about dividing the stitches by the amount needed to increase but here is my dilemma: I have 54 sc and need to increase by 22. 54 divided by 22 is 2.45 so no matter which way I crochet this I only end up with 18 on the increase. I have tried increasing after every 2nd stitch, with various compilations but nothing works out to 22 on the increase. HELP :)
13.04.2017 - 13:14DROPS Design a répondu:
Dear Janice, you will work 2 sts, inc in next st, and repeat this all the round a total of 18 times (= 18x3= 54 sts), finishing with 4 sc: 18 x 4 + 4= 76 sc. Happy crocheting!
18.04.2017 - 08:50Janice a écrit:
New to crochet and haven't worked in diagrams. I am having a hard time with increasing from 56 stitches to 78 at the beginning of the pattern. How do I work out where I do the increase on the sc.
11.04.2017 - 14:28DROPS Design a répondu:
Dear Janice, you will find here how to increase evenly on a round. Happy crocheting!
12.04.2017 - 12:03Lee a écrit:
Can I please ask how many gms of yarn you use for this pattern. Many thanks Lee
16.03.2017 - 07:02DROPS Design a répondu:
Dear Lee, you will find total amount of yarn required under tab "Materials", ie in size S for example, you need 200 g DROPS Alpaca + 300 g DROPS Cotton Viscose. Happy crocheting!
16.03.2017 - 08:57
![]() Valeria a écrit:
Valeria a écrit:
Buongiorno una piccola domanda... quando inizio la seconda riga del diagramma m1 devo fare una maglia alta e poi 2 maglie alte in catenella a venire, oppure una maglia alta, 2maglie alte nella successiva, una maglia alta, 2nella successiva e così via? Grazie per l'aiuto
15.01.2017 - 22:27DROPS Design a répondu:
Buongiorno Valeria. Lavora il secondo giro come segue: * 1 maglia alta nell’arco di catenelle, 1 catenella, 1 maglia alta nell’arco di cat successivo, 1 catenella, 1 maglia alta nello stesso arco di catenelle, 1 catenella * ; ripete queste istruzioni su tutto il giro. Buon lavoro!
15.01.2017 - 23:09
![]() Katrine Jensen a écrit:
Katrine Jensen a écrit:
Når jeg skal igang med M2, så er der en stm som laves ned i ingenting? Jeg forstår simpelthen ikke de første to omgange. Eller jo - det er luftmaskebuer som jeg har lavet hele vejen, men hvordan starter jeg de to omgange? Når jeg starter med en stm, som jeg har gjort i foregående rækker, så vil jeg vel ende med 144 masker igen, men så tager jeg en ind på næste række, så passer maskeantallet ikke med 8*18 masker. Jeg må have misforstået noget, men hvad? :)
11.10.2016 - 19:54DROPS Design a répondu:
Hej Karin. Jeg er ikke 100%, men jeg vil sige st denne förste st hörer til den sidste st fra sidste omg (se til sidst paa diagrammet - der har du 2 st - og der mangler en st). Dette var nok den nemmeste maade at tegne det paa. Saa jeg vil sige du starter med 1 st i den sidste st fra sidste omg, saa du kan starte en ny omgang med 1 lm, spring förste st over osv.
12.10.2016 - 12:45Barbara a écrit:
Lovely pattern! I need to increase the neck line and underarm. Can I just start with more chains for the neck opening and increase the underarm from 8 stitches to 12?
29.09.2016 - 08:32DROPS Design a répondu:
Dear Barbara, we are unfortunately not able to adjust every pattern to each individual request, you will have to recalculating with your gauge and required finished measurements - Further personnal assistance will be provided by the store where you bought your yarn. Happy crocheting!
29.09.2016 - 09:16Nikki a écrit:
Can I do this pattern with 1 strand as I get too confused with 2?
26.08.2016 - 16:27DROPS Design a répondu:
Dear Nikki, if you want oyu cna work it with one strand, but remember to check your gauge, the gauge indicated in the pattern is for 1 strand of each quality (= 2 strand). Happy crocheting!
28.08.2016 - 14:38
![]() Caroline a écrit:
Caroline a écrit:
Thank you for posting this pretty pattern. In diagram M1, it shows each subsequent row slightly offset to the left.... does that mean to slip stitch to where the dc (or other stitch as indicated) begins? Thank you.
02.08.2016 - 17:28DROPS Design a répondu:
Dear Caroline, that's right, you have to work the dc around the ch from previous round, so sl st to 1st ch and crochet 1st dc ( = 3 ch) over the chain, then ch 1 and continue as in diagram. Happy crocheting!
03.08.2016 - 09:18
![]() Cathleen Wilbourn a écrit:
Cathleen Wilbourn a écrit:
Ok, so i finished this tunic. thank you for posting the pattern. however, i have an issue with the fit. the top fits comfortably but the bottom with the mussels is too loose for my liking. to adjust for this, can i just use a smaller hook size than the top mesh part or are there any other ideas im not aware of? thanks so much
05.07.2016 - 08:17DROPS Design a répondu:
Dear Mrs Wilbourn, for any individual assistance, remember you can get tips & advices from your DROPS store, even per mail or telephone. Happy crocheting!
05.07.2016 - 09:02
|
||||||||||||||||||||||
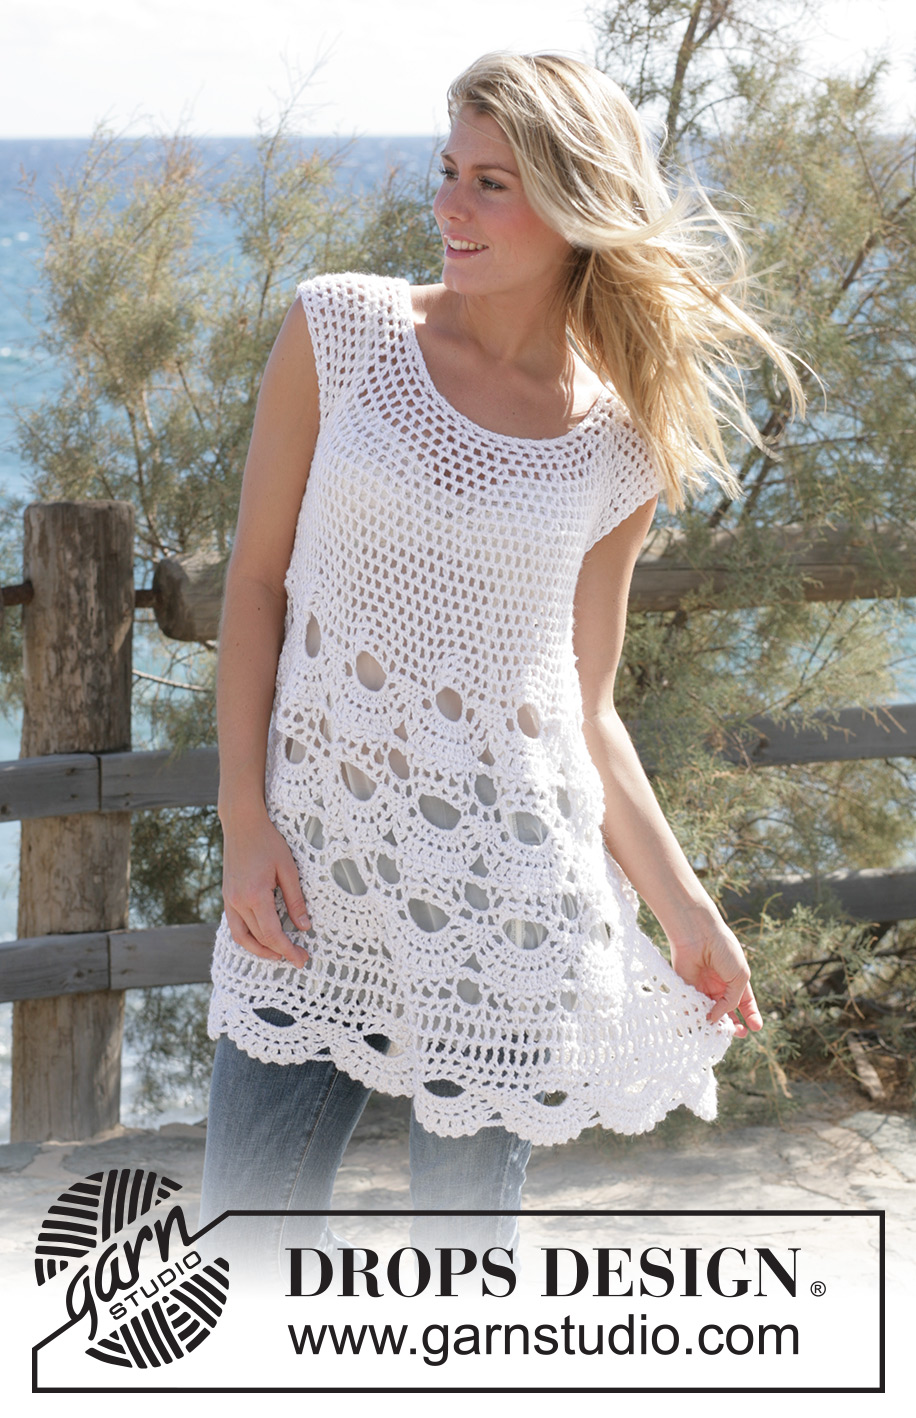
Breath of Summer#breathofsummertunic |
||||||||||||||||||||||
|
|
||||||||||||||||||||||
Tunique crochetée au point d’Eventail avec 1 fil DROPS Alpaca et 1 fil DROPS Coton Viscose ou 1 fil DROPS Bomull-Lin. Du S au XXL
DROPS 99-4 |
||||||||||||||||||||||
|
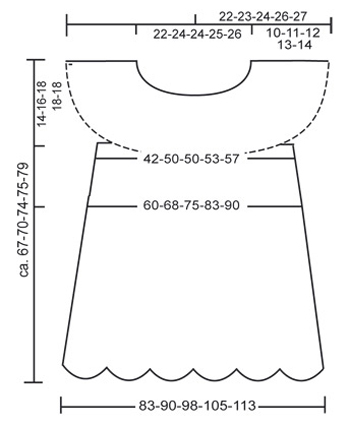
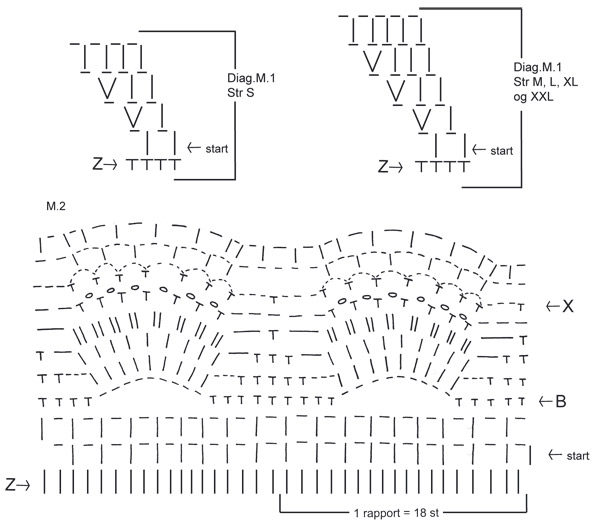
ECHANTILLON 12 B x 7 rangs = 10 x 10 cm avec 1 fil Alpaca + 1 fil Cotton Viscose ou 1 fil Bomull-Lin 1 motif au point d’éventail = 12 cm de large env. AUGMENTATIONS 1 : augmenter 1 ms : faire 2 ms dans 1 ms AUGMENTATIONS 2 : augmenter 1 B : faire 2 B dans 1 B (pas dans les ml entre) AUGMENTATIONS 3 : augmenter 1 arceau : faire 2 arceaux dans la même maille INFO CROCHET En début de rang, remplacer la 1ère B par 3 ml, remplacer la 1ère DB par 4 ml En fin de rang, joindre avec 1 mc dans la 3ème / 4ème ml du début du rang POINT EMPLOYE Voir diagramme M1 et M2. Les diagrammes montrent le point fantaisie sur l’endroit. ASTUCES pour MESURER Etant donné le poids de la laine, il est recommandé de prendre toutes les mesures quand l’ouvrage est suspendu REALISATION DOS et DEVANT La tunique se réalise en rond à partir du haut vers le bas. Avec le crochet 5 et 1 fil Drops Alpaca et 1 fil Drops Coton Viscose (= 2 fils ensemble) ou 1 fil Bomull-Lin monter souplement 71-75-75-79-83 ml. Former un rond avec 1 mc dans la 1ère ml. Faire le 1er rang ainsi : 1 ms dans chacune des 3 premières ml, *sauter 1 ml, 1ms dans chacune des 3 ml suiv* répéter de *à* = 54-57-57-60-63 ms. Faire ensuite 1 rang de ms, en même temps, répartir 22-15-19-20-21 ms – voir Augmentations 1 = 76-72-76-80-84 ms. Continuer en suivant M1 (voir info crochet). Après M1, il y a 76-90-95-100-105 arceaux (1arceau = 1 B + 1 ml). Continuer en faisant des B dans les ml et des ml au dessus des B jusqu’à 10-11-12-13-14 cm. Faire le rang suivant ainsi : Sauter 17-19-21-22-22 arceaux du rang précédent (= manche droite), faire 8 ml (=dessous de bras), faire 21-26-26-28-30 arceaux (= devant), sauter 17-19-21-22-22 arceaux du rang précédent (= manche gauche), monter 8 ml (=dessous de bras), faire 21-26-27-28-31 arceaux (=dos). Mettre un marqueur de chaque côté entre les 8 ml de sous le bras. Continuer en arceaux. NB : sur le 1er rang, dans les 8 ml sous les bras faire ainsi : 1B dans la 1ère ml, 1 ml, sauter 1 ml, 1B dans la ml suiv, 1 ml, 1B dans la même ml, 1 ml, sauter 1 ml, 1B dans la ml suiv, 1 ml, 1B dans la même ml, 1 ml, sauter 1 ml, 1B dans la m l suiv, 1 ml, sauter 1 ml (=6 arceaux sous chaque bras) = 54-64-65-68-73 arceaux. Continuer en arceaux, en même temps, augmenter 1 arceau –voir augmentations 3- de chaque côté des 2 marqueurs 4-4-6-6-7 fois tous les 2 rangs = 70-80-89-92-101 arceaux. Quand toutes les augmentations sont faites, l’ouvrage mesure env. 19-20-23-24-27 cm à partir de la chaînette de base à l’encolure (vous en êtes maintenant à mi-buste, si vous souhaitez ajuster, vous pouvez faire des rangs supplémentaires d’arceaux après les augmentations). Ensuite, faire 1 rang d’arceaux, en même temps, augmenter en répartissant 4-2-2-14-14 B supplémentaires –voir augmentations 2 = 144-162-180-198-216 B/ml Continuer ensuite en suivant M2 (commencer par la flèche start dans le diagramme) = 8-9-10-11-12 motifs sur le rang. Faire 3 motifs de M2 en hauteur, mais commencer le 2ème et le 3ème par 1a flèche B du diagramme. Après M2, faire 2-3-3-3-4 tours de DB ainsi : R 1 : Lire info crochet : Faire 1 DB dans chaque arceau, avec 1 ml entre chaque DB, finir par 1DB dans la dernière DB = 72-81-90-99-108 DB R 2 : 1 DB dans chaque DB du rang précédent, avec 2 ml entre chaque DB (au lieu d’1ml). Taille S : arrêter ici avant le dernier motif éventail = 72DB R 3 : 1 DB dans chaque DB du rang précédent, avec 3 ml entre chaque DB Taille M, L et XL : arrêter ici avant le dernier motif éventail : 81-90-99 DB R 4 : faire 1DB dans chaque DB du rang précédent avec 3 ml entre chaque DB Taille XXL : arrêter ici avant le dernier motif éventail : 108 DB Faire ensuite un rang d’arceau : 1 B et 1 ml (=1 arceau) dans chaque DB du rang précédent, en même temps, augmenter 1 arceau –voir augmentations 3 – toutes les 3-3-4-4-4 DB NB : pour les tailles L et XL, finir par 1 B et 1 ml dans chacune des 2-3 dernières DB = 96-108-112-123-135 arceaux. Faire 1 rang d’arceau, en même temps, augmenter 6-0-10-6-0 B –voir augmentations 2= 198-216-234-252-270 B/ml. Puis, continuer en suivant M2 de nouveau (commencer à la flèche start sur le diagramme), mais arrêter après le rang 7. |
||||||||||||||||||||||
Légende diagramme(s) |
||||||||||||||||||||||
|
||||||||||||||||||||||
 |
||||||||||||||||||||||
 |
||||||||||||||||||||||
Vous avez terminé ce modèle?Alors taguez vos photos avec #dropspattern #breathofsummertunic ou bien présentez-les dans la galerie #dropsfan Vous avez besoin d'aide pour ce modèle ?Vous trouverez 7 tutoriels vidéo, une rubrique commentaires/questions et plus encore en vous rendant sur la page du modèle sur garnstudio.com © 1982-2026 DROPS Design A/S. Tous droits réservés. Ce document, y compris ces sous-sections, est protégé par les droits d'auteur (copyright). Apprenez-en davantage sur ce que vous pouvez faire avec nos modèles en bas de chacune des pages de notre site. |
||||||||||||||||||||||


Avec plus de 40 ans dans la conception de modèles tricot et crochet, DROPS Design offre l'une des plus vastes collections de modèles gratuits sur internet - traduits dans 17 langues. À ce jour, on compte 324 catalogues et 12290 modèles en français.
Nous nous efforçons de vous apporter le meilleur de ce que le tricot et le crochet peuvent vous offrir, inspiration et conseils mais également des fils de haute qualité à des prix incroyables! Vous souhaiteriez utiliser nos modèles autrement que pour un usage personnel? Vous pouvez lire ce que vous êtes autorisés à faire dans le Copyright en bas de page de chacun de nos modèles. Bon tricot!
Poster un commentaire sur le modèle DROPS 99-4
Nous aimerions connaître votre avis sur ce modèle !
Si vous souhaitez poser une question, merci de bien vouloir vérifier que vous avez choisi la bonne catégorie dans le formulaire ci-dessous afin d'accélérer la réponse. Les champs obligatoires sont indiqués par une *.