
Catégories populaires
Vous cherchez un fil?


Commentaires / Questions (180)
![]() Annette a écrit:
Annette a écrit:
I do not understand the increasing from 101 to 216. I found this answer, but I’m still confused. “Dear Mrs Dixon, when you inc 14 tr, you only work tr (no ch in between - see Increasing tip 2), so that you have 101 tr + 101 ch + 14 tr = 216 tr/ch on this round. Happy crocheting!” Am I now crocheting in each STITCH instead of space??
04.04.2018 - 22:56DROPS Design a répondu:
Dear Annette, when you have 101 ch-spaces, there is a total of 202 sts, ie 101 tr + 101 ch. When inc 14 tr, you will crochet in the ch-spaces as before but 2 tr instead of 1 tr evenly spaced = 216 sts (115 tr and 101 ch-spaces). Happy crocheting!
05.04.2018 - 08:55
![]() Annette a écrit:
Annette a écrit:
I’m just starting this pattern. I’m to where I start the M.1, and I don’t understand what “og” means for size XXL. Please help.
19.03.2018 - 01:35DROPS Design a répondu:
Hi Annette, "og" is the Norwegian word for "and" and we have overlooked the translation here. Apologies. Happy crocheting!
19.03.2018 - 08:05
![]() Wendy Ambuhl a écrit:
Wendy Ambuhl a écrit:
I got it! I was counting spaces, not stitches! :)
21.07.2017 - 20:33
![]() Wendy Ambuhl a écrit:
Wendy Ambuhl a écrit:
Ok. So I got 198 stitches by adding 14 stitches. On the next row, do i put a dc and ch between the 2 stitches of my increase? For example, I have made two dc, with no ch between, in one ch-loop. On the next round, do I make a ch-loop between the 2 dc where there is no ch? I cannot get the numbers to come out even to go on from here!
20.07.2017 - 20:38DROPS Design a répondu:
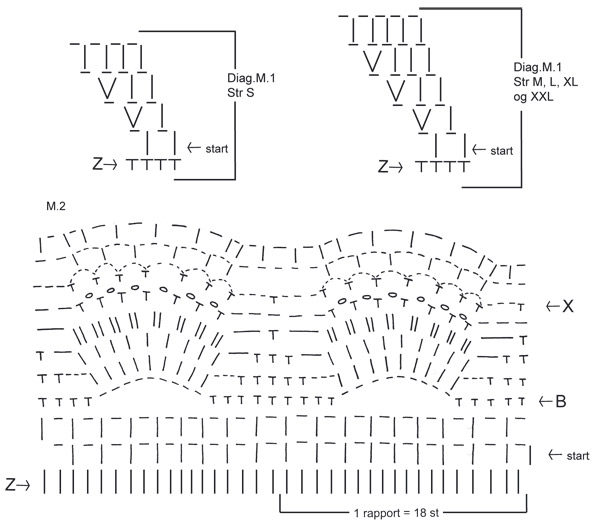
Dear Mrs Ambuhl, there are now 198 sts (= dc and chains), repeat M.2 (= 18 sts) a total of 11 times in the round so that you have 18 sts x 11 = 198 sts. On 1st row in M.2 (= row with arrow "start"), work 1 dc, 1 ch, skip 1 ch (either dc or ch), 1 dc in next st (either dc or ch). Happy crocheting!
21.07.2017 - 08:30
![]() Wendy Ambuhl a écrit:
Wendy Ambuhl a écrit:
I understand the part about 198 ch-loops before the mussel pattern. But what does each symbol stand for on row z? Do they stand for each ch, dc, or both? If so, do I work into every other ch-loop? I find this diagram confusing.
18.07.2017 - 16:17DROPS Design a répondu:
Dear Mrs Ambuhl, each symbol on row Z represents 1 stitch, either 1 dc or 1 ch, M.2 is worked over 18 sts (dc and ch). Happy crocheting!
19.07.2017 - 08:24
![]() Brenda Lee a écrit:
Brenda Lee a écrit:
On the m.2 chart im trying to figure out what that long horizontal line means . its 2 rows under the x if im not mistaken. the rest i understand .
16.07.2017 - 22:17DROPS Design a répondu:
Dear Brenda Lee, as explained earlier, each horizontal bar = 1 chain, the length of this bar is due to the diagram and number of sts in diagram, but either short or long, 1 bar = 1 chain. Happy crocheting!
17.07.2017 - 09:28
![]() Brenda Lee a écrit:
Brenda Lee a écrit:
Could you tell me what the long horizontal bar means on the 2nd row under the x . thats the only part that has me stumped on want this finished so bad to take to the beach with me in aug thank you so much.
16.07.2017 - 00:39DROPS Design a répondu:
Dear Brenda Lee, the horizontal bar either short or long = 1 chain. Happy crocheting
17.07.2017 - 09:08
![]() NieKohle a écrit:
NieKohle a écrit:
Ich habe jetzt nach 8 gescheiterten Versuchen aufgegeben. Im 8. Versuch musste ich schon die Maschenanzahl erhöhen, da diese nicht annähernd auf eine XL zugeschnitten ist. Bereits der Halsausschnitt ist wesentlich enger als auf dem Bild, selbst bei sehr (!) lockeren Lm. Die Anleitung an sich ist gut. Schade nur, dass man selbst noch hin und her rechnen muss.
03.06.2017 - 21:26
![]() NieKohle a écrit:
NieKohle a écrit:
Hallo. Ich verzweifle an M1. ich habe jetzt 5 Mal angefangen und 5 Mal wieder alles aufgeribbelt, weil ich nach M1 nicht auf die angegebene Maschenzahl komme. Bei mir sind es jedes mal 20 maschen weniger als angegeben. Mir ist auch nicht ganz klar, wie ich von Runde zu Runde arbeiten kann, ohne eine sichtbare Kante zwischen Rundenende und Rundenanfang zu erhalten. Außerdem bin ich mir nicht sicher, wie ich M1 zu lesen habe. Von links nach recht in jeder Runde? Vielen Dank schonmal.
01.06.2017 - 13:00DROPS Design a répondu:
Liebe NieKohle, Diagram lesen Sie von unten nach oben und jede Runde von rechts nach links, dh 1. Rd (alle Größe): *1 Stb, 1 Lm, 1 M springen, 1 Stb, 1 Lm, 1 M springen*, von *-* wiederholen. Bei 2. Rd: *1 Stb um die Lm, 1 Lm, um die nächste Lm häkeln Sie: 1 Stb, 1 Lm, 1 Stb*, von *-* wiederholen (= 1 Stb wird in jedem M.1 zugenommen). Viel Spaß beim häkeln!
01.06.2017 - 13:42
![]() Silke a écrit:
Silke a écrit:
Hallo, ich beziehe mich auf die Anleitung nachdem ich M1 gehäkelt haben. Ich verstehe nicht, wie ich eine Luftmasche in Stäbchen häkle? Mir ist klar, Stäbchen in Luftmasche zu häkeln, aber wie häkle ich eine Luftmasche irgendwo hinein? :-) Sorry, bin Anfängerin und vielleicht klingt die Frage etwas ungewöhnlich. Bin aber gerade etwas hilflos!
23.04.2017 - 09:33DROPS Design a répondu:
Liebe Silke, Sie werden jetzt wie im letzten Runde in M.1 häkeln:1 Stb um jeder Luftmasche und 1 Luftmasche über jedes Stb. Viel Spaß beim häkeln!
24.04.2017 - 09:54
|
||||||||||||||||||||||
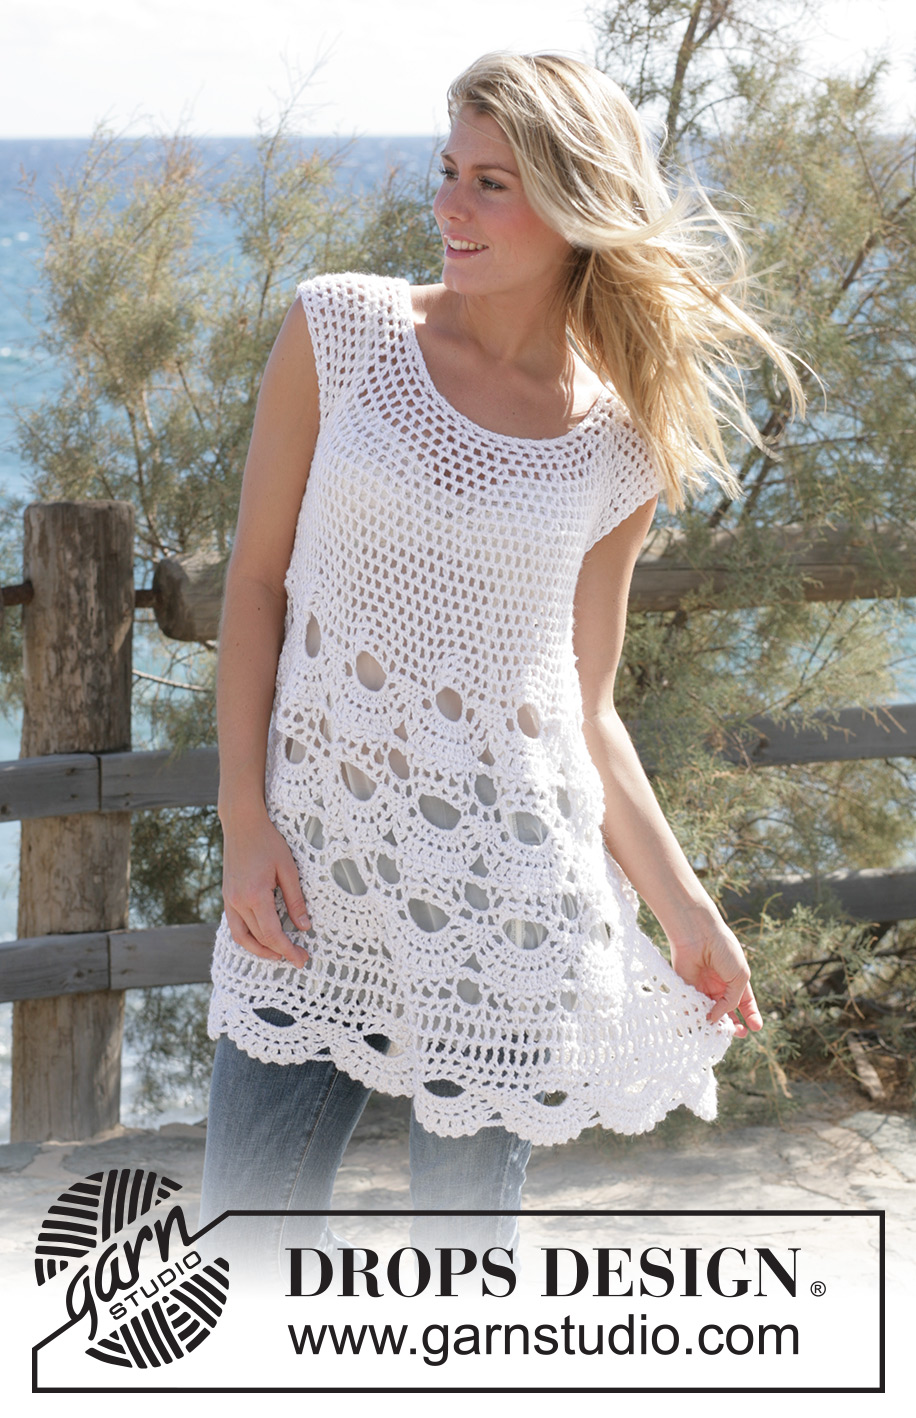
Breath of Summer#breathofsummertunic |
||||||||||||||||||||||
|
|
||||||||||||||||||||||
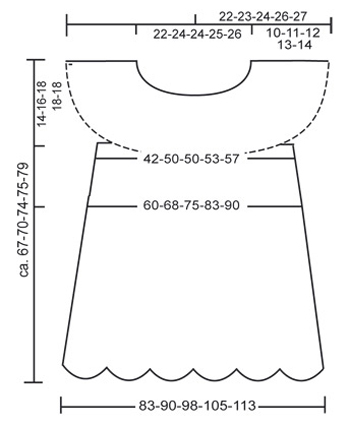
Tunique crochetée au point d’Eventail avec 1 fil DROPS Alpaca et 1 fil DROPS Coton Viscose ou 1 fil DROPS Bomull-Lin. Du S au XXL
DROPS 99-4 |
||||||||||||||||||||||
|
ECHANTILLON 12 B x 7 rangs = 10 x 10 cm avec 1 fil Alpaca + 1 fil Cotton Viscose ou 1 fil Bomull-Lin 1 motif au point d’éventail = 12 cm de large env. AUGMENTATIONS 1 : augmenter 1 ms : faire 2 ms dans 1 ms AUGMENTATIONS 2 : augmenter 1 B : faire 2 B dans 1 B (pas dans les ml entre) AUGMENTATIONS 3 : augmenter 1 arceau : faire 2 arceaux dans la même maille INFO CROCHET En début de rang, remplacer la 1ère B par 3 ml, remplacer la 1ère DB par 4 ml En fin de rang, joindre avec 1 mc dans la 3ème / 4ème ml du début du rang POINT EMPLOYE Voir diagramme M1 et M2. Les diagrammes montrent le point fantaisie sur l’endroit. ASTUCES pour MESURER Etant donné le poids de la laine, il est recommandé de prendre toutes les mesures quand l’ouvrage est suspendu REALISATION DOS et DEVANT La tunique se réalise en rond à partir du haut vers le bas. Avec le crochet 5 et 1 fil Drops Alpaca et 1 fil Drops Coton Viscose (= 2 fils ensemble) ou 1 fil Bomull-Lin monter souplement 71-75-75-79-83 ml. Former un rond avec 1 mc dans la 1ère ml. Faire le 1er rang ainsi : 1 ms dans chacune des 3 premières ml, *sauter 1 ml, 1ms dans chacune des 3 ml suiv* répéter de *à* = 54-57-57-60-63 ms. Faire ensuite 1 rang de ms, en même temps, répartir 22-15-19-20-21 ms – voir Augmentations 1 = 76-72-76-80-84 ms. Continuer en suivant M1 (voir info crochet). Après M1, il y a 76-90-95-100-105 arceaux (1arceau = 1 B + 1 ml). Continuer en faisant des B dans les ml et des ml au dessus des B jusqu’à 10-11-12-13-14 cm. Faire le rang suivant ainsi : Sauter 17-19-21-22-22 arceaux du rang précédent (= manche droite), faire 8 ml (=dessous de bras), faire 21-26-26-28-30 arceaux (= devant), sauter 17-19-21-22-22 arceaux du rang précédent (= manche gauche), monter 8 ml (=dessous de bras), faire 21-26-27-28-31 arceaux (=dos). Mettre un marqueur de chaque côté entre les 8 ml de sous le bras. Continuer en arceaux. NB : sur le 1er rang, dans les 8 ml sous les bras faire ainsi : 1B dans la 1ère ml, 1 ml, sauter 1 ml, 1B dans la ml suiv, 1 ml, 1B dans la même ml, 1 ml, sauter 1 ml, 1B dans la ml suiv, 1 ml, 1B dans la même ml, 1 ml, sauter 1 ml, 1B dans la m l suiv, 1 ml, sauter 1 ml (=6 arceaux sous chaque bras) = 54-64-65-68-73 arceaux. Continuer en arceaux, en même temps, augmenter 1 arceau –voir augmentations 3- de chaque côté des 2 marqueurs 4-4-6-6-7 fois tous les 2 rangs = 70-80-89-92-101 arceaux. Quand toutes les augmentations sont faites, l’ouvrage mesure env. 19-20-23-24-27 cm à partir de la chaînette de base à l’encolure (vous en êtes maintenant à mi-buste, si vous souhaitez ajuster, vous pouvez faire des rangs supplémentaires d’arceaux après les augmentations). Ensuite, faire 1 rang d’arceaux, en même temps, augmenter en répartissant 4-2-2-14-14 B supplémentaires –voir augmentations 2 = 144-162-180-198-216 B/ml Continuer ensuite en suivant M2 (commencer par la flèche start dans le diagramme) = 8-9-10-11-12 motifs sur le rang. Faire 3 motifs de M2 en hauteur, mais commencer le 2ème et le 3ème par 1a flèche B du diagramme. Après M2, faire 2-3-3-3-4 tours de DB ainsi : R 1 : Lire info crochet : Faire 1 DB dans chaque arceau, avec 1 ml entre chaque DB, finir par 1DB dans la dernière DB = 72-81-90-99-108 DB R 2 : 1 DB dans chaque DB du rang précédent, avec 2 ml entre chaque DB (au lieu d’1ml). Taille S : arrêter ici avant le dernier motif éventail = 72DB R 3 : 1 DB dans chaque DB du rang précédent, avec 3 ml entre chaque DB Taille M, L et XL : arrêter ici avant le dernier motif éventail : 81-90-99 DB R 4 : faire 1DB dans chaque DB du rang précédent avec 3 ml entre chaque DB Taille XXL : arrêter ici avant le dernier motif éventail : 108 DB Faire ensuite un rang d’arceau : 1 B et 1 ml (=1 arceau) dans chaque DB du rang précédent, en même temps, augmenter 1 arceau –voir augmentations 3 – toutes les 3-3-4-4-4 DB NB : pour les tailles L et XL, finir par 1 B et 1 ml dans chacune des 2-3 dernières DB = 96-108-112-123-135 arceaux. Faire 1 rang d’arceau, en même temps, augmenter 6-0-10-6-0 B –voir augmentations 2= 198-216-234-252-270 B/ml. Puis, continuer en suivant M2 de nouveau (commencer à la flèche start sur le diagramme), mais arrêter après le rang 7. |
||||||||||||||||||||||
Légende diagramme(s) |
||||||||||||||||||||||
|
||||||||||||||||||||||
 |
||||||||||||||||||||||
 |
||||||||||||||||||||||
Vous avez terminé ce modèle?Alors taguez vos photos avec #dropspattern #breathofsummertunic ou bien présentez-les dans la galerie #dropsfan Vous avez besoin d'aide pour ce modèle ?Vous trouverez 7 tutoriels vidéo, une rubrique commentaires/questions et plus encore en vous rendant sur la page du modèle sur garnstudio.com © 1982-2026 DROPS Design A/S. Tous droits réservés. Ce document, y compris ces sous-sections, est protégé par les droits d'auteur (copyright). Apprenez-en davantage sur ce que vous pouvez faire avec nos modèles en bas de chacune des pages de notre site. |
||||||||||||||||||||||


Avec plus de 40 ans dans la conception de modèles tricot et crochet, DROPS Design offre l'une des plus vastes collections de modèles gratuits sur internet - traduits dans 17 langues. À ce jour, on compte 324 catalogues et 12290 modèles en français.
Nous nous efforçons de vous apporter le meilleur de ce que le tricot et le crochet peuvent vous offrir, inspiration et conseils mais également des fils de haute qualité à des prix incroyables! Vous souhaiteriez utiliser nos modèles autrement que pour un usage personnel? Vous pouvez lire ce que vous êtes autorisés à faire dans le Copyright en bas de page de chacun de nos modèles. Bon tricot!
Poster un commentaire sur le modèle DROPS 99-4
Nous aimerions connaître votre avis sur ce modèle !
Si vous souhaitez poser une question, merci de bien vouloir vérifier que vous avez choisi la bonne catégorie dans le formulaire ci-dessous afin d'accélérer la réponse. Les champs obligatoires sont indiqués par une *.