
Catégories populaires
Vous cherchez un fil?


Commentaires / Questions (180)
![]() Lydia Havenaar a écrit:
Lydia Havenaar a écrit:
Hallo, Een vraag, valt dit model erg groot?
15.07.2013 - 09:07DROPS Design a répondu:
Hoi Lydia. Zie de afmetingen in cm per maat onderaan het patroon.
15.07.2013 - 20:24
![]() Elaine Sue a écrit:
Elaine Sue a écrit:
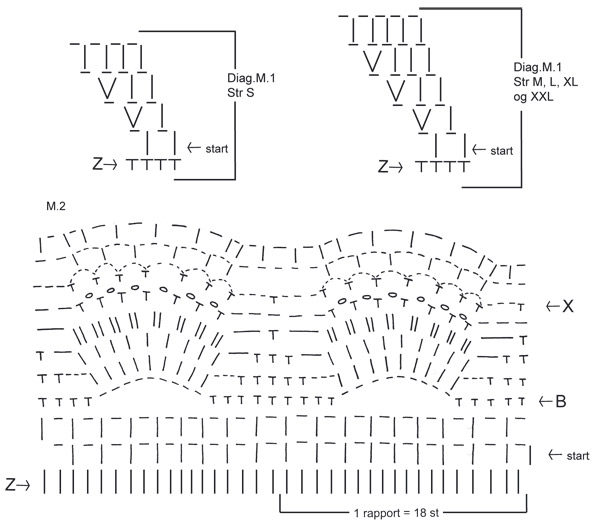
I wonder if there are directions in place of the charts. For me it is difficult to follow the charts M1 and M2. I would appreciate any help with this. Thank you
02.07.2013 - 03:57DROPS Design a répondu:
Dear Mrs Sue, you will find at the end of the written pattern and just above the measurement charts all text to diagrams. Choose M.1 for your size and start diagrams at the arrow or as stated, repeat diagrams all the round. Happy crocheting!
02.07.2013 - 08:44
![]() Karen Hartigan a écrit:
Karen Hartigan a écrit:
Mussel pattern. What does the large B indicate? Am I misinterpreting the two rows above the B to be two rows of tr with the next row being to tr in each tr below it? In looking closely at the photo, it appears that there are not two rows of tr and then two tr in each tr below it. It appears to be a row of tr, a row of dc and chain and then two tr in stitches below. Any clarification would be greatly appreciated. Perhaps you have the pattern written in stich format rather than the diagram?
24.06.2013 - 18:19DROPS Design a répondu:
Dear Mrs Hartigan, the arrow B in M.2 is used when you repeat the diagram, you then start at this arrow. You first work M.2 starting on the arrow "start", then repeat from arrow B. Happy crocheting!
10.07.2013 - 09:43Pnina a écrit:
It`'s beautiful dress. but the direction is wrong. it's decreasing even in the diagram
01.06.2013 - 20:22DROPS Design a répondu:
Dear Pnina, diagram is correct, you start reading it at the bottom corner right and then will work 2 tr (UK english) / 2 dc (US english) regularly in diag M.1 to inc. Happy crocheting!
03.06.2013 - 09:55
![]() Ank a écrit:
Ank a écrit:
Ik heb deze nu 3x gehaakt en kom steeds niet uit .in het begin is het al fout je moet de lus maken voor de armsgaten en dan nog een tour en dan moet je al al op een hoogte zijn van 23 cm dat kan nooit en als je het patroon van m2 moet gaan doen dan kom ik uit op 21 lussen het gevolg is dat hij heel wijd is als een soort tafel kleed ,er staat ook steeds dat je moet meerderen maar nooit dat je moet minderen iemand nog een tip of ook deze fout ondekt heeft of doe ik het echt helemaal fout
21.04.2013 - 13:08DROPS Design a répondu:
Beste Ank. Het patroon is correct. De hoogte van 23 cm klopt als u meerdert volgens het patroon. Het is niet helemaal duidelijk wat u bedoelt met de 21 lussen na 23 cm. Wij raden u aan de stekenverhouding goed te controleren. Het model heeft een A-lijn, zie ook de tekening. U hoeft inderdaad niet te minderen. Wij vermoeden dat u maat L haakt. De onderbreedte is dan inderdaad 98 cm aan het einde = 196 cm rondom. Als u dat te wijd vindt, raden we u aan een ander maat of model te maken.
16.05.2013 - 13:28
![]() Irina a écrit:
Irina a écrit:
Jeg kan simpel ikke finde ud af det .Videre hækles der 1 omg med lm-buer samtidig med at der tages 4-2-2-14-14 st ud jævnt fordelt – læs Udtagningstips 2 - = 144-162-180-198-216 st/lm. Jeg kan ikke finde ud af om det skal være 198 st. Der skal være eller om lm også skal tælles med har nu pillet der op så mange gange
04.04.2013 - 10:32DROPS Design a répondu:
Det er totalt 198 masker st og lm til sammen
04.04.2013 - 17:27
![]() Teri a écrit:
Teri a écrit:
I love this pattern. I am used to working crochet charts, although I am not an expert. In M2 chart, row Z, supposedly the last row in the written pattern consists of all dc. However the last written row is in 1 dc 1 ch loops. What am I missing? I understand the row that I am supposed to start with in the chart where it says "start" just not understanding row Z
28.03.2013 - 15:15DROPS Design a répondu:
Dear Teri, row Z in diagram M.2 shows the number of sts on previous round to let you see how to work 1st row (arrow start). Happy crocheting!
02.04.2013 - 10:09
![]() Bettina Hornscheidt a écrit:
Bettina Hornscheidt a écrit:
Liebes Team, habe dieses wunderschöne Modell angefangen zu häkeln und bin nun an der Stelle, wo die Markeirungsfäden eingezogen werden. Mir ist nicht genau klar, wo genau und warum ist das notwendig.Oder dient das nur dazu, um klar zu haben, was ist Vorderteil und was Rückenteil ist ? Vielen Dank für Eure Hilfe... L.G. Bettina Hornschiedt
18.03.2013 - 17:54DROPS Design a répondu:
Liebe Bettina, die Markierungsfäden kennzeichnen die Stelle, an der aufgenommen wird.
19.03.2013 - 07:41
![]() Becky a écrit:
Becky a écrit:
Nevermind I figured out the arm shaping. I forgot what the ch-loop meant lol but I have it now. I do have another question though. I was wondering am I allowed to sell any of the finished products I make from here on my shop website as long as I put that it was made from DROPS DESIGNS patterns?
24.02.2013 - 00:29DROPS Design a répondu:
Dear Becky, you will find all relevant informations at the very bottom of the page. Happy crocheting !
25.02.2013 - 10:54
![]() Becky a écrit:
Becky a écrit:
I am confused on the first round of the underarm where you chain. I got the skip 17 ch-loops and chain 8. I attached it in the 18th chain but I don't know what crochet to do in the next 21 stitches. Is it single or double crochet or am I supposed to do something else?
23.02.2013 - 23:11DROPS Design a répondu:
Dear Becky, you work ch-loops as before (1 ch-loop = 1 dc + 1 ch) on sts for front piece and back piece. Happy crocheting!
25.02.2013 - 10:03
|
||||||||||||||||||||||
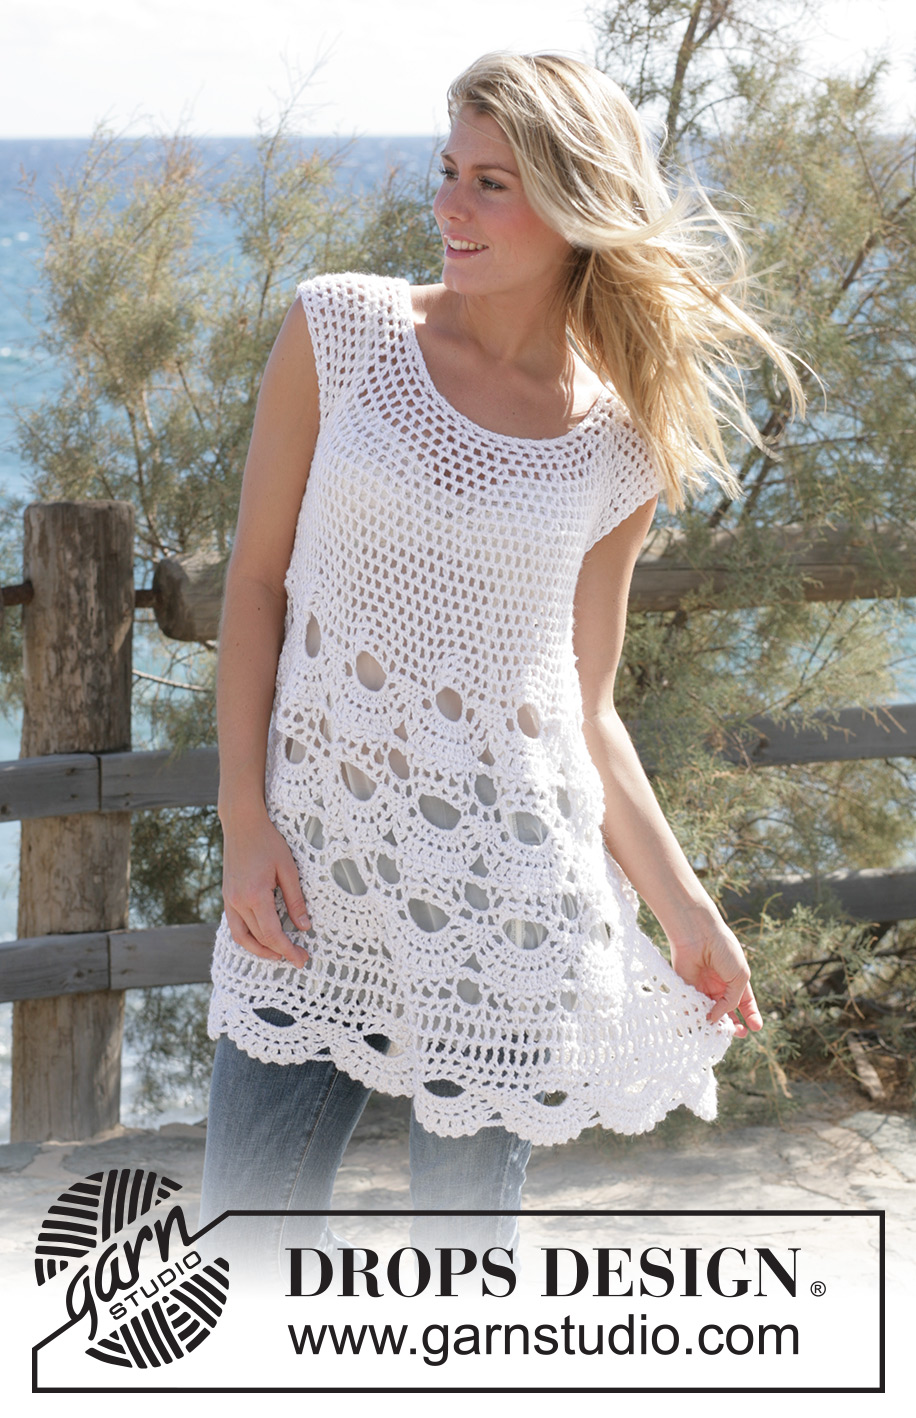
Breath of Summer#breathofsummertunic |
||||||||||||||||||||||
|
|
||||||||||||||||||||||
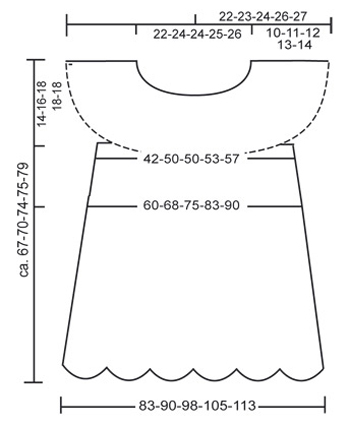
Tunique crochetée au point d’Eventail avec 1 fil DROPS Alpaca et 1 fil DROPS Coton Viscose ou 1 fil DROPS Bomull-Lin. Du S au XXL
DROPS 99-4 |
||||||||||||||||||||||
|
ECHANTILLON 12 B x 7 rangs = 10 x 10 cm avec 1 fil Alpaca + 1 fil Cotton Viscose ou 1 fil Bomull-Lin 1 motif au point d’éventail = 12 cm de large env. AUGMENTATIONS 1 : augmenter 1 ms : faire 2 ms dans 1 ms AUGMENTATIONS 2 : augmenter 1 B : faire 2 B dans 1 B (pas dans les ml entre) AUGMENTATIONS 3 : augmenter 1 arceau : faire 2 arceaux dans la même maille INFO CROCHET En début de rang, remplacer la 1ère B par 3 ml, remplacer la 1ère DB par 4 ml En fin de rang, joindre avec 1 mc dans la 3ème / 4ème ml du début du rang POINT EMPLOYE Voir diagramme M1 et M2. Les diagrammes montrent le point fantaisie sur l’endroit. ASTUCES pour MESURER Etant donné le poids de la laine, il est recommandé de prendre toutes les mesures quand l’ouvrage est suspendu REALISATION DOS et DEVANT La tunique se réalise en rond à partir du haut vers le bas. Avec le crochet 5 et 1 fil Drops Alpaca et 1 fil Drops Coton Viscose (= 2 fils ensemble) ou 1 fil Bomull-Lin monter souplement 71-75-75-79-83 ml. Former un rond avec 1 mc dans la 1ère ml. Faire le 1er rang ainsi : 1 ms dans chacune des 3 premières ml, *sauter 1 ml, 1ms dans chacune des 3 ml suiv* répéter de *à* = 54-57-57-60-63 ms. Faire ensuite 1 rang de ms, en même temps, répartir 22-15-19-20-21 ms – voir Augmentations 1 = 76-72-76-80-84 ms. Continuer en suivant M1 (voir info crochet). Après M1, il y a 76-90-95-100-105 arceaux (1arceau = 1 B + 1 ml). Continuer en faisant des B dans les ml et des ml au dessus des B jusqu’à 10-11-12-13-14 cm. Faire le rang suivant ainsi : Sauter 17-19-21-22-22 arceaux du rang précédent (= manche droite), faire 8 ml (=dessous de bras), faire 21-26-26-28-30 arceaux (= devant), sauter 17-19-21-22-22 arceaux du rang précédent (= manche gauche), monter 8 ml (=dessous de bras), faire 21-26-27-28-31 arceaux (=dos). Mettre un marqueur de chaque côté entre les 8 ml de sous le bras. Continuer en arceaux. NB : sur le 1er rang, dans les 8 ml sous les bras faire ainsi : 1B dans la 1ère ml, 1 ml, sauter 1 ml, 1B dans la ml suiv, 1 ml, 1B dans la même ml, 1 ml, sauter 1 ml, 1B dans la ml suiv, 1 ml, 1B dans la même ml, 1 ml, sauter 1 ml, 1B dans la m l suiv, 1 ml, sauter 1 ml (=6 arceaux sous chaque bras) = 54-64-65-68-73 arceaux. Continuer en arceaux, en même temps, augmenter 1 arceau –voir augmentations 3- de chaque côté des 2 marqueurs 4-4-6-6-7 fois tous les 2 rangs = 70-80-89-92-101 arceaux. Quand toutes les augmentations sont faites, l’ouvrage mesure env. 19-20-23-24-27 cm à partir de la chaînette de base à l’encolure (vous en êtes maintenant à mi-buste, si vous souhaitez ajuster, vous pouvez faire des rangs supplémentaires d’arceaux après les augmentations). Ensuite, faire 1 rang d’arceaux, en même temps, augmenter en répartissant 4-2-2-14-14 B supplémentaires –voir augmentations 2 = 144-162-180-198-216 B/ml Continuer ensuite en suivant M2 (commencer par la flèche start dans le diagramme) = 8-9-10-11-12 motifs sur le rang. Faire 3 motifs de M2 en hauteur, mais commencer le 2ème et le 3ème par 1a flèche B du diagramme. Après M2, faire 2-3-3-3-4 tours de DB ainsi : R 1 : Lire info crochet : Faire 1 DB dans chaque arceau, avec 1 ml entre chaque DB, finir par 1DB dans la dernière DB = 72-81-90-99-108 DB R 2 : 1 DB dans chaque DB du rang précédent, avec 2 ml entre chaque DB (au lieu d’1ml). Taille S : arrêter ici avant le dernier motif éventail = 72DB R 3 : 1 DB dans chaque DB du rang précédent, avec 3 ml entre chaque DB Taille M, L et XL : arrêter ici avant le dernier motif éventail : 81-90-99 DB R 4 : faire 1DB dans chaque DB du rang précédent avec 3 ml entre chaque DB Taille XXL : arrêter ici avant le dernier motif éventail : 108 DB Faire ensuite un rang d’arceau : 1 B et 1 ml (=1 arceau) dans chaque DB du rang précédent, en même temps, augmenter 1 arceau –voir augmentations 3 – toutes les 3-3-4-4-4 DB NB : pour les tailles L et XL, finir par 1 B et 1 ml dans chacune des 2-3 dernières DB = 96-108-112-123-135 arceaux. Faire 1 rang d’arceau, en même temps, augmenter 6-0-10-6-0 B –voir augmentations 2= 198-216-234-252-270 B/ml. Puis, continuer en suivant M2 de nouveau (commencer à la flèche start sur le diagramme), mais arrêter après le rang 7. |
||||||||||||||||||||||
Légende diagramme(s) |
||||||||||||||||||||||
|
||||||||||||||||||||||
 |
||||||||||||||||||||||
 |
||||||||||||||||||||||
Vous avez terminé ce modèle?Alors taguez vos photos avec #dropspattern #breathofsummertunic ou bien présentez-les dans la galerie #dropsfan Vous avez besoin d'aide pour ce modèle ?Vous trouverez 7 tutoriels vidéo, une rubrique commentaires/questions et plus encore en vous rendant sur la page du modèle sur garnstudio.com © 1982-2026 DROPS Design A/S. Tous droits réservés. Ce document, y compris ces sous-sections, est protégé par les droits d'auteur (copyright). Apprenez-en davantage sur ce que vous pouvez faire avec nos modèles en bas de chacune des pages de notre site. |
||||||||||||||||||||||


Avec plus de 40 ans dans la conception de modèles tricot et crochet, DROPS Design offre l'une des plus vastes collections de modèles gratuits sur internet - traduits dans 17 langues. À ce jour, on compte 324 catalogues et 12290 modèles en français.
Nous nous efforçons de vous apporter le meilleur de ce que le tricot et le crochet peuvent vous offrir, inspiration et conseils mais également des fils de haute qualité à des prix incroyables! Vous souhaiteriez utiliser nos modèles autrement que pour un usage personnel? Vous pouvez lire ce que vous êtes autorisés à faire dans le Copyright en bas de page de chacun de nos modèles. Bon tricot!
Poster un commentaire sur le modèle DROPS 99-4
Nous aimerions connaître votre avis sur ce modèle !
Si vous souhaitez poser une question, merci de bien vouloir vérifier que vous avez choisi la bonne catégorie dans le formulaire ci-dessous afin d'accélérer la réponse. Les champs obligatoires sont indiqués par une *.