
Categorie popolari
State cercando un filato?


Commenti / Domande (22)
![]() Mariëlle ha scritto:
Mariëlle ha scritto:
Bedankt Garnstudio voor dit leuke patroon! Inmiddels is het af. Ik wil nog wel even doorgeven dat ik zeker één bol extra verbruikt heb dan wat er volgens het patroon aangegeven staat. Wellicht handig voor andere haaksters die ook nog aan dit project willen beginnen.
24.01.2018 - 10:41
![]() Mariëlle ha scritto:
Mariëlle ha scritto:
Ik reageer even op de graag van Martha, want volgens mij klopt het patroon inderdaad niet. Voor maat L moet je inderdaad begonnen met 218 lossen te haken. Volgens mij moet je deze echt er niet sluiten met een halve vaste, maar gewoon weer terug haken. Als je het patroon vertaalt vanuit het Engels of het Duits, dan staat er Volgens mij nergens dat je deze ketting van lossen moet sluiten met een halve vaste.
29.06.2017 - 19:25DROPS Design ha risposto:
Hoi Mariële, Ik heb het patroon even goed doorgelezen en je hebt gelijk! Als je in de rondte zou breien, zou je ook geen knoopbies krijgen. Het is aangepast hoor. Dankjewel voor het doorgeven!
29.06.2017 - 20:37
![]() Eva Takacs ha scritto:
Eva Takacs ha scritto:
Hi, sorry, me again. Now I am at the point where it says: 'work 1 tr through both layers in each of the 4 tr on band, then work 1 tr in every tr from bottom edge of ch-row' For the life of me I can't imagine what this means how I am supposed to work a tr through two layers of crocheted material. I was looking for video help, also I tried finding info on this generally online, but can't find anything. Could you give me some pointers? Thank you.
27.08.2016 - 23:46DROPS Design ha risposto:
Dear Mrs Takacs, there are no video yet showing how to do, but you will now have to crochet both pieces tog to create the button band: place the first 4 tr from left back piece under the first 4 tr from right back piece and crochet 1 tr in the first of these 4 tr on right back piece and at the same time in the tr on left back piece = both pieces are now crocheted tog. Repeat so that you have worked the 4 band sts on right back piece tog with the 4 band sts of left back piece and continue as stated. Happy crocheting!
29.08.2016 - 11:47
![]() Eva Takacs ha scritto:
Eva Takacs ha scritto:
I am really stuck at the back part, from when it starts with the left back. I don't quite understand what the bit about '4tr=band' means. Does this mean to crochet four trebbles into the last stitch? Is there a picture somewhere of the back of the finished garment? Thank you for the help in advance.
26.08.2016 - 01:17DROPS Design ha risposto:
Dear Mrs Takacs, the 4 tr towards mid back are for the button band, these are the last 4 tr on row from RS and first 4 tr from WS. Happy crocheting!
26.08.2016 - 10:57
![]() Martha Vonder-van Der Leij ha scritto:
Martha Vonder-van Der Leij ha scritto:
Klopt het patroon wel? Ik moet 218 lossen haken en met een hv tot een ring sluiten, daarna keren en in de 4e losse een stokje haken? Dat moeten dan 2 stokjes zijn maar dat kan toch niet kloppen? Dat ziet er heel raar uit!
23.07.2016 - 11:49DROPS Design ha risposto:
Hoi Martha. Ja, de eerste 3 lossen vervangen het eerste stk. Dus dit is correct
25.07.2016 - 15:54
![]() Kristin Svedberg ha scritto:
Kristin Svedberg ha scritto:
Hej! I förklaringen på bakstycket: VÄNSTER BAKST: "Nu virkas det över de första 38-42-46-51-57-63 från överdelen, 4 st mot mitt bak = framkant" borde det kanske stå "knappkant" istället för framkant. Det tog ett tag innan jag fattade vad som menades, sen när man läser längre ner i beskrivningen så kommer nämligen benämningen knappkant. Med vänlig hälsning Kristin
18.07.2016 - 14:37
![]() Metzle ha scritto:
Metzle ha scritto:
Combien de pelotes pour ce modèle en 38/40? SVP
02.03.2016 - 19:08DROPS Design ha risposto:
Consultez 'Astuces et Aide'> 'Lecons DROPS' > le titre de la lecon: Comment lire le schema des mesures. Bien cordialement!
03.03.2016 - 19:34
![]() Metzle ha scritto:
Metzle ha scritto:
Combien de pelotes pour ce modèle en 38/40 SVP?
02.03.2016 - 19:06DROPS Design ha risposto:
Bonjour Mme Metzle, vous trouverez la quantité requise pour chaque taille sous l'onglet "Fournitures", soit par ex en taille S: 450 g Belle/50 g la pelote = 9 pelotes - cliquez ici pour savoir comment choisir la taille. Bon crochet!
03.03.2016 - 08:44
![]() Råsi-Mari Tengsmo ha scritto:
Råsi-Mari Tengsmo ha scritto:
Mycket snygg och lättvirkad. Blir absolut fler virkade.
13.02.2016 - 08:20
![]() Mila ha scritto:
Mila ha scritto:
I would love to make this!!
11.01.2016 - 16:20
|
|
Peaceful Mind#peacefulmindtunic |
|
|
|
|
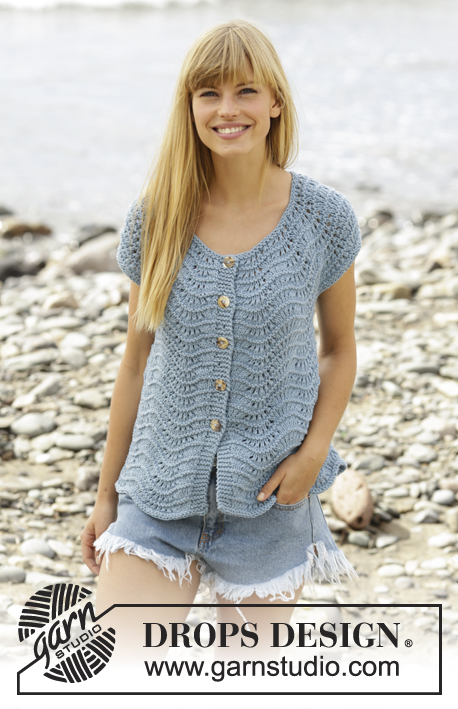
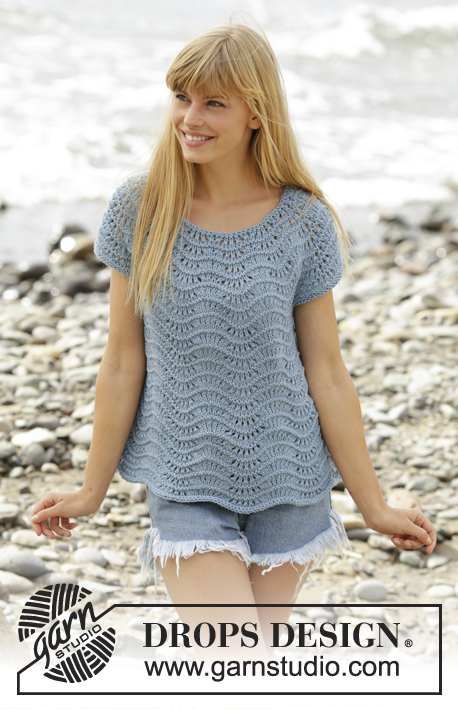
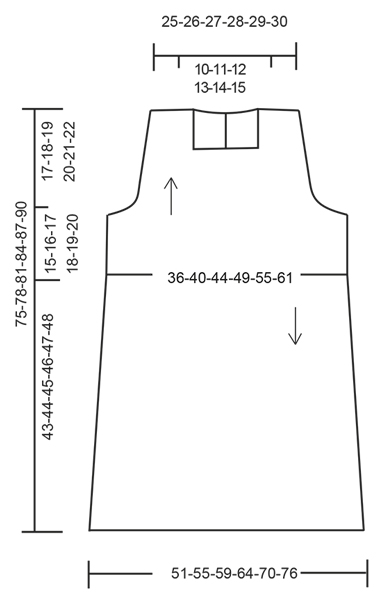
Tunica DROPS lavorata all’uncinetto con motivo a ventaglio in “Belle”. Taglie: S - XXXL.
DROPS 168-26 |
|
|
INFORMAZIONI PER IL LAVORO: Sostituire la 1° m.a all’inizio di ogni riga/giro a m.a con 3 cat. Finire un giro a m.a con 1 m.bss nella 3° cat. SUGGERIMENTO PER LE DIMINUZIONI: Diminuire all’inizio del giro come segue: lavorare a m.bss sul n° di m da diminuire. Diminuire alla fine del giro come segue: quando rimane il n° di m.a da diminire, girare il lavoro. ---------------------------------------------------------- TUNICA: Lavorata in diverse parti e in diverse direzioni. Per prima cosa lavorare la parte superiore con il davanti e il dietro, poi lavorare il corpo in basso e in tondo. PARTE SUPERIORE: Avviare 180-199-218-242-271-300 cat con l’uncinetto n° 3,5 mm con Belle. Girare e lavorare 1 m.a nella 4° cat dall’uncinetto (= 2 m.a), * saltare 1 cat, 1 m.a in ognuna delle 5 cat successive *, ripetere *-* e finire saltando 1 cat, 1 m.a in ognuna delle ultime 1-2-3-3-2-1 cat = 148-164-180-200-224-248 m.a. Girare e lavorare 1 m.a in ogni m.a avanti e indietro fino a quando il lavoro misura 15-16-17-18-19-20 cm – LEGGERE LE INFORMAZIONI PER IL LAVORO. FARE ATTENZIONE ALLA TENSIONE DEL LAVORO! Tagliare il filo. Poi lavorare avanti e indietro sulle 72-80-88-98-110-122 m.a centrali sul f (= 38-42-46-51-57-63 m.a rimaste a ogni lato per il dietro). DAVANTI: = 72-80-88-98-110-112 m.a. Lavorare 1 m.a in ogni m.a e ALLO STESSO TEMPO diminuire per lo scalfo a ogni lato su ogni riga come segue: 3 m.a 1-1-1-2-2-3 volte, 2 m.a 2-3-4-4-6-7 volte e 1 m.a 4-4-4-4-4-3 volte = 50-54-58-62-66-70 m.a – LEGGERE IL SUGGERIMENTO PER LE DIMINUZIONI. Continuare a lavorare fino a quando il lavoro misura 24-26-28-30-32-34 cm. Ora lavorare solo sulle prime 11-12-13-14-15-16 m.a sulla riga (= dal diritto del lavoro). Lavorare 1 m.a in ogni m.a fino a quando il lavoro misura 32-34-36-38-40-42 cm. Ripetere dal lato opposto ma ora lavorare sulle ultime 11-12-13-14-15-16 m.a sulla riga (= dal diritto del lavoro). Le 28-30-32-34-36-38 m.a non lavorate verso il centro davanti = collo. DIETRO SINISTRO: Ora lavorare le prime 38-42-46-51-57-63 m dalla parte superiore, 4 m.a verso il centro dietro = bordo. Intrecciare per lo scalfo a lato come sul davanti = 27-29-31-33-35-37 m.a. Quando il lavoro misura 30-32-34-36-38-40 cm, lavorare solo sulle ultime 11-12-13-14-15-16 m.a sulla riga (= dal diritto del lavoro). Lavorare 2 righe in totale su queste 11-12-13-14-15-16 m, le 16-17-18-19-20-21 m.a non lavorate verso il centro dietro = collo. Chiudere e affrancare, il lavoro misura 32-34-36-38-40-42 cm. DIETRO DESTRO: Lavorare come per il sinistro ma a specchio. CORPO: Lavorato dall’alto in basso, dal lato sotto della riga di cat della parte superiore. Mettere le 4 m.a più esterne del dietro sinistro sotto le 4 m.a più esterne del dietro destro (= bordi), iniziare al centro dietro e lavorare 1 m.a attraverso entrambi gli strati in ognuna delle 4 m.a sul bordo, poi lavorare 1 m.a in ogni m.a dal bordo inferiore della riga di cat, finire con 1 m.bss nella 3° cat all’inizio del giro = 144-160-176-196-220-244 m.a. ORA MISURARE IL LAVORO DA QUI! Lavorare 1 giro con 1 m.a in ogni m.a e allo stesso tempo aumentare 1-0-4-4-0-1 m.a = 145-160-180-200-220-245 m.a. Ora lavorare il motivo a ventaglio come segue: GIRO 1: 1 m.b nella 1° m.a, *4 cat, saltare 4 m.a, 1 m.b nella m.a successiva *, ripetere *-* per tutto il giro e finire con 4 cat, saltare 4 m.a e 1 m.bss nella 1° m.b = 29-32-36-40-44-49 archi di cat. GIRO 2: 3 m.a + 2 cat + 3 m.a in ogni arco di cat. GIRO 3: lavorare a m.bss fino al 1° arco di cat, poi lavorare 3 m.a + 2 cat + 3 m.a in ogni arco di cat. Ripetere il 3° giro fino a quando il lavoro misura 18 cm per tutte le taglie. LAVORARE IL GIRO SUCCESSIVO COME SEGUE: lavorare a m.bss fino al 1° arco di cat, poi lavorare 4 m.a + 2 cat + 4 m.a in ogni arco di cat. Ripetere questo giro fino a quando il lavoro misura 31 cm per tutte le taglie. LAVORARE IL GIRO SUCCESSIVO COME SEGUE: lavorare a m.bss fino al 1° arco di cat, poi lavorare 4 m.a.d + 2 cat + 4 m.a.d in ogni arco di cat. Ripetere questo giro fino a quando il lavoro misura 43-44-45-46-47-48 cm. Chiudere e affrancare. BORDO ATTORNO ALLO SCALFO LAVORATO ALL’UNCINETTO: Lavorare un bordo attorno agli scalfi come segue: GIRO 1: lavorare 1 cat, 1 m.b, * 1 cat, saltare circa 1 cm, 1 m.b *, ripetere *-* e finire con 1 m.bss nella cat all’inizio del giro – assicurarsi di lavorare un n° di m.b/cat che sia divisibile per 4. GIRO 2: lavorare 1 cat, lavorare 1 m.b attorno al 1° arco di cat, * 1 m.b attorno allo stesso arco di cat, 3 cat, 1 m.a nella 1° cat, lavorare 2 m.b attorno all’arco di cat successivo, 1 m.b attorno all’arco di cat successivo *, ripetere *-* e finire con 1 m.bss nella 1° cat sul giro. Chiudere e affrancare. BORDO ATTORNO AL COLLO LAVORATO ALL’UNCINETTO: Lavorare un bordo attorno al collo come segue: RIGA 1: lavorare 1 cat, 1 m.b, * 1 cat, saltare circa 1 cm, 1 m.b *, ripetere *-* assicurarsi di lavorare un n° di cat/m.b che sia divisibile per 4. Girare. RIGA 2: lavorare 1 cat, lavorare 1 m.b attorno al 1° arco di cat, * 1 m.b attorno allo stesso arco di cat, 3 cat, 1 m.a nella 1° cat, lavorare 2 m.b attorno all’arco di cat successivo, 1 m.b attorno all’arco di cat successivo *, ripetere *-*. Chiudere e affrancare. CONFEZIONE: Distribuire 5-5-5-6-6-6 bottoni sul bordo sinistro al centro dietro e affrancare. Allacciare i bottoni tra le m.a sul bordo destro. |
|
 |
|
Avete terminato questo modello?Allora taggate le vostre foto con #dropspattern #peacefulmindtunic o inviatele alla #dropsfan gallery. Avete bisogno di aiuto con questo modello?Troverete 8 video tutorial, una sezione per i commenti/domande e molto altro guardando il modello su www.garnstudio.com © 1982-2026 DROPS Design A/S. Ci riserviamo tutti i diritti. Questo documento, compreso tutte le sue sotto-sezioni, è protetto dalle leggi sul copyright. Potete leggere quello che potete fare con i nostri modelli alla fine di ogni modello sul nostro sito. |


Con oltre 40 anni di esperienza nel design di modelli di maglia e uncinetto, DROPS Design offre la più estesa collezione di modelli gratuiti su internet - tradotti in 17 lingue. Ad oggi vi possiamo fornire 324 cataloghi e 12290 modelli - 9561 dei quali sono tradotti in Italiano.
Ci stiamo impegnando molto per darvi il meglio che vi possiamo offrire in termini di maglia e uncinetto, ispirazioni e consigli così come filati di grande qualità ad un prezzo incredibile! Volete utilizzare i nostri modelli per qualcosa d'altro oltre al vostro uso personale? Potete leggere tutto ciò che è consentito nel testo sul Copyright in basso su tutte le pagine dei nostri modelli. Buon lavoro!
Lasciare un commento sul modello DROPS 168-26
Noi saremmo felici di ricevere i tuoi commenti e opinioni su questo modello!
Se vuoi fare una domanda, fai per favore attenzione a selezionare la categoria corretta nella casella qui sotto per velocizzare il processo di risposta. I campi richiesti sono indicati da *.