
Categorie popolari
State cercando un filato?


Commenti / Domande (109)
![]() CHATILLON ha scritto:
CHATILLON ha scritto:
Bonjour, nous aimerions avoir le diagramme complet pour realiser ce pull. Merci par avance Cordialement Me CHATILLON
18.11.2018 - 17:00DROPS Design ha risposto:
Bonjour Mme Chatillon, nous n'avons pas de diagramme complet pour chaque taille, suivez bien attentivement en même temps les diagrammes et les explications pour votre taille. Bon crochet!
19.11.2018 - 09:08
![]() Dina ha scritto:
Dina ha scritto:
I am sorry to say that my yoke size is small to start the diagram so May I add more rows to increase its length and to be under bust as shown in the photo ...or I had to repeat work by adding more rows in the WS ie working row 1RS then 3more rows then row 2RS then 3more rows and so on????!please advice
06.08.2018 - 17:02DROPS Design ha risposto:
Dear Dina, make sure to check and keep your tension, you should have 18 dc x 9 rows = 10 x 10 cm - if your tension is still too tight in height you can adjust the yoke length working some more rows evenly between the rows with increases. Hapy crocheting!
07.08.2018 - 09:44
![]() Dina ha scritto:
Dina ha scritto:
I am sorry to say that my yoke size is small to start the diagram so May I add more rows to increase its length and to be under bust as shown in the photo ...or I had to repeat work by adding more rows in the WS ie working row 1RS then 3more rows then row 2RS then 3more rows and so on????!please advice
06.08.2018 - 16:59
![]() Carrie ha scritto:
Carrie ha scritto:
On next row from RS, inc as follows: Inc 1 dc on each side of every marker (= 24 dc inc), repeat inc on every row from RS 3-3-4-6-7-9 times in total, then inc before every marker (= 12 dc inc), repeat inc on every row from RS 4-4-4-2-2-0 times in total I'm having trouble with this part. I did the 1st row but don't understand how many more rows I am supposed yo do or how exactly to increase... Can you please help?
31.07.2018 - 03:25DROPS Design ha risposto:
Dear Carrie, you will now increase for the round yoke 1 dc on each side of each marker (= 24 sts increased). Depending on your size you will work these increases on every row 3-3 times in total in size S and M, 4 times in total in size L, 6 times in total in size XL, 7 times in total in size XXL, 9 times in total in size XXXL. Then repeat these increase every other row 4 times in total in size S, M and L and 2 times in total in total in size XL and XXL (no increase every other row in the largest size). Happy crocheting!
31.07.2018 - 10:01
![]() Ellen ha scritto:
Ellen ha scritto:
Your explanation on the chains at beginning of pattern A1 is very confusing!! Looking through peoples questions you haven't answered simply you just say follow A1,A2,A3 then join. BUT the chain shows especially on bobble row. Does the starting point after the joins veer to left each time and not run vertically down the back of jumper? The start of the row of bobbles is particually confusing. To recap PLEASE explain starting chains IN VERY EASY DIALOGUE.
29.06.2018 - 18:03DROPS Design ha risposto:
Dear Ellen, you start either A.1 depending on the row with either 1, 3 or4 chains and finish each round with 1 sl st in the 1st, 3rd or 4th chain from beg of round. On the row with bobbles you start with 4 ch (then work 4 ch = 1st sch-space and 1 boblle, 3 ch = A.1) and finish with 1 sl st in the 4th ch from beg of round. Happy crocheting!
02.07.2018 - 08:49
![]() Sarah ha scritto:
Sarah ha scritto:
When doing the row before bobble it starts 3 chains then 2 chains 4 trebles 2 chains etc. At end of row 2 chains and sl st into previous 3 chains. I am left with a single line of chains where I have joined!!! Which doesn't look right! To recap- 4 trebles,2 Ch joined into 3 Ch at start which looks as if I have one line treble in the pattern. Please explain step by step where I am going wrong with the starting chains
28.06.2018 - 14:54DROPS Design ha risposto:
Dear Sarah, when working A.z you start round with A.1 and finish the round with A.3 = 2 chains at the end of last repeat before the sl st joining the beg of round. Happy crocheting!
28.06.2018 - 18:00
![]() Paula M ha scritto:
Paula M ha scritto:
Es muy enredada la explicación, mucha palabras, especialmente para el canesu, debieran colocar un video de cómo aumentar los puntos y especificar bien dónde comienzan los marcadores,los puntos se aumentan antes o después. Prefiero los patrones y no tanta letra sin sentido, dice repetir de *-* y ves cuentos de asteriscos(✴), al final no sabes de donde a dónde se repite!
27.06.2018 - 20:23
![]() Sarah ha scritto:
Sarah ha scritto:
WHEN STARTING THE PATTERN ARE THE 3 CHAINS AT BEGINNING TO BE USED AS THE FIRST TREBLE STITCH? IF NOT I AM CONFUSED ON WHAT TO DO WITH THEM AT THE JOINS????
26.06.2018 - 17:42DROPS Design ha risposto:
Dear Sarah, the 3 ch replace the first st at beg of row only when working piece back and forth, finish then each row with a sl st in the 3rd ch from beg of row, turn piece, work 3 ch at the beg of row and finish with 1 sl st in the 3rd ch from beg of round. When working diagrams, the first st in A.1 shows how to start and finish the round. Happy crocheting!
27.06.2018 - 08:19
![]() Yvonne ha scritto:
Yvonne ha scritto:
On lacey days jumper continuing with my previous question i cannot get neck size correct, far to wide and it is shoulder high not neck height?? i am determined to get it right but struggling how to do it!! i have unpicked it endlesss times! tension, chains and hook all correct!!!!
19.06.2018 - 15:14DROPS Design ha risposto:
Deaer Yvonne, see previous answer and check the number of chains and number of sts in your size. Hapy crocheting!
19.06.2018 - 15:54
![]() Yvonne ha scritto:
Yvonne ha scritto:
On lacey days jumper i am not getting on too good,!!!! I have correct amount of chains at the start,correct tension, i have just finished yoke, but the neck opening is far too big and it is too far down my back??? there is no way when i do neck edge it will be as high as the picture. what have i done wrong.?
19.06.2018 - 14:25DROPS Design ha risposto:
Dear Yvonne, at the very first round on yoke, you will skip chains evenly so that you should have 124-124-132-136-140-148 tr at the end of this first round over the 153-153-163-168-173-183 ch (this is to avoid that the foundation chain is too tight and prevent a tight neck edge). Happy crocheting!
19.06.2018 - 15:53
|
||||||||||||||||||||||||||||||||||
Lacey Days Jumper#laceydaysjumper |
||||||||||||||||||||||||||||||||||
 |
 |
|||||||||||||||||||||||||||||||||
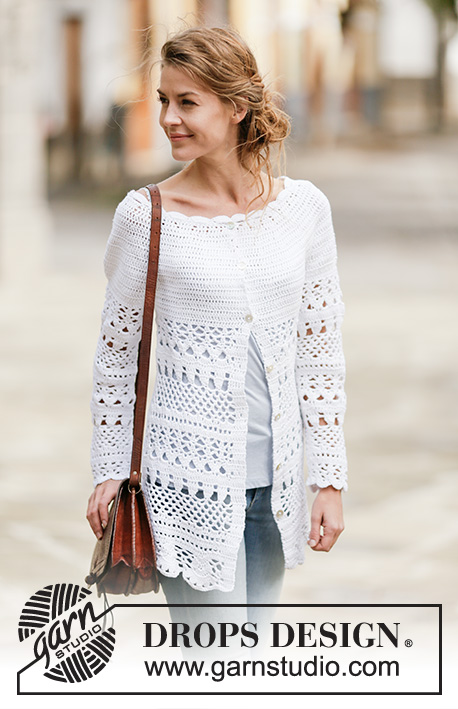
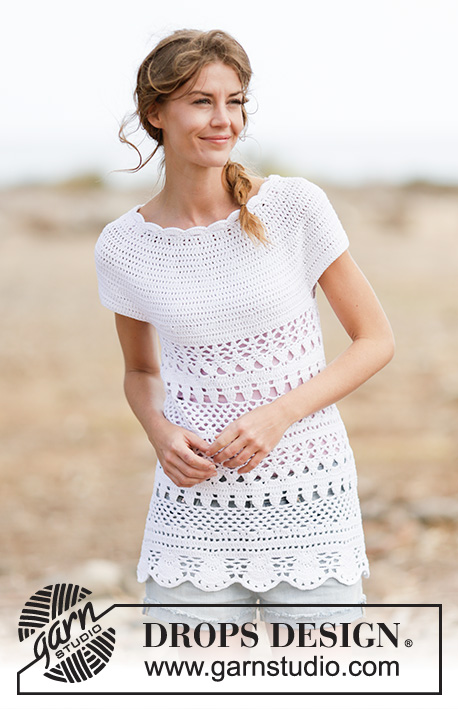
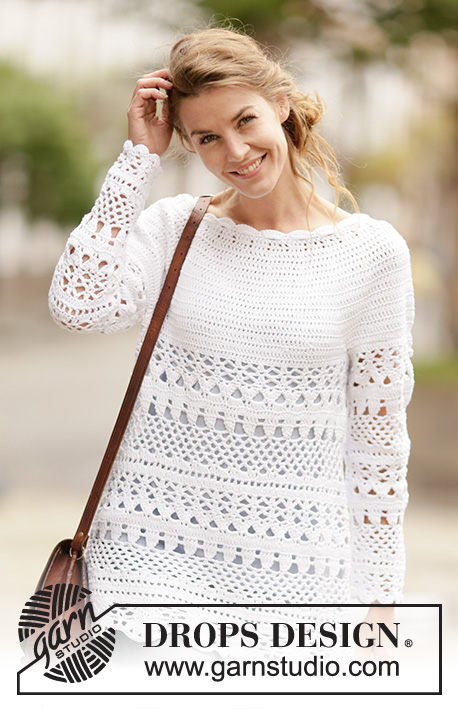
Maglione DROPS lavorato all’uncinetto con motivo traforato e sprone rotondo, lavorato dall’alto verso il basso (top down) in ”Cotton Light”. Taglie: S - XXXL.
DROPS 162-27 |
||||||||||||||||||||||||||||||||||
|
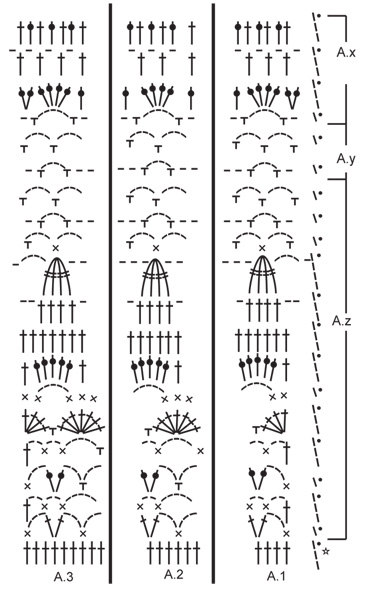
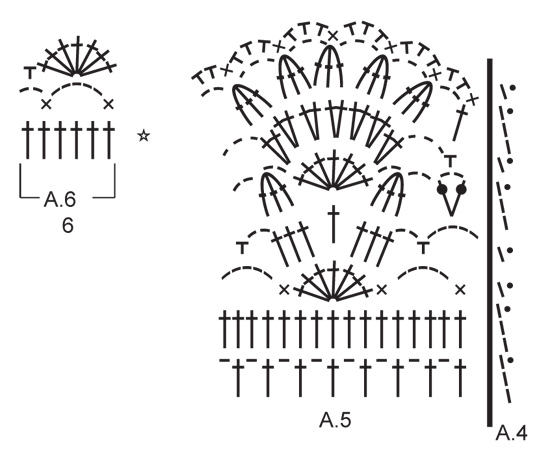
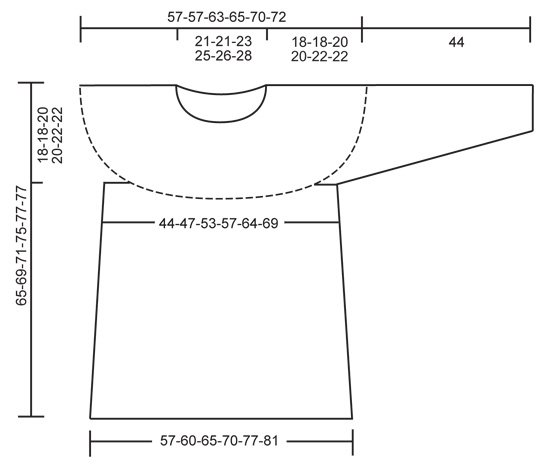
INFORMAZIONI PER IL LAVORO: Applicate durante il lavoro avanti e indietro. Su ogni riga a m.a sostituire la 1° m.a con 3 cat, finire la riga con 1 m.bss nella 3° cat. SUGGERIMENTO PER GLI AUMENTI: Aumentare 1 m.a lavorando 2 m.a in 1 m.a. SUGGERIMENTO PER LE DIMINUZIONI: Lavorare 1 m.a ma aspettare con l’ultimo passaggio (= 2 m sull’uncinetto), poi lavorare la m.a successiva ma sull’ultimo passaggio, far passare il filo attraverso tutte le m sull’uncinetto = 1 m.a diminuita. MOTIVO: Vedere i diagrammi A.1-A.6. A.4 mostra come inizia e finisce il motivo durante il lavoro in tondo. ---------------------------------------------------------- SPRONE: Si lavora dall’alto verso il basso a partire dal centro, sul dietro. Con l’uncinetto n° 4 ed il filato Cotton Merino, avviare 153-153-163-168-173-183 cat e formare un anello con 1 m.bss nella prima cat. Lavorare il giro successivo come segue: 3 cat (= 1 m.a), 1 m.a nella prima cat dell’anello di cat, 1 m.a in ognuna delle 2 cat successive, * saltare 1 cat, 1 m.a in ognuna delle 4 cat successive *, ripetere da *-* = 124-124-132-136-140-148 m.a. Poi lavorare avanti e indietro. Finire ogni riga con 1 m.bss nella 3a cat dell'inizio della riga. Girare il lavoro. VEDERE LE INFORMAZIONI PER IL LAVORO ! Inserire 12 segni nel lavoro, come segue: Lavorare 15-15-17-18-19-21 m.a, ALLO STESSO TEMPO, aumentare 1-5-3-3-4-2 m.a a intervalli regolari – VEDERE IL SUGGERIMENTO PER GLI AUMENTI, inserire il primo segnapunti, * lavorare 4 m.a, inserire il segnapunti successivo *, ripetere da *-* ancora 1 volta, lavorare 16 m.a, inserire il segnapunti successivo, * lavorare 4 m.a, inserire il segnapunti successivo *, ripetere da *-* ancora 1 volta, lavorare 30-30-34-36-38-42 m.a e, ALLO STESSO TEMPO, aumentare 2-10-6-6-8-4 m.a a intervalli regolari, inserire il segnapunti successivo, * lavorare 4 m.a, inserire il segnapunti successivo *, ripetere da *-* ancora 1 volta, lavorare 16 m.a, inserire il segnapunti successivo, * lavorare 4 m.a, inserire il segnapunti successivo *, ripetere da *-* ancora 1 volta, lavorare 15-15-17-18-19-21 m.a e, ALLO STESSO TEMPO, aumentare 1-5-3-3-4-2 m.a a intervalli regolari = 128-144-144-148-156-156 m.a. RICORDARSI LA TENSIONE DEL LAVORO! Girare il lavoro. Nel corso della riga successiva sul diritto del lavoro, aumentare come segue: aumentare 1 m.a da ciascun lato di ogni segnapunti (= 24 m.a aumentate), ripetere questi aumenti ad ogni riga sul diritto del lavoro 3-3-4-6-7-9 volte in tutto, poi aumentare prima di ogni segno (= 12 m.a aumentate), ripetere questi aumenti ad ogni riga sul diritto del lavoro 4-4-4-2-2-0 volte in tutto = 248-264-288-316-348-372 m.a. Il lavoro misura circa17-17-19-19-21-21 cm. Al giro successivo, lavorare come segue: 35-38-42-47-53-57 m.a (metà dietro), 8 cat (sotto la manica), saltare 54-56-60-64-68-72 m.a della riga precedente (da usare per la manica in seguito), 70-76-84-94-106-114 m.a; ALLO STESSO TEMPO, aumentare 1-1-3-1-1-3 m.a a intervalli regolari (davanti), 8 cat (sotto manica), saltare 54-56-60-64-68-72 m.a della riga precedente da usare per la manica in seguito) e 35-38-42-47-53-57 m.a (metà dietro) = 157-169-187-205-229-247 m.a/cat. Lavorare ora in tondo senza girare. Proseguire come segue: diagramma A.1, diagramma A.2 in tutto 24-26-29-32-36-39 volte in larghezza, finire con il diagramma A.3. Lavorare i primi 7 giri del diagramma A.z. Nel corso dell’ 8° giro del diagramma A.z (= giro di m.a) aumentare 6 m.a a intervalli regolari – VEDERE IL SUGGERIMENTO PER GLI AUMENTI-2 = 163-175-193-211-235-253 m.a. Proseguire a lavorare il diagramma A.z come prima, ma lavorare ora il diagramma A.2 25-27-30-33-37-40 volte in larghezza. Dopo aver lavorato il diagramma A.z 1 volta in verticale, lavorare il diagramma A.y sul diagramma A.z in tutto 1-2-2-3-3-3 volte in verticale. Proseguire lavorando il diagramma A.x sul diagramma A.y. Nel corso del 2° giro del diagramma A.x aumentare 12 m.a a intervalli regolari = 175-187-205-223-247-265 m.a. Proseguire a lavorare il diagramma A.x come prima, ma lavorare ora il diagramma A.2 27-29-32-35-39-42 volte in larghezza. Durante l’ultimo giro del diagramma A.x, aumentare 6 m.a a intervalli regolari = 181-193-211-229-253-271 m.a. Lavorare ora il diagramma A.z sulle m del diagramma A.x (lavorare ora il diagramma A.2 28-30-33-36-40-43 volte in larghezza). Nel corso dell’ 8° giro del diagramma A.z, aumentare 12 m.a a intervalli regolari = 193-205-223-241-265-283 m.a. Proseguire a lavorare il diagramma A.z come prima, ma lavorare ora il diagramma A.2 30-32-35-38-42-45 volte in larghezza. Dopo aver lavorato il diagramma A.z 1 volta in verticale, lavorare il diagramma A.y sul diagramma A.z in tutto 1-2-2-3-3-3 volte in verticale. Proseguire lavorando il diagramma A.x sul diagramma A.y. Nel corso del 2° giro del diagramma A.x, aumentare 6 m.a a intervalli regolari = 199-211-229-247-271-289 m.a. Proseguire a lavorare il diagramma A.x come prima, ma lavorare ora il diagramma A.2 31-33-36-39-43-46 volte in larghezza. Durante l’ultimo giro del diagramma A.x, aumentare 9-13-11-9-17-15 m.a a intervalli regolari = 208-224-240-256-288-304 m.a. Proseguire come segue: diagramma A.5 in tutto 13-14-15-16-18-19 volte (il diagramma A.4 mostra come inizia e finisce il giro). Tagliare il filo dopo aver lavorato il diagramma A.5 1 volta in verticale. Il lavoro misura ca.65-69-71-75-77-77 cm. MANICA: Lavorare in tondo, dall’alto in basso (top down). Iniziare lavorando al centro sotto la manica come segue: lavorare 1 m.b nella 5° cat delle 8 cat lavorate sullo scalfo nel corpo. Lavorare 3 cat (= 1 m.a). Poi lavorare con 1 m.a in ognuna delle 3 cat successive. Poi lavorare con 1 m.a in ogni m.a sulla manica e ALLO STESSO TEMPO diminuire 1-3-1-5-3-1 m.a in modo uniforme – LEGGERE IL SUGGERIMENTO PER LE DIMINUZIONI, prima di lavorare 1 m.a in ognuna delle 4 cat rimaste sotto la manica = 61-61-67-67-73-79 m.a. Continuare a lavorare come segue: A.1, A.2 8-8-9-9-10-11 volte in larghezza, finire con A.3. Sull’8° giro di A.z (= giro a m.a) diminuire 6 m.a in modo uniforme = 55-55-61-61-67-73 m.a. Continuare a lavorare A.z come prima ma ora lavorare A.2 7-7-8-8-9-10 volte in larghezza. Quando A.z è stato lavorato 1 volta in verticale, lavorare A.y su A.z. Quando A.y è stato lavorato 1 volta in verticale, lavorare A.x su A.y. Sull’ultimo giro di A.x diminuire 6 m.a in modo uniforme = 49-49-55-55-61-67 m.a. Poi lavorare A.z su A.x. A.2 ora è lavorato 6-6-7-7-8-9 volte in larghezza. Sull’8° giro diminuire 6 m.a in modo uniforme = 43-43-49-49-55-61 m.a. Quando A.z è stato lavorato 1 volta in verticale, lavorare A.y su A.z. Poi lavorare A.x su A.y. Sull’ultimo giro di A.x diminuire 0-0-0-0-6-6 m.a in modo uniforme = 43-43-49-49-49-55 m.a. Poi lavorare i primi 5 giri di A.z. A.2 ora è lavorato 5-5-6-6-6-7 volte in larghezza. Chiudere e affrancare. La manica misura circa 44 cm in tutte le taglie. Lavorare l’altra manica nello stesso modo. BORDO DEL COLLO: Lavorato in tondo. Lavorare un bordo attorno al collo nel giro di cat con l’uncinetto n° 4 mm con Cotton Light, iniziare al centro dietro dal diritto del lavoro come segue: riprendere 114-114-120-120-126-126 m.a nella riga di cat. Quindi lavorare A.6 19-19-20-20-21-21 volte in totale in larghezza. Chiudere e affrancare. |
||||||||||||||||||||||||||||||||||
Spiegazioni del diagramma |
||||||||||||||||||||||||||||||||||
|
||||||||||||||||||||||||||||||||||
 |
||||||||||||||||||||||||||||||||||
 |
||||||||||||||||||||||||||||||||||
 |
||||||||||||||||||||||||||||||||||
Avete terminato questo modello?Allora taggate le vostre foto con #dropspattern #laceydaysjumper o inviatele alla #dropsfan gallery. Avete bisogno di aiuto con questo modello?Troverete 15 video tutorial, una sezione per i commenti/domande e molto altro guardando il modello su www.garnstudio.com © 1982-2026 DROPS Design A/S. Ci riserviamo tutti i diritti. Questo documento, compreso tutte le sue sotto-sezioni, è protetto dalle leggi sul copyright. Potete leggere quello che potete fare con i nostri modelli alla fine di ogni modello sul nostro sito. |
||||||||||||||||||||||||||||||||||


Con oltre 40 anni di esperienza nel design di modelli di maglia e uncinetto, DROPS Design offre la più estesa collezione di modelli gratuiti su internet - tradotti in 17 lingue. Ad oggi vi possiamo fornire 324 cataloghi e 12290 modelli - 9561 dei quali sono tradotti in Italiano.
Ci stiamo impegnando molto per darvi il meglio che vi possiamo offrire in termini di maglia e uncinetto, ispirazioni e consigli così come filati di grande qualità ad un prezzo incredibile! Volete utilizzare i nostri modelli per qualcosa d'altro oltre al vostro uso personale? Potete leggere tutto ciò che è consentito nel testo sul Copyright in basso su tutte le pagine dei nostri modelli. Buon lavoro!
Lasciare un commento sul modello DROPS 162-27
Noi saremmo felici di ricevere i tuoi commenti e opinioni su questo modello!
Se vuoi fare una domanda, fai per favore attenzione a selezionare la categoria corretta nella casella qui sotto per velocizzare il processo di risposta. I campi richiesti sono indicati da *.