
Categorie popolari
State cercando un filato?


Commenti / Domande (81)
![]() Lynne Underkofler ha scritto:
Lynne Underkofler ha scritto:
Your quick response and clarification was amazing! Thank you so much. The differences in punctuation with commas versus semi-colons was what confused me. Now it makes total sense. Thanks again for your wonderful patterns and support.
05.06.2015 - 14:19
![]() Lynne Underkofler ha scritto:
Lynne Underkofler ha scritto:
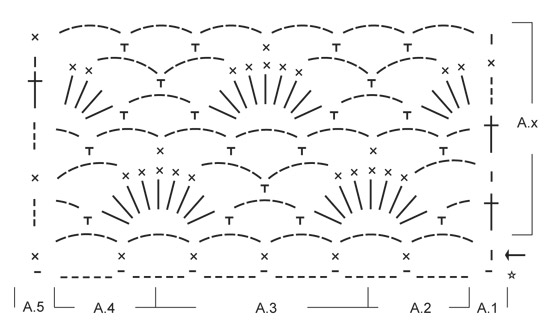
Row 1-'skip ch 1' - does this mean skip a chain AND chain 1 in between 4 dc, or just skip a chain and continue with dc ? I have 55 dc Also confused on rows 1-6 'work A1, A2, A3 2 times in total (does that mean do all 3 and then repeat) (or each one twice) and then do A4 and A5? Doesn’t seem like the fan pattern will flow properly. Also, I’m having trouble distinguishing clearly where A2, A3 and A4 each start and end and that’s maybe the problem.
04.06.2015 - 18:07DROPS Design ha risposto:
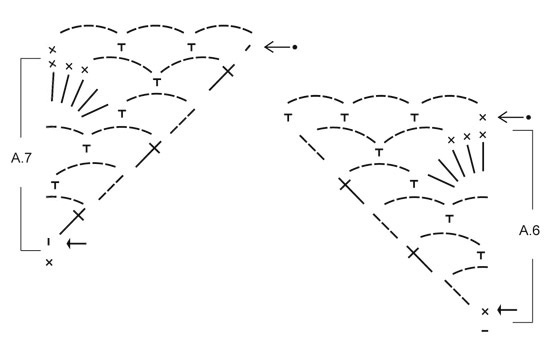
Dear Mrs Underkofler, since the fundation ch is generally tighter than the 1st row crocheted, you cast on a longer ch and skip chains evenly on 1st row. You then work A.1 1 time, A.2 1 time, repeat A.3 a total of 2 times, and finish with A.4 1 time and A.5 1 time. Arrow in diagram shows first row (ch1 in A.1 = beg of row). Happy crocheting!
05.06.2015 - 10:00
![]() Jayla ha scritto:
Jayla ha scritto:
I'm not understanding where to start adding charts A 6 and A7. thank you.
30.05.2015 - 21:42DROPS Design ha risposto:
Dear Jayla, after you have worked the rows 1-6 in A.1, A.2, A.3, A.4, A.5 on right shoulder, work row 7 as before (= last row in A.1-A.4) but replace A.5 with A.6 - and then work A.6 1 time in height (repeat A.x over other sts). For the other shoulder, replace A.1 with A.7 on 7th row in A.1-A.4. Happy crocheting!
01.06.2015 - 09:36
![]() Anja Van Wouwe ha scritto:
Anja Van Wouwe ha scritto:
Helaas moet ik mij aansluiten bij Judith Rotter.Ook ik heb al meerdere patronen gehaakt en gebreid,maar nadat ik al 4 x opnieuw ben begonnen denk ik erover een ander patroon te zoeken,jammer want ik vond het zo'n leuk truitje.
29.05.2015 - 17:16
![]() Emily Webster ha scritto:
Emily Webster ha scritto:
Help please! I don't understand Row 7 - does "work last row in A.1-A.4 as before" mean I do Row 6 again? Only if I do that, it means my first ch.5 is sticking out, and each ch.5 sits on top of the one below instead of straddling it. It looks like I'm supposed to be repeating rows 1-6 but replacing A.5 with A.6 each time before repeating the whole of A.x again, so I think it's just Row 7 that's got me stumped!
24.05.2015 - 14:44DROPS Design ha risposto:
Dear Mrs Webster, row 7 is the last row in A.1-A.4/A.5, work diagram as row 7 in A.1, A.2, A.3, A.4, but work A.6 at the end or row instead of A.5 - at beg of next row, work first A.6 (row 2) then repeat A.1-A.4 = A.X. Happy crocheting!
26.05.2015 - 10:06
![]() Constanze ha scritto:
Constanze ha scritto:
Beide Schultern sind fertig.... Ich verstehe das Verbinden mit den luftmaschen nicht. Sind die spitz zulaufenden Seiten außen ? Die linke Seite endet in der Zunahme von A7, dann kommen die luftmaschen und ich häkele in die 3 luftmaschen der Spitze von A6. Welche Reihe kommt als nächstes? Ich verstehe die Anleitung nicht......
20.05.2015 - 20:37DROPS Design ha risposto:
Legen Sie die Teile beide mal so vor sich hin, dass die schräge Seite von A.6 (im Diagramm die linke Seite) und A.7 (im Diagramm die rechte Seite) die beiden Halsausschnittseiten bilden, also am Hals liegen. Die Lm-Anschlagkanten sind dabei die Schultern. Vielleicht erklärt sich damit schon, wie Sie die Teile verbinden müssen? Ansonsten gerne noch einmal fragen. Wenn Sie die Teile verbunden haben, schneiden Sie den Faden ab und häkeln wieder am dem Beginn der R, dabei wird das Muster (also die Musterabfolge A.1 bis A.5) wie zuvor fortgesetzt und über der Lm-Reihe des Halsausschnitts folgerichtig weitergeführt.
21.05.2015 - 09:13
![]() Dorthe Sonne ha scritto:
Dorthe Sonne ha scritto:
Jeg er gået igang med denne top med er desværre allerede gået i stå når de to skulderstykker skal samles. Jeg kan simpelthen ikke få mønstret til at gå op. Er det muligt at forklare hvor mange "buer" jeg skal have på luftmaskestykket i midten for at det kommer til at passe når der skal hækles stangmaske vifter. På forhånd tak
20.05.2015 - 19:09DROPS Design ha risposto:
Hej, stemmer det ikke med at du får 6 lm buer ifølge diagrammet, i de 35 lm du har hæklet til hals...?
22.05.2015 - 15:16
![]() Judith Rotter ha scritto:
Judith Rotter ha scritto:
Ich wollte dieses Model gleich nacharbeiten;wäre nicht meine erste Arbeit und vor allem wäre es nicht die erste nach Anleitung von Garnstudio.Doch leider muss ich mir ein anderes Muster suchen, da diese Anleitung einfach unverständlich ist. Schriftliche Anleitung wirft Fragen auf, die Grafik lässt die Mustersätze mehr erahnen als ablesen und insgesamt fehlt die Angabe in Centimeter. Bsp.: Wo soll "A.6" bzw. "A.7" an der Arbeit befestigt werden? Was sind die Mustersätze "A.1-A.5"?
19.05.2015 - 21:19DROPS Design ha risposto:
Antwort siehe unten! Es wäre schade, wenn Sie direkt aufgeben und sich ein anderes Muster suchen, es ist zu schaffen. :-)
19.05.2015 - 22:43
![]() Judith Rotter ha scritto:
Judith Rotter ha scritto:
Ich wollte dieses Model gleich nacharbeiten;wäre nicht meine erste Arbeit und vor allem wäre es nicht die erste nach Anleitung von Garnstudio.Doch leider muss ich mir ein anderes Muster suchen, da diese Anleitung einfach unverständlich ist. Schriftliche Anleitung wirft Fragen auf, die Grafik lässt die Mustersätze mehr erahnen als ablesen und insgesamt fehlt die Angabe in Centimeter. Bsp.: Wo soll "A.6" bzw. "A.7" an der Arbeit befestigt werden? Was sind die Mustersätze "A.1-A.5"?
19.05.2015 - 20:49DROPS Design ha risposto:
Sie befestigen die linke Schulter "mit 1 Kett-M in der 3. Lm am Beginn der letzten R der rechten Schulter": Sie häkeln also bei der linken Schulter die letzte R von A.7, dann am Ende 35 Lm, dann nehmen Sie die rechte Schulter, die Sie bereits gehäkelt haben, zur Hand und häkeln 1 Kett-M in die 3. Lm des R-Beginns. A.1 bis A.5 sind die unten gezeichneten Musterabschnitte, das bezieht sich ja auf das Diagramm, wenn es nicht ganz eindeutig ist, wo die Grenze zwischen den Musterabschnitten sitzt, ergibt sich das aber eigentlich beim Häkeln. cm-Angaben sind enthalten, dort, wo sie relevant sind (z.B. Angabe, wann die Ärmel fertig sind). Wir helfen gerne weiter, stellen Sie gern konkrete Fragen.
19.05.2015 - 21:30
![]() Kiruna ha scritto:
Kiruna ha scritto:
De eerste toer met stokjes gaat erg golven als ik de losse tussen de 4 stokjes oversla. Hoort dit zo, of moet ik geen losse over gaan slaan ?
14.05.2015 - 10:52DROPS Design ha risposto:
Hoi Kiruna. We hebben deze lossen tussen de stokjes om de opzetrand wat losser te maken. Ik verwacht dat het na een paar toeren haken veel minder gaat golven. Dus je kan gerust doorgaan.
21.05.2015 - 16:13
|
|||||||||||||||||||||||||
Shy Violet#shyviolettop |
|||||||||||||||||||||||||
 |
 |
||||||||||||||||||||||||
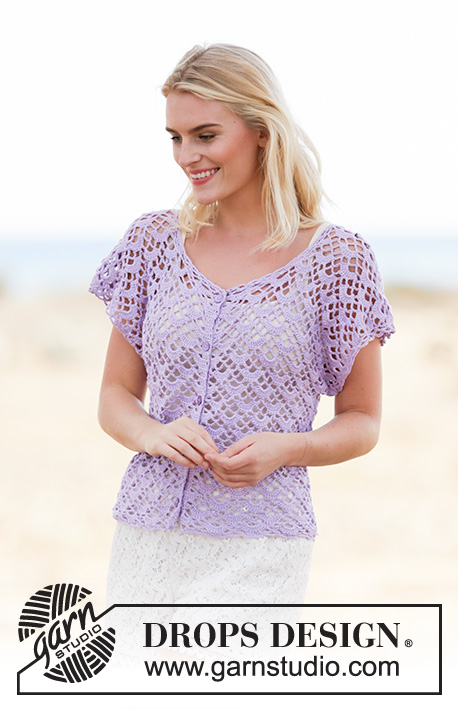
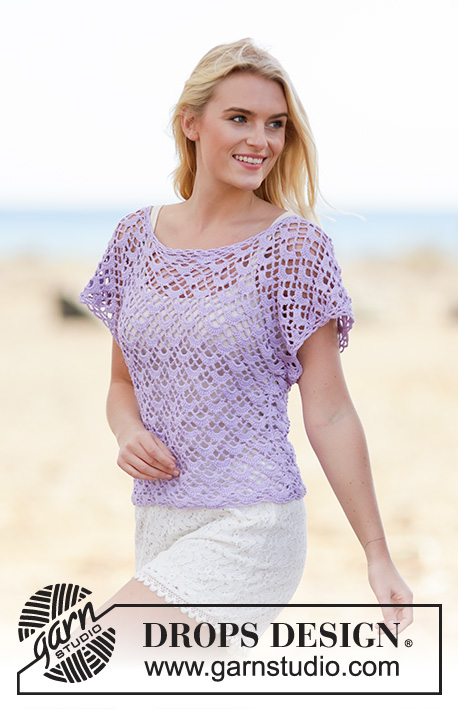
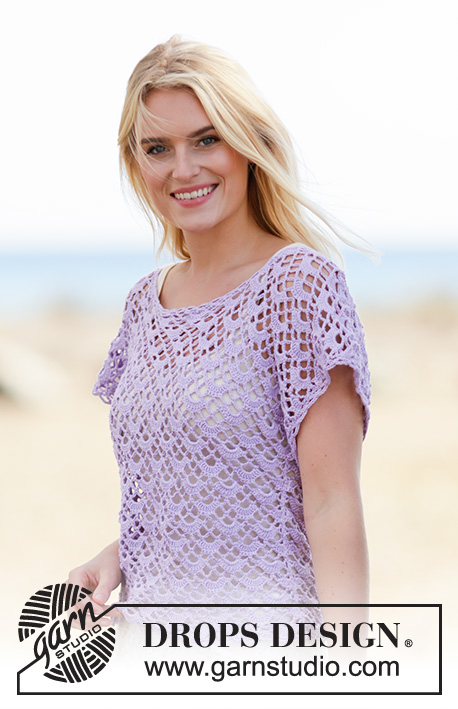
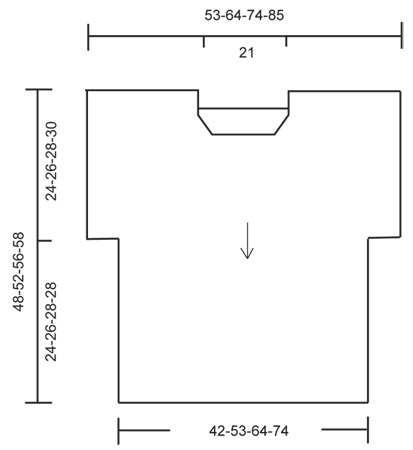
Top DROPS all’uncinetto, con motivo a ventaglio, lavorato dall’alto verso il basso (top down), in "Safran". Taglie: Dalla S alla XXXL.
DROPS 162-15 |
|||||||||||||||||||||||||
|
MOTIVO: Vedere i diagrammi da A.1 a A.7. I diagrammi mostrano tutte le righe del motivo, viste sul diritto del lavoro. ---------------------------------------------------------- DAVANTI: Si lavora dall’alto verso il basso. Spalla destra: Con l’uncinetto n° 3,5 ed il filato Safran, avviare 69-92-114-137 cat (comprese 3 cat per girare il lavoro). RIGA 1 (= rovescio del lavoro): Lavorare 1 m.a nella 4a cat dall’uncinetto (= 2 m.a), 1 m.a in ognuna delle 5-3-5-3 cat successive, * saltare 1 cat, lavorare 1 m.a in ognuna delle 4 cat successive *, ripetere da *-* su tutta la riga = 55-73-91-109 m.a. DA ADESSO IN AVANTI, MISURARE IL LAVORO DA QUESTO PUNTO ! Lavorare ora seguendo il diagramma, quindi lavorare come segue: RIGHE 1-6: (1° riga = diritto del lavoro): Lavorare il diagramma A.1, diagramma A.2, ripetere il diagramma A.3 2-3-4-5 volte in tutto, diagramma A.4, diagramma A.5. RICORDARSI LA TENSIONE DEL LAVORO! RIGA 7 (= diritto del lavoro): Lavorare l’ultima riga dei diagrammi A.1-A.4 come prima, ma finire con il diagramma A.6 sul diagramma A.5. Lavorare il diagramma A.6 1 volta in verticale, per i diagrammi A.1-A.4 ripetere le righe indicate con A.x. Tagliare il filo. Lavorare la spalla sinistra come indicato per la spalla destra, ma lavorare il diagramma A.7 sopra il diagramma A.1. Nel corso dell’ultima riga del diagramma A.7 (= sul rovescio del lavoro) lavorare 35 cat alla fine della riga per lo scollo, finire con 1 m.bss nella 3a cat all’inizio dell’ ultima riga della spalla destra. Tagliare il filo. Lavorare ora su tutte le m, iniziare sul diritto del lavoro come segue: diagramma A.1, diagramma A.2, diagramma A.3 9-10-11-12 volte in tutto, diagramma A.4, finire con il diagramma A.5. Proseguire in questo modo. Quando il lavoro misura ca.24-26-28-30 cm – finire dopo una riga 7, le maniche sono completate. Proseguire come segue, iniziando sul rovescio del lavoro: saltare 3 archi di cat, iniziare lavorando nella m.b successiva come segue: diagramma A.5, diagramma A.4, diagramma A.3 7-8-9-10 volte in tutto, diagramma A.2, finire con il diagramma A.1 (non lavorare negli ultimi 3 archi di cat). Proseguire in questo modo finché il lavoro non misura ca.48-52-56-58 cm; finire dopo una riga 5 del diagramma. Tagliare il filo. DIETRO: Lavorare la spalla sinistra nella riga di avvio delle cat (lavorare nelle stesse cat delle 55-73-91-109 m.a) della spalla sinistra del davanti, come segue: RIGHE 1-6: (1a riga = diritto del lavoro): Lavorare il diagramma A.1, diagramma A.2, diagramma A.3 2-3-4-5 volte in tutto, diagramma A.4, diagramma A.5. Tagliare il filo. Lavorare la spalla destra come indicato per la spalla sinistra, nelle cat della spalla destra del davanti - ATTENZIONE! Non tagliare il filo, lavorare 71 cat per lo scollo e finire con 1 m.bss nella prima cat all’inizio dell’ ultima riga della spalla sinistra. Tagliare il filo. Lavorare ora su tutte le m come indicato per il davanti. CONFEZIONE: Cucire i lati e sotto le maniche. BORDO: Lavorare un bordo intorno allo scollo, come segue: iniziare da una spalla: GIRO 1: Lavorare * 1 m.b, 5 cat *, ripetere da *-* intorno allo scollo lasciando ca.2 cm tra ogni m.b, finire con 1 m.bss nella prima m.b. GIRO 2: 3 cat, 1 m.b nell’arco di cat successivo, * 5 cat, 1 m.b nell’arco di cat successivo *, ripetere da *-* su tutto il giro e finire con 3 cat e 1 m.bss nella prima m.b dall’inizio del primo giro. Tagliare il filo. Lavorare un bordo uguale lungo il bordo inferiore del davanti e del dietro; iniziare da uno dei lati. Lavorare un bordo uguale intorno alle maniche; iniziare dal centro, sotto la manica. |
|||||||||||||||||||||||||
Spiegazioni del diagramma |
|||||||||||||||||||||||||
|
|||||||||||||||||||||||||
 |
|||||||||||||||||||||||||
 |
|||||||||||||||||||||||||
 |
|||||||||||||||||||||||||
Avete terminato questo modello?Allora taggate le vostre foto con #dropspattern #shyviolettop o inviatele alla #dropsfan gallery. Avete bisogno di aiuto con questo modello?Troverete 5 video tutorial, una sezione per i commenti/domande e molto altro guardando il modello su www.garnstudio.com © 1982-2026 DROPS Design A/S. Ci riserviamo tutti i diritti. Questo documento, compreso tutte le sue sotto-sezioni, è protetto dalle leggi sul copyright. Potete leggere quello che potete fare con i nostri modelli alla fine di ogni modello sul nostro sito. |
|||||||||||||||||||||||||


Con oltre 40 anni di esperienza nel design di modelli di maglia e uncinetto, DROPS Design offre la più estesa collezione di modelli gratuiti su internet - tradotti in 17 lingue. Ad oggi vi possiamo fornire 324 cataloghi e 12290 modelli - 9561 dei quali sono tradotti in Italiano.
Ci stiamo impegnando molto per darvi il meglio che vi possiamo offrire in termini di maglia e uncinetto, ispirazioni e consigli così come filati di grande qualità ad un prezzo incredibile! Volete utilizzare i nostri modelli per qualcosa d'altro oltre al vostro uso personale? Potete leggere tutto ciò che è consentito nel testo sul Copyright in basso su tutte le pagine dei nostri modelli. Buon lavoro!
Lasciare un commento sul modello DROPS 162-15
Noi saremmo felici di ricevere i tuoi commenti e opinioni su questo modello!
Se vuoi fare una domanda, fai per favore attenzione a selezionare la categoria corretta nella casella qui sotto per velocizzare il processo di risposta. I campi richiesti sono indicati da *.