
Categorie popolari
State cercando un filato?


Commenti / Domande (127)
![]() Debbie ha scritto:
Debbie ha scritto:
Can you make a you tube video showing how this is made?
20.05.2015 - 01:53DROPS Design ha risposto:
Dear Debbie, you will find videos related to the sts used under tab "videos", you can work either following diagram or written pattern. Should you need any further assistance, you are welcome to ask your question here or to contact your DROPS store. Happy crocheting!
20.05.2015 - 10:02
![]() Judi Ames ha scritto:
Judi Ames ha scritto:
For Ruth, to put it more clearly, at end of first row, you turn, chain 3 (= first stitch) for turning chain...after the ch stitch do 2 more stitches, then stitch in ch-sp, ch 3 and continue...I was wondering why I had no turning chain and the rows were getting wider, too...does this help?
07.05.2015 - 22:35
![]() Lia ha scritto:
Lia ha scritto:
Ik ben met het voorpand bezig .Moet ik 3 stokjes in de 3 lossen tussen de tussen de stokjes in de hoek maken of in het eerst losse boogje? Keer de tweede toer 1st. in de eerst 3losse maar er zijn toch gen losse alleen 3 stokjes ? Moet je om een om aan het begin van de toer 3 stokjes haken of alleen maar boogjes?
30.04.2015 - 20:32
![]() Vivian ha scritto:
Vivian ha scritto:
Thx for the response about the sleeves! I woke up this morning and reread the instructions and understand them completely now!
27.04.2015 - 17:03
![]() Vivian ha scritto:
Vivian ha scritto:
I have the question about the increase every sixth round on the back panel. I think I understand what the instructions say…every 6th round you would have a DC ch3 DC all in the same ch sp on either side of the corners as you go round equaling 8 extra DC & ch3 per sixth round? BUT, I do not see that in the picture, which makes me question whether I understand clearly.
27.04.2015 - 17:01DROPS Design ha risposto:
Dear Vivian, diagram shows only first 4 rounds, increase starts on round 5, then every 6th round where you will work 1 dc + 3ch +1dc +3 ch in same ch-space each side of each corner (= 2 dc more per side = 8 dc inc per inc round). Happy crocheting!
27.04.2015 - 17:14
![]() Vivian ha scritto:
Vivian ha scritto:
I am totally lost on the directions for the sleeves. Is there any possibility I could get a simplified explanation on dec the sleeves? I just don't understand the way it is written. Also, when I enlarge the picture of the back piece, I don't see where the inc are in the example? I don't think I did that part right :( , all I did was put in one extra DC, but I am plowing ahead anyhow. thx!
27.04.2015 - 07:06DROPS Design ha risposto:
Dear Vivian, mid under sleeve replace 1 dc+3 ch that way: work next dc in next ch-space but wait with last pull through (2 sts on hook, work next dc in next ch space and on last pull through, pull yarn through all sts on hook. For any individual assistance, remember you can get help from your DROPS store. Happy crocheting!
27.04.2015 - 11:42
![]() Ruth ha scritto:
Ruth ha scritto:
Nope, sorry, still don't understand what you do at the turn after the first row...any chance of a picture? To clarify - I finish the first row with 3ch, 3 tr in ch-loop in the corner, I turn and then....what??!!
26.04.2015 - 23:22DROPS Design ha risposto:
Dear Ruth, on 2nd row start with 3 ch (= 1st tr), 1 tr in each of the first 2 tr, then repeat *1 tr in ch-space, 3 ch* to the end of row and finish with 1 tr in the last ch-space, 1 tr in each of the last 3 tr. On 3rd row, turn and work 3 ch, 1 tr in each of the next 2 tr, *3 ch, 1 tr in next ch-space*, repeat to the end of row and finish with 1 tr in each of the last 3 tr. Repeat then row 2 and 3. Happy crocheting!
27.04.2015 - 14:19
![]() Ruth ha scritto:
Ruth ha scritto:
Nope, sorry, still don't understand what you do at the turn after the first row...any chance of a picture?
26.04.2015 - 23:10
![]() Ruth ha scritto:
Ruth ha scritto:
I am struggling to understand what happens at the corners when you turn on the frontpiece. A close up picture might help - the pattern makes no sense to me and I am so close! After severalf restarts I have done the main body and arms and it's looking good, but I can't figure out the turns. Help!.
24.04.2015 - 22:44DROPS Design ha risposto:
Dear Ruth, when you work only on front piece, crochet 3 tr in 1st ch-loop in the corner, then repeat *3 ch, 1 tr around ch-loop*, finish with 3ch, 3 tr in ch-loop in the corner. And continue then repeating row 2 and 3 - remember to replace 1st tr with 3 ch at the beg of row. Happy crocheting!
25.04.2015 - 10:19
![]() Lelel Mas ha scritto:
Lelel Mas ha scritto:
En el delantero, como se continua el patrón sin que salgan aumentos, si se trabaja un punto alto en cada arco aumenta igual que antes.
01.04.2015 - 09:34DROPS Design ha risposto:
Hola Lelel, gracias por escribir. Repasando el patrón he encontrado una corrección del delantero sin actualizar en español. Ahora está actualizado. Sentimos las molestias y esperamos que la corrección te ayude a realizar el delantero.
05.04.2015 - 12:12
|
||||||||||||||||||||||
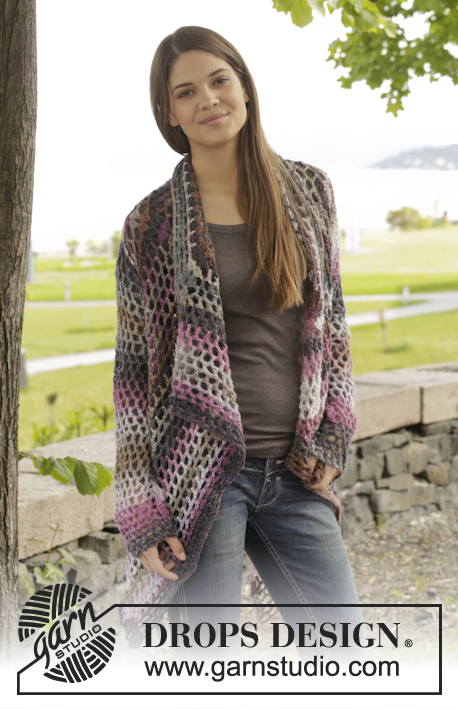
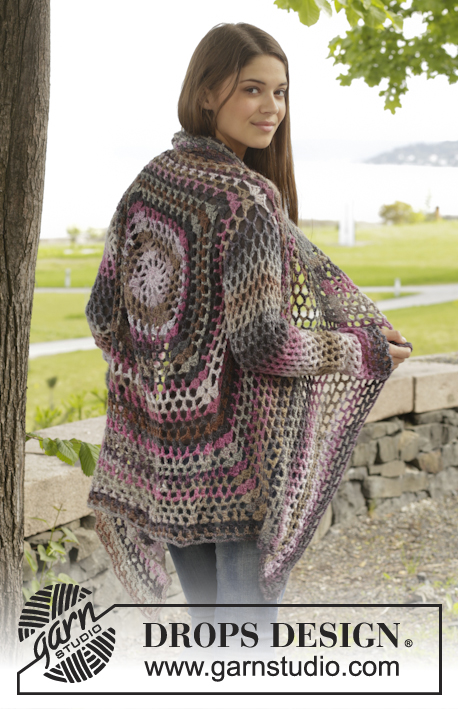
Around the World#aroundtheworldcardigan |
||||||||||||||||||||||
 |
 |
|||||||||||||||||||||
Giacca DROPS all’uncinetto, con motivo traforato, in "Big Delight". Taglie: Dalla S alla XXXL
DROPS 156-42 |
||||||||||||||||||||||
|
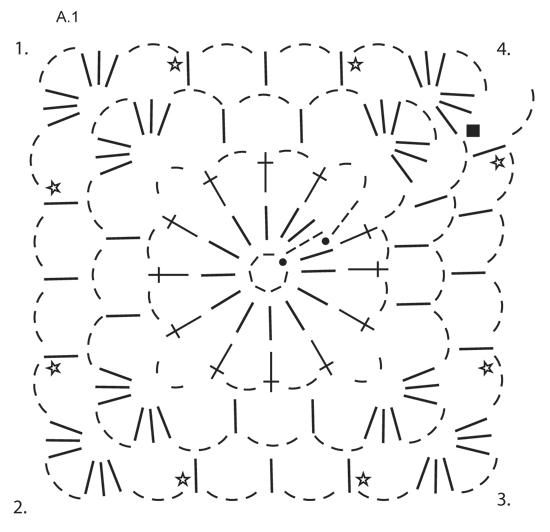
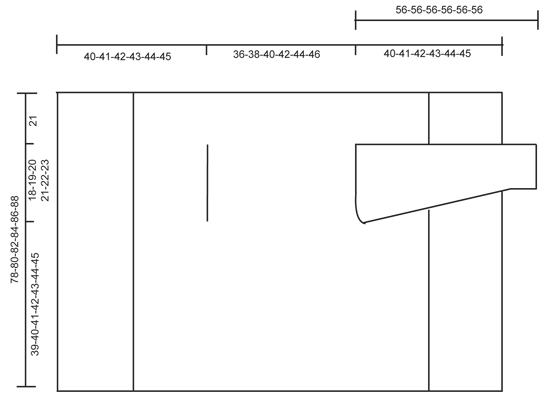
MOTIVO: Vedere il diagramma A.1. SUGGERIMENTO PER LE DIMINUZIONI (per le maniche): Diminuire 1 ripetizione (= 1 m.a + 3 cat), non lavorando le cat, ma lavorare 2 m.a insieme come segue: lavorare 1 m.a ma non fare l’ultima gettata (= 2 m sull’uncinetto), lavorare la m.a successiva e all’ultima gettata, passare il filo attraverso tutte le m sull’uncinetto. ---------------------------------------------------------- DAVANTI E DIETRO: Si lavora in tondo dal centro, sul dietro. Con l’uncinetto n° 5 ed il filato Big Delight, avviare 6 cat e formare un anello con 1 m.bss nella prima cat. Lavorare seguendo il diagramma A.1, quindi lavorare come segue: GIRO 1: 3 cat, 13 m.a nell’anello di cat, finire con 1 m.bss nella 3a cat dall’inizio del giro. GIRO 2: 5 cat, saltare 1 m.a, 1 m.a nella m.a successiva, * 2 cat, 1 m.a nella m.a successiva *, ripetere da *-* su tutto il giro, finire con 2 cat = 12 m.a + 2 cat. GIRO 3: Trasformare ora il cerchio in un quadrato, quindi lavorare come segue: 3 m.a + 3 cat + 3 m.a (= angolo) nel primo arco di cat, 3 cat, 1 m.a nell’arco di cat successivo, 3 cat, 1 m.a nell’arco di cat successivo, 3 cat, * 3 m.a + 3 cat + 3 m.a (= angolo) nell’arco di cat successivo, 3 cat, 1 m.a nell’arco di cat successivo, 3 cat, 1 m.a nell’arco di cat successivo, 3 cat *, ripetere da *-* 3 volte in tutto, 1 m.a nell’arco di cat successivo (= ultime 2 cat del giro precedente), 3 cat. GIRO 4: 3 m.a + 3 cat + 3 m.a (= angolo) nel primo arco di cat, * 3 cat, 1 m.a nell’arco di cat successivo, 3 cat, 1 m.a nell’arco di cat successivo, 3 cat, 1 m.a nell’arco di cat successivo, 3 cat, 3 m.a + 3 cat + 3 m.a (= angolo) nell’arco di cat successivo *, ripetere da *-* 3 volte in tutto, 3 cat, 1 m.a nell’arco di cat successivo, 3 cat, 1 m.a nell’arco di cat successivo, 3 cat, 1 m.a nell’arco di cat successivo, 3 cat, 1 m.a nell’arco di cat successivo, 3 cat. RICORDARSI LA TENSIONE DEL LAVORO! Ripetere il giro 4 con gli aumenti, quindi lavorare 1 m.a + 3 cat in più tra ogni angolo ad ogni giro (= 4 aumenti ad ogni giro); ALLO STESSO TEMPO, ogni 6 giri, aumentare 1 m.a + 3 cat aggiuntive da ciascun lato di ogni angolo – vedere la stella nel diagramma (= 8 aumenti in più sul giro). Proseguire in questo modo finché il quadrato non misura 36-38-40-42-44-46 cm x 36-38-40-42-44-46 cm. Lavorare ora gli scalfi come segue: Lavorare come prima fino al primo angolo, lavorare 3 m.a + 3 cat + 3 m.a nell’arco di cat nell’angolo. Avviare ora delle cat fino al centro del lato successivo (quindi a metà tra il primo ed il secondo angolo) come segue: avviare 1 cat per ogni cat/m.a saltata. Proseguire con il motivo come prima fino al centro tra il 3° ed il 4° angolo. Avviare ora cat fino all’ inizio del giro, come segue: avviare 1 cat per ogni cat/m.a saltata. Al giro successivo, lavorare il motivo ed aumentare come prima su tutte le m, anche nelle cat per gli scalfi. Proseguire in questo modo finché il quadrato non misura 78-80-82-84-86-88 cm x 78-80-82-84-86-88 cm (quindi 21 cm dagli scalfi, per tutte le taglie). Tagliare il filo. DAVANTI: Lavorare ora avanti e indietro tra il primo ed il secondo angolo. ATTENZIONE! Lavorare il davanti senza aumentare. RIGA 1: Lavorare a partire dal primo angolo, come segue: 3 m.a nell’arco di cat nell’angolo, * 3 cat, 1 m.a nell’arco di cat *, ripetere da *-* e finire con 3 cat e 3 m.a nell’angolo. RIGA 2: Girare e lavorare come segue: 1 m.a in ognuna delle prime 3 m.a, * 1 m.a nell’arco di cat, 3 cat *, ripetere da *-* e finire con 1 m.a nell’ultimo arco di cat e 1 m.a in ognuna delle 3 m.a. RIGA 3: Girare e lavorare come segue: 1 m.a in ognuna delle prime 3 m.a, * 3 cat, 1 m.a nell’arco di cat *, ripetere da *-* e finire con 3 cat e 1 m.a in ognuna delle ultime 3 m.a. Ripetere le righe 2 e 3. Proseguire in questo modo finché non sono stati lavorati 19-20-21-22-23-24 cm avanti e indietro. Tagliare il filo. Ripetere sull’altro lato. Lavorare ora avanti e indietro a partire dal terzo angolo verso il quarto angolo. Infine lavorare un giro tutto intorno al quadrato; lavorare il motivo come prima ma nell’arco di cat in ogni angolo lavorare 6 m.a. Tagliare il filo. MANICHE: Lavorare in tondo, dall’alto verso il basso dallo scalfo, iniziando al centro, sotto la manica, sul diritto del lavoro. GIRO 1: 6 cat (= 1 m.a + 3 cat), * 1 m.a nell’arco di cat successivo, 3 cat *, ripetere da *-* 16-17-18-19-20-21 volte in tutto, finire con 1 m.bss nella 3a cat. GIRO 2: 5 cat, * 1 m.a nell’arco di cat successivo, 3 cat *, ripetere da *-* 16-17-18-19-20-21 volte in tutto, 1 cat, finire con 1 m.bss nella 3a cat dall’inizio del giro. Ripetere i giri 1 e 2 - ALLO STESSO TEMPO, diminuire 1 m.a + 3 cat all’inizio del 4°-6°-6°-8°-8°-6° giro lavorando 2 m.a insieme – VEDERE IL SUGGERIMENTO PER LE DIMINUZIONI – al centro, sotto la manica. Ripetere queste diminuzioni ogni 6-6-6-4-4-4 giri = 12-12-13-13-14-14 m.a. Continuare in tondo, senza diminuire finché la manica non misura ca.56 cm per tutte le taglie. Tagliare il filo. Lavorare la seconda manica in modo uguale. |
||||||||||||||||||||||
Spiegazioni del diagramma |
||||||||||||||||||||||
|
||||||||||||||||||||||
 |
||||||||||||||||||||||
 |
||||||||||||||||||||||
Avete terminato questo modello?Allora taggate le vostre foto con #dropspattern #aroundtheworldcardigan o inviatele alla #dropsfan gallery. Avete bisogno di aiuto con questo modello?Troverete 7 video tutorial, una sezione per i commenti/domande e molto altro guardando il modello su www.garnstudio.com © 1982-2026 DROPS Design A/S. Ci riserviamo tutti i diritti. Questo documento, compreso tutte le sue sotto-sezioni, è protetto dalle leggi sul copyright. Potete leggere quello che potete fare con i nostri modelli alla fine di ogni modello sul nostro sito. |
||||||||||||||||||||||


Con oltre 40 anni di esperienza nel design di modelli di maglia e uncinetto, DROPS Design offre la più estesa collezione di modelli gratuiti su internet - tradotti in 17 lingue. Ad oggi vi possiamo fornire 324 cataloghi e 12290 modelli - 9561 dei quali sono tradotti in Italiano.
Ci stiamo impegnando molto per darvi il meglio che vi possiamo offrire in termini di maglia e uncinetto, ispirazioni e consigli così come filati di grande qualità ad un prezzo incredibile! Volete utilizzare i nostri modelli per qualcosa d'altro oltre al vostro uso personale? Potete leggere tutto ciò che è consentito nel testo sul Copyright in basso su tutte le pagine dei nostri modelli. Buon lavoro!
Lasciare un commento sul modello DROPS 156-42
Noi saremmo felici di ricevere i tuoi commenti e opinioni su questo modello!
Se vuoi fare una domanda, fai per favore attenzione a selezionare la categoria corretta nella casella qui sotto per velocizzare il processo di risposta. I campi richiesti sono indicati da *.