
Categorie popolari
State cercando un filato?


Commenti / Domande (127)
![]() Barbara ha scritto:
Barbara ha scritto:
Moet je na de armsgaten als je verder haakt in het patroon ook elke zesde toer extra blijven meerderen?
26.10.2015 - 17:18DROPS Design ha risposto:
Hoi Barbara. Ja, jeg gaat door met de vierkant tot het vierkantje 21 cm meet vanaf het armsgat. Pas bij het haken van de voorpanden maak je geen meerderingen meer.
27.10.2015 - 14:40
![]() Barbara ha scritto:
Barbara ha scritto:
Ik heb een vraag over de toer ná de armsgaten. Je moet volgens het patroon haken, ook over de losse van de armsgaten. Dus drie lossen en een stokje neem ik aan. Als ik op de losse haak, om de hoeveel steken komt dan mijn stokje?
23.10.2015 - 13:08DROPS Design ha risposto:
Hoi Barbara. Je haakt om de lossen, je hoeft ze niet te tellen en in te haken.
23.10.2015 - 13:47Theresa Lambert ha scritto:
I'm not understanding what to do on row 4 would you please help me says something and adding another dc? Please help me out.
20.10.2015 - 00:23DROPS Design ha risposto:
Dear Theresa, it is just to clear, that there is 1 dc + 3 ch more between each corner on every round. Just follow previous instructions.
18.12.2015 - 11:53
![]() Lorraine De Maria ha scritto:
Lorraine De Maria ha scritto:
I think this is my last question on the armholes- thank you for all your help - I understand I am counting the side of the pattern and then chaining that many for the hole in the sleeve- do I attach it in the middle between both corners on the side of this or do I attached it to the other corner before doing my pattern again??
19.10.2015 - 13:43DROPS Design ha risposto:
Dear Mrs De Maria, when you have crocheted the chain for armhole and skipped the number of sts matching between first (1st armhole) corner and mid between 1st and 2nd corner, crochet as before from middle between 1st and 2nd corner to the 2nd corner. For 2nd armhole, crochet as before from 3rd corner to middle side before 4th corner, crochet a chain skipping the matching number of sts to the 4th corner. Happy crocheting!
19.10.2015 - 14:10Lorraine De Maria ha scritto:
Thank you so much - I think I understand now- I will get back to you if I have any questions in the future - Love your site!!
16.10.2015 - 19:38
![]() Lorraine De Maria ha scritto:
Lorraine De Maria ha scritto:
Maybe this is a better way to ask- I will follow for the armhole on the answer that says to chain as many chains as it would take to reach the middle of the square - then do I attach it with a chain where I counted 1/2 before the corner?? or do I attach it in the corner I am working on? and how many sets of double crochets and chains do I put in the corner before doing this long chain??
15.10.2015 - 22:38DROPS Design ha risposto:
Dear Mrs De Maria, after you have skipped half the side (from the corner to middle between both corners), continue in pattern as before to next corner. Number of chains will depend of number of sts you will skip - count the number of sts skipped to the middle between both corners and chain this number. Happy crocheting!
16.10.2015 - 09:28
![]() Lorraine De Maria ha scritto:
Lorraine De Maria ha scritto:
I sent a question early about the sleeves (armholes) and I see others have wrote for help on the same subject and I have been crocheting for years and I am still confused- one answer is saying to decrease - the other is saying count the stitches half way to the next corner and chain that amount - then attach it where? and which one is it?
15.10.2015 - 22:10DROPS Design ha risposto:
Dear Mrs De Maria, when working armhole, work as before until first corner, then work 3 dc+3 ch+ 3 dc in corner (as before), then crochet a ch to create armhole (number of ch = number of sts skipped from 1st corner to the middle of the side between 1st and 2nd corner), and continue as before and repeat armhole between 3rd and 4th corner: work from 3rd corner as before to middle of side between both corners, ch same number of ch as for 1st armhole and 3dc,3ch,3dc in 4th corner, then work as before to the beg of round. Happy crocheting!
16.10.2015 - 09:24
![]() Lorraine De Maria ha scritto:
Lorraine De Maria ha scritto:
I bought the yarn for the drops Pattern (around the world) I had no trouble with it until I got to the Sleeves - I don't understand - do I just do a DC and then ch 3 in each of the corners on the square of the Pattern instead of the 3dc, ch3 and 3dc??
15.10.2015 - 21:20DROPS Design ha risposto:
Dear Mrs De Maria, on 1st round of sleeve, work around armhole, ie in last row on square (skipped sts when working armhole) + in the ch/1st row after armhole and work around 1 dc in each ch-space with 3 ch between each dc. Happy crocheting!
16.10.2015 - 09:14
![]() Helen ha scritto:
Helen ha scritto:
Please can to tell me where I can find instructions on how to do a crochet tension square. In relation to this pattern. As I can only find how too do Knitted ones.
14.10.2015 - 14:20DROPS Design ha risposto:
Dear Helen, you can work the first 7 rounds to check your tension as stated on the tab "materials" at the right side of the picture. Happy crocheting!
14.10.2015 - 16:42Kathie ha scritto:
This is the most confusing pattern I have ever tried to follow. No matter how many times I start over I end up with an extra DC and Ch 3 space on the final side of the A-1 Diagram. It does not matter if I follow the written pattern or the chart. If this is so easily written I would think that you would just make a video of how to do the actual pattern instead of videos just showing the stitches that are used.
01.10.2015 - 02:35
|
||||||||||||||||||||||
Around the World#aroundtheworldcardigan |
||||||||||||||||||||||
 |
 |
|||||||||||||||||||||
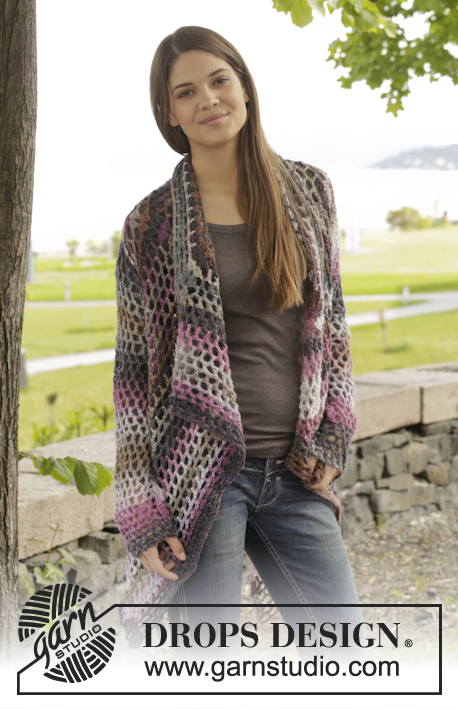
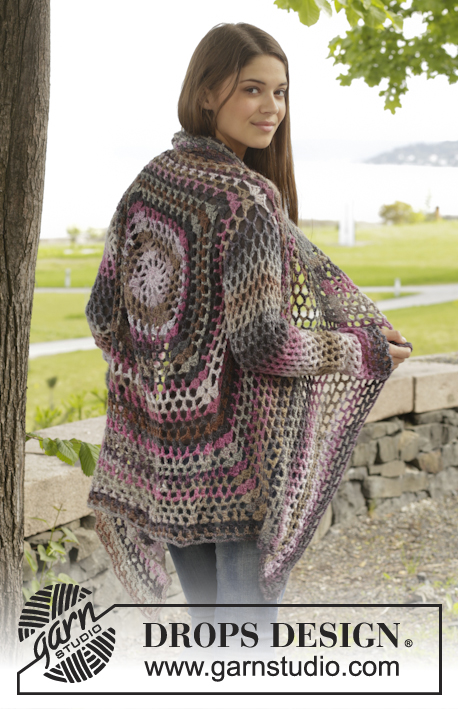
Giacca DROPS all’uncinetto, con motivo traforato, in "Big Delight". Taglie: Dalla S alla XXXL
DROPS 156-42 |
||||||||||||||||||||||
|
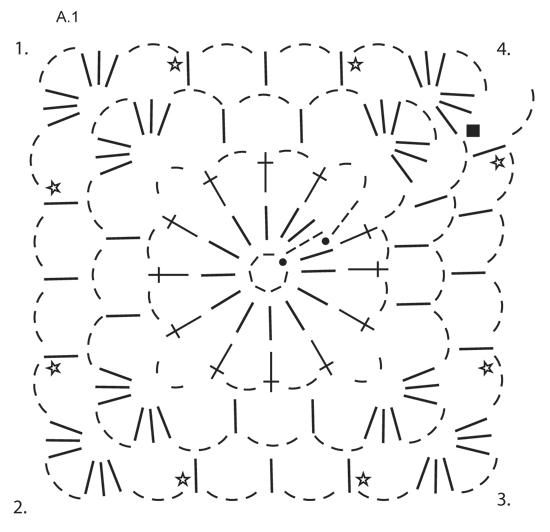
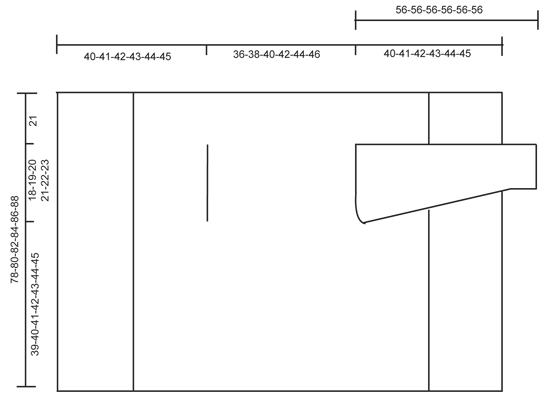
MOTIVO: Vedere il diagramma A.1. SUGGERIMENTO PER LE DIMINUZIONI (per le maniche): Diminuire 1 ripetizione (= 1 m.a + 3 cat), non lavorando le cat, ma lavorare 2 m.a insieme come segue: lavorare 1 m.a ma non fare l’ultima gettata (= 2 m sull’uncinetto), lavorare la m.a successiva e all’ultima gettata, passare il filo attraverso tutte le m sull’uncinetto. ---------------------------------------------------------- DAVANTI E DIETRO: Si lavora in tondo dal centro, sul dietro. Con l’uncinetto n° 5 ed il filato Big Delight, avviare 6 cat e formare un anello con 1 m.bss nella prima cat. Lavorare seguendo il diagramma A.1, quindi lavorare come segue: GIRO 1: 3 cat, 13 m.a nell’anello di cat, finire con 1 m.bss nella 3a cat dall’inizio del giro. GIRO 2: 5 cat, saltare 1 m.a, 1 m.a nella m.a successiva, * 2 cat, 1 m.a nella m.a successiva *, ripetere da *-* su tutto il giro, finire con 2 cat = 12 m.a + 2 cat. GIRO 3: Trasformare ora il cerchio in un quadrato, quindi lavorare come segue: 3 m.a + 3 cat + 3 m.a (= angolo) nel primo arco di cat, 3 cat, 1 m.a nell’arco di cat successivo, 3 cat, 1 m.a nell’arco di cat successivo, 3 cat, * 3 m.a + 3 cat + 3 m.a (= angolo) nell’arco di cat successivo, 3 cat, 1 m.a nell’arco di cat successivo, 3 cat, 1 m.a nell’arco di cat successivo, 3 cat *, ripetere da *-* 3 volte in tutto, 1 m.a nell’arco di cat successivo (= ultime 2 cat del giro precedente), 3 cat. GIRO 4: 3 m.a + 3 cat + 3 m.a (= angolo) nel primo arco di cat, * 3 cat, 1 m.a nell’arco di cat successivo, 3 cat, 1 m.a nell’arco di cat successivo, 3 cat, 1 m.a nell’arco di cat successivo, 3 cat, 3 m.a + 3 cat + 3 m.a (= angolo) nell’arco di cat successivo *, ripetere da *-* 3 volte in tutto, 3 cat, 1 m.a nell’arco di cat successivo, 3 cat, 1 m.a nell’arco di cat successivo, 3 cat, 1 m.a nell’arco di cat successivo, 3 cat, 1 m.a nell’arco di cat successivo, 3 cat. RICORDARSI LA TENSIONE DEL LAVORO! Ripetere il giro 4 con gli aumenti, quindi lavorare 1 m.a + 3 cat in più tra ogni angolo ad ogni giro (= 4 aumenti ad ogni giro); ALLO STESSO TEMPO, ogni 6 giri, aumentare 1 m.a + 3 cat aggiuntive da ciascun lato di ogni angolo – vedere la stella nel diagramma (= 8 aumenti in più sul giro). Proseguire in questo modo finché il quadrato non misura 36-38-40-42-44-46 cm x 36-38-40-42-44-46 cm. Lavorare ora gli scalfi come segue: Lavorare come prima fino al primo angolo, lavorare 3 m.a + 3 cat + 3 m.a nell’arco di cat nell’angolo. Avviare ora delle cat fino al centro del lato successivo (quindi a metà tra il primo ed il secondo angolo) come segue: avviare 1 cat per ogni cat/m.a saltata. Proseguire con il motivo come prima fino al centro tra il 3° ed il 4° angolo. Avviare ora cat fino all’ inizio del giro, come segue: avviare 1 cat per ogni cat/m.a saltata. Al giro successivo, lavorare il motivo ed aumentare come prima su tutte le m, anche nelle cat per gli scalfi. Proseguire in questo modo finché il quadrato non misura 78-80-82-84-86-88 cm x 78-80-82-84-86-88 cm (quindi 21 cm dagli scalfi, per tutte le taglie). Tagliare il filo. DAVANTI: Lavorare ora avanti e indietro tra il primo ed il secondo angolo. ATTENZIONE! Lavorare il davanti senza aumentare. RIGA 1: Lavorare a partire dal primo angolo, come segue: 3 m.a nell’arco di cat nell’angolo, * 3 cat, 1 m.a nell’arco di cat *, ripetere da *-* e finire con 3 cat e 3 m.a nell’angolo. RIGA 2: Girare e lavorare come segue: 1 m.a in ognuna delle prime 3 m.a, * 1 m.a nell’arco di cat, 3 cat *, ripetere da *-* e finire con 1 m.a nell’ultimo arco di cat e 1 m.a in ognuna delle 3 m.a. RIGA 3: Girare e lavorare come segue: 1 m.a in ognuna delle prime 3 m.a, * 3 cat, 1 m.a nell’arco di cat *, ripetere da *-* e finire con 3 cat e 1 m.a in ognuna delle ultime 3 m.a. Ripetere le righe 2 e 3. Proseguire in questo modo finché non sono stati lavorati 19-20-21-22-23-24 cm avanti e indietro. Tagliare il filo. Ripetere sull’altro lato. Lavorare ora avanti e indietro a partire dal terzo angolo verso il quarto angolo. Infine lavorare un giro tutto intorno al quadrato; lavorare il motivo come prima ma nell’arco di cat in ogni angolo lavorare 6 m.a. Tagliare il filo. MANICHE: Lavorare in tondo, dall’alto verso il basso dallo scalfo, iniziando al centro, sotto la manica, sul diritto del lavoro. GIRO 1: 6 cat (= 1 m.a + 3 cat), * 1 m.a nell’arco di cat successivo, 3 cat *, ripetere da *-* 16-17-18-19-20-21 volte in tutto, finire con 1 m.bss nella 3a cat. GIRO 2: 5 cat, * 1 m.a nell’arco di cat successivo, 3 cat *, ripetere da *-* 16-17-18-19-20-21 volte in tutto, 1 cat, finire con 1 m.bss nella 3a cat dall’inizio del giro. Ripetere i giri 1 e 2 - ALLO STESSO TEMPO, diminuire 1 m.a + 3 cat all’inizio del 4°-6°-6°-8°-8°-6° giro lavorando 2 m.a insieme – VEDERE IL SUGGERIMENTO PER LE DIMINUZIONI – al centro, sotto la manica. Ripetere queste diminuzioni ogni 6-6-6-4-4-4 giri = 12-12-13-13-14-14 m.a. Continuare in tondo, senza diminuire finché la manica non misura ca.56 cm per tutte le taglie. Tagliare il filo. Lavorare la seconda manica in modo uguale. |
||||||||||||||||||||||
Spiegazioni del diagramma |
||||||||||||||||||||||
|
||||||||||||||||||||||
 |
||||||||||||||||||||||
 |
||||||||||||||||||||||
Avete terminato questo modello?Allora taggate le vostre foto con #dropspattern #aroundtheworldcardigan o inviatele alla #dropsfan gallery. Avete bisogno di aiuto con questo modello?Troverete 7 video tutorial, una sezione per i commenti/domande e molto altro guardando il modello su www.garnstudio.com © 1982-2026 DROPS Design A/S. Ci riserviamo tutti i diritti. Questo documento, compreso tutte le sue sotto-sezioni, è protetto dalle leggi sul copyright. Potete leggere quello che potete fare con i nostri modelli alla fine di ogni modello sul nostro sito. |
||||||||||||||||||||||


Con oltre 40 anni di esperienza nel design di modelli di maglia e uncinetto, DROPS Design offre la più estesa collezione di modelli gratuiti su internet - tradotti in 17 lingue. Ad oggi vi possiamo fornire 324 cataloghi e 12290 modelli - 9561 dei quali sono tradotti in Italiano.
Ci stiamo impegnando molto per darvi il meglio che vi possiamo offrire in termini di maglia e uncinetto, ispirazioni e consigli così come filati di grande qualità ad un prezzo incredibile! Volete utilizzare i nostri modelli per qualcosa d'altro oltre al vostro uso personale? Potete leggere tutto ciò che è consentito nel testo sul Copyright in basso su tutte le pagine dei nostri modelli. Buon lavoro!
Lasciare un commento sul modello DROPS 156-42
Noi saremmo felici di ricevere i tuoi commenti e opinioni su questo modello!
Se vuoi fare una domanda, fai per favore attenzione a selezionare la categoria corretta nella casella qui sotto per velocizzare il processo di risposta. I campi richiesti sono indicati da *.