
Categorie popolari
State cercando un filato?


Commenti / Domande (127)
![]() Loele Van Den Bergh ha scritto:
Loele Van Den Bergh ha scritto:
Kan iemand mij uitleggen hoe de mouwen gehaakt worden. Ik begrijp het principe wel, maar als ik op de goede kant haak en met de 5 losse de nieuwe toeren begin loopt de hele mindering gedraaid over de voorkant van de mouw. Ik heb overigens ook meer losse bogen dan aangegeven in het patroon. Dit kan ik oplossen door midden onder te minderen maar hoe voorkom ik dat het begin van de rondes over de mouw lopen?
03.01.2016 - 18:02DROPS Design ha risposto:
Hoi Loele. Je moet ervoor zorgen, dat de minderingen steeds op dezelfde plek worden gemaakt. Het lijkt dat je de minderingen op de toer opschuift waardoor ze zich verplaatsen en het mouw "draait". Ik zou ook kijken of je het patroon volgt zodat er niet steeds meer bogen komen.
05.01.2016 - 15:39
![]() Yvonne Pottgießer-Bündgen ha scritto:
Yvonne Pottgießer-Bündgen ha scritto:
Meine Frage vom 20.12.15 wurde leider noch nicht beantwortet. Darf ich mich nochmal in Erinnerung rufen? Vielen Dank.
30.12.2015 - 17:33DROPS Design ha risposto:
Sie müssen bis zur Mitte einer Seite des Quadrats häkeln, Sie häkeln also die Hälfte dieser Seite, dann überspringen Sie den Rest der Seite (also die andere Hälfte), indem Sie statt der Maschen die entsprechende Anzahl an Luftmaschen häkeln. Die Ecke häkeln Sie dann wieder normal und wiederholen das Ganze dann an der gegenüberliegenden Seite. Die Armausschnitte umfassen also jeweils die Hälfte einer Seite.
05.01.2016 - 19:18
![]() Christine Hohenstein ha scritto:
Christine Hohenstein ha scritto:
Are any further questions being answered????? I have a customer waiting on this item to be made. Can someone else help me if the creator isnt available to help me?
29.12.2015 - 16:55DROPS Design ha risposto:
Dear Mrs Hohenstein, please find answer below and thank you very much for your patience. Happy crocheting!
02.01.2016 - 15:17
![]() Christine Hohenstein ha scritto:
Christine Hohenstein ha scritto:
I am so confused as to how to do the sleeve. I got the first corner done. But from there I do not understand the written instructions I have also read many comments and answers and am still confused is there anyway that you can try and in a very simple way explain how to do the first side including the first sleeve? Please and thank you
27.12.2015 - 21:39DROPS Design ha risposto:
Dear Mrs Hohenstein, to shape armholes, work to 1st corner, work 3 dc+3ch+3 dc in corner, then you will work a chain to shape the hole for the sleeve as follows: count number of sts from the 1st corner to the middle of side between 1st and 2nd corner and chain this number of sts, continue working as before from middle of this side to 2nd corner, continue as before to the 3rd corner, then work as before from the corner to the mid of side between 3rd and 4th corner, you will now skip the next sts to the 4th corner and replace these skipped sts by a chain of the number of skipped sts. Finish round as before. Happy crocheting!
02.01.2016 - 14:19
![]() Yvonne Pottgießer-Bündgen ha scritto:
Yvonne Pottgießer-Bündgen ha scritto:
Ich habe Probleme mit den Ärmelausschnitten. Verstehe ich das richtig, dass ich ein Stäbchen gehäkelt habe, dann 3 Lfm + nochmal 3 Lfm um das nächste Stb.zu überspringen,dann wieder 3 Lfm und das nächste Stb häkele? Wenn ja, wie wiederhole ich dass in der nächsten Runde? Verdoppele ich die Lfm zum überspringen, da ja auch der Luftmaschenbogen breiter ist? Ich hoffe, ich habe mich einigermaßen verständlich ausgedrückt. Vielen Dank.
20.12.2015 - 18:15DROPS Design ha risposto:
Antwort siehe oben!
25.01.2016 - 11:09
![]() Tara ha scritto:
Tara ha scritto:
Sorry, I wasn't talking about the armholes, but the sides. It's under the "Front Piece" section of the pattern.
18.11.2015 - 02:35DROPS Design ha risposto:
Dear Tara and sorry, my mistake - the 2nd front piece is worked as you did for the first side but this time crochet between the 3rd and 4th corner (seen from RS): crochet row 1 starting in the 3rd corner and finishing in the 4th corner. Happy crocheting!
18.11.2015 - 09:44
![]() Tara ha scritto:
Tara ha scritto:
This is under the Front section: Repeat on the other side, now work back and forth from third to fourth corner. So am I working this on 3 out of 4 sides? If so, on the bottom side, do I go all the way to the front corners or just the middle to connect the sides (which would not make the sides any longer in front)? I hope this makes sense. I appreciate the help!
17.11.2015 - 14:32DROPS Design ha risposto:
Dear Tara, first armhole is worked between 1st corner and middle of side before 2nd corner, 2nd armhole is worked from middle of side after 3rd corner (work to the middle of the side as before) to the 4th corner (ch same number of ch you crocheted for 1st armhole and skip same number of sts as for 1st armhole). Happy crocheting!
17.11.2015 - 16:39
![]() Tara ha scritto:
Tara ha scritto:
I have read through all the comments and I am confused on Lauren's question. She said that on the 4th side there is an extra DC + 3ch but you said there should not be. However, in the diagram if you count the DC lines it shows 4 on the 4th side and 3 on the other side. When does this get straightened out to be an equal number of DC's on each side? Thanks in advance.
11.11.2015 - 03:10DROPS Design ha risposto:
Dear Tara, your question has been forwarded. Thank you in advance for your patience and comprehension.
12.11.2015 - 09:49Helen Watt ha scritto:
Hi there! I would like some clarification regarding the increase on the body after the chain for the armhole. The pattern reads"On next round work pattern and inc as before OVER ALL STS, also in ch for armholes." To increase over all sts would make the garment very large? I assume this is incorrect and the increase is the same as previous to the making the armhole. Therefore increasing every 6th row? I just want to make sure that this is correct.
05.11.2015 - 10:06DROPS Design ha risposto:
Dear Mrs Watt, yes that's correct, you continue as before and increase as you did before (= continue increasing every 6h row). Happy crocheting!
05.11.2015 - 10:27
![]() Sarah ha scritto:
Sarah ha scritto:
I am not sure what to do on round 5, it says to increase on each corner, which is a total of 4 increases? Correct? Where do i increase and do i still do the extra treble and chain 3 in the last chain space?
01.11.2015 - 17:42DROPS Design ha risposto:
Dear Sarah, on round 5 continue as before (there will be 3 ch, 1 tr more between corners), and on round 6 start inc with 1 tr + 3 ch more in every place with a star in the diagram. Happy crocheting!
02.11.2015 - 09:22
|
||||||||||||||||||||||
Around the World#aroundtheworldcardigan |
||||||||||||||||||||||
 |
 |
|||||||||||||||||||||
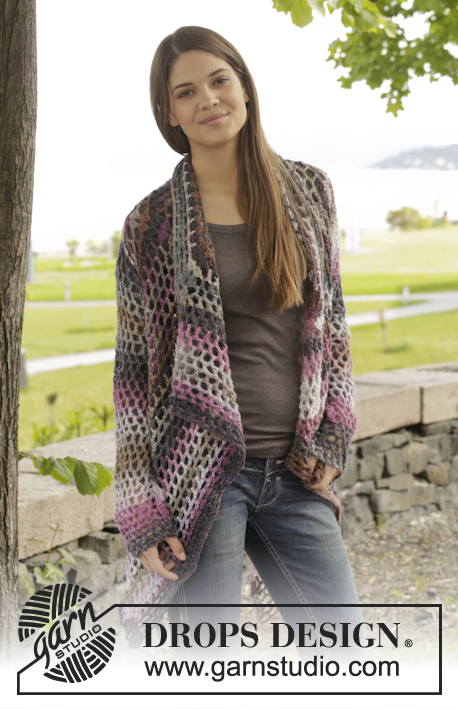
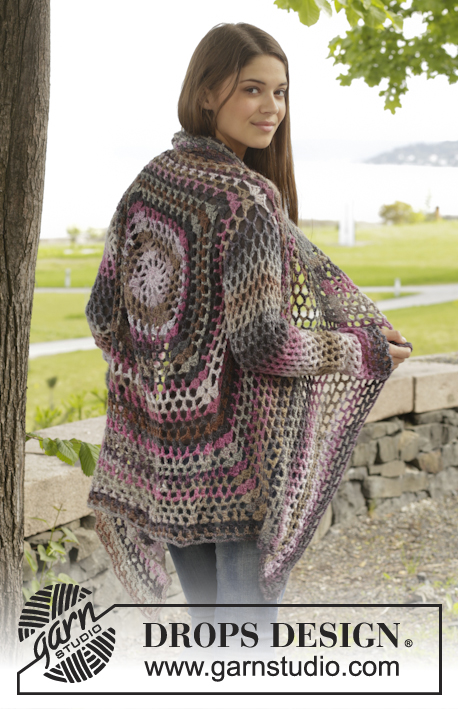
Giacca DROPS all’uncinetto, con motivo traforato, in "Big Delight". Taglie: Dalla S alla XXXL
DROPS 156-42 |
||||||||||||||||||||||
|
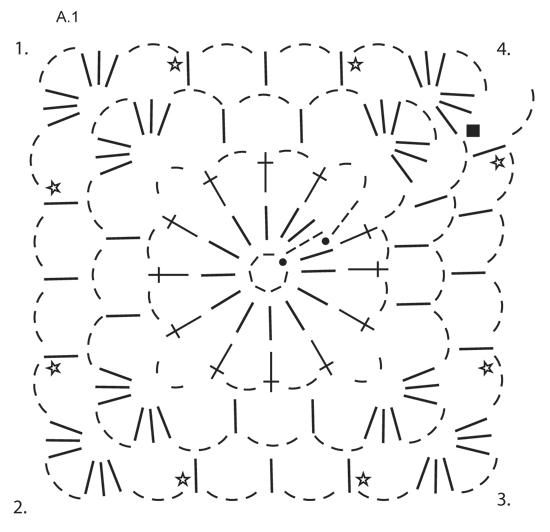
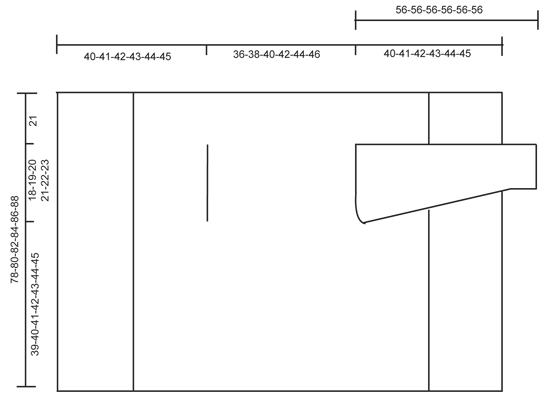
MOTIVO: Vedere il diagramma A.1. SUGGERIMENTO PER LE DIMINUZIONI (per le maniche): Diminuire 1 ripetizione (= 1 m.a + 3 cat), non lavorando le cat, ma lavorare 2 m.a insieme come segue: lavorare 1 m.a ma non fare l’ultima gettata (= 2 m sull’uncinetto), lavorare la m.a successiva e all’ultima gettata, passare il filo attraverso tutte le m sull’uncinetto. ---------------------------------------------------------- DAVANTI E DIETRO: Si lavora in tondo dal centro, sul dietro. Con l’uncinetto n° 5 ed il filato Big Delight, avviare 6 cat e formare un anello con 1 m.bss nella prima cat. Lavorare seguendo il diagramma A.1, quindi lavorare come segue: GIRO 1: 3 cat, 13 m.a nell’anello di cat, finire con 1 m.bss nella 3a cat dall’inizio del giro. GIRO 2: 5 cat, saltare 1 m.a, 1 m.a nella m.a successiva, * 2 cat, 1 m.a nella m.a successiva *, ripetere da *-* su tutto il giro, finire con 2 cat = 12 m.a + 2 cat. GIRO 3: Trasformare ora il cerchio in un quadrato, quindi lavorare come segue: 3 m.a + 3 cat + 3 m.a (= angolo) nel primo arco di cat, 3 cat, 1 m.a nell’arco di cat successivo, 3 cat, 1 m.a nell’arco di cat successivo, 3 cat, * 3 m.a + 3 cat + 3 m.a (= angolo) nell’arco di cat successivo, 3 cat, 1 m.a nell’arco di cat successivo, 3 cat, 1 m.a nell’arco di cat successivo, 3 cat *, ripetere da *-* 3 volte in tutto, 1 m.a nell’arco di cat successivo (= ultime 2 cat del giro precedente), 3 cat. GIRO 4: 3 m.a + 3 cat + 3 m.a (= angolo) nel primo arco di cat, * 3 cat, 1 m.a nell’arco di cat successivo, 3 cat, 1 m.a nell’arco di cat successivo, 3 cat, 1 m.a nell’arco di cat successivo, 3 cat, 3 m.a + 3 cat + 3 m.a (= angolo) nell’arco di cat successivo *, ripetere da *-* 3 volte in tutto, 3 cat, 1 m.a nell’arco di cat successivo, 3 cat, 1 m.a nell’arco di cat successivo, 3 cat, 1 m.a nell’arco di cat successivo, 3 cat, 1 m.a nell’arco di cat successivo, 3 cat. RICORDARSI LA TENSIONE DEL LAVORO! Ripetere il giro 4 con gli aumenti, quindi lavorare 1 m.a + 3 cat in più tra ogni angolo ad ogni giro (= 4 aumenti ad ogni giro); ALLO STESSO TEMPO, ogni 6 giri, aumentare 1 m.a + 3 cat aggiuntive da ciascun lato di ogni angolo – vedere la stella nel diagramma (= 8 aumenti in più sul giro). Proseguire in questo modo finché il quadrato non misura 36-38-40-42-44-46 cm x 36-38-40-42-44-46 cm. Lavorare ora gli scalfi come segue: Lavorare come prima fino al primo angolo, lavorare 3 m.a + 3 cat + 3 m.a nell’arco di cat nell’angolo. Avviare ora delle cat fino al centro del lato successivo (quindi a metà tra il primo ed il secondo angolo) come segue: avviare 1 cat per ogni cat/m.a saltata. Proseguire con il motivo come prima fino al centro tra il 3° ed il 4° angolo. Avviare ora cat fino all’ inizio del giro, come segue: avviare 1 cat per ogni cat/m.a saltata. Al giro successivo, lavorare il motivo ed aumentare come prima su tutte le m, anche nelle cat per gli scalfi. Proseguire in questo modo finché il quadrato non misura 78-80-82-84-86-88 cm x 78-80-82-84-86-88 cm (quindi 21 cm dagli scalfi, per tutte le taglie). Tagliare il filo. DAVANTI: Lavorare ora avanti e indietro tra il primo ed il secondo angolo. ATTENZIONE! Lavorare il davanti senza aumentare. RIGA 1: Lavorare a partire dal primo angolo, come segue: 3 m.a nell’arco di cat nell’angolo, * 3 cat, 1 m.a nell’arco di cat *, ripetere da *-* e finire con 3 cat e 3 m.a nell’angolo. RIGA 2: Girare e lavorare come segue: 1 m.a in ognuna delle prime 3 m.a, * 1 m.a nell’arco di cat, 3 cat *, ripetere da *-* e finire con 1 m.a nell’ultimo arco di cat e 1 m.a in ognuna delle 3 m.a. RIGA 3: Girare e lavorare come segue: 1 m.a in ognuna delle prime 3 m.a, * 3 cat, 1 m.a nell’arco di cat *, ripetere da *-* e finire con 3 cat e 1 m.a in ognuna delle ultime 3 m.a. Ripetere le righe 2 e 3. Proseguire in questo modo finché non sono stati lavorati 19-20-21-22-23-24 cm avanti e indietro. Tagliare il filo. Ripetere sull’altro lato. Lavorare ora avanti e indietro a partire dal terzo angolo verso il quarto angolo. Infine lavorare un giro tutto intorno al quadrato; lavorare il motivo come prima ma nell’arco di cat in ogni angolo lavorare 6 m.a. Tagliare il filo. MANICHE: Lavorare in tondo, dall’alto verso il basso dallo scalfo, iniziando al centro, sotto la manica, sul diritto del lavoro. GIRO 1: 6 cat (= 1 m.a + 3 cat), * 1 m.a nell’arco di cat successivo, 3 cat *, ripetere da *-* 16-17-18-19-20-21 volte in tutto, finire con 1 m.bss nella 3a cat. GIRO 2: 5 cat, * 1 m.a nell’arco di cat successivo, 3 cat *, ripetere da *-* 16-17-18-19-20-21 volte in tutto, 1 cat, finire con 1 m.bss nella 3a cat dall’inizio del giro. Ripetere i giri 1 e 2 - ALLO STESSO TEMPO, diminuire 1 m.a + 3 cat all’inizio del 4°-6°-6°-8°-8°-6° giro lavorando 2 m.a insieme – VEDERE IL SUGGERIMENTO PER LE DIMINUZIONI – al centro, sotto la manica. Ripetere queste diminuzioni ogni 6-6-6-4-4-4 giri = 12-12-13-13-14-14 m.a. Continuare in tondo, senza diminuire finché la manica non misura ca.56 cm per tutte le taglie. Tagliare il filo. Lavorare la seconda manica in modo uguale. |
||||||||||||||||||||||
Spiegazioni del diagramma |
||||||||||||||||||||||
|
||||||||||||||||||||||
 |
||||||||||||||||||||||
 |
||||||||||||||||||||||
Avete terminato questo modello?Allora taggate le vostre foto con #dropspattern #aroundtheworldcardigan o inviatele alla #dropsfan gallery. Avete bisogno di aiuto con questo modello?Troverete 7 video tutorial, una sezione per i commenti/domande e molto altro guardando il modello su www.garnstudio.com © 1982-2026 DROPS Design A/S. Ci riserviamo tutti i diritti. Questo documento, compreso tutte le sue sotto-sezioni, è protetto dalle leggi sul copyright. Potete leggere quello che potete fare con i nostri modelli alla fine di ogni modello sul nostro sito. |
||||||||||||||||||||||


Con oltre 40 anni di esperienza nel design di modelli di maglia e uncinetto, DROPS Design offre la più estesa collezione di modelli gratuiti su internet - tradotti in 17 lingue. Ad oggi vi possiamo fornire 324 cataloghi e 12290 modelli - 9561 dei quali sono tradotti in Italiano.
Ci stiamo impegnando molto per darvi il meglio che vi possiamo offrire in termini di maglia e uncinetto, ispirazioni e consigli così come filati di grande qualità ad un prezzo incredibile! Volete utilizzare i nostri modelli per qualcosa d'altro oltre al vostro uso personale? Potete leggere tutto ciò che è consentito nel testo sul Copyright in basso su tutte le pagine dei nostri modelli. Buon lavoro!
Lasciare un commento sul modello DROPS 156-42
Noi saremmo felici di ricevere i tuoi commenti e opinioni su questo modello!
Se vuoi fare una domanda, fai per favore attenzione a selezionare la categoria corretta nella casella qui sotto per velocizzare il processo di risposta. I campi richiesti sono indicati da *.