
Categorie popolari
State cercando un filato?


Commenti / Domande (127)
![]() Cathelijn ha scritto:
Cathelijn ha scritto:
Bij het lijf staat voor de armsgaten: haak nu lossen tot het midden van de volgende kant als volgt: haak 1 losse voor elke overgeslagen losse/stokje. Wat wordt bedoelt met overgeslagen losse/stokje? Kan ik hier ook ergens een voorbeeld van vinden eventueel?
23.10.2014 - 15:21DROPS Design ha risposto:
U slaat steken over om armsgaten te maken. Dus de ketting van lossen moet zo lang worden als het aantal steken dat u overslaat. Onderaan het patroon ziet u een tekening - de verticale streep die u ziet dat is een armsgat.
23.10.2014 - 22:21
![]() Nicole ha scritto:
Nicole ha scritto:
I am beginning this pattern and would like some clarification. After round 4, the pattern states to repeat round four with increase every round AT THE SAME TIME on every 6th round inc on either side of ever corner. My question is does the "repeat round 4" count as round 5 of the pattern OR do I start a new count with the inc row being round 1 with the 6th round having the additional increase? Thank you for your assistance
15.10.2014 - 19:45DROPS Design ha risposto:
Dear Nicole, inc start on 6th round from beg, and are repeated every 6th round, ie after round 4, repeat round 4 = round 5, then repeat round 4 with inc = round 6, work 5 rounds as round 4 without inc, and inc on next round. Happy crocheting!
16.10.2014 - 09:29
![]() Bianca ha scritto:
Bianca ha scritto:
Hallo Ihr Lieben! Leider scheitere ich schon an der 5. Reihe :( ... Ihr schreibt die 4. Reihe mit den Zunahmen wiederholen ... d.h. an jeder Seite zwischen den Ecken 1 Stb. und 3 Lm. mehr häkeln ... (=4 zunahmen pro Runde) ! Mir ist aber nicht klar wo genau ich das Stb.und die Lm häkeln soll??? :( hilfeeee
13.10.2014 - 23:49DROPS Design ha risposto:
Liebe Bianca, die Zunahmen ergeben sich quasi automatisch - Sie häkeln ja ab dem Lm-Bogen in der Ecke von Lm-Bogen zu Lm-Bogen jeweils 3 Lm (und dann um den Lm-Bogen 1 Stb), wenn Sie dann am anderen Lm-Bogen in der nächsten Ecke angekommen sind, haben Sie 1 Lm-Bogen und 1 Stb mehr gehäkelt als in der Vor-Rd, das können Sie im Diagramm auch sehen, wenn Sie die 3. Rd mit der 4. Rd vergleichen.
14.10.2014 - 00:27
![]() Clare Kane ha scritto:
Clare Kane ha scritto:
Is there any sizing guidance for these patterns? I am not sure how S/M/L etc relates to UK or Euro dress sizes.
04.10.2014 - 10:55DROPS Design ha risposto:
Dear Mrs Kane, you will find at the bottom of the pattern a measurement chart with all measures taken flat from side to side. Compare these (eg back piece between armholes) to a similar garment you like the shape to find out the matching size. Happy knitting!
04.10.2014 - 18:07
![]() Christina ha scritto:
Christina ha scritto:
Hallo liebes Team :) ich beziehe mich auf meine schon gestellte frage am 4.9. - eure antwort am 11.9. WO wird denn dann die antwort gegeben (wenn diese von der designerin zurück ist)? unter meiner frage oder wird das gleich in der anleitung geändert? vielen dank
26.09.2014 - 14:35DROPS Design ha risposto:
Liebe Christina, leider haben wir noch keine Antwort zurückbekommen, ich hake noch einmal nach. Die Anleitung wird dann ggf. korrigiert, ich würde aber in der Kommentarliste auch noch einen kurzen Hinweis schreiben.
27.09.2014 - 09:43
![]() Eva ha scritto:
Eva ha scritto:
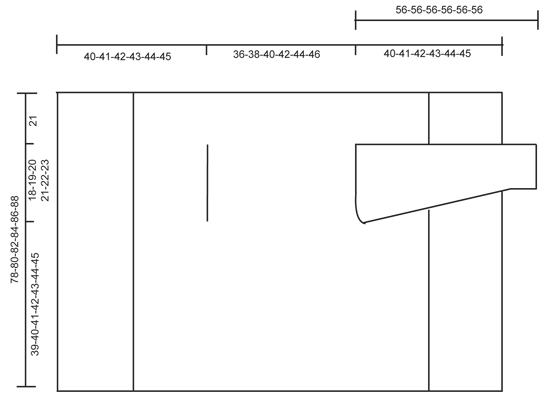
I have been crocheting for a little over a year now and I don't understand the bottom diagram. What are all the numbers such as 56-56-56-56-56? Also, what are the vertical lines to the left? (along the sides) I would appreciate your help because I asked a couple friends of mine that have crocheting a long time and they didn't have the answer either. HaHa Eva
24.09.2014 - 23:10DROPS Design ha risposto:
Dear Eva, the bottom chart shows all measurement for each sizes, the 56 cm (in all sizes) refer to the total length of sleeve - the vertical line on the left side gives several measurements = total length of piece, then from bottom to beg of armhole, height of armhole and lenght from armhole to bottom edge. Happy crocheting!
25.09.2014 - 08:53
![]() Emma ha scritto:
Emma ha scritto:
In het patroon van het voorpand staat er:Haak vanaf de eerste hoek als volgt: 3 stk in l-lus in de hoek, patroon als hiervoor tot de tweede hoek, 3 stk in l-lus in de hoek. Keer en haak de teruggaande toer op dezelfde manier. Als je keert kan je toch niet met 3st starten in een lus, je bent net geëindigd met 3st en geen lus. Begrijp ik dit verkeerd? Alvast bedankt!
19.09.2014 - 12:10DROPS Design ha risposto:
Hoi Emma. We hebben het patroon voor het voorpand aangepast, zodat het duidelijker zou moeten zijn. Zie of het nu lukt.
28.10.2014 - 12:35
![]() Barbara ha scritto:
Barbara ha scritto:
Bedankt voor uw antwoord. Ik heb nog een vraagje. Er staat haak elke 6e toer 1 stokje en 3 losse extra aan elke kant van een hoek. Dus 8 meerderingen per toer. Klopt het dan dat ik in toer 6 in totaal 7 stokjes tussen de hoeken heb en 8 tussen hoek 3 en 4? Alvast bedankt. Ik twijfel zo omdat ik op de foto van de rugzijde van het vest in toer 6 geen meerderingen kan zien. Alvast bedankt.
19.09.2014 - 11:18DROPS Design ha risposto:
Als u in de aangegeven toeren meerdert aan elke kant van de hoeken, dan meerdert u automatisch 8 keer, dus dat klopt.
09.10.2014 - 15:44
![]() Barbara ha scritto:
Barbara ha scritto:
Ik heb een vraag over de tekening. In de patroontekening staat tussen hoek 3 en 4 in elke toer een stokje extra. Bijvoorbeeld toer 3: er zijn steeds 2 stokjes tussen de hoeken, alleen zijn er 3 stokjes tussen hoek 3 en 4. Ik hoop dat u begrijpt wat ik bedoel. Klopt dit wel, want als ik naar de foto kijk van het vest, zie ik dat alle steken gelijk zijn tussen alle hoeken. Alvast bedankt voor uw hulp.
12.09.2014 - 11:31DROPS Design ha risposto:
Hoi Barbara. Ja, dit is correct. Dit is om de toer af te sluiten en op de volgende toer te beginnen. Het is zal zo blijven als je verder gaat. In de tweedelaatste toer van de tekening heb je 3 stk, in de laatste 4 stk, en als je doorgaat zal je 5, 6, 7 stk hebben enzovoort.
18.09.2014 - 17:20
![]() Christina ha scritto:
Christina ha scritto:
Hallo :) Ich bräuchte hilfe bei den vorderteilen. die erste reihe ist mir klar, aber dann die zweite versteh ich leider nicht :( "wenden und ebenso zurück häkeln" hm? jetzt hab ich ja keine ecken mehr wo ich 3 stb reinmachen kann? was mach ich statt den 3 stäbchen? überspring ich die mit luftmaschen? oder mach ich in jedes stb wieder ein stb? :( Hilfe bitte :) (soooo ein schönes teil wird das ;) ) danke im voraus :) lg
04.09.2014 - 21:34DROPS Design ha risposto:
Liebe Christina, das ist in der Tat nicht eindeutig beschrieben. Ich werde Ihre Frage an die Designerinnen weiterleiten, es kann aber dann noch etwas dauern, bis eine Antwort kommt.
11.09.2014 - 10:07
|
||||||||||||||||||||||
Around the World#aroundtheworldcardigan |
||||||||||||||||||||||
 |
 |
|||||||||||||||||||||
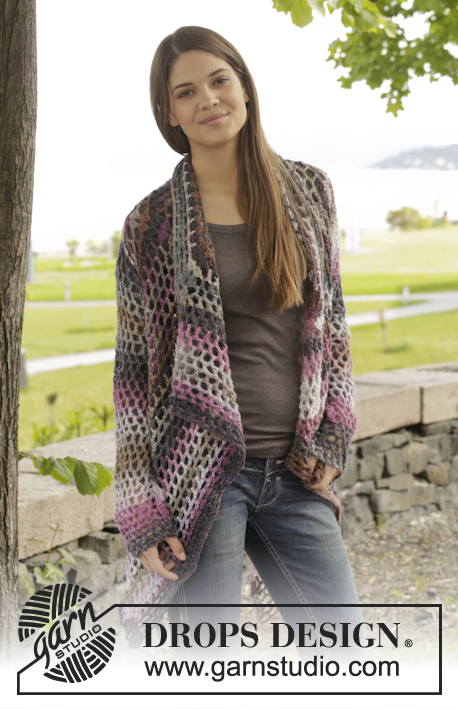
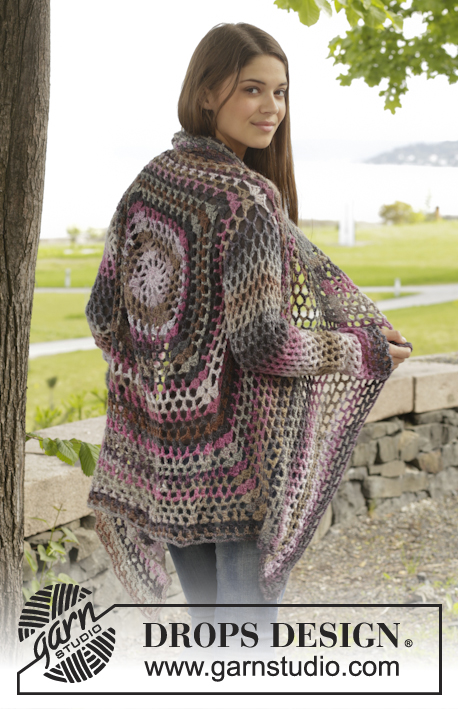
Giacca DROPS all’uncinetto, con motivo traforato, in "Big Delight". Taglie: Dalla S alla XXXL
DROPS 156-42 |
||||||||||||||||||||||
|
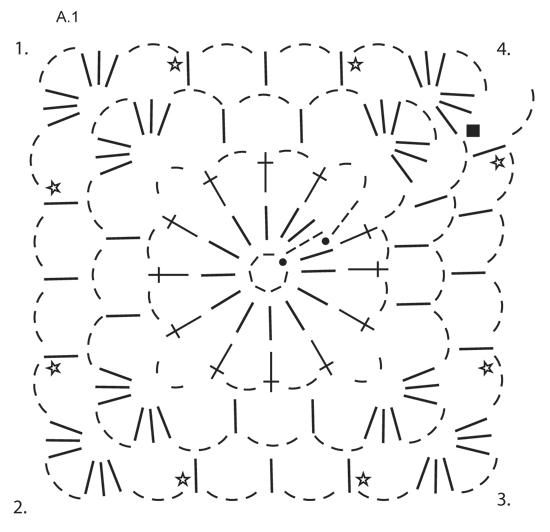
MOTIVO: Vedere il diagramma A.1. SUGGERIMENTO PER LE DIMINUZIONI (per le maniche): Diminuire 1 ripetizione (= 1 m.a + 3 cat), non lavorando le cat, ma lavorare 2 m.a insieme come segue: lavorare 1 m.a ma non fare l’ultima gettata (= 2 m sull’uncinetto), lavorare la m.a successiva e all’ultima gettata, passare il filo attraverso tutte le m sull’uncinetto. ---------------------------------------------------------- DAVANTI E DIETRO: Si lavora in tondo dal centro, sul dietro. Con l’uncinetto n° 5 ed il filato Big Delight, avviare 6 cat e formare un anello con 1 m.bss nella prima cat. Lavorare seguendo il diagramma A.1, quindi lavorare come segue: GIRO 1: 3 cat, 13 m.a nell’anello di cat, finire con 1 m.bss nella 3a cat dall’inizio del giro. GIRO 2: 5 cat, saltare 1 m.a, 1 m.a nella m.a successiva, * 2 cat, 1 m.a nella m.a successiva *, ripetere da *-* su tutto il giro, finire con 2 cat = 12 m.a + 2 cat. GIRO 3: Trasformare ora il cerchio in un quadrato, quindi lavorare come segue: 3 m.a + 3 cat + 3 m.a (= angolo) nel primo arco di cat, 3 cat, 1 m.a nell’arco di cat successivo, 3 cat, 1 m.a nell’arco di cat successivo, 3 cat, * 3 m.a + 3 cat + 3 m.a (= angolo) nell’arco di cat successivo, 3 cat, 1 m.a nell’arco di cat successivo, 3 cat, 1 m.a nell’arco di cat successivo, 3 cat *, ripetere da *-* 3 volte in tutto, 1 m.a nell’arco di cat successivo (= ultime 2 cat del giro precedente), 3 cat. GIRO 4: 3 m.a + 3 cat + 3 m.a (= angolo) nel primo arco di cat, * 3 cat, 1 m.a nell’arco di cat successivo, 3 cat, 1 m.a nell’arco di cat successivo, 3 cat, 1 m.a nell’arco di cat successivo, 3 cat, 3 m.a + 3 cat + 3 m.a (= angolo) nell’arco di cat successivo *, ripetere da *-* 3 volte in tutto, 3 cat, 1 m.a nell’arco di cat successivo, 3 cat, 1 m.a nell’arco di cat successivo, 3 cat, 1 m.a nell’arco di cat successivo, 3 cat, 1 m.a nell’arco di cat successivo, 3 cat. RICORDARSI LA TENSIONE DEL LAVORO! Ripetere il giro 4 con gli aumenti, quindi lavorare 1 m.a + 3 cat in più tra ogni angolo ad ogni giro (= 4 aumenti ad ogni giro); ALLO STESSO TEMPO, ogni 6 giri, aumentare 1 m.a + 3 cat aggiuntive da ciascun lato di ogni angolo – vedere la stella nel diagramma (= 8 aumenti in più sul giro). Proseguire in questo modo finché il quadrato non misura 36-38-40-42-44-46 cm x 36-38-40-42-44-46 cm. Lavorare ora gli scalfi come segue: Lavorare come prima fino al primo angolo, lavorare 3 m.a + 3 cat + 3 m.a nell’arco di cat nell’angolo. Avviare ora delle cat fino al centro del lato successivo (quindi a metà tra il primo ed il secondo angolo) come segue: avviare 1 cat per ogni cat/m.a saltata. Proseguire con il motivo come prima fino al centro tra il 3° ed il 4° angolo. Avviare ora cat fino all’ inizio del giro, come segue: avviare 1 cat per ogni cat/m.a saltata. Al giro successivo, lavorare il motivo ed aumentare come prima su tutte le m, anche nelle cat per gli scalfi. Proseguire in questo modo finché il quadrato non misura 78-80-82-84-86-88 cm x 78-80-82-84-86-88 cm (quindi 21 cm dagli scalfi, per tutte le taglie). Tagliare il filo. DAVANTI: Lavorare ora avanti e indietro tra il primo ed il secondo angolo. ATTENZIONE! Lavorare il davanti senza aumentare. RIGA 1: Lavorare a partire dal primo angolo, come segue: 3 m.a nell’arco di cat nell’angolo, * 3 cat, 1 m.a nell’arco di cat *, ripetere da *-* e finire con 3 cat e 3 m.a nell’angolo. RIGA 2: Girare e lavorare come segue: 1 m.a in ognuna delle prime 3 m.a, * 1 m.a nell’arco di cat, 3 cat *, ripetere da *-* e finire con 1 m.a nell’ultimo arco di cat e 1 m.a in ognuna delle 3 m.a. RIGA 3: Girare e lavorare come segue: 1 m.a in ognuna delle prime 3 m.a, * 3 cat, 1 m.a nell’arco di cat *, ripetere da *-* e finire con 3 cat e 1 m.a in ognuna delle ultime 3 m.a. Ripetere le righe 2 e 3. Proseguire in questo modo finché non sono stati lavorati 19-20-21-22-23-24 cm avanti e indietro. Tagliare il filo. Ripetere sull’altro lato. Lavorare ora avanti e indietro a partire dal terzo angolo verso il quarto angolo. Infine lavorare un giro tutto intorno al quadrato; lavorare il motivo come prima ma nell’arco di cat in ogni angolo lavorare 6 m.a. Tagliare il filo. MANICHE: Lavorare in tondo, dall’alto verso il basso dallo scalfo, iniziando al centro, sotto la manica, sul diritto del lavoro. GIRO 1: 6 cat (= 1 m.a + 3 cat), * 1 m.a nell’arco di cat successivo, 3 cat *, ripetere da *-* 16-17-18-19-20-21 volte in tutto, finire con 1 m.bss nella 3a cat. GIRO 2: 5 cat, * 1 m.a nell’arco di cat successivo, 3 cat *, ripetere da *-* 16-17-18-19-20-21 volte in tutto, 1 cat, finire con 1 m.bss nella 3a cat dall’inizio del giro. Ripetere i giri 1 e 2 - ALLO STESSO TEMPO, diminuire 1 m.a + 3 cat all’inizio del 4°-6°-6°-8°-8°-6° giro lavorando 2 m.a insieme – VEDERE IL SUGGERIMENTO PER LE DIMINUZIONI – al centro, sotto la manica. Ripetere queste diminuzioni ogni 6-6-6-4-4-4 giri = 12-12-13-13-14-14 m.a. Continuare in tondo, senza diminuire finché la manica non misura ca.56 cm per tutte le taglie. Tagliare il filo. Lavorare la seconda manica in modo uguale. |
||||||||||||||||||||||
Spiegazioni del diagramma |
||||||||||||||||||||||
|
||||||||||||||||||||||
 |
||||||||||||||||||||||
 |
||||||||||||||||||||||
Avete terminato questo modello?Allora taggate le vostre foto con #dropspattern #aroundtheworldcardigan o inviatele alla #dropsfan gallery. Avete bisogno di aiuto con questo modello?Troverete 7 video tutorial, una sezione per i commenti/domande e molto altro guardando il modello su www.garnstudio.com © 1982-2026 DROPS Design A/S. Ci riserviamo tutti i diritti. Questo documento, compreso tutte le sue sotto-sezioni, è protetto dalle leggi sul copyright. Potete leggere quello che potete fare con i nostri modelli alla fine di ogni modello sul nostro sito. |
||||||||||||||||||||||


Con oltre 40 anni di esperienza nel design di modelli di maglia e uncinetto, DROPS Design offre la più estesa collezione di modelli gratuiti su internet - tradotti in 17 lingue. Ad oggi vi possiamo fornire 324 cataloghi e 12290 modelli - 9561 dei quali sono tradotti in Italiano.
Ci stiamo impegnando molto per darvi il meglio che vi possiamo offrire in termini di maglia e uncinetto, ispirazioni e consigli così come filati di grande qualità ad un prezzo incredibile! Volete utilizzare i nostri modelli per qualcosa d'altro oltre al vostro uso personale? Potete leggere tutto ciò che è consentito nel testo sul Copyright in basso su tutte le pagine dei nostri modelli. Buon lavoro!
Lasciare un commento sul modello DROPS 156-42
Noi saremmo felici di ricevere i tuoi commenti e opinioni su questo modello!
Se vuoi fare una domanda, fai per favore attenzione a selezionare la categoria corretta nella casella qui sotto per velocizzare il processo di risposta. I campi richiesti sono indicati da *.