
Categorie popolari
State cercando un filato?


Commenti / Domande (12)
![]() Merethe Nielsen ha scritto:
Merethe Nielsen ha scritto:
Jeg er gået i stå efter række 28, den har fået en form for spids, kan ikke se hvor jeg starter i række 29? Synes også at det stykke fra 23 ligner hen ad ryggen, men forstå det er brystkassen? Er halsen drejet?
18.02.2025 - 02:10DROPS Design ha risposto:
Hei Merethe. Når du starter med rad 29, hekler du 4 fastmasker bortover (du hekler "nedover" i radene), ikke i en fastmaske som tidligere. Dette gjøres 6 ganger (rad 29 til rad 34). Du har da heklet brystkassen. Når du heklet omgang 20, skulle denne omgangen hekles 20,5 gang slik at man avsluttet midt oppå nakken. Da vil brystkassen komme i front, ikke på ryggen. mvh DROPS Design
10.03.2025 - 07:45
![]() Anne ha scritto:
Anne ha scritto:
Bonjour, Je ne comprends pas, pour les rangs 8 à 20 de la tête, cou et corps : "sans joindre à la fin de chaque tour". Pouvez-vous m'expliquer? Merci
18.10.2021 - 19:57DROPS Design ha risposto:
Bonjour Anne, bien volontiers: crochetez 1 maille serrée dans chaque maille serrée tout le tour, à la fin du tour, au lieu de terminer par 1 maille coulée dans la première maille serrée du tour, mettez un marqueur pour repérer la fin/le début du tour et crochetez simplement 1 maille serrée dans la 1ère maille serrée du tour suivant, et continuez ainsi, en faisant bien suivre votre marqueur pour repérer le début des tours, vous crochetez ainsi en spirale. Bon crochet!
19.10.2021 - 07:49
![]() Gabriela María Sanmarti ha scritto:
Gabriela María Sanmarti ha scritto:
Could you please send me the pattern to knit a panda toy of about 60 cm? Thank you very much. In spanglish much better
19.12.2020 - 02:08DROPS Design ha risposto:
Hola Gabriela. No hacemos patrones personalizados. Puedes ver en el apartado Mascotas & Juguetes todos los patrones disponibles.
20.12.2020 - 12:24
![]() Herma Van Der Moolen ha scritto:
Herma Van Der Moolen ha scritto:
Hoe haak ik verder na toer 29???????
02.01.2019 - 12:20
![]() Erika Procter ha scritto:
Erika Procter ha scritto:
Hello, where it says 'ROUND 8 to 20: Work 1 dc in every dc in the round without finishing every round, then work up to the middle on top of neck', how do you crochet in the round and not finish every round?
27.03.2018 - 15:32DROPS Design ha risposto:
Dear Mrs Procter, just work 1 dc in each dc without joining at the end of round with a sl st, insert a marker at the beg of each row and move it upwards so that you can count the number of rounds worked. Happy crocheting!
28.03.2018 - 15:09
![]() Kristin ha scritto:
Kristin ha scritto:
Hallo, das Problem ist, wie man ab der 35. Runde weiterhäkelt. An den Seiten befinden sich ja dann so große Löcher.... Danke für die Hilfe! Viele Grüße, Kristin
03.10.2017 - 15:13DROPS Design ha risposto:
Liebe Kristin, bei der 35. Runde werden Sie um herum die ganze "Öffnung" arbeiten, dh in die Maschen der vorrigen Reihe sowie entlang den Reihen 24 bis 35 so daß keinen Loch mehr gibt. Dann in der Runde weiter häkeln. Viel Spaß beim häkeln!
03.10.2017 - 15:37
![]() Alicia ha scritto:
Alicia ha scritto:
I'm very confused at row 34/round 35 - how should I work around the opening? My current attempt has two holes where the precious row ends are, but I can't see any mention of sewing them up later. What forms the opening? Thanks for any help you can offer!
23.02.2015 - 21:45DROPS Design ha risposto:
Dear Alicia, after row 34, turn to work next round from RS, then work 1 dc in each st around the opening created by the rows worked back and forth, working 2 dc in the same dc to get a total of 22 dc at the end of the 35th round. You continue then body in the round to back. Happy crocheting!
24.02.2015 - 09:10
![]() Rob ha scritto:
Rob ha scritto:
I've asked my wife to make me one of these as a present for a friend. She is confused by the instructions at ROUND 2 - Work 2 dc in every dc = 10 dc. Turn with 1 ch, then work back and forth in one." What does the last sentence mean?
28.11.2014 - 16:43DROPS Design ha risposto:
Dear Rob, you first have to work 2 first rounds in the round, but then after round 2, you have to turn and work in rows from row 3 to row 7 (ie for 5 rows), this creates the opening for snout worked later (see in pattern below "SNOUT"). Afterwards, you continue from round 8 in the round again. Happy crocheting to your wife!
28.11.2014 - 17:47
![]() Elisabeth ha scritto:
Elisabeth ha scritto:
Combien de temps faut-il pour réaliser ce modèle ? D'avance merci
17.09.2014 - 21:18DROPS Design ha risposto:
Bonjour Elisabeth, le temps de réalisation dépend notamment de l'expérience de chacune. Bon crochet!
18.09.2014 - 08:53
![]() DROPS Design ha scritto:
DROPS Design ha scritto:
Liebe Abc, das ist 0-1001.
10.01.2014 - 15:04
|
|
Roger |
|
 |
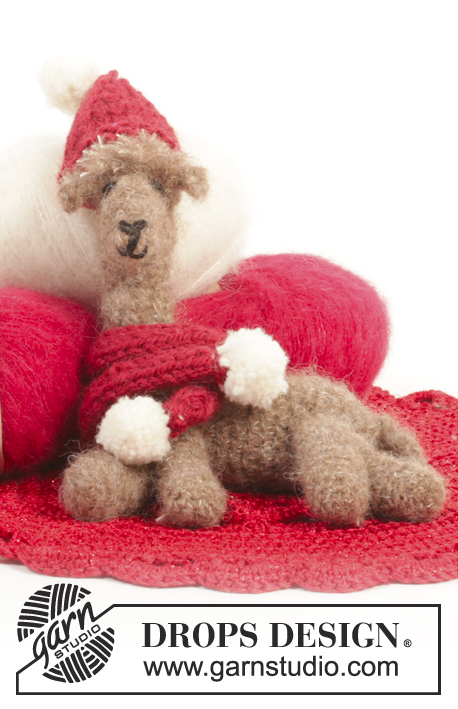 |
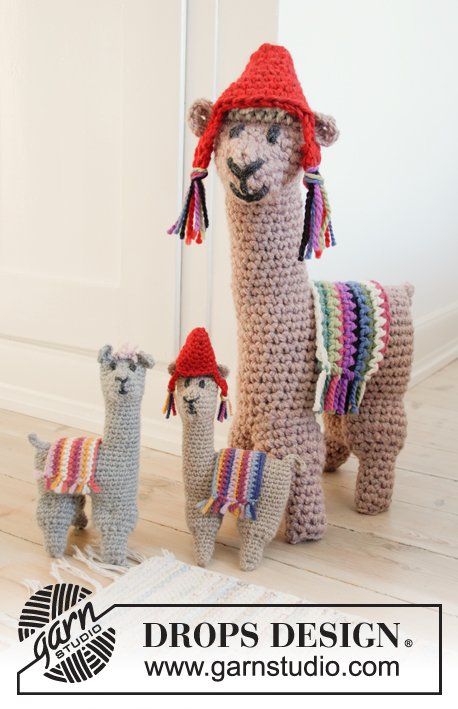
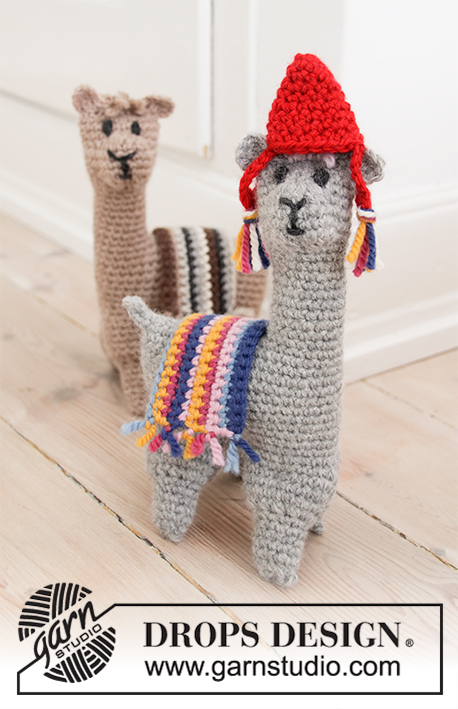
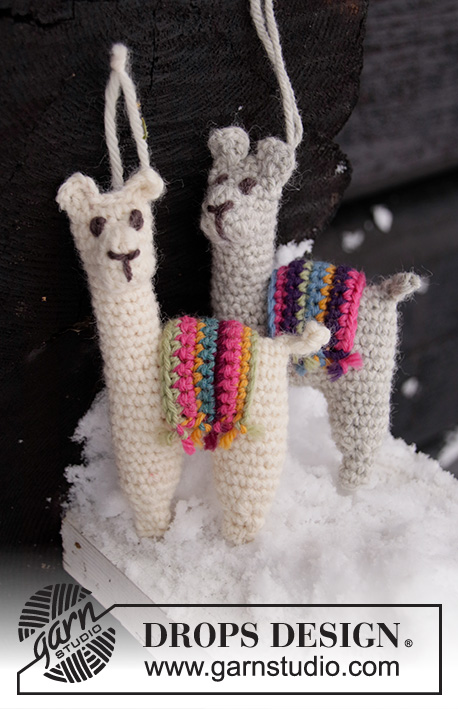
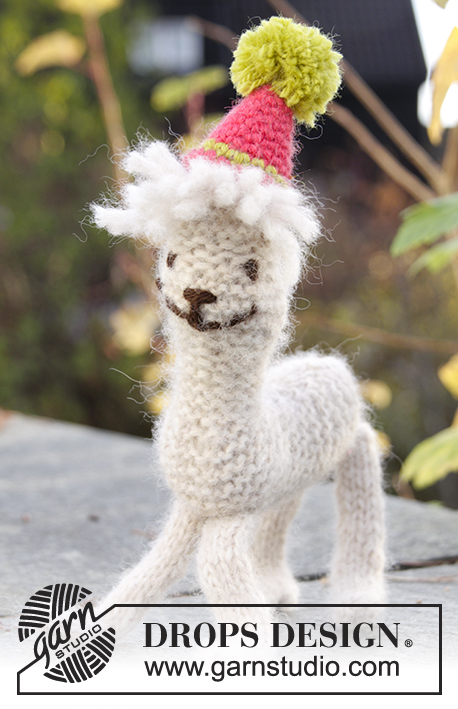
Alpaca DROPS lavorata all’uncinetto in "Brushed Alpaca Silk ".
DROPS Extra 0-985 |
|
|
SUGGERIMENTO PER IL RIEMPIMENTO: Riempire gradualmente l’animale con un po’ di ovatta/Brushed Alpaca Silk durante il lavoro. SUGGERIMENTO PER IL LAVORO: Iniziare ogni giro a m.b con 1 cat (questa non sostituisce la 1° m.b) e finire con 1 m.bss nella 1° m.b dall’inizio del giro. Girare ogni riga a m.b con 1 cat – questa cat non sostituisce la 1° m.b sulla riga. SUGGERIMENTO PER LE DIMINUZIONI: Diminuire 1 m lavorando 2 m insieme. Ciò viene fatto come segue: Inserire l’uncinetto nella 1° m e far passare il filo, inserire l’uncinetto nella m successiva e far passare il filo, fare 1 gettato e far passare il filo attraverso tutti e 3 gli occhielli sull’uncinetto. ---------------------------------------------------------- ALPACA: Lavorata dalla cima della testa, giù lungo il collo e lungo il corpo. Le zampe, la coda e le orecchie sono lavorate in modo separato e attaccate alla fine. LEGGERE IL SUGGERIMENTO PER IL RIEMPIMENTO! TESTA, COLLO E CORPO: Avviare 4 cat con il beige con l’uncinetto n° 3 mm e formare un anello con 1 m.bss nella 1° cat. GIRO 1: Lavorare 5 m.b nell’anello di cat. GIRO 2: lavorare 2 m.b in ogni m.b = 10 m.b. Girare con 1 cat, poi lavorare avanti e indietro. RIGHE 3-7: lavorare 1 m.b in ogni m.b avanti e indietro (= l’apertura per il muso, che sarà lavorato in seguito). GIRI 8-20: lavorare 1 m.b in ogni m.b in tondo senza finire ogni giro, poi lavorare su fino al centro in cima al collo. GIRO 21: lavorare 1 m.b in ognuna delle prima 4 m.b, 2 m.b in ognuna delle 2 m.b successive e 1 m.b in ognuna delle ultime 4 m.b = 12 m.b. GIRO 22: lavorare 1 m.b in ognuna delle prime 5 m.b, 2 m.b in ognuna delle 2 m.b successive e 1 m.b in ognuna delle ultime 5 m.b = 14 m.b. RIGA 23: lavorare 1 m.b in ognuna delle prime 12 m.b, girare il lavoro con 1 cat, ora lavorare avanti e indietro per il torace. RIGA 24 (rovescio del lavoro): saltare la 1° m.b, 1 m.b in ognuna delle 10 m.b successive, girare con 1 cat. RIGA 25 (diritto del lavoro): Saltare la 1° m.b, 1 m.b in ognuna delle 8 m.b successive, girare con 1 cat. RIGA 26 (rovescio del lavoro): Saltare la 1° m.b, 1 m.b in ognuna delle 6 m.b successive, girare con 1 cat. RIGA 27 (diritto del lavoro): Saltare la 1° m.b, 1 m.b in ognuna delle 4 m.b successive, girare con 1 cat. RIGA 28 (rovescio del lavoro): Saltare la 1° m.b, 1 m.b in ognuna delle 2 m.b successive, girare con 1 cat. RIGA 29 (diritto del lavoro): Saltare la 1° m.b, poi lavorare 4 m.b, girare con 1 cat. RIGA 30 (rovescio del lavoro): Saltare la 1° m.b, poi lavorare 6 m.b, girare con 1 cat. RIGA 31 (diritto del lavoro): Saltare la 1° m.b, poi lavorare 8 m.b, girare con 1 cat. RIGA 32 (rovescio del lavoro): Saltare la 1° m.b, poi lavorare 10 m.b, girare con 1 cat. RIGA 33 (diritto del lavoro): Saltare la 1° m.b, poi lavorare 12 m.b, girare con 1 cat. RIGA 34 (rovescio del lavoro): Saltare la 1° m.b, poi lavorare 14 m.b, girare con 1 cat. Ora lavorare ancora in tondo. GIRO 35: lavorare a m.b attorno a tutta l’apertura – aumentare in modo uniforme in modo che ci siano 22 m.b in totale. GIRI 36-45: Continuare in tondo con 10 giri a m.b. GIRO 46: lavorare a m.b, allo stesso tempo diminuire 4 m.b in modo uniforme lavorando le m.b insieme 2 a 2 – LEGGERE IL SUGGERIMENTO PERLE DIMINUZIONI = 18 m.b. GIRO 47: lavorare a m.b, allo stesso tempo diminuire 4 m.b in modo uniforme lavorando le m.b insieme 2 a 2 = 14 m.b – LEGGERE IL SUGGERIMENTO PER L’IMBOTTITURA. GIRO 48: lavorare a m.b, allo stesso tempo diminuire 4 m.b in modo uniforme lavorando le m.b insieme 2 a 2 = 10 m.b. GIRO 49: lavorare tutte le m.b insieme 2 a 2 = 5 m.b. Tagliare il filo, imbastirlo attorno all’apertura, tirare forte e affrancare. MUSO: Lavorare 14 m.b con il beige con l’uncinetto n° 3 mm attorno all’apertura sul davanti della testa. Inserire 1 segnapunti in cima alla testa. Continuare con 4 giri con 1 m.b in ogni m.b e allo stesso tempo lavorare insieme le 2 m.b al centro sulla cima della testa su ogni giro = 10 m.b. Poi lavorare 1 giro dove tutte le m.b vengono lavorate insieme 2 a 2 = 5 m.b, chiudere. Mettere un po’ di ovatta nel muso, imbastire il filo attorno all’apertura, tirare forte e affrancare. ZAMPE: Avviare 4 cat con il beige con l’uncinetto n° 3 mm e formare un anello con 1 m.bss nella 1° cat. GIRO 1: 6 m.b nell’anello di cat. GIRO 2: * 1 m.b nella 1° m.b, 2 m.b nella m.b successiva *, ripetere *-* = 9 m.b. GIRI 3-12: lavorare 1 m.b in ogni m.b sul giro, chiudere. Lavorare un totale di 4 zampe come questa. Riempirle con un po’ di ovatta e attaccarle sulla parte inferiore del corpo. CODA: Avviare 7 cat con 2 capi di beige con l’uncinetto n° 3 mm, poi lavorare 2 m.a.d nella 2° cat dall’uncinetto, poi 1 m.m.a in ognuna delle ultime 5 cat, chiudere e cucire la coda al dietro del corpo in modo che penzoli verso il basso. ORECCHIE: Avviare 6 cat con 2 capi di beige con l’uncinetto n° 3 mm, poi lavorare 2 m.m.a nella 2° cat dall’uncinetto, poi 1 m.b in ognuna delle ultime 4 cat, chiudere. Lavorare un altro orecchio e attaccarli in cima alla testa. CIUFFO DI CAPELLI: Tagliare 8 capi di beige, lunghi circa 8 cm. Unire i capi 2 a 2, inserire un uncinetto in una m sulla cima della testa all’altezza di un orecchio e far passare il filo a metà per formare un anello. Far passare le estremità del filo attraverso quest’anello e tirare. Ripeterlo altre 3 volte, in modo che ci siano dei ciuffi di capelli tra le orecchie. Tagliare i ciuffi di capelli fino alla lunghezza desiderata. Ricamare gli occhi, il muso e la bocca con il nero. |
|
Avete terminato questo modello?Allora taggate le vostre foto con #dropspattern o inviatele alla #dropsfan gallery. Avete bisogno di aiuto con questo modello?Troverete 10 video tutorial, una sezione per i commenti/domande e molto altro guardando il modello su www.garnstudio.com © 1982-2026 DROPS Design A/S. Ci riserviamo tutti i diritti. Questo documento, compreso tutte le sue sotto-sezioni, è protetto dalle leggi sul copyright. Potete leggere quello che potete fare con i nostri modelli alla fine di ogni modello sul nostro sito. |
|


Con oltre 40 anni di esperienza nel design di modelli di maglia e uncinetto, DROPS Design offre la più estesa collezione di modelli gratuiti su internet - tradotti in 17 lingue. Ad oggi vi possiamo fornire 324 cataloghi e 12290 modelli - 9561 dei quali sono tradotti in Italiano.
Ci stiamo impegnando molto per darvi il meglio che vi possiamo offrire in termini di maglia e uncinetto, ispirazioni e consigli così come filati di grande qualità ad un prezzo incredibile! Volete utilizzare i nostri modelli per qualcosa d'altro oltre al vostro uso personale? Potete leggere tutto ciò che è consentito nel testo sul Copyright in basso su tutte le pagine dei nostri modelli. Buon lavoro!
Lasciare un commento sul modello DROPS Extra 0-985
Noi saremmo felici di ricevere i tuoi commenti e opinioni su questo modello!
Se vuoi fare una domanda, fai per favore attenzione a selezionare la categoria corretta nella casella qui sotto per velocizzare il processo di risposta. I campi richiesti sono indicati da *.