
Categorie popolari
State cercando un filato?


Commenti / Domande (59)
Sandra ha scritto:
I'm a beginner and the finished product was too tight at the end. What did I do wrong?
12.12.2018 - 15:21DROPS Design ha risposto:
Dear Sandra, did you get the correct tension? You should have 17 dc (UK)/ sc (US) = 10 cm/4" in width - and keep the same tension while working the hat. Happy crocheting!
12.12.2018 - 16:10Libby ha scritto:
Hi, first of all great pattern it comes out really good! My question is, do I keep decrease as I go along from the black or do I decrease only once in the black row in this pattern? I hope you understand my question
14.11.2018 - 14:24DROPS Design ha risposto:
Dear Libby, you decrease only 1 time 12-14 sts on one round (the first round after the 3 rounds with medium brown) = there are now 76-82 sts continue working the last 6 rounds without decreasing anymore. Happy crocheting!
14.11.2018 - 15:04
![]() Angelina ha scritto:
Angelina ha scritto:
How do I stop the spiral? There's not obvious transition from the beginning of the spiral to the end, so I can't tell where to put my sl st before I change colors.
16.08.2018 - 02:12DROPS Design ha risposto:
Dear Angelina, for a nicer transition for the stripes, add a marker in the first st of every round and let the marker follow the piece so that you can sl st the last st with first colour in this stitch. You can also continue working in the round in a spiral with the new colour, the transition will be quite smooth. Happy crocheting!
16.08.2018 - 09:37Lyn ha scritto:
Thanks for your prompt reply and video. I understand working in the round but it doesn't work the same in a spiral for me. Is the jog unavoidable in this situation
23.05.2018 - 15:02DROPS Design ha risposto:
Dear Lynn, when working stripes, stop the spiral and join in the round with the technique shown in the video will avoid you a jog at the beg of round. Happy crocheting!
23.05.2018 - 16:07Lyn ha scritto:
I am failing to be able to join my spiral stripes without the "jog" despite reading an earlier comment you made. "before changing colour you can join with a sl st with the new colour and continue as before without joining until next stripe, you will then avoid a jog at the back of hat" It sounds simple enough but not working for me. Can you suggest what I'm missing in the interpretation n explain again
23.05.2018 - 14:24Lyn ha scritto:
I'm failing to be able to join my spiral stripes without the "jog" despite reading your earlier answer to Lori. I'm obviously not interpreting something correctly "before changing colour you can join with a sl st with the new colour and continue as before without joining until next stripe, you will then avoid a jog at the back of hat" It sounds simple enough but it's not working for me..any suggestions what I'm missing.
23.05.2018 - 14:18DROPS Design ha risposto:
Dear Lynn, this video shows how to change colour at the end of round, ie work the beg of st with first colour (same of the round you are finishing) and make the last pull through with the colour used on next round. Happy crocheting!
23.05.2018 - 14:39
![]() Lori ha scritto:
Lori ha scritto:
Because the rows are worked in a spiral, my stripes are not straight at the join. Any advice?
06.04.2018 - 06:21DROPS Design ha risposto:
Dear Lori, before changing colour you can join with a sl st with the new colour and continue as before without joining until next stripe, you will then avoid a jog at the back of hat. Happy crocheting!
06.04.2018 - 08:47
![]() Sciakath ha scritto:
Sciakath ha scritto:
I have made two of these now and am on my third -- and I NEVER usually repeat a pattern! These beanies have such a nice weight to them -- not too bulky. I used yarn I had in my stash (Loops & Threads Impeccable) and it worked great. Thanks for the EXCELLENT pattern!
04.03.2018 - 22:12Margarita Lucero Apolonio ha scritto:
Podría mandarme el patrón de este gorro
19.03.2017 - 06:55DROPS Design ha risposto:
Hola Margarita. Con este línk puedes descargar el patrón gratis: https://www.garnstudio.com/pattern.php?id=6379&cid=23
27.03.2017 - 20:49Danielle ha scritto:
It seems to me that this is worked in single crochet, am I wrong?
27.01.2017 - 21:58DROPS Design ha risposto:
Dear Danielle, you are right, this hat is worked in sc, crocheting in back loop of sts. See US-English pattern here. Happy crocheting!
30.01.2017 - 10:33
|
|
Carmel |
|
 |
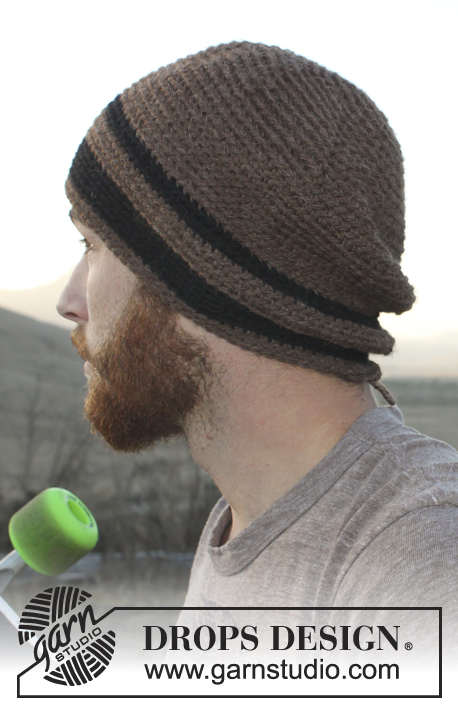 |
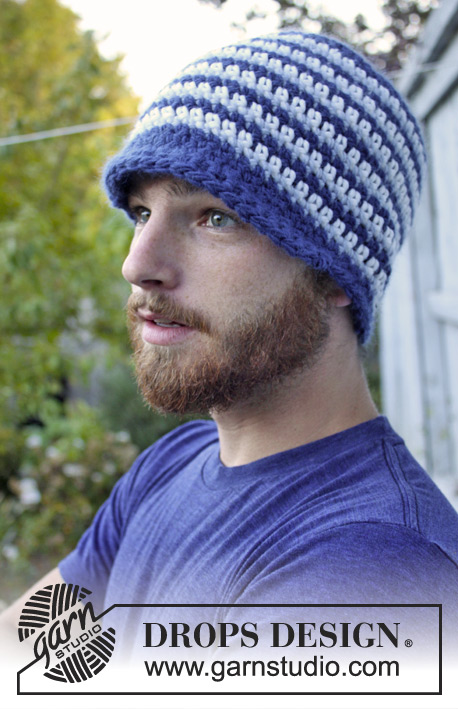
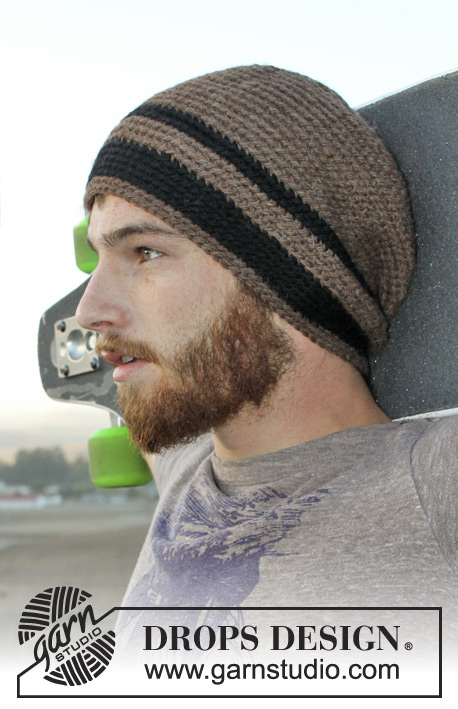
Cappello da uomo DROPS lavorato all'uncinetto in "Nepal". Taglie: dalla S alla XL.
DROPS Extra 0-980 |
|
|
INFORMAZIONI PER IL LAVORO: Dopo l’ultima m.b sul giro, continuare fino al giro successivo con 1 m.b nella m.b successiva (= 1° m.b dal giro precedente). NOTA: Inserire un segnapunti all’inizio del giro tra l’ultima e la 1° m.b sul giro, spostare i segnapunti verso l’alto. Lavorare a m.b nel filo dietro delle m per creare un motivo a strisce. CERCHIO MAGICO: Iniziare con questa tecnica per evitare un buco al centro (invece dell’anello di cat). Tenere l’estremità del filato e arrotolarlo attorno all’indice per fare un anello. Tenere l’occhiello con l’indice e il pollice sinistro, mettere il filo sull’indice sinistro. Inserire l’uncinetto nell’occhiello, fare un gettato e far passare il filo attraverso l’occhiello, lavorare 1 cat, poi lavorare a m.b attorno all’occhiello. Quando è stato raggiunto il n° desiderato di m.b, tirare l’estremità del filo per stringere l’occhiello. Affrancare il filo sul dietro e continuare a lavorare in tondo a cerchio. SUGGERIMENTO PER LE DIMINUZIONI: Lavorare insieme circa ogni 7°/8° m.b – 6°/7° m.b sul giro. Lavorare 2 m.b insieme come segue: Inserire l’uncinetto nella 1° m.b e far passare il filo attraverso, inserire l’uncinetto nella m.b successiva e far passare il filo attraverso, fare un gettato e far passare il filo attraverso tutte le m sull'uncinetto. -------------------------------------------------------- CAPPELLO: Con l’uncinetto n° 5 mm e il marrone medio lavorare un CERCHIO MAGICO – leggere sopra, o lavorare 4 cat e formare un anello con 1 m.bss nella 1° cat. LEGGERE LE INFORMAZIONI PER IL LAVORO! 1° GIRO: lavorare 8 m.b nel cerchio/anello di cat. Ora lavorare a m.b nel filo dietro delle m. 2° GIRO: lavorare 2 m.b in ogni m.b = 16 m.b. 3° GIRO: * 1 m.b nella 1° m.b, 2 m.b nella m.b successiva *, ripetere *-* = 24 m.b. 4° GIRO: * 1 m.b nelle 2 m.b successive, 2 m.b nella m.b successiva *, ripetere *-* = 32 m.b. 5° GIRO: lavorare 1 m.b in ogni m.b = 32 m.b. FARE ATTENZIONE ALLA TENSIONE DEL LAVORO! 6° GIRO: * 1 m.b nelle 3 m.b successive, 2 m.b nella m.b successiva *, ripetere *-* = 40 m.b. 7° GIRO: * 1 m.b nelle 4 m.b successive, 2 m.b nella m.b successiva *, ripetere *-* = 48 m.b. 8° GIRO: * 1 m.b nelle 5 m.b successive, 2 m.b nella m.b successiva *, ripetere *-* = 56 m.b. 9° GIRO: * 1 m.b nelle 6 m.b successive, 2 m.b nella m.b successiva *, ripetere *-* = 64 m.b. 10° GIRO: * 1 m.b nelle 7 m.b successive, 2 m.b nella m.b successiva *, ripetere *-* = 72 m.b. 11° GIRO: * 1 m.b nelle 8 m.b successive, 2 m.b nella m.b successiva *, ripetere *-* = 80 m.b. 12° GIRO: * 1 m.b nelle 9 m.b successive, 2 m.b nella m.b successiva *, ripetere *-* = 88 m.b. Finire qui gli aumenti per la taglia S/M, continuare a lavorare a m.b in tondo. 13° GIRO: * 1 m.b nelle 10 m.b successive, 2 m.b nella m.b successiva *, ripetere *-* = 96 m.b. Finire qui gli aumenti per la taglia L/XL, continuare a lavorare a m.b in tondo. Quando il lavoro misura 12-15 cm, lavorare a m.b come prima e cambiare colore come segue: 2 giri nero, 3 giri marrone medio, 1 giro nero e su questo giro diminuire 12-14 m.b in modo uniforme – LEGGERE IL SUGGERIMENTO PER LE DIMINUZIONI (= 76-82 m.b rimaste), 4 giri nero, 2 giri marrone medio. Il cappello misura circa 20-23 cm dalla cima. Chiudere e affrancare. |
|
Avete terminato questo modello?Allora taggate le vostre foto con #dropspattern o inviatele alla #dropsfan gallery. Avete bisogno di aiuto con questo modello?Troverete 7 video tutorial, una sezione per i commenti/domande e molto altro guardando il modello su www.garnstudio.com © 1982-2026 DROPS Design A/S. Ci riserviamo tutti i diritti. Questo documento, compreso tutte le sue sotto-sezioni, è protetto dalle leggi sul copyright. Potete leggere quello che potete fare con i nostri modelli alla fine di ogni modello sul nostro sito. |
|


Con oltre 40 anni di esperienza nel design di modelli di maglia e uncinetto, DROPS Design offre la più estesa collezione di modelli gratuiti su internet - tradotti in 17 lingue. Ad oggi vi possiamo fornire 325 cataloghi e 12298 modelli - 9569 dei quali sono tradotti in Italiano.
Ci stiamo impegnando molto per darvi il meglio che vi possiamo offrire in termini di maglia e uncinetto, ispirazioni e consigli così come filati di grande qualità ad un prezzo incredibile! Volete utilizzare i nostri modelli per qualcosa d'altro oltre al vostro uso personale? Potete leggere tutto ciò che è consentito nel testo sul Copyright in basso su tutte le pagine dei nostri modelli. Buon lavoro!
Lasciare un commento sul modello DROPS Extra 0-980
Noi saremmo felici di ricevere i tuoi commenti e opinioni su questo modello!
Se vuoi fare una domanda, fai per favore attenzione a selezionare la categoria corretta nella casella qui sotto per velocizzare il processo di risposta. I campi richiesti sono indicati da *.