
Categorie popolari
State cercando un filato?


Commenti / Domande (59)
![]() Jason Ebert ha scritto:
Jason Ebert ha scritto:
Hallo ich habe ihr Anleitung gelesen und wollte es nach machen nur ich habe da ein Problem bei Runde 3, da steht wie folgt: \" 3. Runde: 1fm in die nächste fm*, von * - * wdh 24fm.\" und dazu ist meine frage, wenn ich die 2 Reihe so fort setze komme ich am ende der Runde auf 36, wie komme ich auf die 24 fm?. Ich habe vieles Probiert aber dies ist mir nicht gelungen. ich finde euche anleitung Toll macht weiter so, Bleibt Gesund. mit freundlichen gruß Jason
02.01.2022 - 10:49
![]() Geri ha scritto:
Geri ha scritto:
When you say hat measures 8 to 9 inches from the top, top of what please
21.08.2021 - 21:05DROPS Design ha risposto:
Dear Geri, it is measured from teh top of the hat (from the point you started making it. Happy Stintching!
22.08.2021 - 01:02
![]() Claudia ha scritto:
Claudia ha scritto:
I have never the term "get yarn" in a crochet pattern. When I clicked "here" for terms, the size chart opens. Both links lead to the size chart. There is no explanation of terms available. So, what does "get yarn" mean?
07.01.2021 - 13:54DROPS Design ha risposto:
Dear Claudia, I cannot find this wording in this pattern, maybe you could ask the question under the question section of one of a pattern you found this wording, this will be the best way to be sure to answer you properly. Thanks for your comprehension.
07.01.2021 - 16:22
![]() Carlien ha scritto:
Carlien ha scritto:
Thank you for a wonderful pattern! I made one in med grey and light blue for my son and it came out beautiful.
04.06.2020 - 20:00
![]() Kdamm ha scritto:
Kdamm ha scritto:
I just finished row 12 and it’s completely flat, when I ta time to do the 1 decrease row will it actually give it shape ? And when I do get to that decrease row do I sc tog every 7th st?
30.12.2019 - 08:53DROPS Design ha risposto:
Dear Kdamm, you are supposed to increase for the top of hat (crown) until you get either 88 sts (round 12 in first size) or 96 sts (round 13 in larger size), then work straight to shape the edge of the hat (the length) to the striped edge. Happy crocheting!
02.01.2020 - 13:29
![]() Jennifer ha scritto:
Jennifer ha scritto:
My hat is turning out flat like a pancake at round 10, what am i doing wrong? Pmease help
26.10.2019 - 15:58DROPS Design ha risposto:
Dear Jennifer, the top of hat will be finished after round 12 in size S/M and after round 13 in size L/XL, and then you will work without any increases to make the "sides" of the hat. Happy crocheting!
05.11.2019 - 09:56
![]() Claudia ha scritto:
Claudia ha scritto:
Thank you! So far so good! You explain everything so well :-)
18.06.2019 - 22:48
![]() Claudia ha scritto:
Claudia ha scritto:
How big should the magic circle be, please? Thank you.
14.06.2019 - 19:25DROPS Design ha risposto:
Dear Claudia, dont worry about it - size of magic circle is not so important as you will "close" it (by pulling the strand) afterwards. Happy crafting!
15.06.2019 - 23:44
![]() Adiba ha scritto:
Adiba ha scritto:
Bonjour, J'ai réalisé ce bonnet pour mon frère, il est juste génial, car maintenant 3 autres personnes de ma famille qui voudraient que je leur en fasse un !! Merci.
07.05.2019 - 12:09
![]() Kelly T ha scritto:
Kelly T ha scritto:
Is it possible to make this with super bulky yarn? what adjustments are needed?
06.02.2019 - 02:41DROPS Design ha risposto:
Dear Kelly, your tension will be completely different and pattern would have to be completely adjusted to your own tension. Should you need any individual assistance to adjust the pattern to your yarn please contact the store where you bought the yarn. Happy crocheting!
06.02.2019 - 09:08
|
|
Carmel |
|
 |
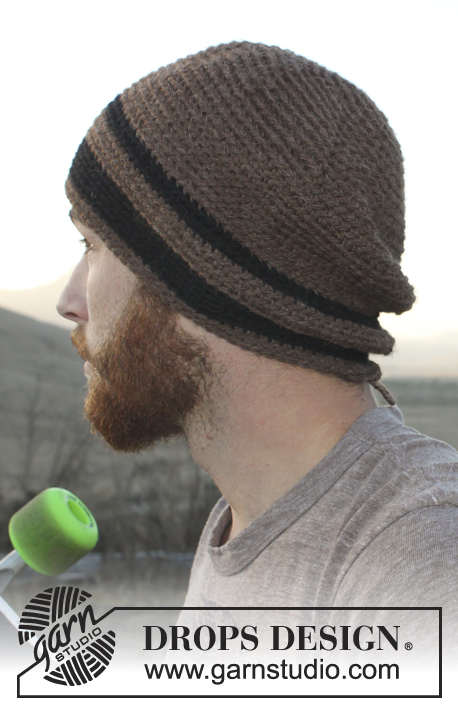 |
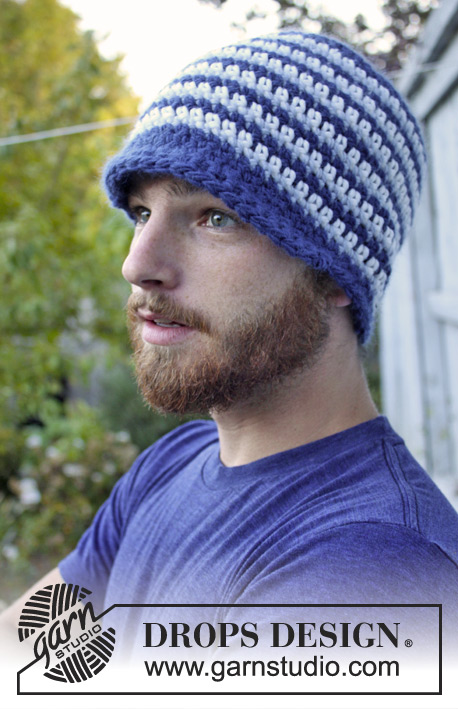
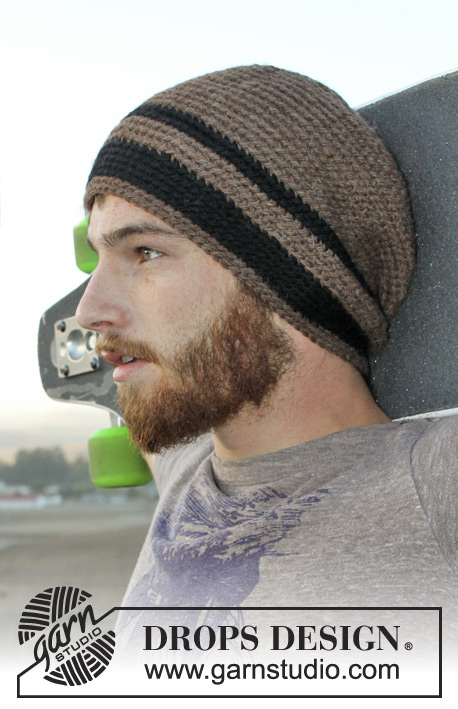
Cappello da uomo DROPS lavorato all'uncinetto in "Nepal". Taglie: dalla S alla XL.
DROPS Extra 0-980 |
|
|
INFORMAZIONI PER IL LAVORO: Dopo l’ultima m.b sul giro, continuare fino al giro successivo con 1 m.b nella m.b successiva (= 1° m.b dal giro precedente). NOTA: Inserire un segnapunti all’inizio del giro tra l’ultima e la 1° m.b sul giro, spostare i segnapunti verso l’alto. Lavorare a m.b nel filo dietro delle m per creare un motivo a strisce. CERCHIO MAGICO: Iniziare con questa tecnica per evitare un buco al centro (invece dell’anello di cat). Tenere l’estremità del filato e arrotolarlo attorno all’indice per fare un anello. Tenere l’occhiello con l’indice e il pollice sinistro, mettere il filo sull’indice sinistro. Inserire l’uncinetto nell’occhiello, fare un gettato e far passare il filo attraverso l’occhiello, lavorare 1 cat, poi lavorare a m.b attorno all’occhiello. Quando è stato raggiunto il n° desiderato di m.b, tirare l’estremità del filo per stringere l’occhiello. Affrancare il filo sul dietro e continuare a lavorare in tondo a cerchio. SUGGERIMENTO PER LE DIMINUZIONI: Lavorare insieme circa ogni 7°/8° m.b – 6°/7° m.b sul giro. Lavorare 2 m.b insieme come segue: Inserire l’uncinetto nella 1° m.b e far passare il filo attraverso, inserire l’uncinetto nella m.b successiva e far passare il filo attraverso, fare un gettato e far passare il filo attraverso tutte le m sull'uncinetto. -------------------------------------------------------- CAPPELLO: Con l’uncinetto n° 5 mm e il marrone medio lavorare un CERCHIO MAGICO – leggere sopra, o lavorare 4 cat e formare un anello con 1 m.bss nella 1° cat. LEGGERE LE INFORMAZIONI PER IL LAVORO! 1° GIRO: lavorare 8 m.b nel cerchio/anello di cat. Ora lavorare a m.b nel filo dietro delle m. 2° GIRO: lavorare 2 m.b in ogni m.b = 16 m.b. 3° GIRO: * 1 m.b nella 1° m.b, 2 m.b nella m.b successiva *, ripetere *-* = 24 m.b. 4° GIRO: * 1 m.b nelle 2 m.b successive, 2 m.b nella m.b successiva *, ripetere *-* = 32 m.b. 5° GIRO: lavorare 1 m.b in ogni m.b = 32 m.b. FARE ATTENZIONE ALLA TENSIONE DEL LAVORO! 6° GIRO: * 1 m.b nelle 3 m.b successive, 2 m.b nella m.b successiva *, ripetere *-* = 40 m.b. 7° GIRO: * 1 m.b nelle 4 m.b successive, 2 m.b nella m.b successiva *, ripetere *-* = 48 m.b. 8° GIRO: * 1 m.b nelle 5 m.b successive, 2 m.b nella m.b successiva *, ripetere *-* = 56 m.b. 9° GIRO: * 1 m.b nelle 6 m.b successive, 2 m.b nella m.b successiva *, ripetere *-* = 64 m.b. 10° GIRO: * 1 m.b nelle 7 m.b successive, 2 m.b nella m.b successiva *, ripetere *-* = 72 m.b. 11° GIRO: * 1 m.b nelle 8 m.b successive, 2 m.b nella m.b successiva *, ripetere *-* = 80 m.b. 12° GIRO: * 1 m.b nelle 9 m.b successive, 2 m.b nella m.b successiva *, ripetere *-* = 88 m.b. Finire qui gli aumenti per la taglia S/M, continuare a lavorare a m.b in tondo. 13° GIRO: * 1 m.b nelle 10 m.b successive, 2 m.b nella m.b successiva *, ripetere *-* = 96 m.b. Finire qui gli aumenti per la taglia L/XL, continuare a lavorare a m.b in tondo. Quando il lavoro misura 12-15 cm, lavorare a m.b come prima e cambiare colore come segue: 2 giri nero, 3 giri marrone medio, 1 giro nero e su questo giro diminuire 12-14 m.b in modo uniforme – LEGGERE IL SUGGERIMENTO PER LE DIMINUZIONI (= 76-82 m.b rimaste), 4 giri nero, 2 giri marrone medio. Il cappello misura circa 20-23 cm dalla cima. Chiudere e affrancare. |
|
Avete terminato questo modello?Allora taggate le vostre foto con #dropspattern o inviatele alla #dropsfan gallery. Avete bisogno di aiuto con questo modello?Troverete 7 video tutorial, una sezione per i commenti/domande e molto altro guardando il modello su www.garnstudio.com © 1982-2026 DROPS Design A/S. Ci riserviamo tutti i diritti. Questo documento, compreso tutte le sue sotto-sezioni, è protetto dalle leggi sul copyright. Potete leggere quello che potete fare con i nostri modelli alla fine di ogni modello sul nostro sito. |
|


Con oltre 40 anni di esperienza nel design di modelli di maglia e uncinetto, DROPS Design offre la più estesa collezione di modelli gratuiti su internet - tradotti in 17 lingue. Ad oggi vi possiamo fornire 324 cataloghi e 12272 modelli - 9543 dei quali sono tradotti in Italiano.
Ci stiamo impegnando molto per darvi il meglio che vi possiamo offrire in termini di maglia e uncinetto, ispirazioni e consigli così come filati di grande qualità ad un prezzo incredibile! Volete utilizzare i nostri modelli per qualcosa d'altro oltre al vostro uso personale? Potete leggere tutto ciò che è consentito nel testo sul Copyright in basso su tutte le pagine dei nostri modelli. Buon lavoro!
Lasciare un commento sul modello DROPS Extra 0-980
Noi saremmo felici di ricevere i tuoi commenti e opinioni su questo modello!
Se vuoi fare una domanda, fai per favore attenzione a selezionare la categoria corretta nella casella qui sotto per velocizzare il processo di risposta. I campi richiesti sono indicati da *.