
Categorie popolari
State cercando un filato?


Commenti / Domande (99)
![]() Sandrine ha scritto:
Sandrine ha scritto:
"TOUR 1: 4 B dans chaque arceau = 128 B." ne correspond pas à ce qui figure sur le diagramme : on ne voit pas 4 brides mais 1 bride 2 ml 1bride 2 ml... "TOUR 2: 1 B dans chaque B, EN MÊME TEMPS diminuer 2 B à intervalles réguliers = 126 B." ne correspond pas à ce qui figure sur le diagramme : on voit 1 bride 3 ml 1bride 3 ml... et ainsi de suite pour les tours suivants. Que faut-il faire ?
28.11.2015 - 11:56DROPS Design ha risposto:
Bonjour Sandrine, effectivement ces 11 tours sont crochetés quand A.1 est terminé. Après avoir crocheté 1 fois A.1 en hauteur, on a 32 arceaux (4 fois les 8 arceaux de chaque A.1 tout le tour), et on continue ainsi avec au 1er tour, 4 B dans chaque arceau (= 4x32) = 128 B - mais bien une fois A.1 terminé. Bon crochet!
30.11.2015 - 10:30
![]() Sandrine ha scritto:
Sandrine ha scritto:
Bonjour, je trouve le modèle très joli mais je n'arrive pas à crocheter ni en suivant le diagramme ni les indications écrites qui selon moi ne coïncident pas : Dans la réponse du 08.10.2015 kl. 09:46, vous écrivez " = sautez 1 ms entre chaque B, et faites bien 2 ml entre chaque" or avec 32 ms si on en saute une il n'y a que 16 brides au final et non 32 et donc 16 arceaux au lieu de 32.
28.11.2015 - 11:55DROPS Design ha risposto:
Bonjour Sandrine, à la fin du 1er tour de A.1, on doit bien avoir 16 B et 16 arceaux, c'est à la fin de A.1 (après les 10 tours) que l'on a 32 arceaux. Bon crochet!
30.11.2015 - 10:28
![]() Est_el_le ha scritto:
Est_el_le ha scritto:
Bonjour Merci pour votre réponse... Nouvelle question: pour le deuxième tour on crochete les brides dans les ml du rang précédent ou dans les arceaux? Merci Estelle
08.10.2015 - 14:04DROPS Design ha risposto:
Bonjour Est_el_le, les brides du 2ème tour sont crochetées autour des arceaux. Bon crochet!
08.10.2015 - 17:26
![]() Est_el_le ha scritto:
Est_el_le ha scritto:
Bonjour je n'ai pas l'habitude de crocheter en suivant un diagramme du coup je ne sais pas comment commencer. Dans quelles mailles serrées dois je crocheter les brides du 1er rang ? Merci d'avance pour votre aide et au cas où n'y a t il pas moyen d'avoir les explications du diagramme écrite rang par rang? Estelle
08.10.2015 - 08:37DROPS Design ha risposto:
Bonjour Est_el_le, crochetez dans la ms où "pointe" la B du rang 1 soit: 1 B dans la 2ème ms, 2 ml, 1 B dans la 3ème ms, 2 ml, 1 B dans la 5ème ms, 2 ml, 1 B dans la 7ème ms, 2 ml ... (= sautez 1 ms entre chaque B, et faites bien 2 ml entre chaque). Bon crochet!
08.10.2015 - 09:46
![]() Michaela ha scritto:
Michaela ha scritto:
Ich wüßte gerne, wie gross der Durchmesser der Mütze ist, und zwar nach dem Ende von A1 bevor man mit den Runden mit den Stäbchen beginnt. Dann kann man das anpassen, wenn die Maschenprobe nicht ganz stimmt.
03.10.2015 - 22:12DROPS Design ha risposto:
Leider haben wir kein Maß des Mützentellers vorliegen. Sie müssten die Mütze dann einfach immer mal wieder anprobieren und ggf. die Stäbchenzahl anpassen.
13.10.2015 - 22:19
![]() Coutarel ha scritto:
Coutarel ha scritto:
Le 1 er tour du diagramme A1 vous commencez le rang 1 par une maille serrée une bride pas 2 mailles en l'air pour commencer et à la fin du rang comment termine t'on ?
07.08.2015 - 06:21DROPS Design ha risposto:
Bonjour Mme Coutarel, remplacez la 1ère ms du tour par 1 ml et la 1ère B des tours de A.1 par 3 ml, et terminez chaque tour avec 1 mc dans la 1ère/la 3ème ml du début du tour (cf "Info Crochet" au début des explications). Bon crochet!
07.08.2015 - 09:42Therese ha scritto:
This is a beautiful pattern, thank you for making it freely available. I can't see how much yarn is required to make both the beret and the neck warmer...could you please clarify. Thank you
07.06.2015 - 15:36DROPS Design ha risposto:
Dear Therese, you will find total weight of required yarn under tab "materials" at the right side of the picture, ie 100 g for the beret (= 2 balls 50 g Karisma) and 200 g for the neckwarmer (= 4 balls 50 g Karisma), ie a total of 6 balls for the whole set. Happy crocheting!
08.06.2015 - 08:55
![]() Maria Livingston ha scritto:
Maria Livingston ha scritto:
I love this hat pattern but I do not understand how to do the pattern according to the diagram given in A.1. Is there some way to explain how to do this without having to follow the picture diagram? Help!!!!
31.12.2014 - 17:17DROPS Design ha risposto:
Dear Mrs Livingstone, each symbol in the diagram represent 1 st, work A.1 in the round repeating diagram a total of 4 times in the round, starting at the bottom corner on the right side and working from the right towards the left every round. Happy crocheting!
02.01.2015 - 16:09
![]() Barbora Smerekova ha scritto:
Barbora Smerekova ha scritto:
Hi, I am not sure what ch4 (= 1st dc+ 1st ch) mean. Am I suppose to crochet 1 dc and then chain 1 four times or just chain 4 and then 1st dc and 1st ch. Thank you for your help
12.11.2014 - 07:25DROPS Design ha risposto:
Dear Mrs Smerekova, at the beg of row the 4 ch will replace 1st dc + 1st ch, then skip first ch-space and work *1 dc in next ch-space, ch 1*, repeat from *to* and finish with 1 dc in last ch-space and 1 sl st in first ch you made with 4ch at beg of round. Happy crocheting!
12.11.2014 - 09:57
![]() Joke Haakvrouwtje ha scritto:
Joke Haakvrouwtje ha scritto:
Heelerg leuk patroon. Heerlijk om te haken. Dank je wel voor het delen Drops.
03.11.2014 - 13:34
|
|||||||||||||
Victoriana#victorianaset |
|||||||||||||
 |
 |
||||||||||||
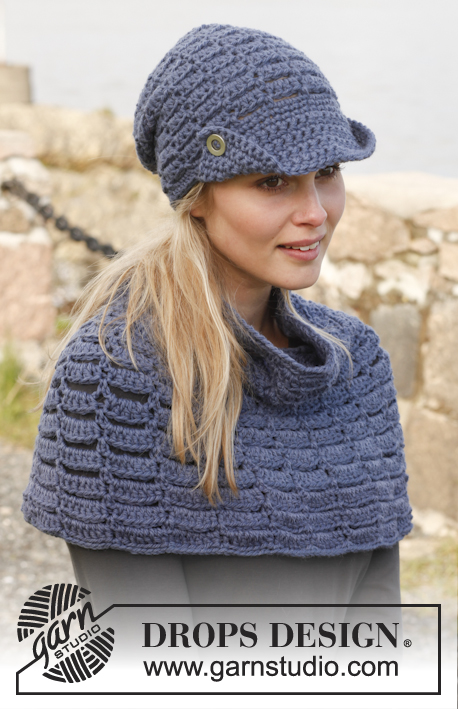
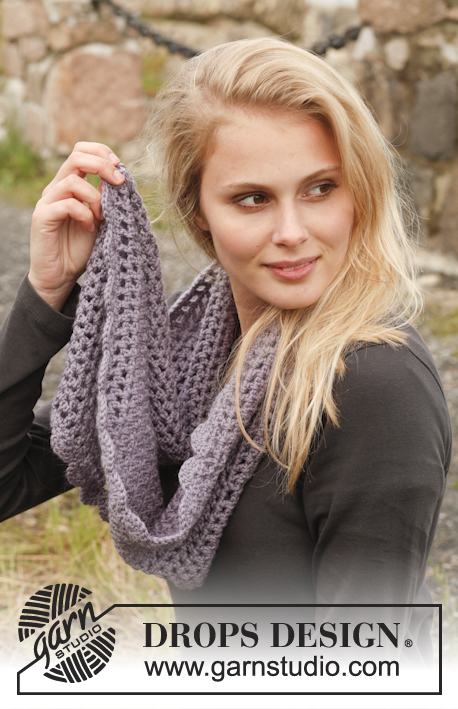
Set composto da: Basco e scaldacollo DROPS all’uncinetto, in "Karisma".
DROPS 149-8 |
|||||||||||||
|
INFORMAZIONI PER IL LAVORO: Sostituire la prima m.b del giro con 1 cat. Finire il giro con 1 m.bss nella 1a cat dall’inizio del giro. Sostituire la prima m.a del giro con 3 cat. Finire il giro con 1 m.bss nella 3a cat dall’inizio del giro. MOTIVO: Vedere il diagramma A.1. PUNTO GAMBERO: Lavorare un giro di m.b, ma in senso inverso, quindi lavorare da sinistra verso destra. GIRI DI M.A E CAT: Lavorare ogni giro di m.a e cat come segue: Girare il lavoro in modo che il rovescio del lavoro sia verso di voi (si lavora quindi sul rovescio del lavoro), lavorare 4 cat (= 1a m.a + 1a cat), saltare il primo arco di cat (= ultima cat del giro precedente), * 1 m.a nell’arco di cat successivo, 1 cat *. Ripetere da *-*, finire il giro con 1 m.a nell’ultimo arco di cat (= arco di 4 cat del giro precedente), 1 m.bss nell’arco di 4 cat dall’inizio del giro – lavorare quindi alternativamente sul diritto e sul rovescio del lavoro per avere una fine / un inizio del giro grazioso. ---------------------------------------------------------- BASCO: Si lavora dall’alto verso il basso. GIRO 1: Avviare 4 cat con l’uncinetto n° 4 ed il filato Karisma e formare un anello con 1 m.bss nella prima cat; lavorare 8 m.b nell’anello di cat - VEDERE LE INFORMAZIONI PER IL LAVORO. GIRO 2: Lavorare 2 m.b in ogni m.b su tutto il giro = 16 m.b. RICORDARSI LA TENSIONE DEL LAVORO! GIRO 3: * 1 m.b nella 1° m.b., 2 m.b nella m.b successiva *, ripetere da *-* = 24 m.b. GIRO 4: * 1 m.b in ognuna delle 2 m.b successive, 2 m.b nella m.b successiva *, ripetere da *-* = 32 m.b. Proseguire seguendo il diagramma A.1 (= 4 ripetizioni sul giro). Dopo aver lavorato il diagramma A.1 una volta in verticale, ci sono 32 archi di cat sul giro. Proseguire come segue: GIRO 1: Lavorare 4 m.a in ogni arco di cat = 128 m.a. GIRO 2: Lavorare 1 m.a in ogni m.a; ALLO STESSO TEMPO diminuire 2 m.a a intervalli regolari = 126 m.a. GIRO 3: Lavorare 1 m.a in ogni m.a, ma lavorare ogni 13a e 14a m.a insieme = 117 m.a. GIRO 4: Lavorare 1 m.a in ogni m.a ma lavorare ogni 12a e 13a m.a insieme = 108 m.a. GIRO 5: Lavorare 1 m.a in ogni m.a ma lavorare ogni 11a e 12a m.a insieme = 99 m.a. GIRO 6: Lavorare 1 m.a in ogni m.a; allo stesso tempo, diminuire 11 m.a a intervalli regolari = 88 m.a. GIRI 7-10: Lavorare 1 m.a in ogni m.a su tutto il giro. GIRO 11: Lavorare con 2 capi del filato. Lavorare un giro a PUNTO GAMBERO - vedere le spiegazioni sopra. --------------------------------------------------------- SCALDACOLLO: Lavorare in tondo. Con il filato Karisma e l’uncinetto n° 4, avviare una fila di 228 cat morbide; formare un anello con 1 m.bss nella prima cat. Lavorare 4 cat (= prima m.a + prima cat), * saltare 1 cat, 1 m.a nella cat successiva, 1 cat *, ripetere da *-* su tutto il giro e finire con 1 m.bss nell’arco di 4 cat dall’inizio del giro = 114 m.a + cat. Lavorare ora GIRI DI M.A E CAT – vedere le spiegazioni sopra. Proseguire in questo modo finché il lavoro non misura 18 cm in verticale. Lavorare ora un bordo a ventagli come segue: GIRO 1: Lavorare 1 cat nella prima m.b, 1 m.b in ogni m.a e 1 m.b in ogni cat su tutto il giro e finire con 1 m.bss nella prima cat = 228 m.b. GIRO 2: Lavorare 1 cat nella prima m.b, * saltare 2 m.b, 6 m.a nella m.b successiva, saltare 2 m.b, 1 m.b nella m.b successiva *, ripetere da *-* su tutto il giro e finire con 1 m.bss nella prima cat = 38 ventagli. Lavorare un bordo uguale dall’altra parte. Tagliare il filo. |
|||||||||||||
Spiegazioni del diagramma |
|||||||||||||
|
|||||||||||||
 |
|||||||||||||
Avete terminato questo modello?Allora taggate le vostre foto con #dropspattern #victorianaset o inviatele alla #dropsfan gallery. Avete bisogno di aiuto con questo modello?Troverete 6 video tutorial, una sezione per i commenti/domande e molto altro guardando il modello su www.garnstudio.com © 1982-2026 DROPS Design A/S. Ci riserviamo tutti i diritti. Questo documento, compreso tutte le sue sotto-sezioni, è protetto dalle leggi sul copyright. Potete leggere quello che potete fare con i nostri modelli alla fine di ogni modello sul nostro sito. |
|||||||||||||


Con oltre 40 anni di esperienza nel design di modelli di maglia e uncinetto, DROPS Design offre la più estesa collezione di modelli gratuiti su internet - tradotti in 17 lingue. Ad oggi vi possiamo fornire 324 cataloghi e 12291 modelli - 9562 dei quali sono tradotti in Italiano.
Ci stiamo impegnando molto per darvi il meglio che vi possiamo offrire in termini di maglia e uncinetto, ispirazioni e consigli così come filati di grande qualità ad un prezzo incredibile! Volete utilizzare i nostri modelli per qualcosa d'altro oltre al vostro uso personale? Potete leggere tutto ciò che è consentito nel testo sul Copyright in basso su tutte le pagine dei nostri modelli. Buon lavoro!
Lasciare un commento sul modello DROPS 149-8
Noi saremmo felici di ricevere i tuoi commenti e opinioni su questo modello!
Se vuoi fare una domanda, fai per favore attenzione a selezionare la categoria corretta nella casella qui sotto per velocizzare il processo di risposta. I campi richiesti sono indicati da *.