
Categorie popolari
State cercando un filato?


Commenti / Domande (99)
![]() Heidi Liebeton ha scritto:
Heidi Liebeton ha scritto:
Bij de patroon staat dat het patroon is gecorrigeerd en dat de toeren 1 tm 4 vasten moeten worden inplaats van stokjes. Maar om welke 4 toeren gaat dit is dat van het telpatroon A1 of van de andere 4 toeren
05.01.2019 - 16:40DROPS Design ha risposto:
Dag Heidi,
Waar vasten hadden moeten staan, stonden eerst stokjes in het patroon, maar je kunt gewoon het online patroon gebruiken, want de correcties zijn hierin al doorgevoerd.
05.01.2019 - 20:29
![]() Sandrine ha scritto:
Sandrine ha scritto:
Mme Gromelle Pour moi le pb de taille se ressoud en prenant un crochet un peu plus gros (4,5 ou 5) et de prėvoir un rab de laine. J'adore ce modèle. J'ai dėja fait ce modèle et je recommence pour ma fille ! Bon crochet
04.12.2018 - 08:10
![]() Gromelle ha scritto:
Gromelle ha scritto:
Bonjour, ce modèle de bonnet est trop petit. Est-il possible de le faire plus grand ? avec peut-être une laine différente et un crochet plus gros ? Il me faudrait une taille L - tour de tête 59cm. Merci pour votre retour d'information. Cordialement.
20.10.2018 - 19:54DROPS Design ha risposto:
Bonjour Mme Gromelle, nous ne sommes malheureusement pas en mesure de pouvoir adapter chacun de nos modèles à chaque demande. N'hésitez pas à contacter - même par mail ou téléphone - le magasin où vous avez acheté votre laine pour toute assistance. Bon crochet!
22.10.2018 - 08:21
![]() Caroline ha scritto:
Caroline ha scritto:
Bonjour j’ai fini A1 mais je ne comprends pas les tour 4 et 5. Pourriez vous m’expliquer s’il vous plaît
12.10.2018 - 20:41DROPS Design ha risposto:
Bonjour Caroline, aux tours 4 et 5 après A.1 on va diminuer ainsi: Tour 4: *1 bride dans chacune des 11 brides suivantes, écoulez les 2 brides suivantes ensemble*, répétez de *-* tout le tour. Tour 5: *1 bride dans chacune des 10 brides suivantes, écoulez les 2 brides suivantes ensemble*, répétez de *-* tout le tour. Bon crochet!
15.10.2018 - 08:07
![]() Zila Doucette ha scritto:
Zila Doucette ha scritto:
Hi - I am relatively new at crochet and I absolutely LOVE this set and want to make a couple. Do you consider it to be easy enough for a beginner? Also, is the size of the yarn 100g the weight? Thanks, Zila
11.10.2018 - 17:33DROPS Design ha risposto:
Dear Zila, you'll find some videos explaining the different techniques used in that pattern, follow diagram as explained in the written pattern starting from the bottom corner on the right side towards the left on every round. You'll find here all informations about the yarn, feel free to contact your DROPS store - even per mail or telephone - for any individual assistance. Happy crocheting!
12.10.2018 - 07:33Cloudy ha scritto:
Yaaay I finished the beret and it's perfect. For those who found it was too big i had the same problem so I continued decreasing in the final rounds after knitting tog 11th and 12th stitches I decreased 10th and 11th, 9th and 10th until I got the desired fit and then did the last row which was the REVERSE CROCHET .....perfect!!
03.08.2018 - 09:16Cloudy ha scritto:
Thank you so much for answering my questions I will persevere 🤗🤗
02.08.2018 - 16:43Cloudy ha scritto:
So does the 3 chain that you do at the beginning of each row count as a stitch? Would that be 3 chain then the dc in the chain space?
02.08.2018 - 13:28DROPS Design ha risposto:
Dear Cloudy, at the beg of row 3 (and then 6, and 9) you can sl st until 1st ch-space and then replace the 1st dc with 3 chains. Happy crocheting!
02.08.2018 - 14:25Cloudy ha scritto:
Thank you for info re: R2 In R3 is it 9 dc in the ch3 space from R2? I wish there was an easier way of reading these graphs. They can be so confusing!
02.08.2018 - 09:51DROPS Design ha risposto:
Dear Cloudy, correct, you work 9 dc (US-English) in the 3-ch-spaces from round 2. Happy crocheting!
02.08.2018 - 14:12Cloudy ha scritto:
Hi there, can you please explain rows 2 and 3 in the A.1 graph for the beret. I don't understand what the 3 little dots are in R.2. As I understand the dots are meant to be slip stitches but that just doesn't make any sense. Thank you
01.08.2018 - 12:43DROPS Design ha risposto:
Dear Cloudy, each little line in row 2 in A.1 is for 1 chain, ie on row 2 you will work: *1 tr (UK-English)/dc(US-English), 3 ch, 1 tr/dc in same ch-space, 1 ch, skip next ch-space, 1 tr/dc, 3 ch, 1 tr/dc in same ch-space, 1 ch*, repeeat from *-* around. Happy crocheting!
01.08.2018 - 14:01
|
|||||||||||||
Victoriana#victorianaset |
|||||||||||||
 |
 |
||||||||||||
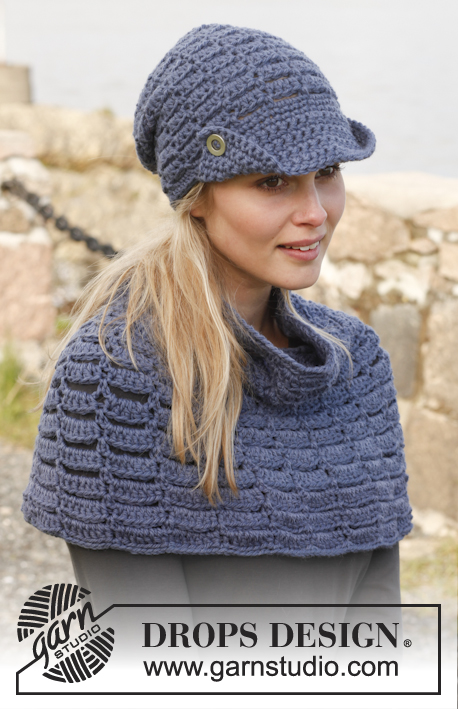
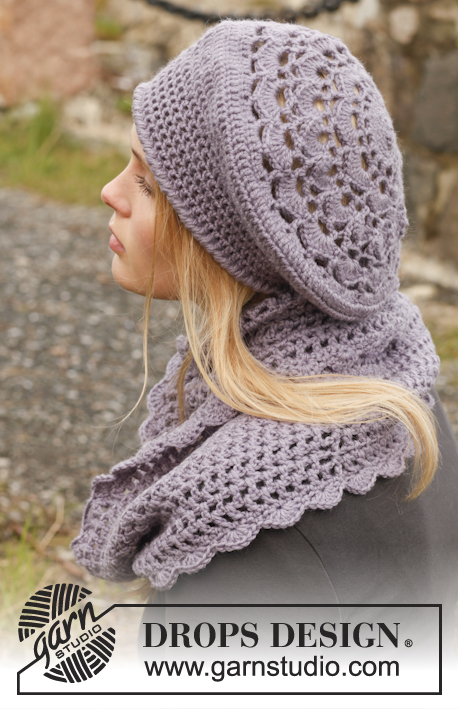
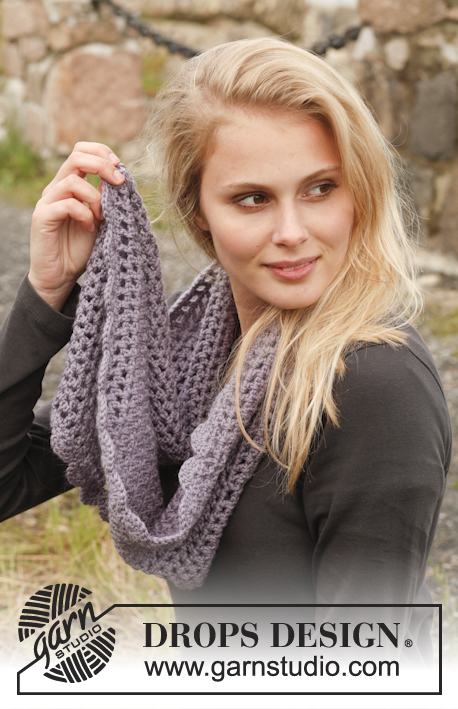
Set composto da: Basco e scaldacollo DROPS all’uncinetto, in "Karisma".
DROPS 149-8 |
|||||||||||||
|
INFORMAZIONI PER IL LAVORO: Sostituire la prima m.b del giro con 1 cat. Finire il giro con 1 m.bss nella 1a cat dall’inizio del giro. Sostituire la prima m.a del giro con 3 cat. Finire il giro con 1 m.bss nella 3a cat dall’inizio del giro. MOTIVO: Vedere il diagramma A.1. PUNTO GAMBERO: Lavorare un giro di m.b, ma in senso inverso, quindi lavorare da sinistra verso destra. GIRI DI M.A E CAT: Lavorare ogni giro di m.a e cat come segue: Girare il lavoro in modo che il rovescio del lavoro sia verso di voi (si lavora quindi sul rovescio del lavoro), lavorare 4 cat (= 1a m.a + 1a cat), saltare il primo arco di cat (= ultima cat del giro precedente), * 1 m.a nell’arco di cat successivo, 1 cat *. Ripetere da *-*, finire il giro con 1 m.a nell’ultimo arco di cat (= arco di 4 cat del giro precedente), 1 m.bss nell’arco di 4 cat dall’inizio del giro – lavorare quindi alternativamente sul diritto e sul rovescio del lavoro per avere una fine / un inizio del giro grazioso. ---------------------------------------------------------- BASCO: Si lavora dall’alto verso il basso. GIRO 1: Avviare 4 cat con l’uncinetto n° 4 ed il filato Karisma e formare un anello con 1 m.bss nella prima cat; lavorare 8 m.b nell’anello di cat - VEDERE LE INFORMAZIONI PER IL LAVORO. GIRO 2: Lavorare 2 m.b in ogni m.b su tutto il giro = 16 m.b. RICORDARSI LA TENSIONE DEL LAVORO! GIRO 3: * 1 m.b nella 1° m.b., 2 m.b nella m.b successiva *, ripetere da *-* = 24 m.b. GIRO 4: * 1 m.b in ognuna delle 2 m.b successive, 2 m.b nella m.b successiva *, ripetere da *-* = 32 m.b. Proseguire seguendo il diagramma A.1 (= 4 ripetizioni sul giro). Dopo aver lavorato il diagramma A.1 una volta in verticale, ci sono 32 archi di cat sul giro. Proseguire come segue: GIRO 1: Lavorare 4 m.a in ogni arco di cat = 128 m.a. GIRO 2: Lavorare 1 m.a in ogni m.a; ALLO STESSO TEMPO diminuire 2 m.a a intervalli regolari = 126 m.a. GIRO 3: Lavorare 1 m.a in ogni m.a, ma lavorare ogni 13a e 14a m.a insieme = 117 m.a. GIRO 4: Lavorare 1 m.a in ogni m.a ma lavorare ogni 12a e 13a m.a insieme = 108 m.a. GIRO 5: Lavorare 1 m.a in ogni m.a ma lavorare ogni 11a e 12a m.a insieme = 99 m.a. GIRO 6: Lavorare 1 m.a in ogni m.a; allo stesso tempo, diminuire 11 m.a a intervalli regolari = 88 m.a. GIRI 7-10: Lavorare 1 m.a in ogni m.a su tutto il giro. GIRO 11: Lavorare con 2 capi del filato. Lavorare un giro a PUNTO GAMBERO - vedere le spiegazioni sopra. --------------------------------------------------------- SCALDACOLLO: Lavorare in tondo. Con il filato Karisma e l’uncinetto n° 4, avviare una fila di 228 cat morbide; formare un anello con 1 m.bss nella prima cat. Lavorare 4 cat (= prima m.a + prima cat), * saltare 1 cat, 1 m.a nella cat successiva, 1 cat *, ripetere da *-* su tutto il giro e finire con 1 m.bss nell’arco di 4 cat dall’inizio del giro = 114 m.a + cat. Lavorare ora GIRI DI M.A E CAT – vedere le spiegazioni sopra. Proseguire in questo modo finché il lavoro non misura 18 cm in verticale. Lavorare ora un bordo a ventagli come segue: GIRO 1: Lavorare 1 cat nella prima m.b, 1 m.b in ogni m.a e 1 m.b in ogni cat su tutto il giro e finire con 1 m.bss nella prima cat = 228 m.b. GIRO 2: Lavorare 1 cat nella prima m.b, * saltare 2 m.b, 6 m.a nella m.b successiva, saltare 2 m.b, 1 m.b nella m.b successiva *, ripetere da *-* su tutto il giro e finire con 1 m.bss nella prima cat = 38 ventagli. Lavorare un bordo uguale dall’altra parte. Tagliare il filo. |
|||||||||||||
Spiegazioni del diagramma |
|||||||||||||
|
|||||||||||||
 |
|||||||||||||
Avete terminato questo modello?Allora taggate le vostre foto con #dropspattern #victorianaset o inviatele alla #dropsfan gallery. Avete bisogno di aiuto con questo modello?Troverete 6 video tutorial, una sezione per i commenti/domande e molto altro guardando il modello su www.garnstudio.com © 1982-2026 DROPS Design A/S. Ci riserviamo tutti i diritti. Questo documento, compreso tutte le sue sotto-sezioni, è protetto dalle leggi sul copyright. Potete leggere quello che potete fare con i nostri modelli alla fine di ogni modello sul nostro sito. |
|||||||||||||


Con oltre 40 anni di esperienza nel design di modelli di maglia e uncinetto, DROPS Design offre la più estesa collezione di modelli gratuiti su internet - tradotti in 17 lingue. Ad oggi vi possiamo fornire 324 cataloghi e 12291 modelli - 9562 dei quali sono tradotti in Italiano.
Ci stiamo impegnando molto per darvi il meglio che vi possiamo offrire in termini di maglia e uncinetto, ispirazioni e consigli così come filati di grande qualità ad un prezzo incredibile! Volete utilizzare i nostri modelli per qualcosa d'altro oltre al vostro uso personale? Potete leggere tutto ciò che è consentito nel testo sul Copyright in basso su tutte le pagine dei nostri modelli. Buon lavoro!
Lasciare un commento sul modello DROPS 149-8
Noi saremmo felici di ricevere i tuoi commenti e opinioni su questo modello!
Se vuoi fare una domanda, fai per favore attenzione a selezionare la categoria corretta nella casella qui sotto per velocizzare il processo di risposta. I campi richiesti sono indicati da *.