
Categorie popolari
State cercando un filato?


Commenti / Domande (25)
![]() Lolo ha scritto:
Lolo ha scritto:
Bonjour, si j’ai bien compris on augmente au 4ème rang de motif, c’est à dire au retour de la 4ème étoile en hauteur ? Merci de votre réponse !
10.12.2022 - 22:58DROPS Design ha risposto:
Bonjour Lolo, c'est exact. Bon crochet!
12.12.2022 - 10:27
![]() Kelly ha scritto:
Kelly ha scritto:
I like this very much thank you for posting it. i found it easier and looks the same to skip the 2nd stitch in the star (I'm using a very bulky yarn) I went in the hole, then into the shared stitch at the bottom, and then in the next 2 chains. i found the 2nd stitch in the star quite awkward - if that helps anyone else Thanks again
05.12.2019 - 04:54Laetitia ha scritto:
Très belle réalisation, beau travail !
26.01.2017 - 01:36
![]() RoseMary ha scritto:
RoseMary ha scritto:
The gauge listed for the M hook and N hook seems to be in error. If 4 stars are 4" with 9mm hook then there would be less stars in 4" with the larger 10mm hook. Please advise. Thanks.
25.10.2016 - 03:02DROPS Design ha risposto:
Dear RoseMary, thanks for your feedback - you should get 4.5 stars = 10 cm with crochet hook size 9 mm and 4 stars = 10 cm with crochet hook size 10 mm. Pattern will be edited. Happy crocheting!
03.11.2016 - 11:36
![]() Matia ha scritto:
Matia ha scritto:
Hej och tack för ett fint mönster! När jag läser igenom mönstret för halsvärmaren får jag det till 7 rader med stjärnor, men ni skriver 8. Är det något jag missar? /Maria
28.11.2015 - 00:29DROPS Design ha risposto:
Hej Maria, När du har virkat varv 2 och 3 totalt 4 ggr har du 8 rader stjärnor, men du kan göra så många du vill så den passar dig. Lycka till!
30.11.2015 - 11:39
![]() Ina ha scritto:
Ina ha scritto:
Is het de bedoeling dat je bij het herhalen van tour 2 en 3 steeds meerdert? Op hoeveel sterren komt het dan in totaal aan het einde?
14.07.2015 - 13:11DROPS Design ha risposto:
Hoi Ina. Haak je het hoofdband meerder je niet, maar haak je de halswarmer dan meerder je als volgt: Herhaal de 2e en 3e toer nog 2 keer (= 3 keer in totaal). Meerder door de 2e toer als hiervoor te haken, maar haak 3 hstk (in plaats van 2 hstk) in 5e en 6e sterrengaatje, geteld vanaf elke kant = 23-25 sterren.
29.07.2015 - 14:51
![]() Anger ha scritto:
Anger ha scritto:
Bonjour, concernant les augmentations pour le tour de cou : on ne fait qu'une fois une dB supplémentaire à la 5è et 6è étoiles. Ou bien est à partir de la 5ème étoile et cela à chaque rang 2? Merci de votre réponse et merci aussi pour votre site
11.02.2015 - 15:52DROPS Design ha risposto:
Bonjour Mme Anger, et merci. On augmente dans la 5ème et la 6ème étoile à partir des côtés 1 seule fois, au moment où on crochète le rang 2 (après avoir répété 3 fois au total les rangs 2 et 3), vous avez 23-25 étoiles (cf taille). Bon crochet!
11.02.2015 - 18:07
![]() Monika Szabova ha scritto:
Monika Szabova ha scritto:
Dobry den, nerozumi co znamena nasledujici věta uvedena ve Vašem návodu: Háčkem č.9 VOLNĚ uháčkujeme přízí Eskimo 45-47 řo. A také nerozumím skratce "řo" - co to znamená? Děkuji za vysvětlení.
08.01.2015 - 20:09DROPS Design ha risposto:
Dobrý den, zkratka "řo" znamená řetízková oka - jelikož pro zvolený model potřebujeme pružný, měkký okraj, háčkujeme počáteční řadu řetízkových ok volněji, tj. oka necháváme trochu větší, neutahujeme je. Hodně zdaru! Hana
14.01.2015 - 08:07
![]() Tiziana ha scritto:
Tiziana ha scritto:
Bellissimo....video chiarissimo....appena arriva la spedizione della lana lo faccio.....sito meraviglioso!😻
11.10.2014 - 14:39
![]() Diane T. Clark ha scritto:
Diane T. Clark ha scritto:
I made a bunch of these for christmas presents...huge hit!!
04.01.2014 - 21:57
|
|
Anemone#anemoneset |
|
|
|
|
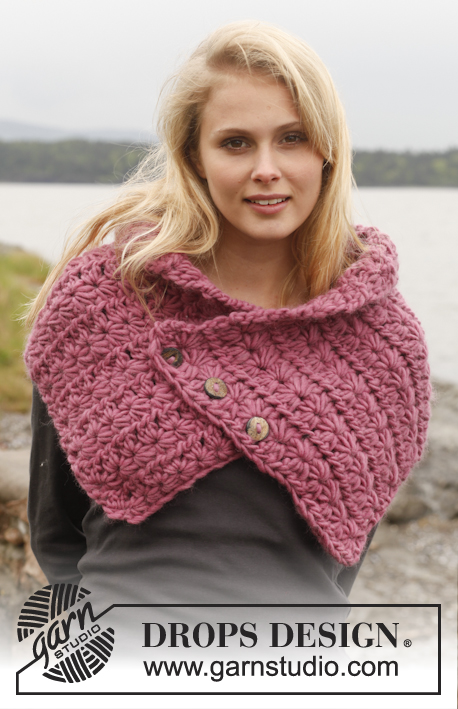
Fascia per la testa e scaldacollo DROPS lavorati all’uncinetto in "Snow".
DROPS 150-51 |
|
|
FASCIA PER LA TESTA: Lavorata avanti e indietro. Avviare 45-47 catenelle LASSE con l’uncinetto n° 9 mm con Snow. RIGA 1 (diritto del lavoro): riprendere 5 m., iniziare nella 2° m. dall’uncinetto = 6 m. sull’uncinetto, fare un gettato e farlo passare attraverso tutte le 6 m., lavorare 1 cat. per fare un buco sulle 6 m., * riprendere 1 m. nel buco, riprendere 1 m. nel lato dell’ultima delle 6 m., riprendere 1 m. nella stessa cat. in cui è stata ripresa l’ultima delle 6 m., 1 m. in ognuna delle 2 cat. successive = 6 m. sull’uncinetto, fare un gettato e farlo passare attraverso tutte le 6 m., 1 cat. *, ripetere *-* fino all’ultima m. Lavorare 1 m.m.a. nell’ultima cat. Girare. 2° RIGA. (rovescio del lavoro): 2 cat. (= 1 m.m.a.), lavorare 2 m.m.a. in ogni "buco della stella", finire la riga con 1 m.m.a. nell’ultima m. Girare. Ora ci sono 20-21 stelle sulla riga e 1 m.m.a. a ogni lato. 3 RIGA: 3 cat., riprendere 1 m. nella 2° e 3° cat. dall’uncinetto, riprendere 1 m. nelle prime 3 m. sulla riga = 6 m. sull’uncinetto, fare un gettato e farlo passare attraverso tutte le 6, lavorare 1 cat., * riprendere 1 m. nel buco, riprendere 1 m. nel lato dell’ultima delle 6 m., riprendere 1 m. nella stessa cat. in cui è stata ripresa l’ultima delle 6 m., 1 m. in ognuna delle 2 cat. successive = 6 m. sull’uncinetto, fare un gettato e farlo passare attraverso tutte le 6 m., 1 cat. *, ripetere *-*. Lavorare 1 m.m.a. nell’ultima cat. Girare. Ripetere la 2° e la 3° riga un’altra volta e finire con la 2° riga 1 volta = 3 righe con le stelle. Tagliare il filo (aggiustarlo in modo che possa essere usato per la confezione) e farlo passare attraverso l’ultima m. CONFEZIONE: Cucire i lati corti margine a margine. Chiudere. SCALDACOLLO: Lavorato avanti e indietro. Avviare 47-51 catenelle LASSE con l’uncinetto n° 10 mm con Snow. RIGA 1 (diritto del lavoro): riprendere 5 m., iniziare nella 2° m. dall’uncinetto = 6 m. sull’uncinetto, fare un gettato e farlo passare attraverso tutte le 6 m., lavorare 1 cat. per fare un buco sulle 6 m., * riprendere 1 m. nel buco, riprendere 1 m. nel lato dell’ultima delle 6 m., riprendere 1 m. nella stessa cat. in cui è stata ripresa l’ultima delle 6 m., 1 m. in ognuna delle 2 cat. successive = 6 m. sull’uncinetto, fare un gettato e farlo passare attraverso tutte le 6 m., 1 cat. *, ripetere *-* fino all’ultima m. Lavorare 1 m.m.a. nell’ultima cat. Girare. 2° RIGA. (rovescio del lavoro): 2 cat. (= 1 m.m.a.), lavorare 2 m.m.a. in ogni "buco della stella", finire la riga con 1 m.m.a. nell’ultima m. Girare. Ora ci sono 21-23 stelle sulla riga e 1 m.m.a. a ogni lato. 3 RIGA: 3 cat., riprendere 1 m. nella 2° e 3° cat. dall’uncinetto, riprendere 1 m. nelle prime 3 m. sulla riga = 6 m. sull’uncinetto, fare un gettato e farlo passare attraverso tutte le 6, lavorare 1 cat., * riprendere 1 m. nel buco, riprendere 1 m. nel lato dell’ultima delle 6 m., riprendere 1 m. nella stessa cat. in cui è stata ripresa l’ultima delle 6 m., 1 m. in ognuna delle 2 cat. successive = 6 m. sull’uncinetto, fare un gettato e farlo passare attraverso tutte le 6 m., 1 cat. *, ripetere *-*. Lavorare 1 m.m.a. nell’ultima cat. Girare. Ripetere la 2° e la 3° riga altre 2 volte (= 3 volte in totale). Poi aumentare lavorando la 2° riga come prima ma lavorare 3 m.m.a. (invece di 2 m.m.a.) nel 5° e nel 6° buco della stella, contati da ogni lato = 23-25 stelle. Ripetere la 3° e la 2° riga altre 3 volte = 8 righe con le stelle in totale. Tagliare il filo (aggiustarlo in modo che possa essere usato per la confezione) e farlo passare attraverso l’ultima m. CONFEZIONE: Cucire i lati corti margine a margine. Chiudere. |
|
Avete terminato questo modello?Allora taggate le vostre foto con #dropspattern #anemoneset o inviatele alla #dropsfan gallery. Avete bisogno di aiuto con questo modello?Troverete 3 video tutorial, una sezione per i commenti/domande e molto altro guardando il modello su www.garnstudio.com © 1982-2026 DROPS Design A/S. Ci riserviamo tutti i diritti. Questo documento, compreso tutte le sue sotto-sezioni, è protetto dalle leggi sul copyright. Potete leggere quello che potete fare con i nostri modelli alla fine di ogni modello sul nostro sito. |


Con oltre 40 anni di esperienza nel design di modelli di maglia e uncinetto, DROPS Design offre la più estesa collezione di modelli gratuiti su internet - tradotti in 17 lingue. Ad oggi vi possiamo fornire 325 cataloghi e 12298 modelli - 9569 dei quali sono tradotti in Italiano.
Ci stiamo impegnando molto per darvi il meglio che vi possiamo offrire in termini di maglia e uncinetto, ispirazioni e consigli così come filati di grande qualità ad un prezzo incredibile! Volete utilizzare i nostri modelli per qualcosa d'altro oltre al vostro uso personale? Potete leggere tutto ciò che è consentito nel testo sul Copyright in basso su tutte le pagine dei nostri modelli. Buon lavoro!
Lasciare un commento sul modello DROPS 150-51
Noi saremmo felici di ricevere i tuoi commenti e opinioni su questo modello!
Se vuoi fare una domanda, fai per favore attenzione a selezionare la categoria corretta nella casella qui sotto per velocizzare il processo di risposta. I campi richiesti sono indicati da *.