Commenti / Domande (56)
![]() Jolene Bailey ha scritto:
Jolene Bailey ha scritto:
I noticed the instructions do not mention to chain 1 at the end of the row and turn. I want to make sure this step is not required.
20.12.2014 - 01:31DROPS Design ha risposto:
Dear Mrs Bailey, you usually always crochet ch to turn, pattern will be checked - thank you very much in advance for your patience.
22.12.2014 - 15:52
![]() Keira ha scritto:
Keira ha scritto:
What is the reason for switching to one strand of yarn for the bottom of the foot? Wouldn't I want extra cushion for the bottom?
10.12.2014 - 22:16DROPS Design ha risposto:
Dear Keira, if you keep 2 strands for the bottom of the foot you will have a different tension, you may adjust end of pattern if you rather like to continue with 2 strands to the end. Happy crocheting!
11.12.2014 - 10:03
![]() Diana ha scritto:
Diana ha scritto:
"Herhaal 3e en 4e toer tot het werk ongeveer 23-26-28 cm meet gemeten in lengte - meet het werk dubbelgevouwen. Ga verder met 1 draad donkergrijs Eskimo en MEET NU HET WERK VANAF HIER. " als ik het werk dubbelvouw en meet doe ik dit dan van punt naar de naad aan de achterkant of meet ik echt vanaf het begin van de voet 26cm? als ik kijk naar de wisseling dan meet ik langs de lengte van de voet van hiel naar teen
02.12.2014 - 11:10DROPS Design ha risposto:
Hoi Diana. Je meet de lengte van de voet, van hiel tot teen.
02.12.2014 - 15:34
![]() Glenda ha scritto:
Glenda ha scritto:
After the 6", in the next row you decease at the end & in the middle of the row, DO YOU CONTINUE TO DECREASE IN EACH ROW TO 10"
22.11.2014 - 21:15DROPS Design ha risposto:
Dear Glenda, you dec 2 sts when piece measures a total of 6", and continue over the 29-31-33 sts until piece measures 10-11-12". Happy crocheting!
24.11.2014 - 10:27
![]() Julie ha scritto:
Julie ha scritto:
Hej DROPS. i 1 OMG står der at man i den midterste maske skal hækle en lm, derefter springe en maske over. Er det den midterste maske man springer over eller den maske, der kommer efter den midterste maske?
18.11.2014 - 16:49DROPS Design ha risposto:
Hej Julie. Masken med maerketraaden er den midterste maske og den skal du springe over.
21.11.2014 - 16:17
![]() Maarit Kuismin ha scritto:
Maarit Kuismin ha scritto:
Hei. Ohjeen kjs-ketjun pituus ei voi olla oikea, tuo 24 cm ei riitä kaksi kertaa nilkan ympäri...
29.10.2014 - 04:23
![]() Yve ha scritto:
Yve ha scritto:
Wie bitte kommt der Preis zustande? Wenn ich 200g equinox in grau und 150gr für die kleinste Größe rechne, sind das schon 14.00euro ohne alpaca boucle?
08.10.2014 - 20:35DROPS Design ha risposto:
Der Preis wurde nun angepasst.
08.10.2014 - 21:31
![]() Yve ha scritto:
Yve ha scritto:
Wie bitte kommt der Preis zustande? Wenn ich 200g equinox in grau und 150gr für die kleinste Größe rechne, sind das schon 14.00euro ohne alpaca boucle?
08.10.2014 - 20:11DROPS Design ha risposto:
Sie haben Recht, da stimmt etwas nicht, eventuell ist beim Preis die Knäuelberechnung für Eskimo falsch gelaufen, ich werde direkt eine Anfrage zur Korrektur schicken! Danke für den Hinweis!
08.10.2014 - 23:13
![]() Amanda ha scritto:
Amanda ha scritto:
Awesome! They are so beautiful! I love them!
08.10.2014 - 16:01
![]() Tammy Olkowski ha scritto:
Tammy Olkowski ha scritto:
I would like to make these slippers, but I don't understand how the materials are listed as far as quantity. For example, "4-4-5 balls of #14 dark gray 3-4-4 balls of #53 light gray What is "4-4-5 and 3-4-4"? Thank you, Tammy
22.09.2014 - 03:04DROPS Design ha risposto:
Dear Mrs Olkowski, the slippers are given in 3 sizes, each number refers to the size, ie in 1st size eg, You need 4 balls of Eskimo #14 + 3 balls of Eskimo #53 + 1 ball of Alpaca Bouclé #517. Happy crocheting!
22.09.2014 - 09:58
Lucky Wanderer |
|
|
|
|
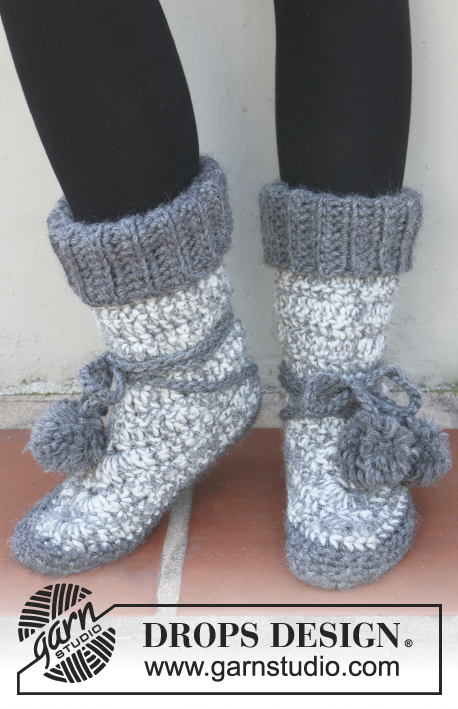
Pantofole DROPS all’uncinetto, in "Snow". Taglie: Dalla 35 alla 43.
DROPS Extra 0-888 |
|
|
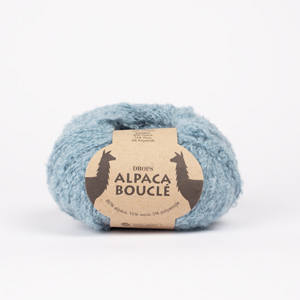
LAVORARE 2 M INSIEME: Lavorare la prima m ma non fare l’ultima gettata, lavorare la m successiva e, all’ultima gettata, passare il filo attraverso tutte e 3 le m sull’uncinetto. INFORMAZIONI PER IL LAVORO: Iniziare ogni riga a m.b con 1 cat. ---------------------------------------------- BORDO: Si lavora da lato a lato. Con 1 capo del filato Snow colore grigio scuro, avviare 13 cat morbide. Lavorare 1 m.b nella 2a cat dall’uncinetto, proseguire lavorando 1 m.b in ogni cat = 12 m.b. Leggere le INFORMAZIONI PER IL LAVORO - Proseguire avanti e indietro, lavorando 1 m.b nel filo posteriore delle m per 27-28-29 cm. Tagliare il filo. PANTOFOLA: Si lavora dall’alto verso il basso, avanti e indietro, con una cucitura sul dietro della gamba. Con 1 capo del filato Snow colore grigio chiaro e 1 capo del filato Alpaca Bouclé (= 2 capi lavorati insieme), riprendere 31-33-35 m.b a intervalli regolari lungo uno dei lati del bordo. Proseguire a lavorare come segue: * 2 cat, girare il lavoro, lavorare 1 m.a in ogni m della riga, 1 cat, girare il lavoro, lavorare 1 m.b in ogni m della riga *, ripetere da *-*. ALLO STESSO TEMPO, quando il lavoro misura in tutto 15 cm, diminuire 2 m nel corso della riga successiva, come segue: Lavorare le prime 2 m insieme - vedere le spiegazioni sopra - e al centro, sul davanti, lavorare 2 m insieme = 29-31-33 m. Proseguire come prima finché il lavoro non misura 26-28-31 cm. Lavorare ora il piede come segue – inserire un segno nella m centrale della riga: RIGA 1: Lavorare 1 m.b in ogni m finchè non rimane 1 m prima della m centrale, lavorare 2 m.b nella m successiva, 1 cat (= m centrale), saltare la m successiva, 2 m.b nella m successiva, 1 m.b in ognuna delle ultime m, girare il lavoro. RIGA 2: Lavorare 1 m.b in ognuna delle prime m fino alla cat, lavorare 7 m.a nella cat centrale (quindi la 4a m.a di queste 7 m.a è ora la m centrale) e 1 m.b in ognuna delle ultime m, girare il lavoro. RIGA 3: Lavorare 1 m.b in ognuna delle m successive finché non rimane 1 m prima della m centrale, lavorare 2 m.b nella m successiva, 1 cat (=m centrale), saltare la m successiva, lavorare 2 m.b nella m successiva, 1 m.b in ognuna delle ultime m, girare il lavoro. RIGA 4: Lavorare 1 m.b in ogni m fino alla m centrale, 7 m.a nella cat e 1 m.b in ognuna delle ultime m, girare il lavoro. Ripetere le righe 3 e 4 finché il lavoro non misura ca.23-26-28 cm, misurare la lunghezza del piede – misurare il lavoro piegato in due. Proseguire con 1 capo del filato Snow colore grigio scuro e da adesso in avanti, misurare il lavoro da questo punto. * Lavorare 1 riga di m.b, finire la riga con 1 cat e girare il lavoro *, ripetere da *-* finché il lavoro non misura ca.4-4½-5 cm. Lavorare ancora un’altra riga lavorando insieme le prime 2 e le ultime 2 m. Tagliare il filo. CONFEZIONE: Piegare la pantofola in due, cucire insieme sotto il piede e lungo il dietro della gamba. Cucire bordo contro bordo per evitare una cucitura troppo spessa. CORDINI CON POMPON Con il filato Snow colore grigio scuro avviare una fila di cat lunga ca.150 cm. Preparare un piccolo pompon da cucire ad ogni estremità – Suggerimento: prima di cucire il secondo pompon, far passare il cordino attraverso una m nella parte inferiore della gamba sul dietro, nel punto in cui si passa dal grigio chiaro al grigio scuro, in modo che il cordino sia fissato alla pantofola. Avvolgere intorno alla gamba. |
|
Avete terminato questo modello?Allora taggate le vostre foto con #dropspattern o inviatele alla #dropsfan gallery. Avete bisogno di aiuto con questo modello?Troverete 9 video tutorial, una sezione per i commenti/domande e molto altro guardando il modello su www.garnstudio.com © 1982-2026 DROPS Design A/S. Ci riserviamo tutti i diritti. Questo documento, compreso tutte le sue sotto-sezioni, è protetto dalle leggi sul copyright. Potete leggere quello che potete fare con i nostri modelli alla fine di ogni modello sul nostro sito. |


Lasciare un commento sul modello DROPS Extra 0-888
Noi saremmo felici di ricevere i tuoi commenti e opinioni su questo modello!
Se vuoi fare una domanda, fai per favore attenzione a selezionare la categoria corretta nella casella qui sotto per velocizzare il processo di risposta. I campi richiesti sono indicati da *.