
Categorie popolari
State cercando un filato?


Commenti / Domande (30)
![]() Elke ha scritto:
Elke ha scritto:
Wieviel wolle brauche ich für kniestrümpfe gr.38/39? Danke im voraus
01.10.2025 - 15:06DROPS Design ha risposto:
Hi, Elke, for this pattern, you need 250 grams of yarn for all sizes. Regards, DROPS Design
21.10.2025 - 12:54
![]() Madeleine ha scritto:
Madeleine ha scritto:
Fråga om minskningen efter 15 cm stickst a-1 mm . Minskningstips: Det minskas varannan gång i början och slutet av varje avigt parti genom att sticka 2 am tills? Minskas det varannan gång på ett och samma varv eller på vartannat minsknings varv, alltså första minskningsvarvet endast i början och på nästa minskningsvarv i slutet ?
12.11.2024 - 01:16DROPS Design ha risposto:
Hej Madeleine. Det minskas varannan gång på ett och samma varv. Mvh DROPS Design
12.11.2024 - 13:48
![]() Madeleine ha scritto:
Madeleine ha scritto:
Fråga om minskningarna efter 15 cm stickat a-1 diagram mm. På nästa v minskas det 1 m i vart och ett av de 6 aviga partierna mellan A-1 = 78 m? Är det endast minskningar i partiet emellan diagrammet a1, alltså resårstickningen ej flätade ?
12.11.2024 - 01:12DROPS Design ha risposto:
Hej Madeleine. Ja du minskar bara i de aviga partierna i resårstickningen, ej i diagram A.1 där flätan finns. Mvh DROPS Design
12.11.2024 - 13:51
![]() Anette Pettersson ha scritto:
Anette Pettersson ha scritto:
Får inte mönstret att stämma. Har ju 20m på varje sticka och efter resårstickningen så stickar jag** 2rm 6am sedan 2rm I var och en av de 2nästa 2m (4m) *6am 2rm*. Jag får detta inte att stämma. Totalt blir det 20m men jag får 2m över på fösta stickan. Är det något fel i beskrivningen? Mvh Anette
10.09.2024 - 08:25DROPS Design ha risposto:
Hej Anette, du strikker ifølge mønsteret uden at tage hensyn til hvor mange masker du har på hver sticka. Repetitionen kan starte på første sticka og fortsætte på anden sticka. Hvis du vil have mere hjælp skal du skrive hvilken størrelse du strikker og om du vil have hjælp med feks første varv :)
12.09.2024 - 15:15
![]() Reiko ha scritto:
Reiko ha scritto:
Thanks a lot for yous support!!! I`m so excited to finish this gorgeous looking socks.
25.11.2021 - 18:33
![]() Reiko ha scritto:
Reiko ha scritto:
Hello again, I started with cast on 80 sts for 5cm of rib. Then followed bty instructions 42 sts tweice.... I read over and over but could not understand how the 4 sts more now from the beginning. Is there anything to do to add on 4 sts??
23.11.2021 - 09:28DROPS Design ha risposto:
Dear Reiko, I might not understand your question, but repeating the 42 sts twice, you should have 42x2= 84 sts. You increase only one time 2 sts on the first half and then 2 sts on the 2nd half = 80 + 2 sts increased on 1st half + 2 sts increased on 2nd half = 84 sts. Can this help?
23.11.2021 - 16:18
![]() Reiko ha scritto:
Reiko ha scritto:
Would you please explain to me the meaning of below with *, *-* and **-**. * P 6, K 2 *, repeat from *-* a total of 3 times, P 6 **, half the sts have been worked, repeat from **-** I tried to figure this out but could not count 84 sts by the end.
18.11.2021 - 09:23DROPS Design ha risposto:
Dear Reiko, this means you have to repeat the stitches worked between these stars, ie: ** K 2, P 6, then K 2 in each of the next 2 sts (= K 4), * P 6, K 2 *, repeat from *-* a total of 3 times at the beg of the pattern for example means to work: K2, P6, K2 in each of the next 2 sts, then repeat P6, K2 a total of 3 times (= P6, K2, P6, K2,P6,K2 = 24 sts) and work now P6 **= there are now 2+6+(2+2)+24 +6 sts = 42 sts on needle; repeat these from ** to ** = one more time = 84 sts on needle. Happy knitting!
18.11.2021 - 17:07
![]() Claudia ha scritto:
Claudia ha scritto:
Hi everyone.... I would like to have theses socks so much! can somebody can make them for me? is this somehow possible?
12.11.2021 - 21:44DROPS Design ha risposto:
Dear Claudia, we do not offer knitting services. However, we have a ton of tutorials, if you would be willing to learn knitting so you could make it for yourself.
13.11.2021 - 00:37Natalia ha scritto:
Se pueden comprar y enviar a colombia ?
12.03.2017 - 00:41DROPS Design ha risposto:
Hola Natalia, no hay tiendas de Drops en Colombia, pero existe la posibilidad de hacer envíos internacionales. Puedes consultar las tiendas online con esta opción en este link: https://www.garnstudio.com/findastore.php?s=w&cid=23
13.03.2017 - 13:49
![]() Pat Scott ha scritto:
Pat Scott ha scritto:
Thank you very much for the sock pattern!😊
27.05.2016 - 05:24
|
|||||||||||||||||||
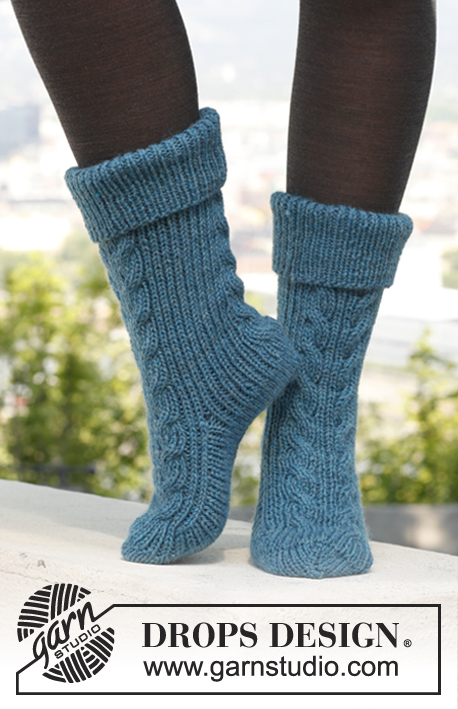
Golden Socks#goldensocks |
|||||||||||||||||||
 |
 |
||||||||||||||||||
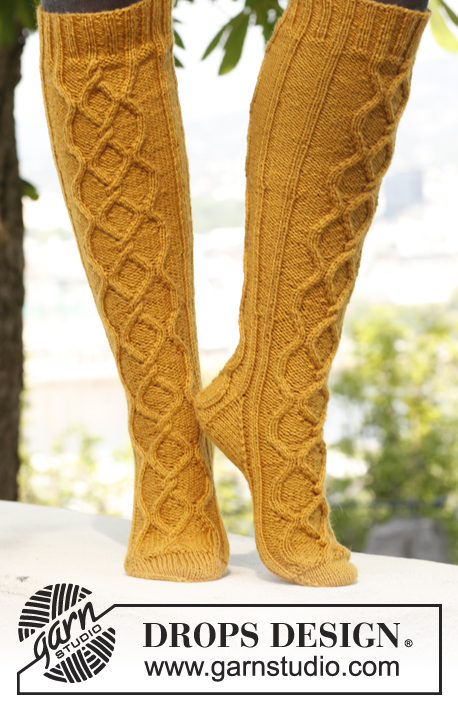
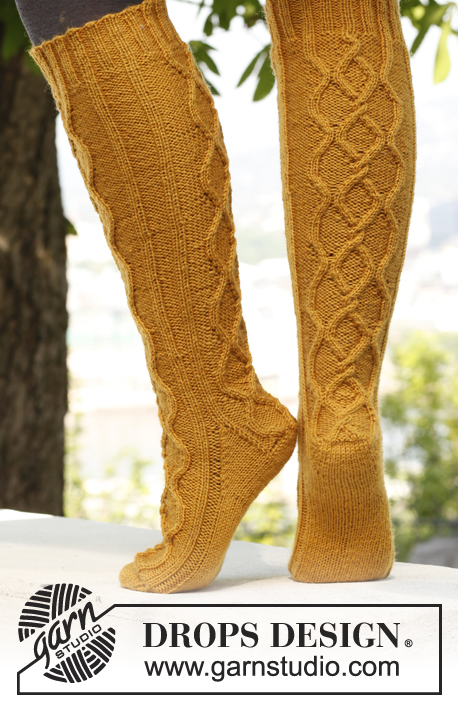
Calze DROPS lavorate ai ferri con trecce in "Karisma".
DROPS 143-8 |
|||||||||||||||||||
|
MOTIVO: Vedere il diagramma A.1. Il diagramma mostra 1 ripetizione del motivo. SUGGERIMENTO PER LE DIMINUZIONI: Diminuire in modo alternato all’inizio e alla fine di ogni sezione a rov. lavorando 2 m. insieme a rov. DIMINUZIONI PER IL TALLONE: Ferro 1 (= diritto del lavoro): lavorare a dir. fino a quando rimangono 8 m., passare 1 m. a dir. senza lavorarla, 1 m. dir., accavallare la m. passata sopra quella appena lavorata, girare il lavoro. Ferro 2 (= rovescio del lavoro): lavorare a rov. fino a quando rimangono 8 m., passare 1 m. a rov. senza lavorarla, 1 m. rov., accavallare la m. passata sopra quella appena lavorata, girare il lavoro. Ferro 3 (= diritto del lavoro): lavorare a dir. fino a quando rimangono 7 m., passare 1 m. a dir. senza lavorarla, 1 m. dir., accavallare la m. passata sopra quella appena lavorata, girare il lavoro. Ferro 4 (= rovescio del lavoro): lavorare a rov. fino a quando rimangono 7 m., passare 1 m. a rov. senza lavorarla, 1 m. rov., accavallare la m. passata sopra quella appena lavorata, girare il lavoro. Continuare a diminuire in questo modo con 1 m. in meno prima di ogni diminuzione fino a quando ci sono 12-12-14 m. sul f. ---------------------------------------------------------- CALZA: Lavorata in tondo con i ferri a doppia punta. Avviare 80 m. per tutte le taglie con i ferri a doppia punta n° 3 mm con il Karisma. Lavorare a coste = 2 m. dir./2 m. rov. per 5 cm. Passare ai ferri a doppia punta n° 3,5 mm e continuare come segue: ** 2 m. dir., 6 m. rov., quindi lavorare 2 m. dir. in ognuna delle 2 m. successive (= 4 m. dir.), * 6 m. rov., 2 m. dir. *, ripetere *-* per un totale di 3 volte, 6 m. rov. **, metà delle m. sono state lavorate, ripetere **-** un’altra volta = 84 m. Continuare come segue: * Diagramma A.1 (= 20 m.), inserire un segnapunti al centro delle 2 m. centrali – vedere la freccia nel diagramma (= centro dietro), 6 m. rov., 2 m. dir., 6 m. rov., 2 m. dir., 6 m. rov. *, ripetere *-* un’altra volta (il segnapunti successivo è al centro davanti). Continuare in questo modo fino a quando il lavoro misura 15 cm. Sul giro successivo diminuire 1 m. in ognuna delle sezioni a 6 rovesci tra A.1 = 78 m. Ripetere le diminuzioni ogni 6-6-8 cm altre 3-3-2 volte – LEGGERE IL SUGGERIMENTO PER LE DIMINUZIONI! Ora ci sono 2-2-3 m. rov. nelle 6 sezioni a rov. tra A.1 e 60-60-66 m. in totale. Continuare con A.1 e dir. su dir. e rov. su rov. ai lati fino a quando il lavoro misura 40-42-44 cm – sull’ultimo giro lavorare fino a 4-4-5 m. prima dell’inizio del giro. Ora tenere le prime 28-28-30 m. sul f. per il tallone (= A.1 + 4-4-5 m. a ogni lato di queste) e trasferire le 32-32-36 m. rimaste su un fermamaglie (= centro sul sopra del piede). Continuare con il motivo come prima sulle m. del tallone per 5-5½-6 cm – ALLO STESSO TEMPO sull’ultimo f. (= rovescio del lavoro), distribuire 2 diminuzioni in modo uniforme su A.1 = 26-26-28 m. rimaste sul f. Inserire un segnapunti, misurare il piede da qui. Quindi lavorare le DIMINUZIONI PER IL TALLONE a m. rasata su tutte le m. – leggere la spiegazione sopra! Alla fine delle diminuzioni per il tallone, riprendere 11-12-13 m. lungo ogni lato del tallone e trasferire le 32-32-36 m. dal fermamaglie sul f. di lavoro = 66-68-76 m. Inserire un segnapunti da ogni lato delle 32-32-36 m. sul sopra del piede. Continuare il motivo come prima su queste m. e a m. rasata sulle altre m. – ALLO STESSO TEMPO lavorare insieme a dir. ritorto le ultime 2 m. PRIMA del primo segnapunti sul sopra del piede e lavorare insieme a dir. le prime 2 m. DOPO il segnapunti sul sopra del piede. Ripetere le diminuzioni ogni 2 giri altre 9-8-10 volte = 46-50-54 m. Continuare come prima fino a quando il lavoro misura 18-20-22 cm dal segnapunti sul tallone (= circa 4-4-5 cm rimasti) – ALLO STESSO TEMPO sull’ultimo giro distribuire 2 diminuzioni in modo uniforme su A.1 = 44-48-52 m. Inserire un segnapunti da ogni lato in modo che ci siano 22-24-26 m. sia sul sopra che sul sotto del piede. Continuare a lavorare a m. rasata su tutte le m. e ALLO STESSO TEMPO diminuire per le dita a ogni lato di entrambi i segnapunti come segue: lavorare fino a quando rimangono 2 m. prima del segnapunti, 2 m. insieme a dir., segnapunti, poi 2 m. insieme a dir. ritorto. Ripetere le diminuzioni ogni 2 giri altre 3-3-4 volte e quindi ogni giro 5-6-6 volte = 8 m. rimaste sul f. Tagliare il filo e farlo passare attraverso le m. rimaste, tirare forte e affrancare. |
|||||||||||||||||||
Spiegazioni del diagramma |
|||||||||||||||||||
|
|||||||||||||||||||
 |
|||||||||||||||||||
Avete terminato questo modello?Allora taggate le vostre foto con #dropspattern #goldensocks o inviatele alla #dropsfan gallery. Avete bisogno di aiuto con questo modello?Troverete 23 video tutorial, una sezione per i commenti/domande e molto altro guardando il modello su www.garnstudio.com © 1982-2026 DROPS Design A/S. Ci riserviamo tutti i diritti. Questo documento, compreso tutte le sue sotto-sezioni, è protetto dalle leggi sul copyright. Potete leggere quello che potete fare con i nostri modelli alla fine di ogni modello sul nostro sito. |
|||||||||||||||||||


Con oltre 40 anni di esperienza nel design di modelli di maglia e uncinetto, DROPS Design offre la più estesa collezione di modelli gratuiti su internet - tradotti in 17 lingue. Ad oggi vi possiamo fornire 324 cataloghi e 12290 modelli - 9561 dei quali sono tradotti in Italiano.
Ci stiamo impegnando molto per darvi il meglio che vi possiamo offrire in termini di maglia e uncinetto, ispirazioni e consigli così come filati di grande qualità ad un prezzo incredibile! Volete utilizzare i nostri modelli per qualcosa d'altro oltre al vostro uso personale? Potete leggere tutto ciò che è consentito nel testo sul Copyright in basso su tutte le pagine dei nostri modelli. Buon lavoro!
Lasciare un commento sul modello DROPS 143-8
Noi saremmo felici di ricevere i tuoi commenti e opinioni su questo modello!
Se vuoi fare una domanda, fai per favore attenzione a selezionare la categoria corretta nella casella qui sotto per velocizzare il processo di risposta. I campi richiesti sono indicati da *.