
Categorie popolari
State cercando un filato?


Commenti / Domande (94)
![]() Thea ha scritto:
Thea ha scritto:
Bij het achterpand staat minderen bij 10 en 20 cm en bij het voorpand bij 15 en 25 cm. Wat is juist?
29.04.2015 - 21:20DROPS Design ha risposto:
Hoi Thea. Ze zijn beide juist. Je mindert op twee verschillende hoogtes voor de vorm van het model.
30.04.2015 - 15:21
![]() Rita Deuster ha scritto:
Rita Deuster ha scritto:
Wie kann ich am Besten die Länge messen???
19.12.2014 - 20:02DROPS Design ha risposto:
Sie messen die Länge, indem Sie die Jacke senkrecht nach unten hängen lassen, da sich das Muster in der Länge weitet. Am besten ist es natürlich, wenn eine andere Person die Jacke hochhält, aber Sie können Sie zum Messen z.B. auch an einen Haken o.Ä. hängen.
21.12.2014 - 17:29
![]() Rita Deuster ha scritto:
Rita Deuster ha scritto:
Wird eine Vorderseite spiegelverkehrt gehäkelt??? Wenn ja, bitte kurze Info wie der a Anfang ist. Dankeschön
19.12.2014 - 17:30DROPS Design ha risposto:
Sie fangen beide Vorderteile gleich an, machen die Abnahmen dann aber jeweils an der anderen Seite. Die Abnahmen sind ja für beide Seiten (rechts und links) im Diagramm X.1 und X.2 gezeigt.
21.12.2014 - 17:33
![]() Marjanna ha scritto:
Marjanna ha scritto:
Patroon klopt van geen kant. Kom hierdoor nu niet meer uit met het haakgaren dat ik bij Drops gekocht heb. Heb voor maat s garen gekocht, en moet maat l maken om aan de afmetingen te komen. Dit is ontzettend jammer!
25.11.2014 - 21:17DROPS Design ha risposto:
Hoi Marjanna. Let op, dat haak je van het patroon in het boek, dat je de juiste teltekening moet hebben (die hier op de site staat - zie ook CORRECTIES). Verder hebben wij geen foutmeldingen gehad. Klopt jouw haakstekenverhouding? (heb je 4 keer 4 herhalingen van het patroon op 10 x 10 cm). Door een verkeerde stekenverhouding krijg je ook verkeerde afmetingen.
27.11.2014 - 13:49
![]() Iris ha scritto:
Iris ha scritto:
Hallo, ik ben bezig een proeflapje te haken voor dit patroon, maar ik kom niet op de juiste afmeting uit. Als ik haaknaald 4 gebruik krijg ik 4 x 4 patroonherhalingen = 10 cm breed x 8 cm lang in plaats van 10 x 10 cm. In de werkbeschrijving staat dat het werk langer wordt als het hangt vanwege het patroon. Kan ik het beste doorgaan met naald 4 of kan ik beter toch 4,5 proberen?
19.05.2014 - 11:17DROPS Design ha risposto:
Hoi Iris. Je kan ook het proeflapje even wassen en dan meten. Twijfel je nog, dan haak en een lapje met 4.5 (ook wassen) en kijk welke van de twee het beste past.
21.05.2014 - 17:28
![]() Emma ha scritto:
Emma ha scritto:
Das Ende der Ärmel ist mir leider unverständlich: " Dann auf jeder Seite insgesamt 0-0-0-0-2-2 x in jeder 2. R ½ Rapport abk und schliesslich in jeder R 6-7-8-8-6-6 x = 5-6-6-6-7-7 Rapporte ." Was kommt nach dem x? Wie nehme ich da ab? Ab wann mache ich das bei den kleinen Größen und wie viele Rapporte sollte ich dann am Ende haben? Ich hoffe sehr, dass Sie mir dabei helfen können, damit ich bald mit dieser wunderschönen Jacke anfangen kann.
23.02.2014 - 23:26DROPS Design ha risposto:
Die Abnahmen arbeiten Sie wie am Rückenteil. "in jeder R 6-7-8-8-6-6 x" - d.h. nun nehmen Sie in jeder R an beiden Seiten je 1/2 Rapport ab (also insgesamt 1 Rapport pro R). Bei den kleinen Größen nehmen Sie aber gar nicht in jeder 2. R ab (also 0 x), sondern direkt in jeder R. Die restliche Zahl der Rapporte steht in Ihrem Zitat: "5-6-6-6-7-7 Rapporte". Über diese Rapporte häkeln Sie bis zur angegebenen Länge. Viel Spaß beim Häkeln!
24.02.2014 - 01:49
![]() Emma ha scritto:
Emma ha scritto:
Bei den Ärmeln ist noch ein Fehler drin. Es muss heißen: Nach 6cm auf beiden Seiten je 1/2 Rapport aufnehmen.
23.02.2014 - 23:25DROPS Design ha risposto:
Danke für den Hinweis, das war ein Übersetzungsfehler und die Anleitung wurde an dieser Stelle nun korrigiert.
24.02.2014 - 01:36
![]() Emma ha scritto:
Emma ha scritto:
Und ich komme irgendwie auch nicht auf die 6 Rapporte, die übrig bleiben sollen: Ich habe 12 am Anfang, dann nehme ich bei 15/25cm links und rechts einen halben R. ab (12-4*1/2=10). Dann wird zum Hals 4mal ein halber abgenommen(10-2=8) und außen wie bei dem Rückenteil 2x1 R. und 2x 1/2 R.. Also nochmal 8-3=5.
23.02.2014 - 23:25DROPS Design ha risposto:
Sie nehmen bei den Vorderteilen nur an der einen Seite einen halben Rapport ab (nämlich an der Seite der Jacke, nicht am vorderen Rand), d.h. 12-2*1/2=11, somit bleiben am Ende wie beschrieben 6 Rapporte übrig, nicht 5.
24.02.2014 - 01:35
![]() Emma ha scritto:
Emma ha scritto:
Hallo, habe mich gerade an das Verstehen der Anleitung ran gemacht und ein paar Probleme: Warum wird beim Rückenteil bei 10cm und 20cm abgenommen und bei den Vorderseiten bei 15cm und 25cm? Soll das wirklich so? Wenn ja, warum?
23.02.2014 - 23:24DROPS Design ha risposto:
Liebe Emma, ja, das ist so richtig, auf diese Weise wird über die gesamte Jacke gleichmäßiger abgenommen und es entstehen keine "Stufen" an den Abnahmestellen.
24.02.2014 - 01:32
![]() Brittany ha scritto:
Brittany ha scritto:
Dec for armholes in each side on every row as follows: 1 repetition 1-1-2-2-2-2 times, then ½ repetitions 0-2-2-2-4-4 times = 15-15-15-17-17-19 repetitions. When piece measures 52-54-56-58-60-62 cm / 20½''-21¼''-22''-22¾''-23 5/8''-24 3/8'', work 1 row only over the outermost 6-6-6-6-6-7 repetitions in each side (do not work over the middle 3-3-3-5-5-5 repetitions = neck line). Work 1 more row, cut and . Now this whole piece is confusing me. Can someone help? Please lol
10.12.2013 - 22:50DROPS Design ha risposto:
Dear Brittany, you dec for armhole each side 1 repetition (see diag. X.1) or 1/2 repetition (see diag. X2) as stated under Decreasing tips. 15-19 repetitions remain (see size). Then work for shoulders separately: 2 rows over the 6-7 repetitions towards side - the middle sts unworked = neckline on back piece. Happy crocheting!
11.12.2013 - 09:17
|
||||||||||
Whispers#whisperscardigan |
||||||||||
 |
 |
|||||||||
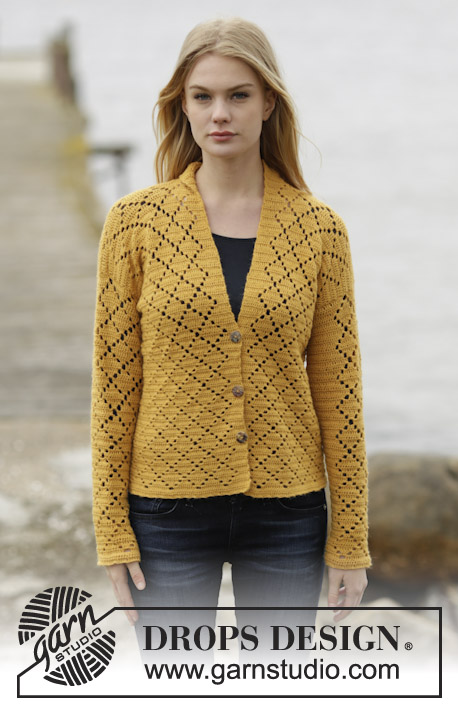
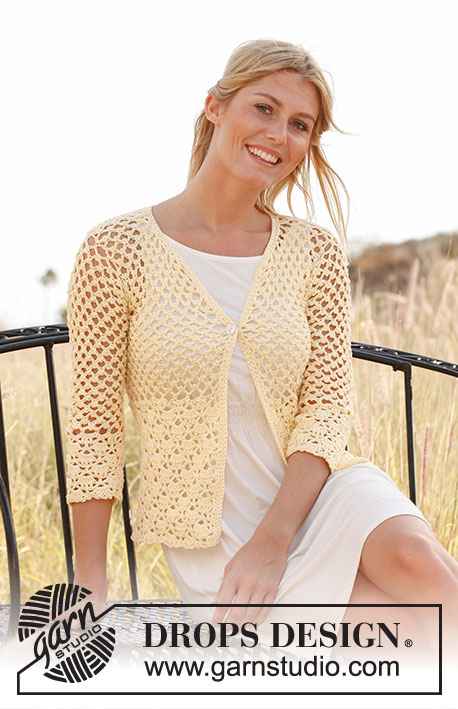
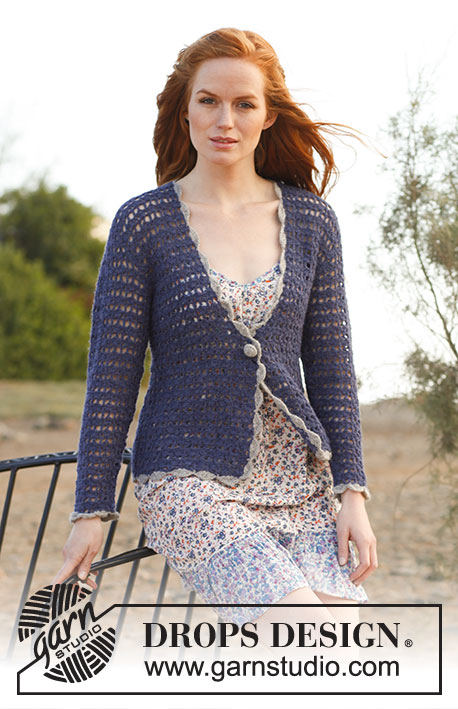
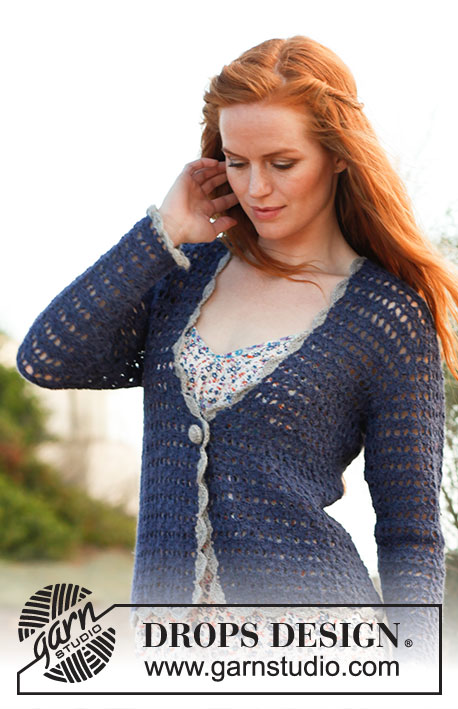
Giacca DROPS all’uncinetto "Alpaca". Dalla S alla XXXL.
DROPS 136-13 |
||||||||||
|
INFO UNCINETTO: Sostituire la 1° m.a di all’inizio di ogni giro con 3 cat. MOTIVO: Vedere il diagramma M.1. Ripetere il giro 1 e 2. M.1 mostra 3 ripetizioni in larghezza e 1 ripetizione in altezza. SUGGERIMENTO PER PRENDERE LE MISURE: Per via del peso del filato, tutte le misure devono essere prese tenendo il lavoro in verticale, altrimenti il capo risulterebbe troppo lungo una volta indossato. DIMINUZIONI: Diminuire 1 ripetizione nel X.1, oppure ½ ripetizione nel X.2. Diminuire così all’inizio del giro: Sostituire 1 ripetizione con 6 m.bss e ½ ripetizione con 3 m.bss. Diminuire così alla fine del giro: Girare il lavoro quando rimane o 1 oppure ½ ripetizione. AUMENTI (maniche): Aumentare ½ ripetizione. Aumentare facendo 6/7 cat anziché di 3, vedere X.3. -------------------------------------------------------- -------------------------------------------------------- DIETRO: Lavorare 120-132-144-156-168-180 cat (incluse 8 cat per girare) con l’uncinetto 3,5 ed il filo blu. Lavorare 1 m.a nella 9° cat dall’uncinetto, * 2 cat, saltare 2 cat, 1 m.a nella cat seguente *, ripetere da *-* = 39-43-47-51-55-59 m.a. Continuare con M.1 (1 giro è ora lavorato, iniziare il 2° giro) = 19-21-23-25-27-29 ripetizioni. Quando il lavoro misura 10 e 20 cm – Vedere SUGGERIMENTO PER PRENDERE LE MISURE, diminuire ½ ripetizione ad ogni lato - vedere DIMINUZIONI e vedere X.2 = 17-19-21-23-25-27 ripetizioni. Quando il lavoro misura 35-36-37-38-39-40 cm diminuire per gli scalfi ad ogni lato ogni giro così: 1 ripetizione 1-1-2-2-2-2 volte, poi ½ ripetizione 0-2-2-2-4-4 volte = 15-15-15-17-17-19 ripetizioni. Quando il lavoro misura 52-54-56-58-60-62 cm lavorare 1 giro solo sulle 6-6-6-6-6-7 ripetizioni ad ogni lato (non lavorare sopra le 3-3-3-5-5-5 ripetizioni centrali = scollatura). Lavorare ancora 1 giro, tagliare il filo, il lavoro misura ca 54-56-58-60-62-64 cm. DAVANTI DESTRO: LEGGERE ATTENTAMENTE TUTTO IL SEGUITO PRIMA DI CONTINUARE! Lavorare 66-72-78-84-90-96 cat (incluse 8 cat per girare) con l’uncinetto 3,5 ed il filo blu. Cominciare in mezzo davanti e lavorare verso il lato. Lavorare 1 m.a nella 9° cat dall’uncinetto, * 2 cat, saltare 2 cat, 1 m.a nella cat seguente * ripetere da *-* = 21-23-25-27-29-31 m.a. Continuare con M.1 (1° giro è ora lavorato, cominciare con il 2° giro) = 10-11-12-13-14-15 ripetizioni. Quando il lavoro misura 15 e 25 cm diminuire al lato come per il dietro. ALLO STESSO TEMPO, quando il lavoro misura 23-24-25-26-27-28 cm, diminuire per lo scollo ogni 2 giri in mezzo davanti così: diminuire ½ ripetizione 4-4-4-6-6-6 volte. ALLO STESSO TEMPO, quando il lavoro misura 35-36-37-38-39-40 cm diminuire per lo scalfo come per il dietro. Dopo tutte le diminuzioni rimangono 6-6-6-6-6-7 ripetizioni per la spalla. Continuare finché il lavoro non misuri 54-56-58-60-62-64 cm, tagliare e fissare il filo. DAVANTI SINISTRO: Lavorare come il davanti destro. MANICHE: Lavorare 60-60-66-66-72-72 cat (incluse 8 cat per girare) con l’uncinetto 3,5 ed il filo blu. Lavorare 1 m.a nella 9° cat dall’uncinetto, * 2 cat, saltare 2 cat, 1 m.a nella cat seguente *, ripetere da *-* = 19-19-21-21-23-23 m.a. Continuare con M.1 (1° giro è ora lavorato, cominciare con il 2° giro) = 9-9-10-10-11-11 ripetizioni. Quando il lavoro misura 6 cm aumentare ½ ripetizione ad ogni lato, ripetere gli aumenti ogni 12-7-7-7-7-7 cm altre 3-5-5-5-5-5 volte - vedere AUMENTI = 13-15-16-16-17-17 ripetizioni. Quando il lavoro misura 48-47-47-46-46-45 cm (misura più corta per le taglie più grandi per causa dell’arrotondamento della manica più lunga e le spalle più larghe) diminuire 1 ripetizione ad ogni lato per l’arrotondamento della manica. Diminuire poi ½ ripetizione ad ogni lato ogni 2 giri in totale 0-0-0-0-2-2 volte, poi ogni giro 6-7-8-8-6-6 volte = 5-6-6-6-7-7 ripetizioni. Lavorare finché il lavoro non misuri 57-57-58-58-59-59 cm, tagliare e fissare il filo. CONFEZIONE: Cucire le spalle. Attaccare le maniche. Cucire le maniche e i lati - cucire bordo contro bordo con piccoli bei punti. BORDO ALL’UNCINETTO: Lavorare un bordo con l’uncinetto 3,5 con il filo grigio eco chiaro salendo verso l’alto lungo il bordo del davanti destro, intorno alla scollatura, giù verso il basso del davanti sinistro, intorno il basso ed intorno alle aperture delle maniche così: 1 m.b, * saltare 2 cm, 4 m.a.d nella cat seguente, 2 cat, 4 m.a.d nella stessa m, saltare 2 cm, 1 m.b nella m seguente *, ripetere da *-* e terminare con 1 m.bss nella 1° m.b. FODERA BOTTONE: Fare 1 fodera per bottone con l’uncinetto 3,5 con il chiaro eco chiaro così: Lavorare 2 cat, poi 16 m.a nella 1° delle 2 cat, terminare con 1 m.bss in alto della 1° m.a (= 1° GIRO). 2° GIRO: Lavorare 1 m.b in ogni m.a e terminare con 1 m.bss nella 1° m.b del giro. 3° GIRO: Lavorare *1 m.a nella m seguente, saltare la m seguente*, ripetere da *-* e terminare con 1 m.bss nella 1° m.a del giro = 8 m.a. Inserire il bottone nella fodera, imbastire intorno al bordo e stringere. Attaccare il bottone sul davanti sinistro, poco prima l’inizio della diminuzione per la scollatura. Utilizzare i buchi del motivo per abbottonare. |
||||||||||
Spiegazioni del diagramma |
||||||||||
|
||||||||||
 |
||||||||||
 |
||||||||||
Avete terminato questo modello?Allora taggate le vostre foto con #dropspattern #whisperscardigan o inviatele alla #dropsfan gallery. Avete bisogno di aiuto con questo modello?Troverete 6 video tutorial, una sezione per i commenti/domande e molto altro guardando il modello su www.garnstudio.com © 1982-2026 DROPS Design A/S. Ci riserviamo tutti i diritti. Questo documento, compreso tutte le sue sotto-sezioni, è protetto dalle leggi sul copyright. Potete leggere quello che potete fare con i nostri modelli alla fine di ogni modello sul nostro sito. |
||||||||||


Con oltre 40 anni di esperienza nel design di modelli di maglia e uncinetto, DROPS Design offre la più estesa collezione di modelli gratuiti su internet - tradotti in 17 lingue. Ad oggi vi possiamo fornire 324 cataloghi e 12290 modelli - 9561 dei quali sono tradotti in Italiano.
Ci stiamo impegnando molto per darvi il meglio che vi possiamo offrire in termini di maglia e uncinetto, ispirazioni e consigli così come filati di grande qualità ad un prezzo incredibile! Volete utilizzare i nostri modelli per qualcosa d'altro oltre al vostro uso personale? Potete leggere tutto ciò che è consentito nel testo sul Copyright in basso su tutte le pagine dei nostri modelli. Buon lavoro!
Lasciare un commento sul modello DROPS 136-13
Noi saremmo felici di ricevere i tuoi commenti e opinioni su questo modello!
Se vuoi fare una domanda, fai per favore attenzione a selezionare la categoria corretta nella casella qui sotto per velocizzare il processo di risposta. I campi richiesti sono indicati da *.