
Categorie popolari
State cercando un filato?


Commenti / Domande (94)
![]() Francesca ha scritto:
Francesca ha scritto:
Mi consigliate un filato in cotone per realizzare questa giacca? Grazie
14.02.2017 - 15:31DROPS Design ha risposto:
Buongiorno Francesca. Può usare i cotoni Safran, Drops Loves You 6 (controlli la disponibilità presso il rivenditore), Drops Loves You 7, anch’essi del gruppo A come il filato Alpaca. Alla seguente pagina trova le indicazioni per sostituire correttamente i filati. Verifichi sempre di ottenere lo stesso campione indicato nelle spiegazioni. Buon lavoro!
14.02.2017 - 16:04
![]() Raquel ha scritto:
Raquel ha scritto:
Estoy haciendo el delantero derecho y no entiendo eso de empezar a partir del centro del frente y trabajar hacia el lado. Que tengo que ir tejiéndo directamente con la espalda o cómo y si cuando mida 15 cm que tengo que disminuir de un lado o ambos como en la espalda. Gracias
25.04.2016 - 17:38DROPS Design ha risposto:
Hola Raquel, el centro del frente se refiere a la parte de las cenefas, donde se abotona la chaqueta. Los delanteros y la espalda se trabajan por separado pero la espalda nos sirve de referencia para trabajar el delantero. Ten en cuenta que trabajamos 2 delanteros con lo cual las dism se trabajan solo a un lado en este caso y no como en la espalda.
26.04.2016 - 12:21
![]() Raquel ha scritto:
Raquel ha scritto:
Estoy haciendo el delantero derecho y no entiendo eso de empezar a partir del centro del frente y trabajar hacia el lado. Que tengo que ir tejiéndo directamente con la espalda o cómo y si cuando mida 15 cm que tengo que disminuir de un lado o ambos como en la espalda. Gracias
25.04.2016 - 17:29DROPS Design ha risposto:
ver respuesta arriba
26.04.2016 - 12:23
![]() Wilma ha scritto:
Wilma ha scritto:
Ik hem met maat L bezig maar ik kom niet uit de beschrijving voor de mouw kop. Hoeveel herhalingen moet ik uiteindelijk over houden?
17.04.2016 - 15:27DROPS Design ha risposto:
Hoi Wilma. Je mindert 1 heel herhaling en 8 keer 1/2 herhalingen aan elke zijkant = 6 herhalingen over
18.04.2016 - 14:14Vana Giannitsopoulou ha scritto:
Hello, I have a problem I cannot understand the 1/2 increase in the sleeve pattern. The diagram given is only for the left side I cannot figure out how it will be done for the other side. Thank you
03.02.2016 - 19:52DROPS Design ha risposto:
Dear Mrs Giannitsopoulou, diagram X.2 shows on the right side how to work the dec at beg of row (work 3 sl sts) and on the left side how to dec at the end of row (finish with 1 tr (UK-English) in the last ch-space (ie leave uworked the remaining sts on row). Happy crocheting!
04.02.2016 - 09:50Lorena ha scritto:
Excelentes diseños. Gracias. ***
01.02.2016 - 21:37Vana Giannitsopoulou ha scritto:
Hello, I do not understand in the back piece what am I going to do when the piece measures 10 cm and what when it measures 20 cm ? Thank you
23.01.2016 - 14:37DROPS Design ha risposto:
Dear Mrs Giannitsopoulou, when piece measures 10 and then 20 cm, you dec ½ reepetition in each side, ie at beg of row replace ½ repetition with 3 sl t and at theh end of row, turn when ½ repetition remain - see diag. X.2. Happy crocheting!
25.01.2016 - 11:12
![]() Kate ha scritto:
Kate ha scritto:
Thanks for your reply but I'm still a bit confused. Am I then crocheting the front right piece until it mesures 15 before I start the decrease or 25? Sorry!
10.09.2015 - 13:19DROPS Design ha risposto:
Dear Kate, you will decrease on the side as you did for back piece (= 1/2 repetitions - see Decrease tip) a total of 2 times: first time when front piece measures 15 cm and 2nd time when pice measures 25 cm. Happy crocheting!
10.09.2015 - 14:07
![]() Kate ha scritto:
Kate ha scritto:
Hello, where it says "When piece measures 15 and 25 cm" why measurements? Thanks
09.09.2015 - 21:37DROPS Design ha risposto:
Dear Kate, these measurements refer to the dec on the side, they were different on back piece so that they are not so marked on the side (they will look smoother when piece is sewn tog). Happy crocheting!
10.09.2015 - 10:00Magda Grobbelaar ha scritto:
Sorry, I dont want to seem clueless....................but obviously I am. Where do I find the diagram M.1 for the pattern?
25.05.2015 - 20:39DROPS Design ha risposto:
Dear Mrs Grobbelaar, you will find all diagrams at the bottom of the page, just above measurement chart. Happy crocheting!
26.05.2015 - 10:46
|
||||||||||
Whispers#whisperscardigan |
||||||||||
 |
 |
|||||||||
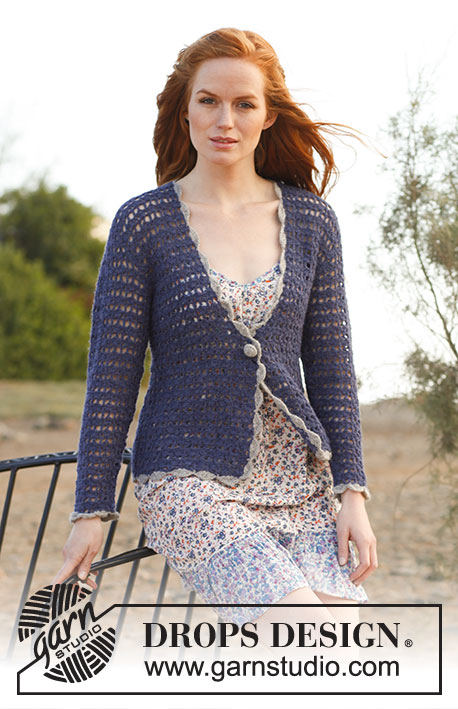
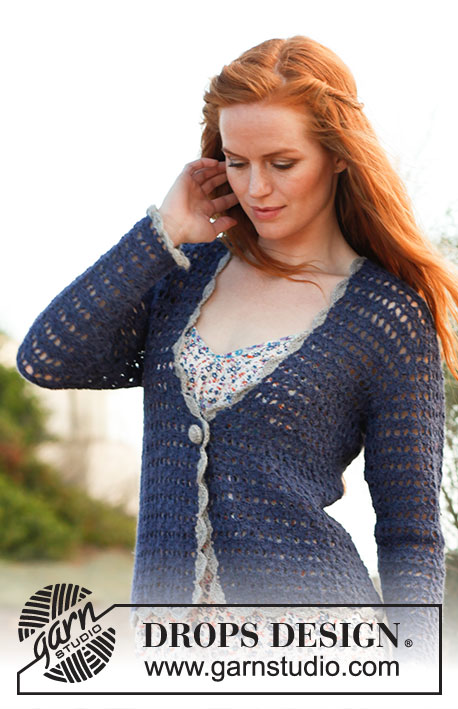
Giacca DROPS all’uncinetto "Alpaca". Dalla S alla XXXL.
DROPS 136-13 |
||||||||||
|
INFO UNCINETTO: Sostituire la 1° m.a di all’inizio di ogni giro con 3 cat. MOTIVO: Vedere il diagramma M.1. Ripetere il giro 1 e 2. M.1 mostra 3 ripetizioni in larghezza e 1 ripetizione in altezza. SUGGERIMENTO PER PRENDERE LE MISURE: Per via del peso del filato, tutte le misure devono essere prese tenendo il lavoro in verticale, altrimenti il capo risulterebbe troppo lungo una volta indossato. DIMINUZIONI: Diminuire 1 ripetizione nel X.1, oppure ½ ripetizione nel X.2. Diminuire così all’inizio del giro: Sostituire 1 ripetizione con 6 m.bss e ½ ripetizione con 3 m.bss. Diminuire così alla fine del giro: Girare il lavoro quando rimane o 1 oppure ½ ripetizione. AUMENTI (maniche): Aumentare ½ ripetizione. Aumentare facendo 6/7 cat anziché di 3, vedere X.3. -------------------------------------------------------- -------------------------------------------------------- DIETRO: Lavorare 120-132-144-156-168-180 cat (incluse 8 cat per girare) con l’uncinetto 3,5 ed il filo blu. Lavorare 1 m.a nella 9° cat dall’uncinetto, * 2 cat, saltare 2 cat, 1 m.a nella cat seguente *, ripetere da *-* = 39-43-47-51-55-59 m.a. Continuare con M.1 (1 giro è ora lavorato, iniziare il 2° giro) = 19-21-23-25-27-29 ripetizioni. Quando il lavoro misura 10 e 20 cm – Vedere SUGGERIMENTO PER PRENDERE LE MISURE, diminuire ½ ripetizione ad ogni lato - vedere DIMINUZIONI e vedere X.2 = 17-19-21-23-25-27 ripetizioni. Quando il lavoro misura 35-36-37-38-39-40 cm diminuire per gli scalfi ad ogni lato ogni giro così: 1 ripetizione 1-1-2-2-2-2 volte, poi ½ ripetizione 0-2-2-2-4-4 volte = 15-15-15-17-17-19 ripetizioni. Quando il lavoro misura 52-54-56-58-60-62 cm lavorare 1 giro solo sulle 6-6-6-6-6-7 ripetizioni ad ogni lato (non lavorare sopra le 3-3-3-5-5-5 ripetizioni centrali = scollatura). Lavorare ancora 1 giro, tagliare il filo, il lavoro misura ca 54-56-58-60-62-64 cm. DAVANTI DESTRO: LEGGERE ATTENTAMENTE TUTTO IL SEGUITO PRIMA DI CONTINUARE! Lavorare 66-72-78-84-90-96 cat (incluse 8 cat per girare) con l’uncinetto 3,5 ed il filo blu. Cominciare in mezzo davanti e lavorare verso il lato. Lavorare 1 m.a nella 9° cat dall’uncinetto, * 2 cat, saltare 2 cat, 1 m.a nella cat seguente * ripetere da *-* = 21-23-25-27-29-31 m.a. Continuare con M.1 (1° giro è ora lavorato, cominciare con il 2° giro) = 10-11-12-13-14-15 ripetizioni. Quando il lavoro misura 15 e 25 cm diminuire al lato come per il dietro. ALLO STESSO TEMPO, quando il lavoro misura 23-24-25-26-27-28 cm, diminuire per lo scollo ogni 2 giri in mezzo davanti così: diminuire ½ ripetizione 4-4-4-6-6-6 volte. ALLO STESSO TEMPO, quando il lavoro misura 35-36-37-38-39-40 cm diminuire per lo scalfo come per il dietro. Dopo tutte le diminuzioni rimangono 6-6-6-6-6-7 ripetizioni per la spalla. Continuare finché il lavoro non misuri 54-56-58-60-62-64 cm, tagliare e fissare il filo. DAVANTI SINISTRO: Lavorare come il davanti destro. MANICHE: Lavorare 60-60-66-66-72-72 cat (incluse 8 cat per girare) con l’uncinetto 3,5 ed il filo blu. Lavorare 1 m.a nella 9° cat dall’uncinetto, * 2 cat, saltare 2 cat, 1 m.a nella cat seguente *, ripetere da *-* = 19-19-21-21-23-23 m.a. Continuare con M.1 (1° giro è ora lavorato, cominciare con il 2° giro) = 9-9-10-10-11-11 ripetizioni. Quando il lavoro misura 6 cm aumentare ½ ripetizione ad ogni lato, ripetere gli aumenti ogni 12-7-7-7-7-7 cm altre 3-5-5-5-5-5 volte - vedere AUMENTI = 13-15-16-16-17-17 ripetizioni. Quando il lavoro misura 48-47-47-46-46-45 cm (misura più corta per le taglie più grandi per causa dell’arrotondamento della manica più lunga e le spalle più larghe) diminuire 1 ripetizione ad ogni lato per l’arrotondamento della manica. Diminuire poi ½ ripetizione ad ogni lato ogni 2 giri in totale 0-0-0-0-2-2 volte, poi ogni giro 6-7-8-8-6-6 volte = 5-6-6-6-7-7 ripetizioni. Lavorare finché il lavoro non misuri 57-57-58-58-59-59 cm, tagliare e fissare il filo. CONFEZIONE: Cucire le spalle. Attaccare le maniche. Cucire le maniche e i lati - cucire bordo contro bordo con piccoli bei punti. BORDO ALL’UNCINETTO: Lavorare un bordo con l’uncinetto 3,5 con il filo grigio eco chiaro salendo verso l’alto lungo il bordo del davanti destro, intorno alla scollatura, giù verso il basso del davanti sinistro, intorno il basso ed intorno alle aperture delle maniche così: 1 m.b, * saltare 2 cm, 4 m.a.d nella cat seguente, 2 cat, 4 m.a.d nella stessa m, saltare 2 cm, 1 m.b nella m seguente *, ripetere da *-* e terminare con 1 m.bss nella 1° m.b. FODERA BOTTONE: Fare 1 fodera per bottone con l’uncinetto 3,5 con il chiaro eco chiaro così: Lavorare 2 cat, poi 16 m.a nella 1° delle 2 cat, terminare con 1 m.bss in alto della 1° m.a (= 1° GIRO). 2° GIRO: Lavorare 1 m.b in ogni m.a e terminare con 1 m.bss nella 1° m.b del giro. 3° GIRO: Lavorare *1 m.a nella m seguente, saltare la m seguente*, ripetere da *-* e terminare con 1 m.bss nella 1° m.a del giro = 8 m.a. Inserire il bottone nella fodera, imbastire intorno al bordo e stringere. Attaccare il bottone sul davanti sinistro, poco prima l’inizio della diminuzione per la scollatura. Utilizzare i buchi del motivo per abbottonare. |
||||||||||
Spiegazioni del diagramma |
||||||||||
|
||||||||||
 |
||||||||||
 |
||||||||||
Avete terminato questo modello?Allora taggate le vostre foto con #dropspattern #whisperscardigan o inviatele alla #dropsfan gallery. Avete bisogno di aiuto con questo modello?Troverete 6 video tutorial, una sezione per i commenti/domande e molto altro guardando il modello su www.garnstudio.com © 1982-2026 DROPS Design A/S. Ci riserviamo tutti i diritti. Questo documento, compreso tutte le sue sotto-sezioni, è protetto dalle leggi sul copyright. Potete leggere quello che potete fare con i nostri modelli alla fine di ogni modello sul nostro sito. |
||||||||||


Con oltre 40 anni di esperienza nel design di modelli di maglia e uncinetto, DROPS Design offre la più estesa collezione di modelli gratuiti su internet - tradotti in 17 lingue. Ad oggi vi possiamo fornire 324 cataloghi e 12290 modelli - 9561 dei quali sono tradotti in Italiano.
Ci stiamo impegnando molto per darvi il meglio che vi possiamo offrire in termini di maglia e uncinetto, ispirazioni e consigli così come filati di grande qualità ad un prezzo incredibile! Volete utilizzare i nostri modelli per qualcosa d'altro oltre al vostro uso personale? Potete leggere tutto ciò che è consentito nel testo sul Copyright in basso su tutte le pagine dei nostri modelli. Buon lavoro!
Lasciare un commento sul modello DROPS 136-13
Noi saremmo felici di ricevere i tuoi commenti e opinioni su questo modello!
Se vuoi fare una domanda, fai per favore attenzione a selezionare la categoria corretta nella casella qui sotto per velocizzare il processo di risposta. I campi richiesti sono indicati da *.