
Categorie popolari
State cercando un filato?


Commenti / Domande (190)
![]() Martine ha scritto:
Martine ha scritto:
Ik wil graag de mouwen langer maken. Op welke manier kan ik dat doen?
28.05.2023 - 08:02DROPS Design ha risposto:
Dag Martine,
Dit kun je eenvoudig doen door meer toeren te haken en de meerderingen anders te verdelen, dus dat je in het begin, bij de onderarm niet op elke toer meerdert. Zorg er wel voor dat de meerderingen aan beide kant komen, anders gaat je mouwnaad scheef lopen.
29.05.2023 - 15:35
![]() Jasmin Schneider ha scritto:
Jasmin Schneider ha scritto:
Hallo, ich habe eine Frage zur Anleitung 138-6 Wie muss ich das verstehen bei der KANTE: Oben am Rückenteil je 1 Stb in jedes Stb, 56-58-60-64 Lm, 1 Stb in jede M. an der unteren Kante des Rückenteils, 56-58-60-64 Lm ? Ich muss erst 1 Stb in jedes Stb häkeln. Was hat es dann mit den 56-58-60-64 Lm (Luftmaschen) auf sich?
21.05.2023 - 03:54DROPS Design ha risposto:
Liebe Frau Schneider, diese Luftmaschen werden ein Loch bilden und dieses Loch wird die Armloch; nach diesen Luftmaschen häkeln Sie Stäbchen in dem unteren Kant (Anfang vom Rückenteil) und häkeln Sie genauso viele Luftmaschen für das 2. Armloch. Viel Spaß beim häkeln!
22.05.2023 - 08:22
![]() Mel ha scritto:
Mel ha scritto:
Ich habe das Bolero Jäckchen in genau der gleichen Farbe und Wolle gehäkelt und verzweifelt ein bisschen am Ärmel. Welcher Teil des Ärmels soll an den Ausschnitt für den Arm am Jäckchen genäht werden? Wo ist oben und wo unten? Der Armausschnitt erscheint mir zu groß.
21.04.2023 - 21:33DROPS Design ha risposto:
Liebe Mel, die Ärmel werden von unten nach oben gehäkelt; das obere Teil (von 24-20 cm biz zur Ende) wird dann am Armauschnitt angenäht. Viel Spaß beim häkeln!
24.04.2023 - 09:27
![]() Kathleen ha scritto:
Kathleen ha scritto:
It says 1 dbl crochet in each of the next chain 3 skip 1 chain until last 2 for the back piece. I double crochet chained 3, skipped one chain but its not correct because I only have 48 dbl crochet. Could you explain what that part of the pattern means? Thank you
28.03.2023 - 16:13DROPS Design ha risposto:
Dera Kathleen, work the 78 chains as follows: 1 dc in the 4th ch from hook (= 2 dc/4 ch), then work a total of 18 times from *-*, ie *1 dc in each of the next 3 ch, skip 1 ch*, (= 3 dc x 18= 54 dc / 4 ch x 18=72 ch), finish with 1 dc in each of the last 2 chains (2 dc/2 ch) = 2+54+2=58 dc worked over 4+72+2=78 chains. Happy crocheting!
29.03.2023 - 09:27
![]() Magalie ha scritto:
Magalie ha scritto:
Bonjour. Je suis à la partie bordure. Comment peut-on ne faire que 42-44-46-48 brides dans la chaînette qui fait 56-58-60-64 mailles en l'air ? Merci par avance pour votre réponse
22.06.2022 - 16:34DROPS Design ha risposto:
Bonjour Magalie, tout simplement en sautant des mailles en l'air à intervalles réguliers; comme les chainettes sont souvent plus serrées que les rangs crochetés ensuite, on monte ici davantage de mailles en l'air que l'on a besoin de mailles en largeur, ainsi, on obtient la largeur souhaitée avec le nombre de brides. Bon crochet!
23.06.2022 - 08:28
![]() Zehren Christiane ha scritto:
Zehren Christiane ha scritto:
Je ne comprends?? commet est ce possible ? pas le calcul des augmentations de la bordure on part de 204 mailles dans la plus petite tailles . on augmente de 30 mailles et on obtient 294 mailles Comment est ce possible ? C 'est pareil pour toutes les tailles! je suis bloquée merci de votre réponse.
14.02.2022 - 10:31DROPS Design ha risposto:
Bonjour Mme Zehren, vous commencez la bordure avec 204 brides et, à 5 cm, vous augmentez 30 mailles = 234 mailles; à 10 cm, vous augmentez 30 mailles = 264 mailles et à 15 cm, vous augmentez 30 mailles = 294 mailles. Bon crochet!
14.02.2022 - 10:47
![]() Barbara Klemp ha scritto:
Barbara Klemp ha scritto:
Can this be made longer than the picture shown? Thank you so much for your time, Barbara
21.10.2021 - 07:15DROPS Design ha risposto:
Dear Mrs Klemp, this might be tricky to make it longer because of its construction, but you will find all our crocheted jackets with rounded front edges here - do not hesitate to use other keywords/tags if needed. Happy crocheting!
21.10.2021 - 11:15
![]() Stephanie ha scritto:
Stephanie ha scritto:
Bonjour 12 pelotes est trop juste pour mon ouvrage. J’ai encore les bordures des manches a faire et le montage, et je n’ai plus de fil !
11.09.2021 - 10:40DROPS Design ha risposto:
Bonjour Stéphanie, nous sommes désolés d'apprendre ça, vous crochetez bien en Cotton Light et vous avez bien le bon échantillon/la même tension tout du long? soit 17 mailles (brides ou mailles serrées) = 10 cm de large? Merci!
13.09.2021 - 09:25
![]() Mya ha scritto:
Mya ha scritto:
Hi there! I'm just starting this pattern, and I don't understand what it means when it says, "Work 1 dc in 4th ch from hook, * 1 dc in each of the next ch 3, skip 1 ch *, repeat from *-*, and finish with 1 dc in each of the last 2-2-2-3 ch = 58-64-70-74 dc." Can you please specify what "1 dc in each of the next ch 3, skip 1 ch *, repeat from *-*, and finish with 1 dc in each of the last 2-2-2-3 ch" means please? Thank you.
26.08.2021 - 04:39DROPS Design ha risposto:
Dear Mya, each number refers to each size, eg in first size you will get 58 dc, in 2nd size 64 dc, etc... Since chain stitches are often too tight, you cast on here more chains than you need dc on first row, this means just work as explained: 1 dc in 4th chain from hook (-=first 3 chains = 1st dc, read CROCHET INFO), then crochet *1 dc in each of the next 3 chains, skip 1 ch*, repeat from *-* until 2 or 3 chains remain (see size) and finish the row with 1 dc in each of these 2 or 3 chains, you should have now 58-64-70-74 dc. Happy crocheting!
26.08.2021 - 08:48
![]() Rebecca W ha scritto:
Rebecca W ha scritto:
I am trying to make the sleeves but I do not understand, nor can I find guidance on what is meant by "Work 1 tr in every tr back and forth" Does this mean one row in the front of stitches and then one row in the back of stitches? Or does it mean I work two stitches into one stitch but one front and one back? Please help!
16.08.2021 - 19:36DROPS Design ha risposto:
Dear Rebecca, it means that you should continue to crochet back and forth (as opposed to on the round), and crochet 1 treble into each treble. Happy Stitching!
17.08.2021 - 00:31
|
||||||||||
Country Rose#countryrosebolero |
||||||||||
 |
 |
|||||||||
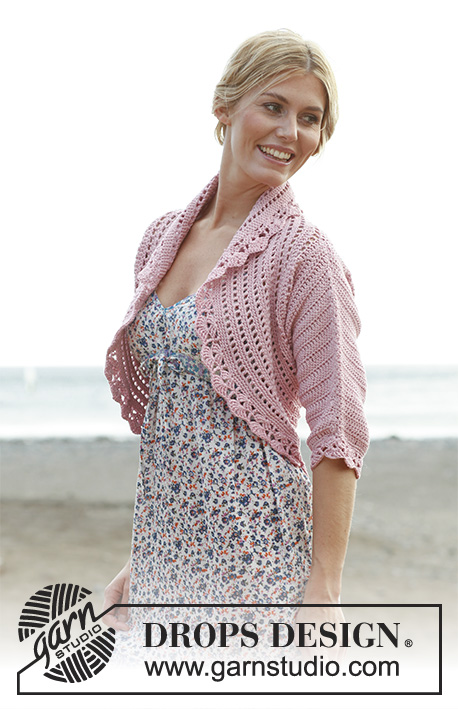
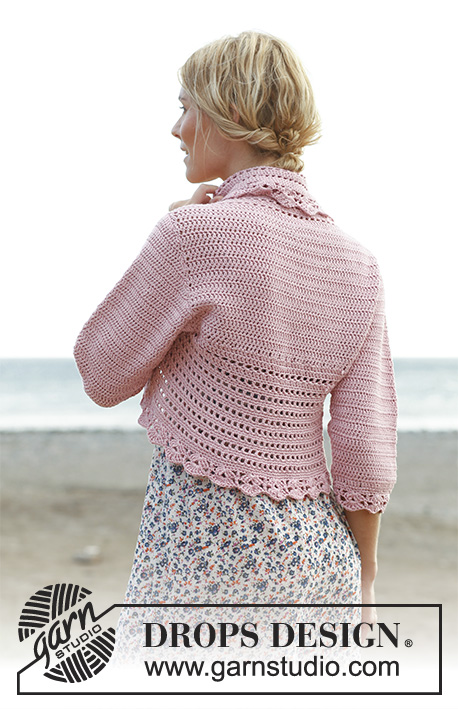
Giacca all’uncinetto DROPS in "Cotton Light" e "Glitter" Taglia: Dalla S alla XXXL.
DROPS 138-6 |
||||||||||
|
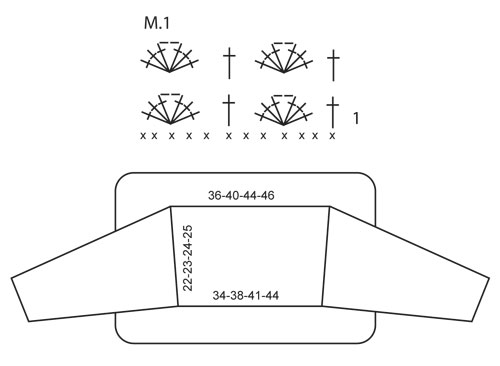
INFO UNCINETTO: Sostituire la 1° m.a. di ogni riga con 3 cat. Sostituire la 1° m.b. di ogni giro con 1 cat. Terminare ogni giro di m.b. con 1 m.bss. nella 1° cat. d’inizio giro. Sostituire la 1° m.a. di ogni giro con 3 cat. Terminare ogni giro di m.a. con 1 m.bss. nella 3° cat. di inizio giro. AUMENTI: Aumentare lavorando 2 m.a. nella 1° e nell’ultima m.a. della riga. DIMINUZIONI: Diminuire all’inizio della riga come segue: lavorare 1 m.bss. su tante m.a. quanto sono le m. da diminuire. Diminuire alla fine della riga come segue: quando rimangono da lavorare il numero di m.a da diminuire, girare il lavoro. -------------------------------------------------------- DIETRO: Avviare senza tendere troppo il filo una catena di 78-86-94-99 cat. con l’uncinetto nr. 4 con 1 filo di Cotton Light e 1 filo di Glitter (= 2 fili insieme). Lavorare 1 m.a. nella 4° cat. dall’uncinetto, * 1 m.a. in ognuna delle 3 cat. seguenti, saltare 1 cat. *, ripetere da * a * e terminare con 1 m.a. in ognuna delle ultime 2-2-2-3 cat = 58-64-70-74 m.a. Poi lavorare 1 m.a. in ogni m.a. - VEDERE INFO UNCINETTO. Quando il lavoro misura 7 cm, aumentare 1 m.a. su entrambi i lati - LEGGERE AUMENTI, ripetere l’aum. quando il lavoro misura 15 cm = 62-68-74-78 m.a. Lavorare finché il lavoro non misura 22-23-24-25 cm. BORDO GRANDE: Lavorare 1 m.a. in ogni m.a. sulla parte superiore del dietro, lavorare 56-58-60-64 cat, 1 m.a. in ogni m.a. lungo il basso del dietro, lavorare 56-58-60-64 cat e terminare con 1 m.bss. nella 1° m.a. del lato superiore del dietro. Lavorare 1 m.a. in ogni m.a. del dietro, negli archi di catene lavorare 42-44-46-48 m.a. = 204-220-236-248 m.a. Continuare a lavorare in tondo come di seguito: GIRO 1: 1 m.a. nella 1° m.a., * 1 cat., saltare 1 m.a, 1 m.a. nella m.a. seguente*, ripetere da * a * e terminare con 1 cat., saltare 1 m.a. e 1 m.bss. per chiudere il giro. GIRO 2: 1 m.b. in ogni m.a. e 1 m.b. in ogni cat. GIRO 3: 1 m.b. in ogni m.b. Ripetere questi 3 giri, ALLO STESSO TEMPO quando il bordo misura 5, 10 e 15 cm (assicurarsi di trovarsi in un giro di m.b), aum. 30-30-30-32 m.b. distribuite uniformemente nel giro - LEGGERE AUMENTI = 294-310-326-344 m.b. Quando il bordo misura 17-18-19-20 cm (assicurarsi che il giro successivo sia a m.b.), lavorare un giro a m.b. e ALLO STESSO TEMPO aum. di 0-2-4-4 m.b. distribuite uniformemente = 294-312-330-348 m.a. Poi lavorare seguendo il diagramma M.1 NOTA! Iniziare a lavorare sulla riga 1 sul diagramma. Lavorare il diagramma M.1 per 1 volta in altezza, tagliare e fissare il filo. MANICA: Avviare senza tendere il filo 67-72-72-77 cat. con l’uncinetto nr. 4 usando 1 filo di Cotton Light e un filo di Glitter (= 2 fili insieme). Lavorare 1 m.a. nella 4° cat. dall’uncinetto (= 2 m.a.), *saltare 1 cat., 1 m.a. nelle 4 cat. seguenti, *, ripetere da * a * e finire saltando 1 cat. e lavorando 1 m.a. in ognuna delle ultime 2 cat. = 52-56-56-60 m.a. Lavorare 1 m.a. in ogni m.a. avanti e indietro. ALLO STESSO TEMPO aum. 1 m.a. su entrambi i lati ogni riga per un totale di 13-14-16-17 volte, leggere AUMENTI = 78-84-88-94 m.a. Quando il lavoro misura 24-24-22-20 cm (la manica è più corta nelle taglie più grandi perché l’ampiezza della spalla è maggiore) dim. per lo scalfo ad ogni lato su tutte le righe - LEGGERE CONSIGLIO DIMINUZIONI: dim. 4 m.a. per 1 volta, poi 3-3-2-2 m.a. ad entrambi i lati finché il lavoro non misura 31-33-33-34 cm, ora dim. di 4 m.a. per 1 volta su entrambi i lati. Tagliare il filo e fissarlo. Cucire insieme la manica con piccoli punti. Lavorare intorno alla parte inferiore della manica come segue: lavorare 1 giro con 1 m.b. in ogni m.a., e allo stesso tempo aumentare 2-4-4-0 m.b. distribuite uniformemente = 54-60-60-60 m.b. Poi eseguire il diagramma M.1 per 1 volta in altezza. Tagliare il filo e fissarlo. CONFEZIONE: Cucire le maniche negli scalfi. |
||||||||||
Spiegazioni del diagramma |
||||||||||
|
||||||||||
 |
||||||||||
Avete terminato questo modello?Allora taggate le vostre foto con #dropspattern #countryrosebolero o inviatele alla #dropsfan gallery. Avete bisogno di aiuto con questo modello?Troverete 8 video tutorial, una sezione per i commenti/domande e molto altro guardando il modello su www.garnstudio.com © 1982-2026 DROPS Design A/S. Ci riserviamo tutti i diritti. Questo documento, compreso tutte le sue sotto-sezioni, è protetto dalle leggi sul copyright. Potete leggere quello che potete fare con i nostri modelli alla fine di ogni modello sul nostro sito. |
||||||||||


Con oltre 40 anni di esperienza nel design di modelli di maglia e uncinetto, DROPS Design offre la più estesa collezione di modelli gratuiti su internet - tradotti in 17 lingue. Ad oggi vi possiamo fornire 324 cataloghi e 12290 modelli - 9561 dei quali sono tradotti in Italiano.
Ci stiamo impegnando molto per darvi il meglio che vi possiamo offrire in termini di maglia e uncinetto, ispirazioni e consigli così come filati di grande qualità ad un prezzo incredibile! Volete utilizzare i nostri modelli per qualcosa d'altro oltre al vostro uso personale? Potete leggere tutto ciò che è consentito nel testo sul Copyright in basso su tutte le pagine dei nostri modelli. Buon lavoro!
Lasciare un commento sul modello DROPS 138-6
Noi saremmo felici di ricevere i tuoi commenti e opinioni su questo modello!
Se vuoi fare una domanda, fai per favore attenzione a selezionare la categoria corretta nella casella qui sotto per velocizzare il processo di risposta. I campi richiesti sono indicati da *.