
Categorie popolari
State cercando un filato?


Commenti / Domande (190)
![]() Annina ha scritto:
Annina ha scritto:
Hallo! ich häkle den Bolero in Größe L. Das Rückenteil und die Luftmaschenketten sind fertig. Ich verstehe jedoch die Maschenanzahl nicht. Die Oberkante am Rücken hatte zuletzt 68 Stb, die Unterkante hat nach Anleitung 86 (Luft)maschen, in jede soll ein Stäbchen. Hinzu kommen 2*44 Stb in den Luftmaschenbögen. 68+86+44+44 =242, in der Anleitung steht jedoch, dass es nur 220 Stb sein sollen. Wo ist mein Denkfehler? Vielen Dank für Eure Hilfe! Annina
21.04.2014 - 01:14DROPS Design ha risposto:
Liebe Annina, am unteren Rand des Rückenteils sind es nur 64 Stb, denn Sie haben ja bis zum oberen Rand, an dem es 68 Stb sind, 4 Stb zugenommen. Sie häkeln also: 68 Stb + 44 Stb (um den Lm-Bogen) + 64 Stb + 44 Stb (um den Lm-Bogen) = 220 Stb.
22.04.2014 - 13:42
![]() Annina ha scritto:
Annina ha scritto:
Hallo! ich häkle den Bolero in Größe L. Das Rückenteil und die Luftmaschenketten sind fertig. Ich verstehe jedoch die Maschenanzahl nicht. Die Oberkante am Rücken hatte zuletzt 68 Stb, die Unterkante hat nach Anleitung 86 (Luft)maschen, in jede soll ein Stäbchen. Hinzu kommen 2*44 Stb in den Luftmaschenbögen. 68+86+44+44 =242, in der Anleitung steht jedoch, dass es nur 220 Stb sein sollen. Wo ist mein Denkfehler? Vielen Dank für Eure Hilfe! Annina
21.04.2014 - 01:13DROPS Design ha risposto:
Antwort siehe oben. :-)
22.04.2014 - 13:43
![]() Anna ha scritto:
Anna ha scritto:
I am ready to sew in the sleeves and in the picture it looks like the seam of the sleeve is on the top is that right? This pattern is beautiful as is so many of the other ones. Thanks
12.04.2014 - 03:49DROPS Design ha risposto:
Dear Anna, seam for sleeve should be under arm as usual, and top of cap sleeve at the top of armhole. Happy crocheting!
14.04.2014 - 15:09
![]() Jyoti Mehta ha scritto:
Jyoti Mehta ha scritto:
I am making it in medium size. Although I'm following the numbers on the pattern instructions, the arm holes look way too big for the sleeves. What can I do?
08.04.2014 - 18:00DROPS Design ha risposto:
Dear Mrs Mehta, to shorten armholes, you can adjust working less rows on back piece and then cast on less ch for armhole on edge. Happy crocheting!
09.04.2014 - 09:22
![]() Jyoti Mehta ha scritto:
Jyoti Mehta ha scritto:
I am making it in medium size. Although I'm following the numbers on the pattern instructions, the arm holes look way too big for the sleeves. What can I do?
08.04.2014 - 18:00
![]() Elke Pusch ha scritto:
Elke Pusch ha scritto:
Habe Probleme mit den 44 Stb in die LM-Kette. Die Stb einfach um die Kette oder wahllos in die 58 LM häkeln?
16.03.2014 - 13:02DROPS Design ha risposto:
Liebe Elke, Sie können Sie Stb einfach fortlaufend um die Lm-Kette häkeln, sie legen sich schön nebeneinander.
17.03.2014 - 13:19
![]() Hanneke ha scritto:
Hanneke ha scritto:
Sorry,heb mijn fout al gevonden.
14.03.2014 - 09:42Hanneke ha scritto:
Ik heb 58 st.aan de bovenkant.Haak 44 st.in de lossenboog.ik kom totaal aan 204 stokjes en niet de 220 die bij mijn maat staan.Wat moet het nu zijn?Kunt u mij dit uitleggen?of hoe ik het moet haken.
12.03.2014 - 22:51DROPS Design ha risposto:
Hoi Hanneke. Je hebt 58 stk aan de onderkant en 62 stk aan de bovenkant van het achterpand en je haakt 42 stk in beide l-lussen = 58+62+42+42 = 204.
14.03.2014 - 16:56
![]() Karen ha scritto:
Karen ha scritto:
Having trouble understanding the beginning of the edge piece. Not sure where the upper side of back piece and bottom side of back piece is located. Love the pattern and this far along and would like to finish. Thanks for any help you might give.
15.02.2014 - 10:58DROPS Design ha risposto:
Dear Karen, bottom of back piece is fundation ch and upper back piece is last row worked for back piece. you ch each side for armholes. Happy crocheting!
17.02.2014 - 08:59
![]() M. Wicht ha scritto:
M. Wicht ha scritto:
Hallo, ich habe eine Frage bevor ich weiterstricke und eventuell aufziehen muß. Kante: SIch habe 60 Lm, in diesen Luftmaschenbogen habe ich 46 Stb gehäkelt nun habe ich schon mehrere Reihen darübergehäkelt und es wird sehr wellig durch die vielen Luftmaschen (60). Ist das normal?? Bitte um Antwort. Danke im voraus. Mit freundlichem Gruß M. Wicht
04.02.2014 - 12:39DROPS Design ha risposto:
Liebe Frau Wicht, die höhere Anzahl Lm braucht man, damit die Kante am Armloch nicht zu fest wird. Evtl sind Ihre Luftmaschen doch etwas zu locker, probieren Sie bitte, bis es ein schönes Resultat gibt. Beim Einsetzen der Ärmel kommt die Lm-Kette aber in die Naht und Sie können dann noch etwas korrigieren.
05.02.2014 - 10:28
|
||||||||||
Country Rose#countryrosebolero |
||||||||||
 |
 |
|||||||||
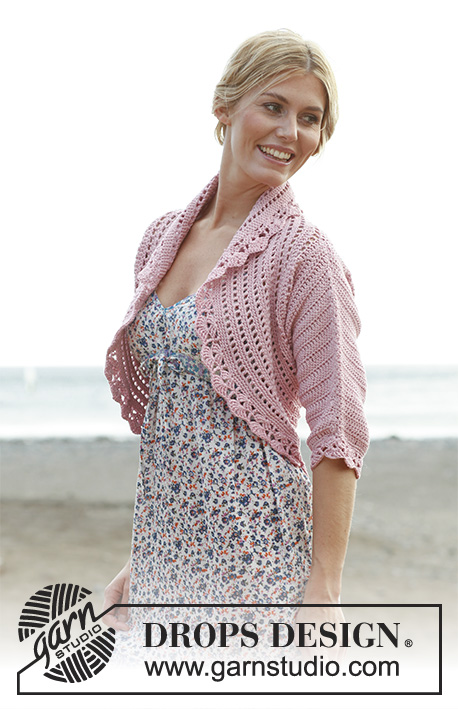
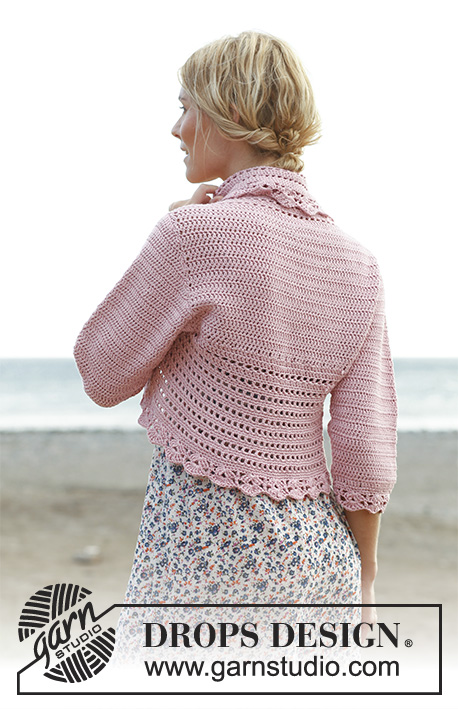
Giacca all’uncinetto DROPS in "Cotton Light" e "Glitter" Taglia: Dalla S alla XXXL.
DROPS 138-6 |
||||||||||
|
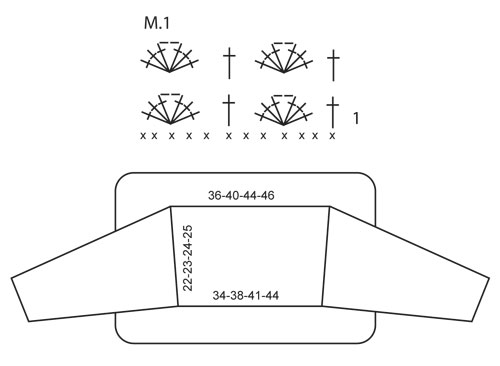
INFO UNCINETTO: Sostituire la 1° m.a. di ogni riga con 3 cat. Sostituire la 1° m.b. di ogni giro con 1 cat. Terminare ogni giro di m.b. con 1 m.bss. nella 1° cat. d’inizio giro. Sostituire la 1° m.a. di ogni giro con 3 cat. Terminare ogni giro di m.a. con 1 m.bss. nella 3° cat. di inizio giro. AUMENTI: Aumentare lavorando 2 m.a. nella 1° e nell’ultima m.a. della riga. DIMINUZIONI: Diminuire all’inizio della riga come segue: lavorare 1 m.bss. su tante m.a. quanto sono le m. da diminuire. Diminuire alla fine della riga come segue: quando rimangono da lavorare il numero di m.a da diminuire, girare il lavoro. -------------------------------------------------------- DIETRO: Avviare senza tendere troppo il filo una catena di 78-86-94-99 cat. con l’uncinetto nr. 4 con 1 filo di Cotton Light e 1 filo di Glitter (= 2 fili insieme). Lavorare 1 m.a. nella 4° cat. dall’uncinetto, * 1 m.a. in ognuna delle 3 cat. seguenti, saltare 1 cat. *, ripetere da * a * e terminare con 1 m.a. in ognuna delle ultime 2-2-2-3 cat = 58-64-70-74 m.a. Poi lavorare 1 m.a. in ogni m.a. - VEDERE INFO UNCINETTO. Quando il lavoro misura 7 cm, aumentare 1 m.a. su entrambi i lati - LEGGERE AUMENTI, ripetere l’aum. quando il lavoro misura 15 cm = 62-68-74-78 m.a. Lavorare finché il lavoro non misura 22-23-24-25 cm. BORDO GRANDE: Lavorare 1 m.a. in ogni m.a. sulla parte superiore del dietro, lavorare 56-58-60-64 cat, 1 m.a. in ogni m.a. lungo il basso del dietro, lavorare 56-58-60-64 cat e terminare con 1 m.bss. nella 1° m.a. del lato superiore del dietro. Lavorare 1 m.a. in ogni m.a. del dietro, negli archi di catene lavorare 42-44-46-48 m.a. = 204-220-236-248 m.a. Continuare a lavorare in tondo come di seguito: GIRO 1: 1 m.a. nella 1° m.a., * 1 cat., saltare 1 m.a, 1 m.a. nella m.a. seguente*, ripetere da * a * e terminare con 1 cat., saltare 1 m.a. e 1 m.bss. per chiudere il giro. GIRO 2: 1 m.b. in ogni m.a. e 1 m.b. in ogni cat. GIRO 3: 1 m.b. in ogni m.b. Ripetere questi 3 giri, ALLO STESSO TEMPO quando il bordo misura 5, 10 e 15 cm (assicurarsi di trovarsi in un giro di m.b), aum. 30-30-30-32 m.b. distribuite uniformemente nel giro - LEGGERE AUMENTI = 294-310-326-344 m.b. Quando il bordo misura 17-18-19-20 cm (assicurarsi che il giro successivo sia a m.b.), lavorare un giro a m.b. e ALLO STESSO TEMPO aum. di 0-2-4-4 m.b. distribuite uniformemente = 294-312-330-348 m.a. Poi lavorare seguendo il diagramma M.1 NOTA! Iniziare a lavorare sulla riga 1 sul diagramma. Lavorare il diagramma M.1 per 1 volta in altezza, tagliare e fissare il filo. MANICA: Avviare senza tendere il filo 67-72-72-77 cat. con l’uncinetto nr. 4 usando 1 filo di Cotton Light e un filo di Glitter (= 2 fili insieme). Lavorare 1 m.a. nella 4° cat. dall’uncinetto (= 2 m.a.), *saltare 1 cat., 1 m.a. nelle 4 cat. seguenti, *, ripetere da * a * e finire saltando 1 cat. e lavorando 1 m.a. in ognuna delle ultime 2 cat. = 52-56-56-60 m.a. Lavorare 1 m.a. in ogni m.a. avanti e indietro. ALLO STESSO TEMPO aum. 1 m.a. su entrambi i lati ogni riga per un totale di 13-14-16-17 volte, leggere AUMENTI = 78-84-88-94 m.a. Quando il lavoro misura 24-24-22-20 cm (la manica è più corta nelle taglie più grandi perché l’ampiezza della spalla è maggiore) dim. per lo scalfo ad ogni lato su tutte le righe - LEGGERE CONSIGLIO DIMINUZIONI: dim. 4 m.a. per 1 volta, poi 3-3-2-2 m.a. ad entrambi i lati finché il lavoro non misura 31-33-33-34 cm, ora dim. di 4 m.a. per 1 volta su entrambi i lati. Tagliare il filo e fissarlo. Cucire insieme la manica con piccoli punti. Lavorare intorno alla parte inferiore della manica come segue: lavorare 1 giro con 1 m.b. in ogni m.a., e allo stesso tempo aumentare 2-4-4-0 m.b. distribuite uniformemente = 54-60-60-60 m.b. Poi eseguire il diagramma M.1 per 1 volta in altezza. Tagliare il filo e fissarlo. CONFEZIONE: Cucire le maniche negli scalfi. |
||||||||||
Spiegazioni del diagramma |
||||||||||
|
||||||||||
 |
||||||||||
Avete terminato questo modello?Allora taggate le vostre foto con #dropspattern #countryrosebolero o inviatele alla #dropsfan gallery. Avete bisogno di aiuto con questo modello?Troverete 8 video tutorial, una sezione per i commenti/domande e molto altro guardando il modello su www.garnstudio.com © 1982-2026 DROPS Design A/S. Ci riserviamo tutti i diritti. Questo documento, compreso tutte le sue sotto-sezioni, è protetto dalle leggi sul copyright. Potete leggere quello che potete fare con i nostri modelli alla fine di ogni modello sul nostro sito. |
||||||||||


Con oltre 40 anni di esperienza nel design di modelli di maglia e uncinetto, DROPS Design offre la più estesa collezione di modelli gratuiti su internet - tradotti in 17 lingue. Ad oggi vi possiamo fornire 324 cataloghi e 12290 modelli - 9561 dei quali sono tradotti in Italiano.
Ci stiamo impegnando molto per darvi il meglio che vi possiamo offrire in termini di maglia e uncinetto, ispirazioni e consigli così come filati di grande qualità ad un prezzo incredibile! Volete utilizzare i nostri modelli per qualcosa d'altro oltre al vostro uso personale? Potete leggere tutto ciò che è consentito nel testo sul Copyright in basso su tutte le pagine dei nostri modelli. Buon lavoro!
Lasciare un commento sul modello DROPS 138-6
Noi saremmo felici di ricevere i tuoi commenti e opinioni su questo modello!
Se vuoi fare una domanda, fai per favore attenzione a selezionare la categoria corretta nella casella qui sotto per velocizzare il processo di risposta. I campi richiesti sono indicati da *.