
Categorie popolari
State cercando un filato?


Commenti / Domande (190)
![]() Louise ha scritto:
Louise ha scritto:
Hello. I am a little confused on this part because after starting the edge piece of this pattern, I am supposed to do the following (I am making a size S/M): Work 1 dc in every dc from back piece, in ch-spaces work (42)-44-46-48 dc = (204)-220-236-248 dc. Now when I started the chain stitches, I did 56 just like what the pattern asked for, but why the 42 dc? Am I missing something? How does that work?
09.11.2025 - 16:47
![]() Anneli Kulju ha scritto:
Anneli Kulju ha scritto:
Kiitos, sen ymmärrän. Mutta vielä, kjs kaareen virkataan vaan 46 p, ja kjs on 60, miten siitä tulee hyvä.
13.05.2025 - 17:21DROPS Design ha risposto:
Ketjusilmukat ovat usein tiukemmat kuin pylväät, ja tästä syystä ketjusilmukoita virkataan aluksi enemmän kuin seuraavalla kerroksella virkataan pylväitä.
14.05.2025 - 16:45
![]() Anneli Kulju ha scritto:
Anneli Kulju ha scritto:
Kyllä, mutta siinä ohjeessa on myös 46 p =220 p ... Mitä tuo tarkoittaa.
12.05.2025 - 19:22DROPS Design ha risposto:
Nämä 220 pylvästä ovat koko kerroksen silmukkaluku, eli kerroksella virkataan yhteensä 220 pylvästä.
13.05.2025 - 17:02
![]() Anneli Kulju ha scritto:
Anneli Kulju ha scritto:
Hei. Kun virkkaan selkäkappaleen ympärille, ja kjs kaareen, mitä tarkoittaa, ensin virkataan 46 p=220 p Tarkoittaako tuo, että kjs ķaareen virkataan 220 p +46 p En ymmärrä.
12.05.2025 - 15:32DROPS Design ha risposto:
Hei, virkkaat 1 pylvään selkäkappaleen jokaiseen pylvääseen ja samalla kerroksella virkkaat kumpaankin ketjusilmukkaketjuun 46 pylvästä.
12.05.2025 - 16:57
![]() Anita Lindskog Jönsson ha scritto:
Anita Lindskog Jönsson ha scritto:
Virkar på kantstycket. Virkat varv 1,2 och 3 enligt beskrivning. Mäter 10 cm och skall öka till 310fm. Har ju endast 220 runt om och ökar man med 30blir det 250. Vad gör jag för fel? Står läs ökningstips, där står bara om stolparna ökning.😵💫???
31.05.2024 - 12:51DROPS Design ha risposto:
Hei Anita. Husk at når du har heklet 1.-3. omgang skal alle disse gjentas (ikke bare 3. omgang uten økning). Slik at når du har heklet 3. omgang, starter du på 1. omgang igjen, så 2. omgang, så 3. omgang, så 1. omgang igjen osv. Og når arbeidet måler 5 cm økes det med 30 masker jevnt fordelt (økes på omgangen med bare fastmasker). Så hekles 1. omgang igjen, så 2. omgang, så 3. omgang, så 1. omgang igjen osv. Og når arbeidet måler 10 cm økes det med 30 masker jevnt f. ordelt. mvh DROPS Design
03.06.2024 - 11:48
![]() Sarah ha scritto:
Sarah ha scritto:
Hej. När jag ökar efter 5 cm på kantstycket, från 204 till 234 maskor och sen när jag gör stolparna, ska jag fortsätta göra endast en lösmaska emellan trots att de blir fler iom att jag ökat, om man går efter att man vill ha ”stolphålen” under varandra.
08.01.2024 - 16:49DROPS Design ha risposto:
Hei Sarah. Ikke helt sikker på om jeg skjønte spørsmålet ditt, men man gjentar 1. omg der man hekler 1 luftmaske mellom hver stav. Stavene vil ikke komme 100% rett overfor hverandre. Se på nærbildet av jakken og du at de bare kommer sånn ca over hverandre. mvh DROPS Design
15.01.2024 - 09:34
![]() UmmBilal ha scritto:
UmmBilal ha scritto:
Hi there! If I want to make the same design but for 5 yr old girl, what changes will i have to make. Or can you suggest a similar pattern written for girls?
10.11.2023 - 05:08DROPS Design ha risposto:
Dear UmmBilal, you will find all our boleros for children here, one of them might inspire you. Happy crocheting!
10.11.2023 - 09:37
![]() Jasmin ha scritto:
Jasmin ha scritto:
Hallo, bin in der Anleitung des Ärmels an der Stelle GLEICHZEITIG total 13 Mal bei jeder R. auf beiden Seiten je 1 M. aufnehmen = 78-84-88-94 Stb. Heisst dass 13 Reihen mit 1 Masche je Seite= 2 pro Reihe? Nach 24 cm beidseitig, am Anfang der R. für die Armkugel abk. – 1 Mal 4 Stb , heisst das 1×4 Stb oder 2×1 Stb pro Seite? weiter auf beiden Seiten je 1 Mal 4 Stb abk, heisst das 4 Stb pro Reihe mit jeweils 2 auf jeder Seite oder 8 Stb je Reihe auf jeder Seite 4 Stb?.
16.08.2023 - 23:59DROPS Design ha risposto:
Liebe Jasmin, ja genau dh insgesamt 13 Reihen mit je 1 Zunahmen am Anfang + am Ende jeder dieser Reihen; für die Armkugel sollen Sie am Anfang + am Ende jeder Reihe (Hin- sowie Rück-Reihe) abnehemen bzw abketten damit beide Seite symmetrisch sind, so 4 Stb beidseitig, siehe TIPP ZUM ABNEHMEN: = die 4 Stäbchen beidseitig sind auf 1 Reihe abgenommen. Viel Spaß beim stricken!
17.08.2023 - 09:48
![]() Antonia ha scritto:
Antonia ha scritto:
Hallo, wie soll ich 44 Stäbchen in 58 Luftmaschen häkeln (bei den Armlöchern), ohne das dabei riesige Lücken und Löcher entstehen? Vielen Dank für die Hilfe.
15.08.2023 - 21:57DROPS Design ha risposto:
Liebe Antonia, die Luftmaschen sind oft enger als Die Maschen von den nächsten Reihen deshalb wurden mehr Luftmaschen gehäkelt als man Stäbchen danach braucht; sollten Sie Löcher bekommen, wenn Sie Luftmaschen überspringen, dann häkeln Sie lieber Abnahmen (2 Stäbchen zusammen) anstatt. so regelmäßig verteilt abnehmen, damit am Ende nur 44 Stäbchen sind. Viel Spaß beim häkeln!
16.08.2023 - 09:09
![]() Heather ha scritto:
Heather ha scritto:
I have started making this project and am stuck on the back piece. I see one reply to Mya on 26.08.2021: We skip chains in the starting chain because some people make their starting chains too tight. But mine are fine to work in all of them and skipping chains makes my work into a curve. Is this correct that the bottom where the foundation chain is creates a turn in the whole work so that it is not straight? Is the bottom of the work supposed to be straight or curved? Thank you.
23.07.2023 - 15:52DROPS Design ha risposto:
Dear Heather, what we mean to say is that we usually work more chain stitches than necessary, to compensate in case that we start working too tightly. Therefore, after casting on chain stitches, we will adjust the number of stitches to the correct amount for the piece, which means that we will skip some chain stitches from the cast-on edge. The piece shouldn't get curved; if the chain stitches were worked too loosely, it could form some arcs and form a slight curve. In that case you can adjust the cast-on chain size with the same needle size, use a smaller needle for the foundation chain or cast on less stitches so that the border will be straight. Happy crocheting!
23.07.2023 - 20:14
|
||||||||||
Country Rose#countryrosebolero |
||||||||||
 |
 |
|||||||||
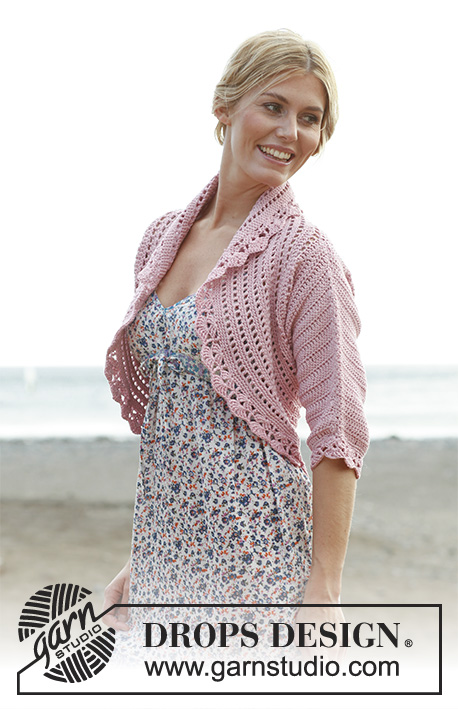
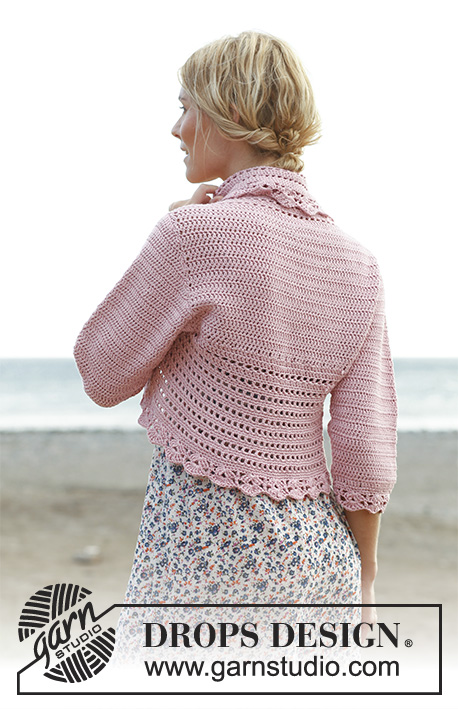
Giacca all’uncinetto DROPS in "Cotton Light" e "Glitter" Taglia: Dalla S alla XXXL.
DROPS 138-6 |
||||||||||
|
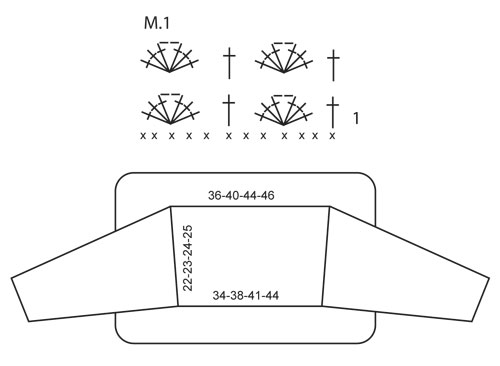
INFO UNCINETTO: Sostituire la 1° m.a. di ogni riga con 3 cat. Sostituire la 1° m.b. di ogni giro con 1 cat. Terminare ogni giro di m.b. con 1 m.bss. nella 1° cat. d’inizio giro. Sostituire la 1° m.a. di ogni giro con 3 cat. Terminare ogni giro di m.a. con 1 m.bss. nella 3° cat. di inizio giro. AUMENTI: Aumentare lavorando 2 m.a. nella 1° e nell’ultima m.a. della riga. DIMINUZIONI: Diminuire all’inizio della riga come segue: lavorare 1 m.bss. su tante m.a. quanto sono le m. da diminuire. Diminuire alla fine della riga come segue: quando rimangono da lavorare il numero di m.a da diminuire, girare il lavoro. -------------------------------------------------------- DIETRO: Avviare senza tendere troppo il filo una catena di 78-86-94-99 cat. con l’uncinetto nr. 4 con 1 filo di Cotton Light e 1 filo di Glitter (= 2 fili insieme). Lavorare 1 m.a. nella 4° cat. dall’uncinetto, * 1 m.a. in ognuna delle 3 cat. seguenti, saltare 1 cat. *, ripetere da * a * e terminare con 1 m.a. in ognuna delle ultime 2-2-2-3 cat = 58-64-70-74 m.a. Poi lavorare 1 m.a. in ogni m.a. - VEDERE INFO UNCINETTO. Quando il lavoro misura 7 cm, aumentare 1 m.a. su entrambi i lati - LEGGERE AUMENTI, ripetere l’aum. quando il lavoro misura 15 cm = 62-68-74-78 m.a. Lavorare finché il lavoro non misura 22-23-24-25 cm. BORDO GRANDE: Lavorare 1 m.a. in ogni m.a. sulla parte superiore del dietro, lavorare 56-58-60-64 cat, 1 m.a. in ogni m.a. lungo il basso del dietro, lavorare 56-58-60-64 cat e terminare con 1 m.bss. nella 1° m.a. del lato superiore del dietro. Lavorare 1 m.a. in ogni m.a. del dietro, negli archi di catene lavorare 42-44-46-48 m.a. = 204-220-236-248 m.a. Continuare a lavorare in tondo come di seguito: GIRO 1: 1 m.a. nella 1° m.a., * 1 cat., saltare 1 m.a, 1 m.a. nella m.a. seguente*, ripetere da * a * e terminare con 1 cat., saltare 1 m.a. e 1 m.bss. per chiudere il giro. GIRO 2: 1 m.b. in ogni m.a. e 1 m.b. in ogni cat. GIRO 3: 1 m.b. in ogni m.b. Ripetere questi 3 giri, ALLO STESSO TEMPO quando il bordo misura 5, 10 e 15 cm (assicurarsi di trovarsi in un giro di m.b), aum. 30-30-30-32 m.b. distribuite uniformemente nel giro - LEGGERE AUMENTI = 294-310-326-344 m.b. Quando il bordo misura 17-18-19-20 cm (assicurarsi che il giro successivo sia a m.b.), lavorare un giro a m.b. e ALLO STESSO TEMPO aum. di 0-2-4-4 m.b. distribuite uniformemente = 294-312-330-348 m.a. Poi lavorare seguendo il diagramma M.1 NOTA! Iniziare a lavorare sulla riga 1 sul diagramma. Lavorare il diagramma M.1 per 1 volta in altezza, tagliare e fissare il filo. MANICA: Avviare senza tendere il filo 67-72-72-77 cat. con l’uncinetto nr. 4 usando 1 filo di Cotton Light e un filo di Glitter (= 2 fili insieme). Lavorare 1 m.a. nella 4° cat. dall’uncinetto (= 2 m.a.), *saltare 1 cat., 1 m.a. nelle 4 cat. seguenti, *, ripetere da * a * e finire saltando 1 cat. e lavorando 1 m.a. in ognuna delle ultime 2 cat. = 52-56-56-60 m.a. Lavorare 1 m.a. in ogni m.a. avanti e indietro. ALLO STESSO TEMPO aum. 1 m.a. su entrambi i lati ogni riga per un totale di 13-14-16-17 volte, leggere AUMENTI = 78-84-88-94 m.a. Quando il lavoro misura 24-24-22-20 cm (la manica è più corta nelle taglie più grandi perché l’ampiezza della spalla è maggiore) dim. per lo scalfo ad ogni lato su tutte le righe - LEGGERE CONSIGLIO DIMINUZIONI: dim. 4 m.a. per 1 volta, poi 3-3-2-2 m.a. ad entrambi i lati finché il lavoro non misura 31-33-33-34 cm, ora dim. di 4 m.a. per 1 volta su entrambi i lati. Tagliare il filo e fissarlo. Cucire insieme la manica con piccoli punti. Lavorare intorno alla parte inferiore della manica come segue: lavorare 1 giro con 1 m.b. in ogni m.a., e allo stesso tempo aumentare 2-4-4-0 m.b. distribuite uniformemente = 54-60-60-60 m.b. Poi eseguire il diagramma M.1 per 1 volta in altezza. Tagliare il filo e fissarlo. CONFEZIONE: Cucire le maniche negli scalfi. |
||||||||||
Spiegazioni del diagramma |
||||||||||
|
||||||||||
 |
||||||||||
Avete terminato questo modello?Allora taggate le vostre foto con #dropspattern #countryrosebolero o inviatele alla #dropsfan gallery. Avete bisogno di aiuto con questo modello?Troverete 8 video tutorial, una sezione per i commenti/domande e molto altro guardando il modello su www.garnstudio.com © 1982-2026 DROPS Design A/S. Ci riserviamo tutti i diritti. Questo documento, compreso tutte le sue sotto-sezioni, è protetto dalle leggi sul copyright. Potete leggere quello che potete fare con i nostri modelli alla fine di ogni modello sul nostro sito. |
||||||||||


Con oltre 40 anni di esperienza nel design di modelli di maglia e uncinetto, DROPS Design offre la più estesa collezione di modelli gratuiti su internet - tradotti in 17 lingue. Ad oggi vi possiamo fornire 324 cataloghi e 12290 modelli - 9561 dei quali sono tradotti in Italiano.
Ci stiamo impegnando molto per darvi il meglio che vi possiamo offrire in termini di maglia e uncinetto, ispirazioni e consigli così come filati di grande qualità ad un prezzo incredibile! Volete utilizzare i nostri modelli per qualcosa d'altro oltre al vostro uso personale? Potete leggere tutto ciò che è consentito nel testo sul Copyright in basso su tutte le pagine dei nostri modelli. Buon lavoro!
Lasciare un commento sul modello DROPS 138-6
Noi saremmo felici di ricevere i tuoi commenti e opinioni su questo modello!
Se vuoi fare una domanda, fai per favore attenzione a selezionare la categoria corretta nella casella qui sotto per velocizzare il processo di risposta. I campi richiesti sono indicati da *.