
Categorie popolari
State cercando un filato?


Commenti / Domande (53)
![]() Gerda ha scritto:
Gerda ha scritto:
De zijkanten, M1 en M3, tellen slechts 8 rijen op het telpatroon. Moet je dan na de 8ste rij herbeginnen met M1A en M3A en daarna M1B en M3B of laat je M1A en M3A weg en haak je enkel nog telkens opnieuw de 7 rijen van M1B en M3B voor de zijkanten? Alvast bedankt. Groetjes, Gerda.
04.04.2022 - 08:31DROPS Design ha risposto:
Dag Gerda,
Je herhaalt M.1B en M.3B steeds in de hoogte. M.3A en M.1A haak je slechts 1 keer.
04.04.2022 - 13:49
![]() Mira ha scritto:
Mira ha scritto:
Hallo Ich möchte diese Jacke gerne ohne Taille häkeln, also gerade an den Seiten hoch . Kann ich dann ich dann den Teil mit den 16 stb abnahme und Aufnahme einfach überspringen und bis zum Armausschnitt gerade weiter häkeln? Das selbe möchte bei dem Arm auch machen, kann ich da bis ca 18 cm normal hoch häkeln und dann mit der Zunahme der M beginnen? Danke
06.03.2022 - 10:51DROPS Design ha risposto:
Liebe Mira, also ja wahrscheinlich, beachten Sie nur, daß Sie vielleicht dann etwas mehr Garn brauchen werden. Viel Spaß beim häkeln!
07.03.2022 - 09:02
![]() Uta Große ha scritto:
Uta Große ha scritto:
Wird immer nur am Reihenanfang der Armkugel abgenommen? Oder gleichzeitig am Anfang und Ende?
30.03.2021 - 11:12DROPS Design ha risposto:
Liebe Uta, Sie nehmen sowohl am Anfang als auch am Ende jeder Reihe ab. Gutes Gelingen weiterhin!
03.04.2021 - 11:05
![]() Stéphanie ha scritto:
Stéphanie ha scritto:
Bonsoir, je suis bloquée dès le début du travail... Au 4eme rang du diagramme, il y a un point ajouré formé par les 2 mailles en l'air mais je ne tombe pas juste à la fin du rang car je n'ai pas les 13 brides qui séparent la fin de M2 et le début de M3B. Je crois que je ne lis pas correctement ces diagrammes...je réalise une taille L. Pouvez-vous m'aider s'il vous plaît ? Merci
03.03.2021 - 22:59DROPS Design ha risposto:
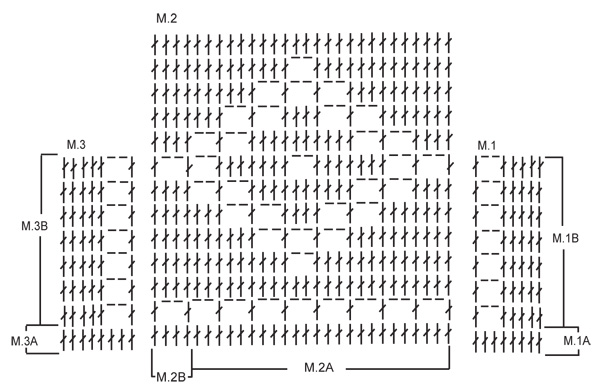
Bonjour Stéphanie, vérifiez que vous crochetez bien les diagrammes comme il faut, autrement dit: M.1 (= 8 brides), puis répétez 10 fois les 24 mailles de M.2A (= 240 mailles au total), crochetez maintenant les 4 mailles de M.2B et terminez par les 8 mailles de M.3A; vous avez ainsi: 8+ (10x24) + 9 + 8 = 260 mailles. Au 4ème rang, M.2A se commence par *13 brides, puis 2 ml, on saute 2 brides et on termine par 9 brides* (=13+2+9= 24) et on répète 10 fois de *-* et on termine par les 4 mailles de M.2B (= vous aurez ainsi bien 13 mailles après le dernier point ajouré). Bon crochet!
04.03.2021 - 07:57
![]() Liv ha scritto:
Liv ha scritto:
Ich arbeite am Vorder- und Rückenteil. Es heißt, auf beiden Seiten des Markierungsfadens je eine Masche ab- bzw. zunehmen. Sind dies direkt die Maschen links und rechts vom Markierungsfaden, oder in gleichmäßigen Abständen über die Reihe verteilt? Danke!
25.08.2020 - 07:24DROPS Design ha risposto:
Liebe Liv, die Abnahmen auf beiden Seiten der Markierungsfäden sollen vor und nach jedem Markierungsfäden abgenommen werden (nicht regelmäßig), dh es wird jeweils 1 M bei jedem Vorderteil abgenommen und 2 M beim Rückenteil. Viel Spaß beim häkeln!
25.08.2020 - 09:24
![]() Chus ha scritto:
Chus ha scritto:
Una duda que tengo viendo las medidas. La medida del pecho y bajo pecho es solo frontal o también cuenta con la espalda???
11.06.2018 - 10:29DROPS Design ha risposto:
Hola Chus. Las medidas que aparecen son siempre la mitad de la medida total. Si la medida del pecho total (por el delantero y por la espalda) en una talla es de 100 cm, entonces la medida a coger sería la de 50 cm ( la mitad).
23.06.2018 - 19:23Raffa ha scritto:
Good afternoon. I have a questioni about the beginning of back Side. It is said"Crochet tr back and forth on the middle 88-98-108-118-128-138 tr between markers (4-5-6-7-8-9 tr each side = armhole)". I work small and I have 96 points in back Side not 88 as indicated. Must I leave 4 points at each side of marker points as made for right and left Side? So in total 4 before marker and 4 after marker for right and same foto left.
16.05.2017 - 18:18DROPS Design ha risposto:
Dear Mrs Raffa, that's how you are intended to work: the 4 tr on each side are left unwored for the armhole, and you work only over the middle 88 sts on back piece. Happy crocheting!
17.05.2017 - 08:33Raffa ha scritto:
In The model afternoon date 120/31 I can't understand how I must decrease the neck when the work measures 28 in small size. We have not touched m1 e m3 for the hole along the column made. So I must decrease at right or left of m1 and m3? Thanks.
13.05.2017 - 07:46DROPS Design ha risposto:
Dear Raffa, you are right, for shaping the neckline, you have to decrease inside of the pattern of the front band (i.e, right on one side and left on the other side). I hope this helped. Happy Crocheting!
13.05.2017 - 18:22
![]() Trini ha scritto:
Trini ha scritto:
In der Anleitung steht nach 15 cm bei Fadenmarkierung auf beiden Seiten ein Stäbchen abnehmen. Sind damit 15 cm ab der Fadenmarkierung gemeint oder die Höhe des gesamten Häkelstücks?
29.07.2016 - 10:20DROPS Design ha risposto:
Liebe Trini, damit ist die Gesamthöhe gemeint.
03.08.2016 - 15:52
![]() Margo Kemp ha scritto:
Margo Kemp ha scritto:
Im having trouble understanding what "Crochet next row as follows: M.1A (= 8 sts), M.2A a total of 8-9-10-11-12-13 times, M.2B (= 4 sts) and M.3A (= 8 sts). Continue with M.1B over M.1A and M.3B over M.3A (continue M.2 as before). " means I dont usually work from a chart so Im lost to what the M.1A M.2A etc means.....thank you
30.03.2016 - 14:04DROPS Design ha risposto:
Dear Mrs Kemp, in the diagrams, 1 symbol represents 1 st (either ch or dc - start reading diagrams from the bottom corner on the right side towards the left from RS (and from the left towards the right from WS) - and work as stated: the 8 sts in M.1A, then repeat in width the sts in M.2A a total of 8-13 times, work then the 4 sts in M.2B and finish with the 8 sts in M.3A. Continue then following M.1B over the 8 sts in M.1 and M.3B over the 8 sts in M.3B. Read more about diagrams here. Happy crocheting!
30.03.2016 - 15:41
|
|||||||
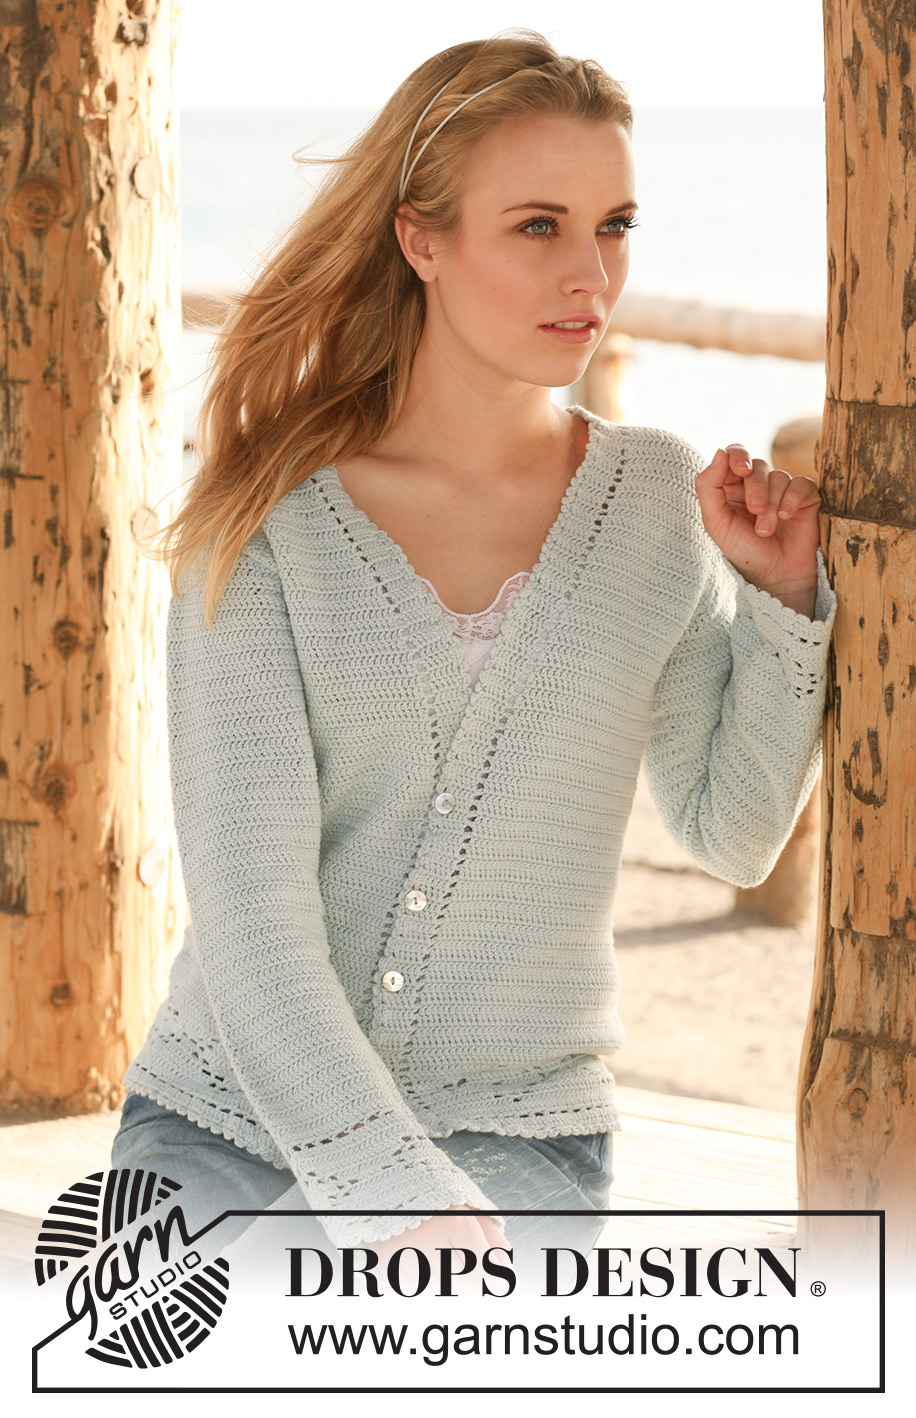
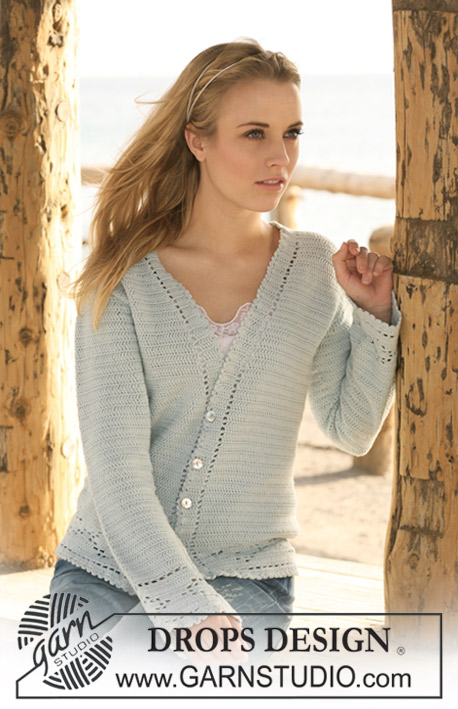
Afternoon Date#afternoondatecardigan |
|||||||
 |
 |
||||||
Giacca DROPS lavorata all’uncinetto in "Safran" con motivo traforato. Taglie: dalla S alla XXXL.
DROPS 120-31 |
|||||||
|
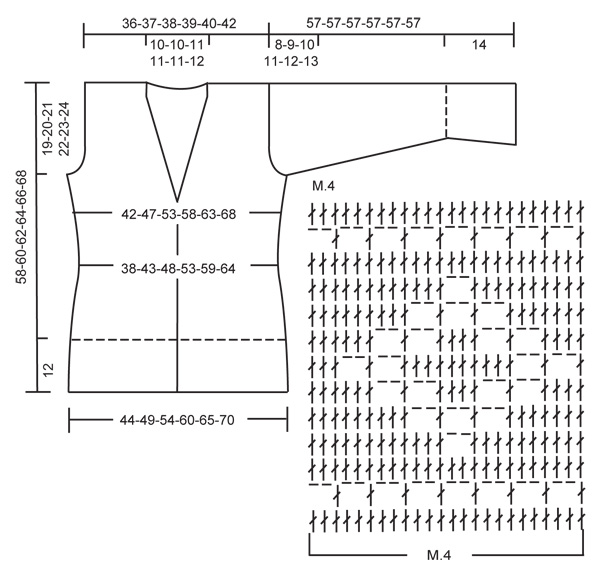
SUGGERIMENTO PER IL LAVORO: Girare ogni riga con 3 cat – NOTA: Queste 3 cat non sostituiscono la 1° m.a ma sono m in più. MOTIVO: Vedere i diagrammi M.1-M.4 – NOTA: Assicurarsi che la 1° cat sia lunga come la larghezza di 1 m.a, altrimenti il motivo non sarà ordinato. SUGGERIMENTO PER LE DIMINUZIONI-1: Diminuire 1 m.a lavorando 2 m.a insieme come segue: lavorare 1 m.a nella 1° m ma aspettare con l’ultimo passaggio, lavorare 1 m.a nella m successiva e durante l’ultimo passaggio far passare il filo attraverso tutte e 3 le m sull’uncinetto. SUGGERIMENTO PER LE DIMINUZIIONI-2: (applicato allo scalfo e all’arrotondamento della manica): Diminuire come segue alla fine della riga: lavorare la riga fino a quando rimane il n° di m.a da diminuire, girare il lavoro e lavorare la riga di ritorno. Diminuire come segue all’inizio della riga: lavorare a m.bss sul n° di m.a da diminuire. ASOLE: Fare le asole sul bordo davanti destro. 1 asola = sostituire la 3° m.a dal centro davanti con 1 cat. Fare le asole quando il lavoro misura: TAGLIA S: 3, 9, 15, 21 e 27 cm. TAGLIA M: 4, 10, 16, 22 e 28 cm. TAGLIA L: 5, 11, 17, 23 e 29 cm. TAGLIA XL: 6, 12, 18, 24 e 30 cm. TAGLIA XXL: 7, 13, 19, 25 e 31 cm. TAGLIA XXXL: 8, 14, 20, 26 e 32 cm. -------------------------------------------------------- -------------------------------------------------------- CORPO: Lavorato avanti e indietro dal centro davanti. Avviare 267-297-327-357-387-417 cat (comprese 3 cat con cui girare) con l’uncinetto n° 3 mm e Safran. Lavorare la prima riga come segue (dal rovescio del lavoro): 1 m.a nella 4° cat dall’uncinetto, 1 m.a in ognuna delle 3 cat successive, * saltare 1 cat, 1 m.a in ognuna delle 4 cat successive *, ripetere *-* = 212-236-260-284-308-332 m.a (+ 3 cat all’inizio della riga). LEGGERE IL SUGGERIMENTO PER IL LAVORO! Lavorare la riga successiva come segue: M.1A (= 8 m), M.2A per un totale di 8-9-10-11-12-13 volte, M.2B (= 4 m) e M.3A (= 8 m). Continuare con M.1B su M.1A e M.3B su M.3A (continuare M.2 come prima). ALLO STESSO TEMPO quando il lavoro misura 3-4-5-6-7-8 cm fare le ASOLE – leggere sopra! Alla fine di M.2 continuare a m.a su M.2 e M.1B e M.3B a ogni lato come prima, ALLO STESSO TEMPO sulla 1° riga dopo M.2 diminuire 16 m.a in modo uniforme (non diminuire in M.1 e M.3) – LEGGERE IL SUGGERIMENTO PER LE DIMINUZIONI-1 = 196-220-244-268-292-316 m. Inserire 1 segnapunti all’interno di 52-58-64-70-76-82 m da ogni lato (= 92-104-116-128-140-152 m tra i segnapunti sul dietro). Quando il lavoro misura 15-15-16-16-17-17 cm diminuire 1 m.a a ogni lato di entrambi i segnapunti – LEGGERE IL SUGGERIMENTO PER LE DIMINUZIONI-1, e ripetere le diminuzioni ogni 3 righe per un totale di 3 volte = 184-208-232-256-280-304 m. LEGGERE TUTTA LA SEZIONE SEGUENTE PRIMA DI CONTINUARE! AUMENTI AI LATI: quando il lavoro misura 24-25-26-27-28-29 cm aumentare 1 m.a a ogni lato di entrambi i segnapunti lavorando 2 m.a in 1 m.a, ripetere gli aumenti ogni 3 righe per un totale di 5 volte. DIMINUZIONI PER IL COLLO: quando il lavoro misura 28-29-30-32-32-33 cm diminuire per il collo. Diminuire 1 m all’interno di M.1 e M.3 – LEGGERE IL SUGGERIMENTO PER LE DIMINUZIONI-1, e ripetere le diminuzioni su ogni riga per un totale di 4 volte per tutte le taglie, poi a righe alterne 14-14-15-15-15-16 volte. SCALFO: ALLO STESSO TEMPO quando il lavoro misura 39-40-41-42-43-44 cm dividerlo per lo scalfo e finire il davanti e il dietro in modo separato. DAVANTI DESTRO: Lavorare la riga fino a quando rimangono 4-5-6-7-8-9 m.a prima del segnapunti a lato, girare e lavorare la riga di ritorno – continuare le diminuzioni per il collo. Ora diminuire per lo scalfo verso il lato su ogni riga: 2 m.a 0-1-2-4-6-7 volte, poi 1 m.a 3-5-6-6-6-7 volte – LEGGERE IL SUGGERIMENTO PER LE DIMINUZIONI-2. Alla fine di tutte le diminuzioni per lo scalfo e il collo ci sono 29-30-31-32-33-34 m rimaste sulla spalla. Continuare a m.a e con il motivo come prima fino a quando il lavoro misura 58-60-62-64-66-68 cm, tagliare il filo. DAVANTI SINISTRO: Come il davanti destro, ma a specchio. DIETRO: Lavorare a m.a avanti e indietro sulle 88-98-108-118-128-138 m.a centrali tra i segnapunti (4-5-6-7-8-9 m.a a ogni lato = scalfo) – ALLO STESSO TEMPO diminuire per lo scalfo a ogni lato come descritto per il davanti = 82-84-88-90-92-96 m.a. Quando il lavoro misura 56-58-60-62-64-66 cm lavorare 2 righe solo su 29-30-31-32-33-34 m.a su ogni spalla (le 24-24-26-26-26-28 m.a centrali = collo). Tagliare il filo, il lavoro misura circa 58-60-62-64-66-68 cm. MANICA: Lavorare avanti e indietro. Avviare 93 cat per tutte le taglie (comprese 3 cat con cui girare) con l’uncinetto n° 3 mm e Safran. Lavorare la prima riga come segue (dal rovescio del lavoro): 1 m.a nella 4° cat dall’uncinetto, 1 m.a in ognuna delle 4 cat successive, * saltare 1 cat, 1 m.a in ognuna delle 4 cat successive *, ripetere *-* = 73 m.a (+ 3 cat all’inizio della riga). Continuare in M.4, 3 ripetizioni lungo la riga – LEGGERE IL SUGGERIMENTO PER IL LAVORO, e finire con 1 m.a nell’ultima m.a. Dopo M.4 continuare con 1 m.a in ogni m.a fino alla fine del lavoro. ALLO STESSO TEMPO sulla 1° riga dopo M.4 diminuire 13-13-11-11-9-9 m.a in modo uniforme – LEGGERE IL SUGGERIMENTO PER LE DIMINUZIONI-1 = 60-60-62-62-64-64 m.a. Quando il lavoro misura 18-18-16-20-19-15 cm aumentare 1 m.a a ogni lato lavorando 2 m.a nella penultima m.a, ripetere gli aumenti ogni 4-3-3-2-2-2 righe per un totale di 9-11-12-14-15-17 volte = 78-82-86-90-94-98 m.a. Quando il lavoro misura 49-48-47-46-45-44 cm (meno per le taglie più grandi a causa dell’arrotondamento della manica più lungo e della maggiore ampiezza delle spalle) diminuire per l’arrotondamento della manica su ogni riga a ogni lato – LEGGERE IL SUGGERIMENTO PER LE DIMINUZIONI-2: 4 m.a 1 volta, 3 m.a 1-2-2-2-2-2 volte, 2 m.a 3-2-2-2-2-3 volte e 1 m.a 1-1-3-5-5-6 volte, poi diminuire 2 m.a a ogni lato fino a quando il lavoro misura 56 cm, ora diminuire 3 m.a 1 volta a ogni lato. Tagliare il filo, il lavoro misura circa 57 cm. CONFEZIONE: Cucire i margini delle spalle margine a margine. Cucire i margini delle maniche e attaccare le maniche. Attaccare i bottoni. BORDI A PICOT: Iniziare al centro dietro e lavorare lungo la scollatura, giù lungo il davanti sinistro, lungo il bordo inferiore, su lungo il davanti destro e dietro fino al centro dietro. Lavorare con l’uncinetto n° 3 mm e Safran come segue: 1 m.b nella 1° m, * 4 cat, 1 m.a nella 1° cat (= 1 picot), saltare circa 1 cm, 1 m.b nella m successiva *, ripetere *-* e finire con 1 m.bss nella 1° m.b. Lavorare un bordo simile attorno a entrambi i bordi delle maniche. |
|||||||
Spiegazioni del diagramma |
|||||||
|
|||||||
 |
|||||||
 |
|||||||
Avete terminato questo modello?Allora taggate le vostre foto con #dropspattern #afternoondatecardigan o inviatele alla #dropsfan gallery. Avete bisogno di aiuto con questo modello?Troverete 10 video tutorial, una sezione per i commenti/domande e molto altro guardando il modello su www.garnstudio.com © 1982-2026 DROPS Design A/S. Ci riserviamo tutti i diritti. Questo documento, compreso tutte le sue sotto-sezioni, è protetto dalle leggi sul copyright. Potete leggere quello che potete fare con i nostri modelli alla fine di ogni modello sul nostro sito. |
|||||||


Con oltre 40 anni di esperienza nel design di modelli di maglia e uncinetto, DROPS Design offre la più estesa collezione di modelli gratuiti su internet - tradotti in 17 lingue. Ad oggi vi possiamo fornire 324 cataloghi e 12290 modelli - 9561 dei quali sono tradotti in Italiano.
Ci stiamo impegnando molto per darvi il meglio che vi possiamo offrire in termini di maglia e uncinetto, ispirazioni e consigli così come filati di grande qualità ad un prezzo incredibile! Volete utilizzare i nostri modelli per qualcosa d'altro oltre al vostro uso personale? Potete leggere tutto ciò che è consentito nel testo sul Copyright in basso su tutte le pagine dei nostri modelli. Buon lavoro!
Lasciare un commento sul modello DROPS 120-31
Noi saremmo felici di ricevere i tuoi commenti e opinioni su questo modello!
Se vuoi fare una domanda, fai per favore attenzione a selezionare la categoria corretta nella casella qui sotto per velocizzare il processo di risposta. I campi richiesti sono indicati da *.