
Categorie popolari
State cercando un filato?


Commenti / Domande (74)
![]() Helena Lilja ha scritto:
Helena Lilja ha scritto:
Hur maskar man av för ärmhål? Förstår inte instruktionen. Tacksam för hjälp och tydligare beskrivning.
13.11.2025 - 17:33DROPS Design ha risposto:
Hej Helena, Se på vores videoer som er lagt ind til denne opskrift, her ser du hur man maskar av :)
19.11.2025 - 12:12
![]() Lise Strømsvik ha scritto:
Lise Strømsvik ha scritto:
Når man setter sammen bakstykkene og skal begynne å øke i sidene, da står det at det skal gjentas på hver 2. rad. Menes det hver andre rad med staver? Ellers blir det hver rad med staver og økningen i siden blir nokså skarp…?
25.05.2025 - 16:00DROPS Design ha risposto:
Hei Lise. Ja, hver 2. rad med staver. Etter at du har satt sammen bakstykket måler arbeidet 12 cm, så skal du øke i sidene på hver 2.rad (med staver) totalt 9 ganger. Du har da heklet 18 rader med Mønster (mønster = 2 rader). mvh DROPS Design
02.06.2025 - 07:37
![]() Thomas Schmidt ha scritto:
Thomas Schmidt ha scritto:
Okay I will try again since you didn’t answer my question. Regarding the part of armholes that concerns the SIDES. Could you please try and explain how this should be done as the recipe is VERY confusing and near for someone that doesn’t know the pattern by heart. Please refrain from just explain with the same wording as the recipe since it makes very little sense. The dec tips also don’t make sense if it should apply to the sides since you then dec 2 st each row. And dec with a dc?
26.03.2025 - 08:47DROPS Design ha risposto:
Dear Thomas, you work the decreases over the 0-3-5-7-8-11 sts at the beginning of the armhole on each side piece, before the armhole stitches (5-5-8-14-21-25 sts on each side, right before the back piece sts). So, you will only work over the 0-3-5-7-8-11 sts, while the armhole stitches are left unworked, and will leave the hole for the arm. For example, for size L, start the row on the outermost stitch, work 4 stitches and turn, then work back without decreases. On the next row, work 3 stitches and turn. Repeat like this until you decrease all stitches. Happy crochetting!
30.03.2025 - 21:28
![]() Thomas Schmidt ha scritto:
Thomas Schmidt ha scritto:
Hi. I’m having trouble with the armholes. 1. Do I start from the last st, then do 5 st and turn? 2. Or do I start 5 st in and crochet to the last st then turn? 3. Also do I dec both in the beginning with a sl ST and at the end with skipping the last st? 4. Is says crochet until you reach 46 cm. Does that also regard the 5 st in each side? Usually I don’t have troubles with the patterns but I find the part about the armholes very confusing.
25.03.2025 - 23:00DROPS Design ha risposto:
Dear Mr Schmidt, see DECREASING TIP (armholes): at the beg of the pattern, and here to decrease 1 dc (US English) in each side and here to decrease 1 sc in each side. When all decreases are done work until piece measures 46 cm from very bottom edge and work each shoulder separately with 2 rows over the 16 sts leaving the middle 30 sts unworked for neckline = piece measures now 48 cm from top down. Happy crocheting!
26.03.2025 - 08:31
![]() Gabi ha scritto:
Gabi ha scritto:
Hallo und danke für die letzte Hilfe. Bin jetzt beim Armloch und verstehe die Anleitung wieder nicht. Äußerste 5 M häkeln, dann 8 auslassen und dann weiter? Was wird das für ein Armloch? Dann gegen die Seite abnehmen bis das ganze Seitenteil abgenommen ist? Linke Seite dann genauso. Wo ist denn dann das Rückenteil? Wenn ich alles abnehme, ist doch nichts mehr übrig in der Mitte! Bitte noch einmal um Hilfe. Danke.
14.02.2025 - 19:12DROPS Design ha risposto:
Liebe Gabi, so wird die Arbeit "verteilt": 5 M für das Vorderteil, 8 M für das Armloch, 72 M für das Rückenteil, 8 M für das Armloch und 5 M für das Vorderteil = 98 M insgesamt. So häkeln Sie zuerst die Vorderteile (separat) über die 5 M beidseitig, dann häkeln die Mittelren 72 M so haben Sie 8 M für die beide Armlöcher. Und dazu nehmen Sie 1 Masche jede Reihe am Anfang /Ende der Reihe für das Armloch ab, bis keine Masche übrig sind, so dazu brauchen Sie 5 Reihen im L für die Vorderteile. Viel Spaß beim Häkeln!
17.02.2025 - 07:36
![]() Gabi ha scritto:
Gabi ha scritto:
Hallo, habe alle Squares gehäkelt u die ersten 12 cm 1. Teil. Und von da ab verstehe ich gar nichts mehr. Wieso soll ich Seitenteile häkeln, wenn die Seiten doch Squares sind? Was sind Blenden? Was heißt, dass die in der Mitte übereinander kommen? Was heißt, 1. Reihe häkelt man die Blenden mit den 6 M. zusammen? Welche 6 Maschen? Ich verstehe den ganzen Rest nicht mehr! Soll ich die ganzen Squares und die Wolle jetzt in den Müll werfen?
12.02.2025 - 19:12DROPS Design ha risposto:
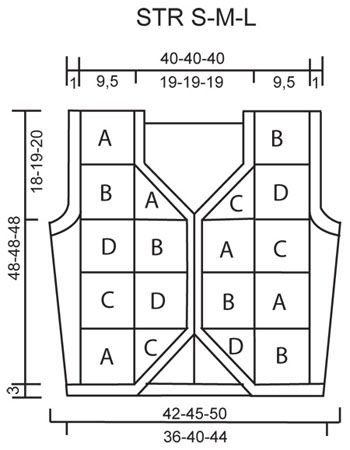
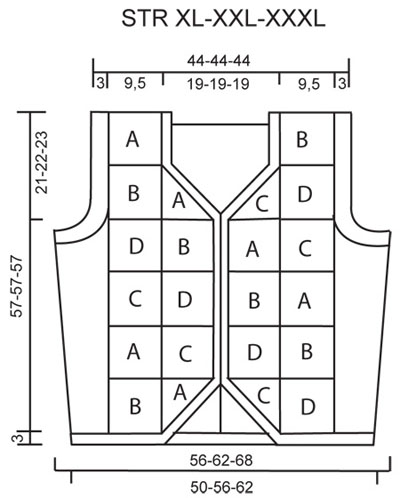
Liebe Gabi, die Quadraten sind nur für beide Vorderteile, an beiden Seiten + Rückenteil sind es Stäbchen - siehe auch Maßskizze. Mit "Blenden" sind hier die Maschen am Schlitz, so die ersten 6 Maschen bei der rechten Seite und die letze 6 M bei der linken Seiten, dann werden sich diese 6 Maschen in der Mitte vom Rückenteil überlappen und je 1 Stäbchen in beiden Teilen häkeln wenn man weiter häkelt. Dann häkelt man mit Zunahmen bis zum Armlöcher und die 3 Teilen: rechte Seite/Vorderteil, linke Seite/Vorderteil und Rückenteil werden dann separat gehäkelt. Viel Spaß beim Häkeln!
13.02.2025 - 09:46
![]() Helen ha scritto:
Helen ha scritto:
PART-1 (= left side includes buttonhole band) PART-2 (= right side includes buttonhole band) Could someone explain or show what the above should look like as confused? I have an odd shape at the mo??
04.12.2024 - 10:42DROPS Design ha risposto:
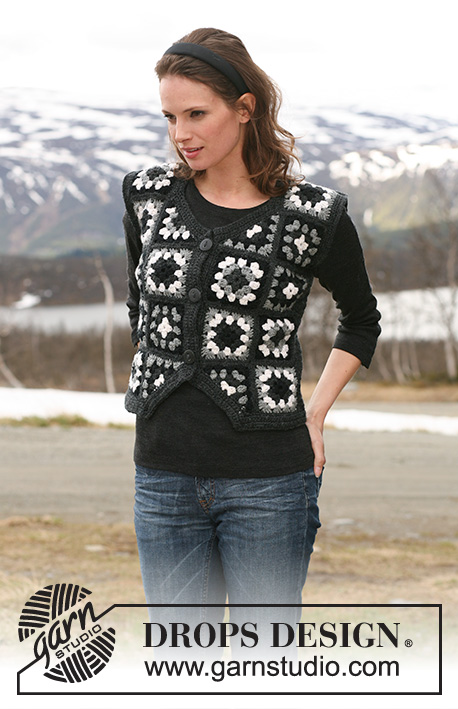
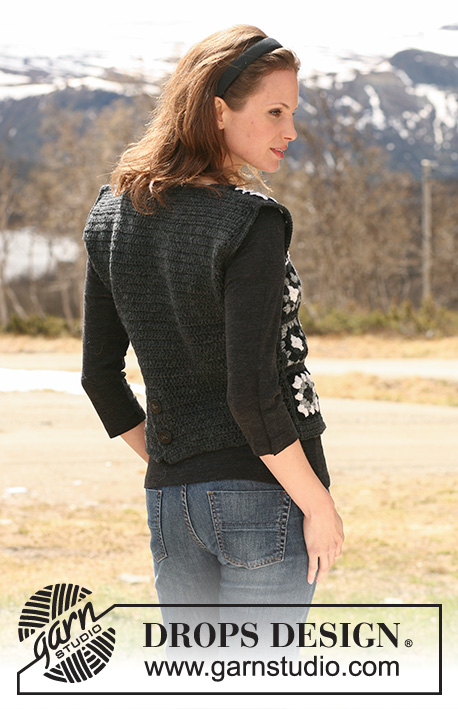
Dear Helen, there seems to be a typo in the pattern. Part-1 is the left side, which includes the band where the back buttons will be later placed. Part-2 is the right side, which includes the band with back buttonholes. You can see this second set of buttons in the second photo. After working each part, you will place them together, with the Part-2 buttonhole band over the Part-1 button band. Only the bands overlap, the rest of Part-2 and Part-1 will cover the right side and left side of the back piece, respectively. Happy knitting!
08.12.2024 - 18:57
![]() Mary Johansson ha scritto:
Mary Johansson ha scritto:
Mönster 115-37 Fråga kring ärmhålet ska man virka en smygmaska i början sen 3 maskor sen 5 maskor , det står nåt om i slutet av varvet att man ska lämna en, vänd Har aldrig varit med om så krångligt mönster att läsa.
07.11.2024 - 11:20DROPS Design ha risposto:
Hei Mary. Vi skal hjelpe deg så godt vi kan, men fint om du kan opplyse nøyaktig hvor i oppskriften du er / hvilket avsnitt (og hvilken str. du hekler etter). mvh DROPS Design
11.11.2024 - 09:22
![]() Sonja Nilsson ha scritto:
Sonja Nilsson ha scritto:
Var i mönstret gäller detta ? Uppdaterad online: 15.09.2009 VARV 3: 4 lm, 3 st om första lm från föregående v, 1 lm, 3 st i nästa lm, 1 lm, 3 st i nästa lm-båge, 3 lm, 3 st i samma lm-båge (= hörnet), 1 lm, 3 st i nästa lm, 1 lm, 3 st i sista lm. \" 1lm, 1 st till om samma lm.\" Vänd arb. Tack på förhand
04.11.2024 - 13:11DROPS Design ha risposto:
Hei Sonja. Ser ut som om det er samme rettelse som fra 13.11.2009 bare med uten teksten HALV MORMORS-RUTA. Vi skal få slettet denne. Takk for at du gjorde oss oppmerksom på dette. mvh DROPS Design
04.11.2024 - 13:54
![]() Joan ha scritto:
Joan ha scritto:
I am an experienced crocher, but am having trouble understanding the increases for the back. I did it the way I thought, but they came out to sharp, i.e. not a gradual increase. If I do it the way I understand the instructions, I am only increasing on one side, as you are always working right to left (or left to right in my case as I'm left-handed). Please clarify
01.08.2024 - 18:02DROPS Design ha risposto:
Dear Joan, make sure you are increasing on every other row but on each side crocheting both sides together (under back piece + sides). Make also sure to get the right tension in both width and height. Happy crocheting!
02.08.2024 - 08:54
|
|
Licorice Squares Vest |
|
 |
 |
Gilet DROPS all’uncinetto in Karisma, con quadrati. Taglie: Dalla S alla XXXL.
DROPS 115-37 |
|
|
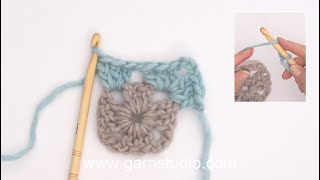
MOTIVO: RIGA 1: 1 m.a in ogni m.b; finire la riga con 1 cat per girare il lavoro. RIGA 2: 1 m.b in ogni m.a; finire la riga con 3 cat per girare il lavoro. SUGGERIMENTO PER LE DIMINUZIONI (per gli scalfi): Diminuire come segue alla fine di ogni riga: lavorare finché non rimane 1 m, girare il lavoro e proseguire con la riga successiva. Diminuire come segue all’inizio della riga: lavorare 1 m.bss nella 1a m, proseguire come prima. ---------------------------------------------------------- GILET: I davanti sono formati da quadrati all’uncinetto. Lavorare il dietro e i lati all’uncinetto, seguendo il MOTIVO. COLORI DEI QUADRATI: QUADRATO A: Avvio e giro 1 = antracite, giro 2 = grigio medio, giro 3 = bianco, giro 4 = nero, giro 5 = antracite. QUADRATO B: Avvio e giro 1 = nero, giro 2 = antracite, giro 3 = bianco, giro 4 = grigio medio, giro 5 = antracite. QUADRATO C: Avvio e giro 1 = bianco, giro 2 = antracite, giro 3 = nero, giro 4 = grigio medio, giro 5 = antracite. QUADRATO D: Avvio e giro 1 = bianco, giro 2 = antracite, giro 3 = grigio medio, giro 4 = nero, giro 5 = antracite. QUADRATO INTERO: Con l’uncinetto n° 4 avviare 6 cat e formare un anello con 1 m.bss nella 1a cat. GIRO 1: 3 cat, 2 m.a nell’anello di cat, * 3 cat, 3 m.a *, ripetere da *-* per un totale di 3 volte e finire con 3 cat e 1 m.bss nella 3a cat dall’inizio del giro. Girare il lavoro. GIRO 2: 3 cat, 2 m.a nel primo arco di cat, 3 cat, 3 m.a nello stesso arco di cat, * 1 cat, 3 m.a nell’ arco di cat successivo, 3 cat, 3 m.a nello stesso arco di cat *, ripetere da *-* per un totale di 3 volte, finire con 1 cat e 1 m.bss nella 3a cat dall’inizio del giro. Girare il lavoro. GIRO 3: 3 cat, 2 m.a nel primo arco di cat, 1 cat, * 3 m.a nell’ arco di cat successivo, 3 cat, 3 m.a nello stesso arco di cat, 1 cat, 3 m.a nell’ arco di cat successivo, 1 cat *, ripetere da *-* per un totale di 3 volte, 3 m.a nell’ arco di cat successivo, 3 cat, 3 m.a nello stesso arco di cat, 1 cat, finire con 1 m.bss nella 3a cat dall’inizio del giro. Girare il lavoro. GIRO 4: 3 cat, 2 m.a nel primo arco di cat, 1 cat, * 3 m.a nell’ arco di cat successivo, 3 cat, 3 m.a nello stesso arco di cat, 1 cat, 3 m.a nell’ arco di cat successivo, 1 cat, 3 m.a nell’ arco di cat successivo, 1 cat *, ripetere da *-* per un totale di 3 volte, 3 m.a nell’ arco di cat successivo, 3 cat, 3 m.a nello stesso arco di cat, 1 cat, 3 m.a nell’ arco di cat successivo, 1 cat, finire con 1 m.bss nella 3a cat dall’inizio del giro. Girare il lavoro. GIRO 5: Lavorare 1 m.b in ogni m.a e 1 m.b in ogni cat, finire con 1 m.bss nella 1a m.b. Il quadrato misura ca. 9,5 x 9,5 cm. MEZZO QUADATRO: Con l’uncinetto n° 4 avviare 6 cat e formare un anello con 1 m.bss nella 1a cat. RIGA 1: 4 cat, 3 m.a nell’anello di cat, 3 cat, 3 m.a nell’anello di cat, 1 cat, 1 m.a nell’anello di cat. Girare il lavoro. RIGA 2: 4 cat, 3 m.a nella 1a cat della riga precedente, 1 cat, 3 m.a nell’ arco di cat successivo, 3 cat, 3 m.a nello stesso arco di cat (= angolo), 1 cat, 3 m.a nell’ultima cat, 1 cat, 1 m.a nella stessa cat. Girare il lavoro. RIGA 3: 4 cat, 3 m.a nella 1a cat della riga precedente, 1 cat, 3 m.a nella cat successiva, 1 cat, 3 m.a nell’ arco di cat successivo, 3 cat, 3 m.a nello stesso arco di cat (= angolo), 1 cat, 3 m.a nella cat successiva, 1 cat, 3 m.a nell’ultima cat, 1 cat, 1 m.a nella stessa cat. Girare il lavoro. RIGA 4: 4 cat, 3 m.a nella 1a cat del giro precedente, * 1 cat, 3 m.a nell’ arco di cat successivo *, ripetere da *-* per un totale di 3 volte, 3 cat, 3 m.a nello stesso arco di cat, ripetere da *-* per un totale di 3 volte, 1 cat, 1 m.a nell’ultima cat. Girare il lavoro. RIGA 5: Lavorare 1 m.b in ogni m.a e 1 m.b in ogni cat. NUMERO DI QUADRATI: TAGLIE S-M-L: Lavorare 4 quadrati A interi + 1 mezzo quadrato A; 5 quadrati B interi; 2 quadrati C interi e 2 mezzi quadrati C; 3 quadrati D interi e 1 mezzo quadrato D = in tutto 14 quadrati interi e 4 mezzi quadrati. TAGLIE XL-XXL-XXXL: Lavorare 4 quadrati interi A e 2 mezzi quadrati A; 6 quadrati interi B; 3 quadrati interi C e 2 mezzi quadrati C; 5 quadrati interi D = in tutto 18 quadrati interi e 4 mezzi quadrati. DIETRO + LATI: Lavorare i primi 12 cm in 2 parti separate (serve per formare lo spacco al centro, sul dietro). PARTE 1 (= lato sinistro, compreso il bordo per i bottoni): Con l’uncinetto n° 4,5 ed il colore antracite, avviare 38-45-54-66-78-90 cat lente. Lavorare la 1a riga come segue: 1 m.b nella 2a cat dall’uncinetto, 1 m.b in ognuna delle 1-3-2-4-1-3 cat successive, * saltare 1 cat, 1 m.b in ognuna delle 4 cat successive *, ripetere da *-* = 30-36-43-53-62-72 m.b. Proseguire seguendo il MOTIVO – vedere le spiegazioni sopra. RICORDARSI LA TENSIONE DEL LAVORO! Quando il lavoro misura 12 cm, lasciare in sospeso il lavoro e proseguire con la parte 2. PARTE 2 (= lato destro compreso il bordo per le asole): Lavorare come indicato per la parte 1, ma quando il lavoro misura ca. 5 cm – assicurarsi che la riga successiva sia una riga di m.a – fare 1 asola verso il centro, sul dietro lavorando 1 cat al posto delle terzultima m.a; alla riga successiva lavorare 1 m.a nella cat. Ripetere quando il lavoro misura 10 cm. Quando il lavoro misura 12 cm, lasciare il lavoro in sospeso (lavorare lo stesso numero di righe lavorate per la parte 1). DIETRO + LATI: Mettere la parte 1 e la parte 2 una di fianco all’altra, la parte destra sopra la parte sinistra, in modo che si sovrappongano le 6 m verso il centro, sul dietro (lavorare la riga successiva puntando l’uncinetto attraverso le due parti, su queste 6 m) = 54-66-80-100-118-138 m. Proseguire seguendo il motivo; ALLO STESSO TEMPO, alla riga successiva di m.a, aumentare 1 m da ciascun lato, lavorando 2 m.a nella seconda e nella penultima m. Ripetere questi aumenti ogni 2 righe per un totale di 9 volte = 72-84-98-118-136-156 m. Quando il lavoro misura 30-29-28-36-35-34 cm, formare gli scalfi come segue: LATO DESTRO: Proseguire seguendo il motivo come prima sulle 0-3-5-7-8-11 m al lato (le 5-5-8-14-21-25 m successive = scalfo – nella taglia S tutte le m al lato = scalfo). Diminuire ora 1 m, ad ogni riga verso lo scalfo, finché tutte le m non sono state diminuite – vedere IL SUGGERIMENTO PER LE DIMINUZIONI! LATO SINISTRO: Lavorare come indicato per il lato destro. DIETRO: Lavorare avanti e indietro solo sulle 62-68-72-76-78-84 m centrali; ALLO STESSO TEMPO, diminuire 1 m verso gli scalfi, da ciascun lato, ad ogni riga finché non rimangono 62 m (per tutte le taglie). Quando il lavoro misura 46-46-46-55-55-55 cm, lavorare 2 righe solo sulle 16 m ai lati (le 30 m centrali = scollo). Tagliare il filo. CONFEZIONE: Cucire i quadrati insieme ai 2 davanti come indicato nello schema – cucire bordo contro bordo con il colore antracite, nell’asola più esterna delle m. Cucire i davanti al dietro e cucire le spalle nello stesso modo. BORDO INTORNO AGLI SCALFI: Con l’uncinetto n° 4,5 ed il colore antracite, lavorare 2-2-2-5-5-5 giri di m.b intorno agli scalfi – lavorare ca. 16 m.b in 10 cm – Assicurarsi che il bordo rimanga pari, quindi non riprendere troppe m.b. BORDO DEL GILET: Con l’uncinetto n° 4,5 ed il colore antracite, lavorare un bordo tutto intorno al gilet. Iniziare dal bordo inferiore dello spacco sul dietro, proseguire lungo tutto il bordo inferiore, lungo il davanti destro, intorno al collo, lungo il davanti sinistro e lungo il bordo inferiore fino allo spacco al centro, sul dietro (non lavorare quindi lungo i lati dello spacco al centro, sul dietro). Lavorare 5 righe di m.b avanti e indietro – lavorare ca. 16 m.b in 10 cm - ATTENZIONE: in tutti gli angoli esterni, lavorare 3 m.b e in tutti gli angoli interni saltare 1 m. ALLO STESSO TEMPO, nel corso della riga 2 (= rovescio del lavoro), fare 3-3-3-4-4-4 asole sul bordo davanti destro. 1 ASOLA = 2 cat e saltare 2 m.b; alla riga successiva lavorare 2 m.b in ogni arco di cat. Fare 1 asola in ogni passaggio tra i quadrati. Cucire 2 bottoni sullo spacco al centro, sul dietro e 3-3-3-4-4-4 bottoni sul bordo davanti sinistro. |
|
 |
|
 |
|
Avete terminato questo modello?Allora taggate le vostre foto con #dropspattern o inviatele alla #dropsfan gallery. Avete bisogno di aiuto con questo modello?Troverete 11 video tutorial, una sezione per i commenti/domande e molto altro guardando il modello su www.garnstudio.com © 1982-2026 DROPS Design A/S. Ci riserviamo tutti i diritti. Questo documento, compreso tutte le sue sotto-sezioni, è protetto dalle leggi sul copyright. Potete leggere quello che potete fare con i nostri modelli alla fine di ogni modello sul nostro sito. |
|


Con oltre 40 anni di esperienza nel design di modelli di maglia e uncinetto, DROPS Design offre la più estesa collezione di modelli gratuiti su internet - tradotti in 17 lingue. Ad oggi vi possiamo fornire 324 cataloghi e 12239 modelli - 9507 dei quali sono tradotti in Italiano.
Ci stiamo impegnando molto per darvi il meglio che vi possiamo offrire in termini di maglia e uncinetto, ispirazioni e consigli così come filati di grande qualità ad un prezzo incredibile! Volete utilizzare i nostri modelli per qualcosa d'altro oltre al vostro uso personale? Potete leggere tutto ciò che è consentito nel testo sul Copyright in basso su tutte le pagine dei nostri modelli. Buon lavoro!
Lasciare un commento sul modello DROPS 115-37
Noi saremmo felici di ricevere i tuoi commenti e opinioni su questo modello!
Se vuoi fare una domanda, fai per favore attenzione a selezionare la categoria corretta nella casella qui sotto per velocizzare il processo di risposta. I campi richiesti sono indicati da *.