
Categorie popolari
State cercando un filato?


Commenti / Domande (28)
![]() Heidi ha scritto:
Heidi ha scritto:
Hi, is there a video of how to make the fan pattern? I just can't get my head around it. Thank you
15.12.2023 - 19:08DROPS Design ha risposto:
Dear Heidi, you can check the following video for the fan: https://www.garnstudio.com/video.php?id=36&lang=en. In the video, they use a similar technique but, instead of the first sc you need to work a ss and instead of the second sc you work a dc (UK tr). All the dc are worked in the same stitch. Happy crocheting!
17.12.2023 - 18:20
![]() Seve ha scritto:
Seve ha scritto:
Je ne comprends pas qand vous dites crocheter une maille dans les 20 premières mailles : de quel type de maille s' agit-il? Merci
30.11.2016 - 22:26DROPS Design ha risposto:
Bonjour Seve, en fonction du rang crocheté (DB ou ms) dans M.1 vous ferez soit 1 DB soit 1 ms. Bon crochet!
01.12.2016 - 09:36
![]() Christy ha scritto:
Christy ha scritto:
Ok I figured out how to join all the fingers on my own. Now I'm on 1 tr in each of the first 18 dc, m.1 on next 9 dc and 1 tr in each of next 0-0-1 dc? 0....what on earth? Is this the pattern that needed to be fixed? Cause I read that 1 of the same pattern was messed up. I want to make sure I'm using the right pattern.
16.11.2014 - 03:22DROPS Design ha risposto:
If you are working the first 2 sizes, finish the round with M1 over the next 9 dc - in the last size, you will finish the round with 1 tr in the next 1 dc. Happy crocheting!
17.11.2014 - 10:43
![]() Christy ha scritto:
Christy ha scritto:
One last thing. I thought m.1 was an abbreviation for a make 1 in knitting? Now I'm really confused. I don't mean to be rude but I only have till Monday to get these finished. I can't wait forever on answers and help.
15.11.2014 - 23:48DROPS Design ha risposto:
Dear Christy, M.1 is here the name of the pattern you will find at the bottom of written pattern where each st is represented by a symbol - diagram text is just above diagram. Read more about diagrams here. Happy crocheting!
17.11.2014 - 10:41
![]() Christy ha scritto:
Christy ha scritto:
Forgot to add this is my first time. making gloves.
15.11.2014 - 21:12
![]() Christy ha scritto:
Christy ha scritto:
The pattern for the drops gloves fan pattern is confusing I crocheted all 4 of the fingers and can't figure out what it's talking about from there. I understand all abbreviations that's not a problem. I did three fingers with 10 st around instead of 12. My fingers are small but long so I had to go longer than the directions said. I did 8 stitches around for little finger. Do you have a tutorial on how to do the whole glove?
15.11.2014 - 21:08DROPS Design ha risposto:
Dear Christy, when all fingers are done, work half the sts on ring finger, half the sts + 1 on middle finger + all sts on index finger, then work unworked sts on middle finger + ring finger. Cut the thread. Work then half the sts on little finger, work then a row over all sts (over the 3 fingers) and finish with unworked sts on little finger and continue in the round. Happy crocheting!
17.11.2014 - 10:05
![]() Katerina ha scritto:
Katerina ha scritto:
Please fix: Ring finger: Work 10-12-12 tr instead of Work 10-10-12 tr
31.01.2013 - 19:05DROPS Design ha risposto:
Dear Katerina, pattern has been edited to 10-12-12 tr for Ring finger, thank you ! Happy crocheting !
02.02.2013 - 09:51Fatemeh ha scritto:
When connect the thumb to the glove, we must crochet st or tr? in this paragraph: "Now work next round including thumb as follows: 1 st in each of the first 18-20-21 sts, 1 st in each dc round the thumb and then 1 st in each of next 0-1-2 sts, M.1 on the next 9 sts, 1 st in each of next 0-1-2 sts, M.1 on the next 9 sts and 1 st in each of the last 0-0-1 sts on round = 48-54-60 dc on round. "
02.12.2012 - 13:26DROPS Design ha risposto:
Dear Fatemeh, you have to crochet this round when piece measures 4 cm, so following your tension, you may have to crochet either 1 tr (uk)/pattern or dc (uk), so just follow how you are working, considering 1 stitch as it should be worked previously. Happy crocheting !
03.12.2012 - 09:16
![]() Drops Design France ha scritto:
Drops Design France ha scritto:
Bonjour Elhem et merci. Pour imprimer les explications, cliquez sur 'imprimer' à droite de la photo, sur la page des explications. Bon crochet !
06.02.2012 - 11:30
![]() Elhem ha scritto:
Elhem ha scritto:
J'aime beaucoup ce modèle je veux recevoir son patron ou
06.02.2012 - 11:08
|
||||||||||||||||
DROPS 110-10 |
||||||||||||||||
|
|
||||||||||||||||
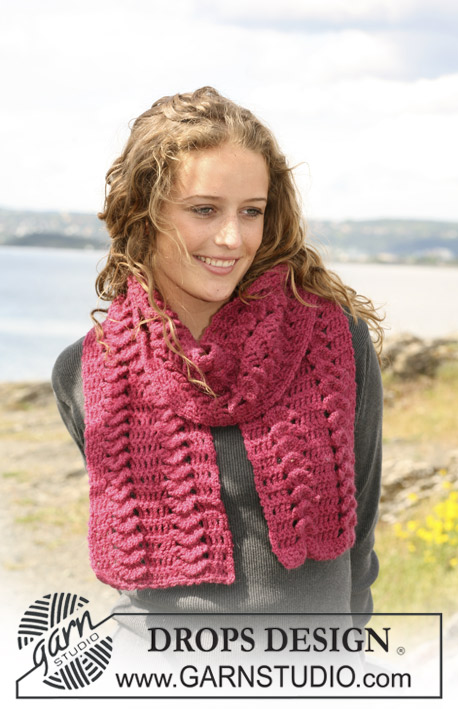
Guanti DROPS lavorati all’uncinetto con motivo a ventaglio in Alpaca.
DROPS 110-10 |
||||||||||||||||
|
GUANTI: Lavorati dalla punta delle dita verso la mano, quindi vengono lavorate prima tutte le dita. MIGNOLO: Avviare 4 cat con l’uncinetto n° 3 mm con Alpaca e formare un anello con 1 m.bss nella 1° cat. Lavorare 8-10-10 m.a nell’anello – leggere le INFORMAZION PER IL LAVORO-1. Continuare in tondo con 1 m.a in ogni m.a fino a quando il ditp misura 5-6-7 cm. Tagliare il filo e mettere il lavoro da parte. ANULARE: Avviare 4 cat e formare un anello con 1 m.bss nella 1° cat. Lavorare 10-12-12 m.a nell’anello. Continuare in tondo con 1 m.a in ogni m.a fino a quando il dito misura 6-7-8 cm. Tagliare il filo e mettere il lavoro da parte. MEDIO: Avviare 4 cat e formare un anello con 1 m.bss nella 1° cat. Lavorare 12-12-14 m.a nell’anello. Continuare in tondo con 1 m.a in ogni m.a fino a quando il dito misura 7-8-9 cm. Tagliare il filo e mettere il lavoro da parte. INDICE: Come il medio fino a quando il dito misura 6-7-8 cm. Tagliare il filo e mettere il lavoro da parte. POLLICE: Avviare 4 cat e formare un anello con 1 m.bss nella 1° cat. Lavorare 12-14-16 m.a nell’anello. Continuare in tondo con 1 m.a in ogni m.a fino a quando il dito misura 5-6-7 cm. Tagliare il filo e mettere il lavoro da parte. MANO DESTRA: Lavorare 1 m.a nelle 5-6-6 m.a sull’anulare, continuare con 1 m.a nelle 6-6-7 m.a sul medio. Ora lavorare 1 m.a in ogni m.a attorno all’indice, continuare con 6-6-7 m.a sull’altro lato del medio e 5-6-6 m.a sull’altro lato dell’anulare = 34-36-40 m.a (ci saranno dei piccoli buchi tra le dita, cucirli alla fine). Tagliare il filo. Ora lavorare 1 m.a nelle 4-5-5 m.a sul mignolo e continuare attorno alla mano, ALLO STESSO TEMPO diminuire 6 m.a in modo uniforme – leggere il SUGGERIMENTO PER LE DIMINUZIONI – e finire con 4-5-5 m.a sull’altro lato del mignolo = 36-40-44 m.a sul giro. Inserire un segnapunti nel lato del mignolo (indica il lato del guanto). FARE ATTENZIONE ALLA TENSIONE DEL LAVORO E AL MOTIVO A PUNTO FANTASIA! Continuare in tondo come segue: 1 m.a.d in ognuna delle prime 18-21-23 m.a, M.1 sulle 9 m.a successive, 1 m.a.d in ognuna delle 0-1-2 m.a successive, M.1 sulle 9 m.a successive e 1 m.a.d in ognuna delle ultime 0-0-1 m.a sul giro. Continuare in questo modo fino a quando il lavoro misura 4 cm dal segnapunti a lato. Ora lavorare il giro successivo includendo il pollice come segue: 1 m in ognuna delle prime 18-20-21 m, 1 m in ogni m.a attorno al pollice e poi 1 m in ognuna delle 0-1-2 m successive, M.1 sulle 9 m successive, 1 m in ognuna delle 0-1-2 m successive, M.1 sulle 9 m successive, 1 m in ognuna delle ultime 0-0-1 m sul giro = 48-54-60 m.a sul giro. Inserire un nuovo segnapunti all’altro lato del lavoro, quindi 6-7-8 m del pollice a ogni lato del segnapunti. Continuare come prima, ALLO STESSO TEMPO diminuire per il tassello del pollice come segue: Diminuire 1 m.a.d/m.b a ogni lato del segnapunti sul pollice su ogni giro per un totale di 6-7-8 volte – leggere il SUGGERIMENTO PER LE DIMINUZIONI = 36-40-44 m. Alla fine di tutte le diminuzioni lavorare 1 giro come segue: 1 m in ognuna delle prime 18-21-23 m, M.1 sulle 9 m successive, 1 m in ognuna delle 0-1-2 m successive, M.1 sulle 9 m successive e 1 m in ognuna delle ultime 0-0-1 m sul giro. Inserire un nuovo segnapunti nel lavoro, e ora misurare il lavoro da qui. Lavorare il giro successivo come segue: 1 m in ognuna delle prime 0-1-1 m, M.1 sulle 9 m successive, 1 m in ognuna delle 0-1-2 m successive, M.1 sulle 9 m successive, 1 m in ognuna delle 0-1-2 m successive, M.1 sulle 9 m successive, 1 m in ognuna delle 0-1-2 m successive, M.1 sulle 9 m successive e finire il giro con 1 m in ognuna delle ultime 0-0-1 m. Continuare in questo modo fino a quando il lavoro misura circa 3 cm dal segnapunti. Ora aumentare 1 m.a.d – leggere il SUGGERIMENTO PER GLI AUMENTI – in ogni sezione a m.a.d (cioè tra i ventagli = 4 aumenti) ogni 3 cm per un totale di 3 volte = 48-52-56 m. Incorporare gli aumenti nel motivo durante il lavoro, cioè aumentare il n° di m tra M.1. Quando il lavoro misura circa 12 cm dal segnapunti, tagliare il filo. MANO SINISTRA: Come la mano destra, ma a specchio. Lavorare il motivo a specchio come segue: dopo aver lavorato e unito il mignolo, anulare, medio e indice, continuare come segue: lavorare 1 m.a.d in ognuna delle prime 0-0-1 m.a, M.1 sulle 9 m.a successive, 1 m.a.d in ognuna delle 0-1-2 m.a successive, M.1 sulle 9 m.a successive e 1 m.a.d in ognuna delle ultime 18-21-23 m.a sul giro. CONFEZIONE: Cucire i piccoli buchi tra le dita. |
||||||||||||||||
Spiegazioni del diagramma |
||||||||||||||||
|
||||||||||||||||
 |
||||||||||||||||
Avete terminato questo modello?Allora taggate le vostre foto con #dropspattern o inviatele alla #dropsfan gallery. Avete bisogno di aiuto con questo modello?Troverete 10 video tutorial, una sezione per i commenti/domande e molto altro guardando il modello su www.garnstudio.com © 1982-2026 DROPS Design A/S. Ci riserviamo tutti i diritti. Questo documento, compreso tutte le sue sotto-sezioni, è protetto dalle leggi sul copyright. Potete leggere quello che potete fare con i nostri modelli alla fine di ogni modello sul nostro sito. |
||||||||||||||||


Con oltre 40 anni di esperienza nel design di modelli di maglia e uncinetto, DROPS Design offre la più estesa collezione di modelli gratuiti su internet - tradotti in 17 lingue. Ad oggi vi possiamo fornire 324 cataloghi e 12290 modelli - 9561 dei quali sono tradotti in Italiano.
Ci stiamo impegnando molto per darvi il meglio che vi possiamo offrire in termini di maglia e uncinetto, ispirazioni e consigli così come filati di grande qualità ad un prezzo incredibile! Volete utilizzare i nostri modelli per qualcosa d'altro oltre al vostro uso personale? Potete leggere tutto ciò che è consentito nel testo sul Copyright in basso su tutte le pagine dei nostri modelli. Buon lavoro!
Lasciare un commento sul modello DROPS 110-10
Noi saremmo felici di ricevere i tuoi commenti e opinioni su questo modello!
Se vuoi fare una domanda, fai per favore attenzione a selezionare la categoria corretta nella casella qui sotto per velocizzare il processo di risposta. I campi richiesti sono indicati da *.