
Categorie popolari
State cercando un filato?


Commenti / Domande (59)
![]() Ana Arres ha scritto:
Ana Arres ha scritto:
Ya he leído los típs de aumento de las sisas, pero no entiendo cómo hacer la segunda porque si lo hago como dice la segunda sisa aumenta en la siguiente vuelta. Gracias
14.02.2021 - 00:47
![]() Stephanie Basting ha scritto:
Stephanie Basting ha scritto:
Ich bräuchte dringend Hilfe. Und zwar bin ich im letzten Abschnitt und hier steht das die Zu und Abnahmen beendet sind. Bedeutet das, dass man jetzt auch in der Mitte keine 2 zusätzlichen Stäbchen mehr häkelt und am Rand 2 zusammen häkelt??
07.02.2021 - 13:09DROPS Design ha risposto:
Liebe Frau Basting, ja genau, jetzt häkeln Sie einfach 1 Doppelstäbchen in jedes Doppelstäbchen. Viel Spaß beim häkeln!
08.02.2021 - 09:43
![]() Lydia ha scritto:
Lydia ha scritto:
Ich verstehe leider die Rechnung der ersten Reihe nicht! Wie komme ich bei 40 angeschlagenen Lm bei der ersten Reihe auf 39 Stb?
13.08.2020 - 16:03DROPS Design ha risposto:
Liebe Lydia, Sie haben 40 Luftmaschen und häkeln 1 Doppel-Stb in die 5. Lm von der Nadel (= 2 Doppel-Stb), 1 Doppel-Stb in jeder der nächsten 16 Lm (= 16 Doppel-Stb), 3 Doppel-Stb in die nächste Lm, 1 Doppel-Stb in jeder der letzten 18 Lm = 2+16+3+18=39Doppel-Stb . Viel Spaß beim häkeln!
13.08.2020 - 16:44
![]() Mandy ha scritto:
Mandy ha scritto:
As with earlier question from Mary...I can’t seem to increase under arm evenly... I can complete on one side , but when I continue with the dtr’s I don’t know what to do for the other side as I am one row further on. So the increase for under arm will be lower on one side than the other. If some can help I would be very grateful. I can’t seem to comprehend. Mandy, Aussie in France 🇫🇷
04.07.2020 - 16:10DROPS Design ha risposto:
Dear Mandy, are you talking about the chains cast on on each side for the armholes? If you want them on the same row, cut the y arn at the end of previous row, turn piece (to keep texture alternately from RS and from WS), cast on the number of chains for your size, continue working on piece as before and cast on the number of chains for your size, then work the new stitches for armholes as explained. Happy crocheting!
06.07.2020 - 08:44
![]() Iride ha scritto:
Iride ha scritto:
In genere mi trovo benissimo con i vostri modelli, ma questo schema è veramente poco chiaro. Almeno in italiano. Peccato... perché il top è carino ed è un modello non facile da trovare....
23.05.2020 - 23:08
![]() Virginie ha scritto:
Virginie ha scritto:
Bonjour il y a un problème dans vos explications,pour les augmentations, doit on augmenter de 1 DB à la fin de chaque rang ou de 2 DB : 1 au début et 1 à la fin chaque rang. si on augmente de 1 DB 6 fois (pour la taille M) on obtient 6 rang donc 6 augmentations + les 2 du milieu çà fait un total de 12 (2x6) +6 = 18....donc plus les 39 de départ çà fait 57, en rajoutant les 10 des emmanchures x2 (car on a 2 bras ;-) çà fait 77 , pouvez vous expliquer comment on arrive à 85 DB ? merci.
11.05.2020 - 16:43DROPS Design ha risposto:
Bonjour Virginie, en taille M/L on commence par 39 m et on augmente 2 DB pour la pointe tous les rangs (= 7 rangs = on augmente 14 DB), en même temps, vous augmentez 6 fois 1 DB de chaque côté (+ 12 m) puis (7ème rang) 2 x 10 DB (= +20 DB), soit: 39+14+12+20=85 double-brides. Bon crochet!
11.05.2020 - 16:59
![]() Mary ha scritto:
Mary ha scritto:
How do I complete the underarm increase on the otherside Arrowheart crochet top. I have tried various techniques but have not found a satisfactory one and the pattern I'm afraid falls short of explanation.
06.05.2020 - 14:08DROPS Design ha risposto:
Dear Mary, I'm sorry I'm afraid I misudnerstand your question - you have to increase for armholes by crocheting an extra dtr (= 2 dtr in the same dtr) on each side a total of 5 to 7 times (see size) on every row, ie you will increase 2 sts on each of these rows. Then continue increasing on mid front but now decrease at the sides as explained under Decreasing tips to get the correct number of sts. Hope this helps. Happy crocheting!
06.05.2020 - 14:53
![]() Deb ha scritto:
Deb ha scritto:
Hi there, I love this top, but I\\\'m not great at following patterns I'm more of a visual learner and hoping somewhere theres a tutorial to follow, is that possible? I love it! Thank you kindly for any help..stay safe out there. Deb
20.03.2020 - 04:35DROPS Design ha risposto:
Dear Deb, we only have a written pattern to this top, try to follow it step by step to get it. Feel free to contact the store where you bought the yarn for any further individual assistance. Happy crocheting!
20.03.2020 - 09:47
![]() Karin Lammers ha scritto:
Karin Lammers ha scritto:
Ik heb een vraag over het armsgat. Als ik het rekenvoorbeeld van maat m/l volg, kom ik ook aan 95 steken. Er staat:” Finaly you crochet extra 10 dst”, maar dat moet toch aan beide kanten? 10 aan de linker en 10 aan de rechterkant? Dan kom ik toch echt aan 95. 39 + 12 (6x2)+ 24 (12x2) + 10 + 10 = 95.
21.08.2019 - 22:17DROPS Design ha risposto:
Dag Karin,
Ik heb het even voor je nagerekent en je zou op 85 steken moeten komen voor voor maat M/L als de meerderingen voor het armsgat klaar zijn. Je meerdert 6 keer 1 steek aan beide kanten = 12 steken, Dan meerder je aan beide kanten 10 steken voor de armsgaten = 20 steken. Daarnaast meerder je steeds in het midden 2 steken door 3 dst in 1 dst te haken. Dit is dan 7 keer gedaan = 14 steken. Na het opzetten en het haken van de eerste toer heb je 39 steken waardoor je op een totaal van 12 + 20 + 14 +39 =85 steken.
01.09.2019 - 11:53
![]() Laura ha scritto:
Laura ha scritto:
Hi, I'm making the M/L that starts with 40 chains. After all the increases I have 95 stitches, not 85 as the pattern states. What am I doing wrong?
20.06.2019 - 20:25DROPS Design ha risposto:
Dear Laura, before the increases, you have 39 dtr for size M. Afterwards, you increase at each side 6 times (which means you have increased 12 dtr). Then you increase twice on the centre of each row (since you have 12 rows= you get 24 sts increased). Finally you crochet 10 extra dtr. 39 + 12 (6x2) + 24 (12x2) + 10 = 85 sts.
20.06.2019 - 22:45
|
|
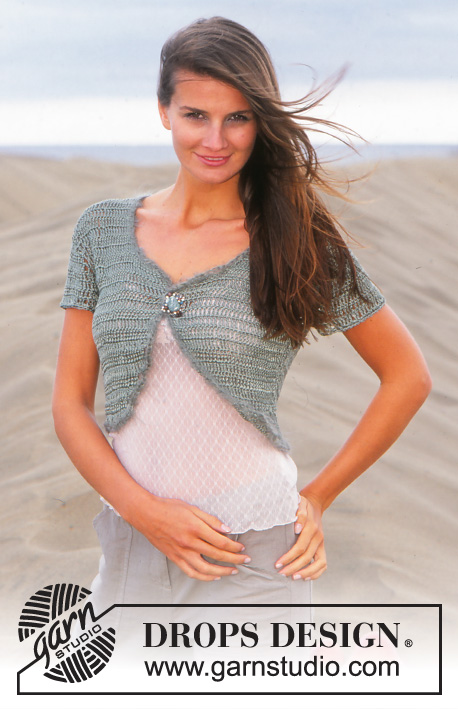
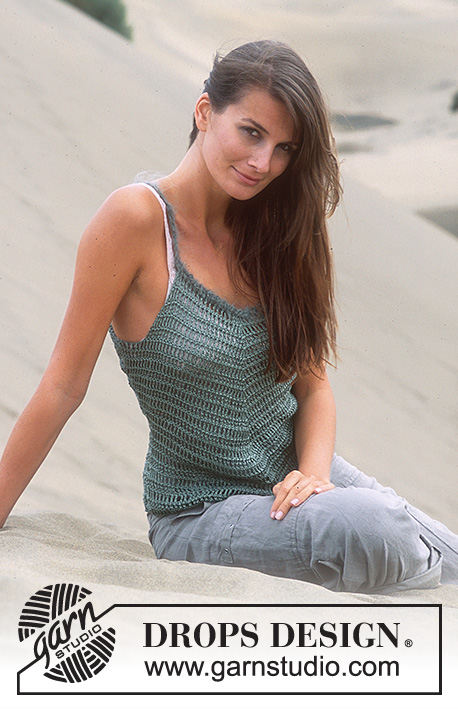
Arrowheart |
|
 |
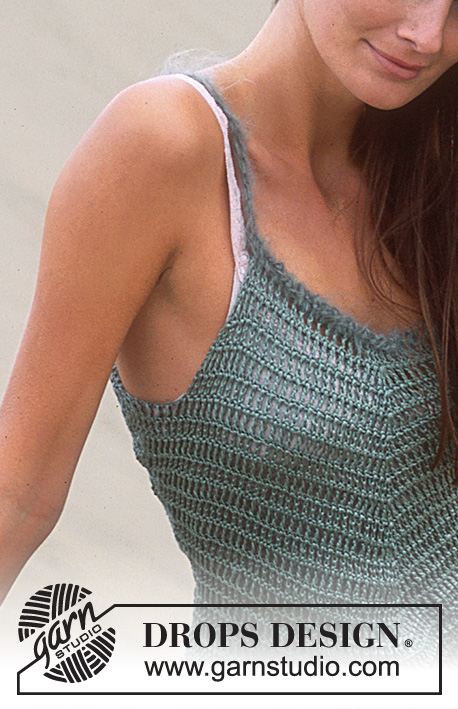 |
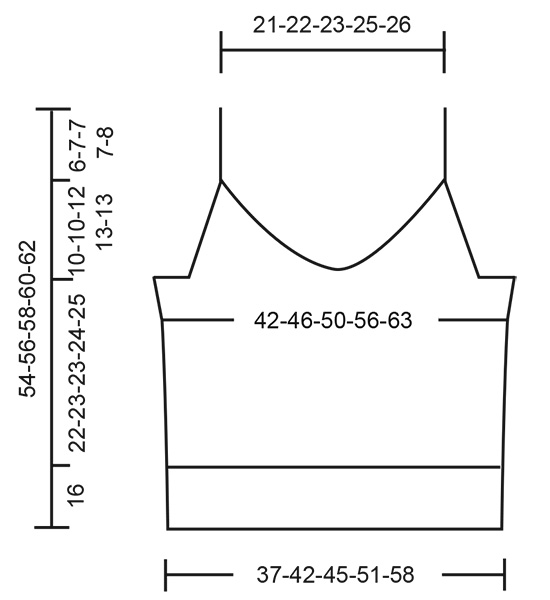
Top DROPS all’uncinetto in Cotton Viscose e Vienna o BabyMerino e Melody. Taglia: XS/S - S/M - M/L - L/XL - XXL
DROPS 95-37 |
|
|
INFO UNCINETTO: Sostituire la 1° m.a.d all’inizio di ogni riga con 4 cat, terminare ogni riga con 1° m.a.d nella 4° cat dell’inizio del giro precedente. NOTA: Puntare l’uncinetto in ogni m.a e non tra le maglie. DIMINUZIONE (per i lati): Siccome vengono aumentate 2 m.a.d lungo tutto il mezzo davanti, bisogna diminuire 1 m.a.d ad ogni lato per mantenere lo stesso numero di maglie. Quando bisogna diminuire ad ogni lato perché il numero di maglia diminuisca, diminuire 1 m.a.d in più ad ogni lato. Intrecciare/Diminuire 1 m.a.d lavorando 2 m.a.d insieme, vuol dire lavorare 1 m.a.d, ma non fare l’ultimo gettato e non estrarre il filo (= 2 maglie sull’uncinetto), lavorare 1 m.a.d nella m seguente, poi estrarre il filo attraverso tutte le 3 m sull’uncinetto = 1 m diminuita. AUMENTI: Aumentare in basso dello scalfo ad ogni lato così: fare un catena di catenelle alla fine della riga prima della riga degli aumenti. Lavorare 16-22-22-24-34 cat, girare il lavoro e lavorare indietro così: 1 m.a.d nella 6° cat dall’uncinetto, * saltare 1 cat, 1 m.a.d nella cat seguente *, ripetere da *-* = 7-10-10-11-16 m.a.d aumentate per lo scalfo. Continuare come prima con 1 m.a.d in ogni m.a.d della riga precedente. DAVANTI: Si lavora ad uncinetto dall’alto verso il basso. Lavorare 36-38-40-44-46 cat lente con l’uncinetto 4 e Cotton Viscose o Baby Merino. Lavorare la 1° riga così: 1 m.a.d nella 5° cat dall’uncinetto, 1 m.a.d in ognuna delle 14-15-16-18-19 cat seguenti, 3 m.a.d nella cat successiva, 1 m.a.d in ognuna delle rimanenti 16-17-18-20-21 cat = 35-37-39-43-45 m.a.d, inserire 1 segnapunti nella m.a.d centrale. Leggere tutto il resto prima di continuare il lavoro! Lavorare a m.a.d - vedere INFO UNCINETTO. Effetto storto: allo stesso tempo, aumentare in mezzo davanti per ottenere l’effetto storto lavorando 3 m.a.d nella m.a.d con il segnapunti - continuare questi aumenti ogni riga. Scalfo: allo stesso tempo, aumentare per gli scalfi ad ogni lato ogni riga lavorando 1 m.a.d in più nella m.a.d più esterna ad ogni lato in totale 5-5-6-7-7 volte (dopo l’ultimo aumento, inserire 1 nuovo segnapunti e misurare il lavoro d’ora in poi da qui). Avviare 7-10-10-11-16 nuove m.a.d ad ogni lato per gli scalfi - vedere AUMENTI. Dopo tutti gli aumenti per gli scalfi ci sono 71-79-85-95-107 m.a.d sulla riga. Continuare a m.a.d, allo stesso tempo, aumentare in mezzo davanti come prima, ma ora bisogna diminuire ad ogni lato per mantenere il numero delle maglie costante - vedere DIMINUZIONI. Allo stesso tempo, quando il lavoro misura ca 7-7-8-8-10 cm (dal nuovo segnapunti) diminuire 1 m.a.d in più ad ogni lato ogni 2 righe in totale 4 volte - vedere DIMINUZIONI = 63-71-77-87-99 m.a.d. Quando il lavoro misura ca 22-23-23-24-25 cm - le diminuzioni ad ogni lato devono essere terminati - continuare a lavorare sopra le 63-71-77-87-99 m.a.d con 1 m.a.d in ogni m.a.d della riga precedente, questo vuol dire che gli aumenti in mezzo davanti e le diminuzioni ai lati terminano qui. Quando il lavoro misura ca 38-39-39-40-41 cm, tagliare il filo (il lavoro misura ora ca 48-49-51-53-54 cm på nella parte più larga). DIETRO: Lavorare come il davanti. CONFEZIONE: Cucire i lati, bordo contro bordo, con piccoli punti. Bordo all’uncinetto: Tutto intorno allo scollo davanti e dietro si lavora un bordo all’uncinetto con l’uncinetto 6 e Vienna o Melody. Lavorare così: 1 m.bss nella 1° m.a.d, 1 cat, 1 m.b tra la 1° e la 2° m.a.d, * 1 cat, 1 m.b tra le 2 m.a.d seguenti *, ripetere da *-* tutta la riga e terminare con 1 m.bss nell’ultima m.a.d della riga. Bretelle: Lavorare 1 m.bss nella m.bss più esterna dalla parte destra del dietro, lavorare una catena di catenelle di ca 12-14-14-14-16 cm (eventualmente lunga quanto si desidera, si consiglia di provare il top), fissare con 1 m.bss nella m.bss più esterna della parte destra sul davanti, lavorare una catena di catenelle di ca 12-14-14-14-16 cm e fissare con 1 m.bss nella m.bss più esterna dalla parte destra del dietro in modo da formare una bretella doppia. Tagliare e fissare il filo. Ripetere per il lato sinistro. |
|
 |
|
Avete terminato questo modello?Allora taggate le vostre foto con #dropspattern o inviatele alla #dropsfan gallery. Avete bisogno di aiuto con questo modello?Troverete 7 video tutorial, una sezione per i commenti/domande e molto altro guardando il modello su www.garnstudio.com © 1982-2026 DROPS Design A/S. Ci riserviamo tutti i diritti. Questo documento, compreso tutte le sue sotto-sezioni, è protetto dalle leggi sul copyright. Potete leggere quello che potete fare con i nostri modelli alla fine di ogni modello sul nostro sito. |
|


Con oltre 40 anni di esperienza nel design di modelli di maglia e uncinetto, DROPS Design offre la più estesa collezione di modelli gratuiti su internet - tradotti in 17 lingue. Ad oggi vi possiamo fornire 324 cataloghi e 12290 modelli - 9561 dei quali sono tradotti in Italiano.
Ci stiamo impegnando molto per darvi il meglio che vi possiamo offrire in termini di maglia e uncinetto, ispirazioni e consigli così come filati di grande qualità ad un prezzo incredibile! Volete utilizzare i nostri modelli per qualcosa d'altro oltre al vostro uso personale? Potete leggere tutto ciò che è consentito nel testo sul Copyright in basso su tutte le pagine dei nostri modelli. Buon lavoro!
Lasciare un commento sul modello DROPS 95-37
Noi saremmo felici di ricevere i tuoi commenti e opinioni su questo modello!
Se vuoi fare una domanda, fai per favore attenzione a selezionare la categoria corretta nella casella qui sotto per velocizzare il processo di risposta. I campi richiesti sono indicati da *.