
Categorie popolari
State cercando un filato?


Commenti / Domande (56)
![]() Van Hai T Nguyen ha scritto:
Van Hai T Nguyen ha scritto:
Drops design dear, I am so sorry about my question, because I did not showed the numbers of pattern. This is number: Loch Tay /woman/ cardigan/ bolero/ drops/95 /36 My question> How to crochet right front piece but mirrored? And then I got your answer, but I still had confused. Can you share me detail to do. Thank you for your help.
28.04.2026 - 18:41
![]() Van Hai ha scritto:
Van Hai ha scritto:
How to crochet right front piece but mirrored?
23.04.2026 - 00:52DROPS Design ha risposto:
Dear Mrs Van Hai, work as left front piece but increase on mid front on the right side of piece (seen from RS) and increase towards the side at the left side of piece. Armhole will be worked on the left side of piece and neckline on the right side of piece. Happy crocheting!
23.04.2026 - 11:03
![]() Greta ha scritto:
Greta ha scritto:
Pershendetje! Si ti kuptoj shtesat apo mbylljet ne reshta te alternuara, Faleminderit
06.08.2024 - 12:04
![]() Rose L ha scritto:
Rose L ha scritto:
It is unfortunate I don't read other languages because perhaps you have answered but I don't understand how to add stitches at the end of the row, for that row when I mirror. I can add chains at the end of the row to create 5 new tr at the beginning of the next row but when I am mirroring I have to add chains at the end of a row specifically for that row not the next. The instructions only explain now to set up the next row, not add to the existing row which is what is needed to mirror. Thx
02.05.2024 - 02:44DROPS Design ha risposto:
Dear Rose, you will increase at the end of the row crocheting extra chains just as explained under Increasing tips (applies to slope at front): on both front pieces. Happy crocheting!
02.05.2024 - 08:35
![]() Irina ha scritto:
Irina ha scritto:
Es geht um den Beginn beim Rücken. Da steht 3 D-Stäbchen und eine Masche überspringen. Soll ich, jeweils eine Luftmasche dazwischen häkeln? Wenn ich das nicht mache verringert sich sonst die Maschenanzahl. Oder ist das absichtlich so um das Bund locker zu gestalten?
23.03.2024 - 09:17DROPS Design ha risposto:
Liebe Irina, da die Luftmaschenketten oft zu eng sind, als man dann später braucht, wird man mehr Luftmaschen anschlagen als man Maschen braucht, dann bei der 1. Reihe wird man regelmäßig verteilt 1 Luftmasche überspringen um die richtige Maschenanzahl bzw Breite zu haben. So überspringen Sie jede 4. Luftmasche aber keine extra Lufmtasche häkeln. Viel Spaß beim Häkeln!
02.04.2024 - 08:20
![]() Delphine ha scritto:
Delphine ha scritto:
Hello, and thank you for your reply to my last question ☺️. Now struggling with the sleeves 🤪 ! No issues with the first few rows and going from 60 to 66 dtr (working on an XL), but a bit confused about the decreasing 4 dtrs 1 time, 3 dtrs 1 time and 2dtr until piece measures 19 cm. Is it done on every row (says English translation) or every other row (according to French translation). And if I want to make longer sleeves, that’s where I keep going, right ? Thank you
12.12.2023 - 14:29DROPS Design ha risposto:
Dear Delphine, thanks for your feedback, both UK and French pattern were edited in some places, as the increases for sleeves are worked on every row (and not on every other row/tous les 2 rangs) - decreasing on top of sleeve is worked on every row. Happy crocheting!
13.12.2023 - 08:37
![]() Delphine G ha scritto:
Delphine G ha scritto:
Hi, I was wondering what you meant by « mid front » for the front pieces. Do you mean the end of the piece worked (which would be the middle of the front of finished product I guess) ? Or the middle of the piece worked ? I’m thinking the former, but just wanted to be sure. Many thanks !
06.12.2023 - 19:08DROPS Design ha risposto:
Hi Delphine, Yes, it is the edge of the front piece which is mid-front of the garment. Happy crafting!
07.12.2023 - 06:42
![]() Valérie ha scritto:
Valérie ha scritto:
Bonjour, J'ai terminé le devant gauchet et je commence le devant droite. Et je suis bloquée dès le 3ème rang:. Comment faire plusieurs augmentations avec des doubles-brides en fin de rang? Pour le devant gauche, l'arrondi était en début de rang, et j'ai donc ajouté des ML, pour le devant gauche, les augmentations pour l'arrondi viennent en fin de rang et je ne sais pas comment les faire. Mes recherches dans les tutoriels en ligne n'ont rien donné. Merci pour votre aide :-)
29.07.2023 - 19:05DROPS Design ha risposto:
Bonjour Valérie, vous allez augmenter de la même façon que pour le devant gauche, mais pour le devant gauche, vous avez monté vos mailles en l'air en fin de rang sur l'endroit, pour le devant droit, vous allez monter vos mailles en l'air en fin de rang sur l'envers. Bon crochet!
31.07.2023 - 10:22
![]() Valérie ha scritto:
Valérie ha scritto:
Hello, Je viens de commencer cet ouvrage et je bute dès la fin du premier rang. Au début du 2ème rang, faut-il faire des ml ? et si oui, combien? Merci
10.06.2023 - 15:38DROPS Design ha risposto:
Bonjour Valérie, au début de chaque rang de double-brides, vous allez remplacer la 1ère double-bride par 4 mailles en l'air et vous terminez le rang par 1 double-bride dans la 4ème maille en l'air du début du rang précédent - cf INFO CROCHET. Bon crochet!
12.06.2023 - 09:23
![]() Sandra ha scritto:
Sandra ha scritto:
Ik heb alles gehaakt. Nu moet ik de mouwen aan het voor/achterpand haken. Mij valt op dat mijn mouw maat M, met 54 dst ongeveer 31 cm meet. Mijn armsgaten meten 19 cm, keer 2 is 38 cm. Kom ik 7 cm tekort toch?
10.04.2022 - 08:35DROPS Design ha risposto:
Dag Sandra,
De hoogte van het armsgat is inderdaad 19 cm, maar er zit ook een ronding in richting de oksel, dus als je opmeet langs de ronding vanaf het begin van het armsgat tot de schouder, dan zou je op een hoger getal uit moeten komen.
14.04.2022 - 11:37
|
|
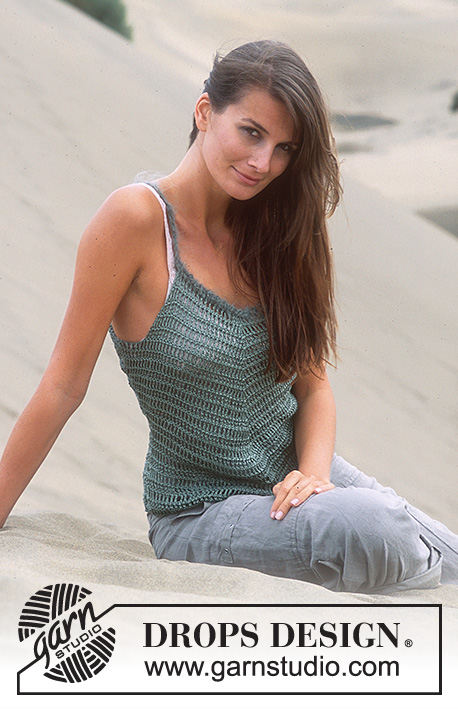
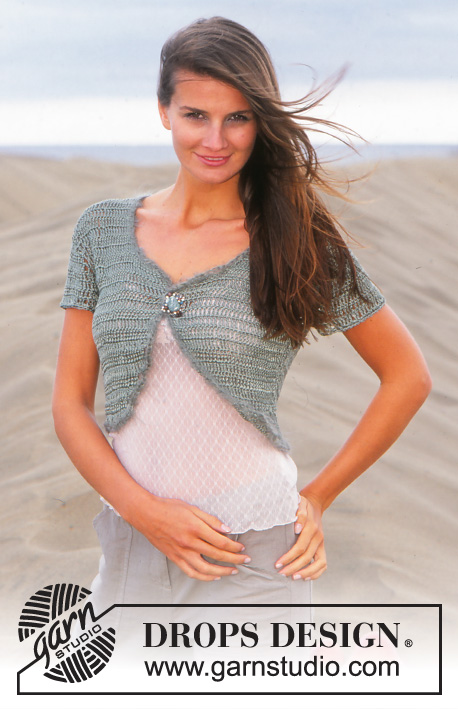
Loch Tay |
|
 |
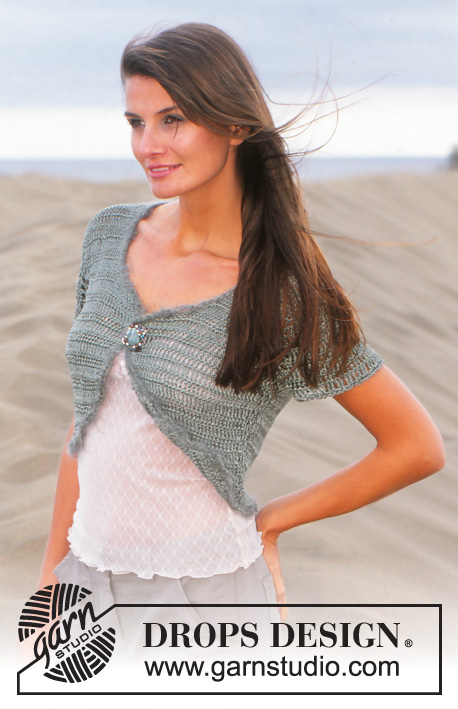 |
Bolero lavorato all’uncinetto in DROPS Cotton Viscose o Safran e DROPS Vienna o Melody. Taglie: XS/S-XXL.
DROPS 95-36 |
|
|
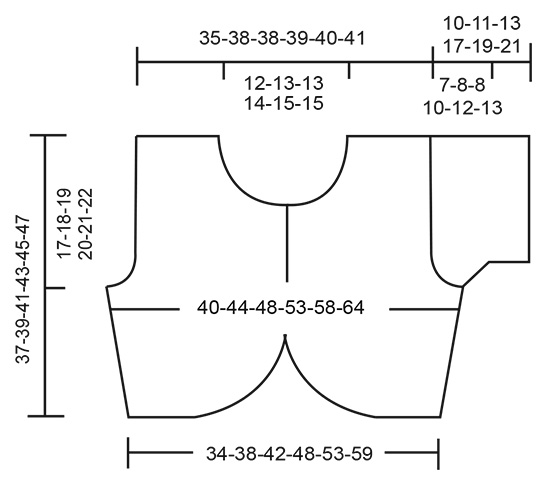
Informazioni: All’inizio di ogni riga sostituire 1 m.a.d. con 4 catenelle e finire ogni riga con 1 m.a.d. nella 4° catenella dall’inizio della riga precedente. Lavorare in ogni m. e non tra le m.. Suggerimento per le diminuzioni (applicato agli scalfi e al collo): Diminuire come segue all’inizio della riga: sostituire la prima m.a.d. con 1 m.bss.. Diminuire come segue alla fine della riga: girare il lavoro quando rimane il numero di m.a.d. da diminuire e lavorare la riga successiva. Suggerimento per gli aumenti (applicato alla pendenza sul davanti): Aumentare nuove m. verso il centro lavorando catenelle nell’ultima m. della riga precedente. Lavorare lo stesso numero di catenelle delle m.a.d. da aumentare, ma, dal momento che la prima m.a.d. sulla riga successiva deve essere sostituita da 4 catenelle, sostituire l’ultima catenella con 4 catenelle, cioè, se dovete aumentare 5 m.a.d. lavorate 8 catenelle, girate il lavoro, lavorate 1 m.a.d. nella quinta catenella dall’uncinetto e poi 1 m.a.d. in ognuna delle rimanenti catenelle, continuare sulla riga con 1 m.a.d. in ogni m.a.d. della riga precedente. Dietro: Senza stringere avviare 80-88-99-112-123-136 catenelle usando l’uncinetto misura 4 e il Cotton Viscose o Safran. Lavorare la prima riga come segue: 1 m.a.d. nella 5° catenella dall’uncinetto, *saltare 1 catenella, 1 m.a.d. in ognuna delle 3 catenelle successive* ripetere da *-* ma per le taglie XS + S + L + XXL finire con 1 m.a.d. nelle ultime 2 catenelle (invece delle ultime 3 catenelle) e per le taglie M + XL finire con 1 m.a.d. nell’ultima catenella (invece delle ultime 3 catenelle) = 58-64-72-82-90-100 m.a.d.. Ora lavorare 1 m.a.d. in ognuna delle m.a.d. della riga precedente – vedere le informazioni. Allo stesso tempo, dopo 2-2-3-3-3-3 righe aumentare 1 m.a.d. per lato lavorando 1 m.a.d. extra nella penultima m.a.d. per lato come segue: Taglie XS + S + M: a righe alterne, taglie L + XL + XXL: su ogni terza riga per un totale di 5-5-5-4-4-4 volte = 68-74-82-90-98-108 m.a.d.. Quando il lavoro misura circa 20-21-22-23-24-25 cm diminuire per gli scalfi da ogni lato su ogni riga – vedere i suggerimenti per le diminuzioni: 3-3-4-6-7-9 m.a.d. 1 volta, 2 m.a.d. 0-0-1-1-2-3 volte e 1 m.a.d. 1-2-3-4-4-4 volte = 60-64-64-66-68-70 m.a.d.. Quando il lavoro misura circa 35-37-39-41-43-45 cm (solo una riga rimasta alla lunghezza finale) lavorare 1 riga lungo le 20-21-21-21-21-22 m.a.d. più esterne per lato (cioè non lavorare le 20-22-22-24-26-26 m.a.d. centrali = collo). Tagliare il filo, il lavoro misura circa 37-39-41-43-45-47 cm. Davanti sinistro: Senza stringere avviare 28-29-32-35-37-40 catenelle usando l’uncinetto misura 4 mm e il Cotton Viscose o Safran. Lavorare la prima riga come segue: 1 m.a.d. nella 5° catenella dall’uncinetto, *saltare 1 catenella, 1 m.a.d. in ognuna delle 3 catenelle successive* ripetere da *-* ma per le taglie XS + M + XXL finire con 1 m.a.d. nelle ultime 2 catenelle (invece delle ultime 3 catenelle ) e per la taglia L finire con 1 m.a.d. nell’ultima catenella (invece delle ultime 3 catenelle) = 19-20-22-24-26-28 m.a.d. Ora lavorare 1 m.a.d. in ognuna delle m.a.d. della riga precedente come per il dietro, allo stesso tempo aumentare verso il centro a righe alterne (cioè su ogni riga verso il centro) – vedere il suggerimento per gli aumenti: 5 m.a.d. 1-1-2-2-2-2 volte, 4 m.a.d. 1-1-0-0-0-0 volte, 3 m.a.d. 0-0-0-1-1-2 volte, 2 m.a.d. 1-2-2-2-3-3 volte e 1 m.a.d. 1-1-2-2-2-2 volte. Allo stesso tempo aumentare ai lati come per il dietro. Allo stesso tempo quando il lavoro misura 20-21-22-23-24-25 cm – confrontarlo con il dietro – diminuire per gli scalfi come descritto per il dietro. Allo stesso tempo, quando il lavoro misura 26-26-26-28-28-30 cm diminuire per la scollatura verso il centro su ogni riga – vedere il suggerimento per le diminuzioni: 7-8-8-9-10-10 m.a.d. 1 volta, 2 m.a.d. 1 volta e 1 m.a.d. 3 volte = 20-21-21-21-21-22 m.a.d. rimaste per la spalla. Quando il lavoro misura circa 37-39-41-43-45-47 – confrontarlo con il dietro – tagliare il filo. Davanti destro: Lavorato come il sinistro ma a specchio. Manica: Senza stringere avviare 66-70-74-78-82-86 catenelle usando l’uncinetto misura 4 e il filato Cotton Viscose o Safran. Lavorare la prima riga come segue: 1 m.a.d. nella quinta catenella dal ferro, 1 m.a.d. nella catenella successiva, *saltare 1 catenella, 1 m.a.d. in ognuna delle 3 catenelle successive * ripetere da *-* = 48-51-54-57-60-63 m.a.d.. Lavorare 1-1-2-3-3-4 righe di m.a.d. come prima, allo stesso tempo aumentare 1 m.a.d. per lato a righe alterne lavorando 1 m.a.d. extra nella penultima m.a.d. per lato = 50-53-58-63-66-71 m.a.d.. Sulla riga successiva diminuire per l’arrotondamento della manica da ogni lato su ogni riga – vedere il suggerimento per le diminuzioni: 4 m.a.d. 1 volta, 3 m.a.d. 1 volta, e quindi 2 m.a.d. per lato fino a quando il lavoro misura circa 10-11-13-17-19-21 cm. Tagliare il filo. Confezione: Cucire i margini delle spalle. Attaccare le maniche al corpo usando l’uncinetto misura 4 mm e il filato Cotton Viscose o Safran come segue: 1 m.b. nella prima m. sulla manica, 2 catenelle, 1 m.b. nella prima m. sul pezzo dietro/davanti, 2 catenelle, 1 m.b. nella m.a.d. sulla manica, 2 catenelle, 1 m.b. nella m.a.d. sul pezzo davanti/dietro, ecc. Lavorare la manica e cucire i margini insieme allo stesso modo. Lavorare il bordo: Lavorare un bordo all’uncinetto lungo l’apertura del bolero (cioè: su lungo entrambi i pezzi davanti, lungo il collo e lungo il margine inferiore) usando l’uncinetto misura 6 e il Vienna o Melody come segue: 1 m.b. nella prima m., *3 catenella, saltare circa 2.5 cm, 1 m.b. nella m. successiva*, ripetere da *-* e finire con 3 catenelle e 1 m.bss. nella prima m.b. dall’inizio del giro. NB! Il bordo deve essere carino e piatto, non ad onde. Chiudere il giacchino con un bottone a spilla. |
|
 |
|
Avete terminato questo modello?Allora taggate le vostre foto con #dropspattern o inviatele alla #dropsfan gallery. Avete bisogno di aiuto con questo modello?Troverete 8 video tutorial, una sezione per i commenti/domande e molto altro guardando il modello su www.garnstudio.com © 1982-2026 DROPS Design A/S. Ci riserviamo tutti i diritti. Questo documento, compreso tutte le sue sotto-sezioni, è protetto dalle leggi sul copyright. Potete leggere quello che potete fare con i nostri modelli alla fine di ogni modello sul nostro sito. |
|


Con oltre 40 anni di esperienza nel design di modelli di maglia e uncinetto, DROPS Design offre la più estesa collezione di modelli gratuiti su internet - tradotti in 17 lingue. Ad oggi vi possiamo fornire 324 cataloghi e 12290 modelli - 9561 dei quali sono tradotti in Italiano.
Ci stiamo impegnando molto per darvi il meglio che vi possiamo offrire in termini di maglia e uncinetto, ispirazioni e consigli così come filati di grande qualità ad un prezzo incredibile! Volete utilizzare i nostri modelli per qualcosa d'altro oltre al vostro uso personale? Potete leggere tutto ciò che è consentito nel testo sul Copyright in basso su tutte le pagine dei nostri modelli. Buon lavoro!
Lasciare un commento sul modello DROPS 95-36
Noi saremmo felici di ricevere i tuoi commenti e opinioni su questo modello!
Se vuoi fare una domanda, fai per favore attenzione a selezionare la categoria corretta nella casella qui sotto per velocizzare il processo di risposta. I campi richiesti sono indicati da *.