
Categorie popolari
State cercando un filato?


Commenti / Domande (23)
![]() Marina Le Devin ha scritto:
Marina Le Devin ha scritto:
Très joli. Juste pour info : je n'ai pas eu assez des 50g de laine coloris blé pour terminer l'ouvrage. Prévoir une pelote supplémentaire...
08.02.2025 - 18:53
![]() Pauline Higuet ha scritto:
Pauline Higuet ha scritto:
Bonjour, J'ai une question par rapport au rendu de l'ouvrage. Je n'ai pas terminé mon carré mais il ne repose pas à plat, est ce que c'est normal ? J'hésite à continuer ou à tout recommencer mais pourtant j'ai bien suivi le modèle à la lettre et je me demande d'où peut bien venir l'anomalie. Merci de votre aide par avance
23.01.2025 - 22:48DROPS Design ha risposto:
Bonjour Mme Higuet, pensez à bien conserver la même tension tout du long, en largeur mais aussi en hauteur, pour conserver la bonne forme aux carrés. Bon crochet!
24.01.2025 - 09:49
![]() Nancy ha scritto:
Nancy ha scritto:
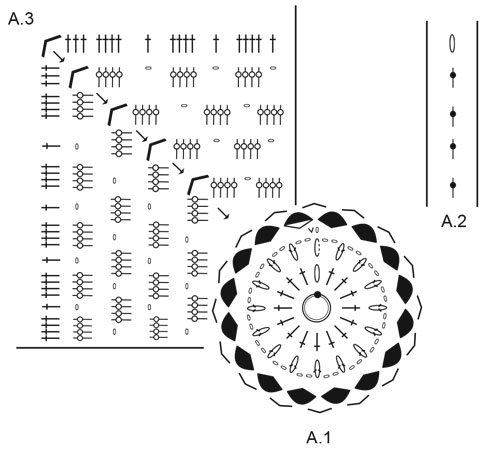
I am unsure about the number of double trebles I should have at the beginning and end of the rounds in diagram A.2 and A.3. It says the chain 4 stitches do not replace the trebles, but I end up with what feels like a larger amount of stitch posts than I should have. Should I have five stitch posts in the beginning/end of round and four on the rest of the round? Or is that one too many?
16.01.2025 - 23:50DROPS Design ha risposto:
Dear Nancy, A.2 is worked only one time at the beginning of the round, this means you work 4 chains then you will repeat A.3 a total of 4 times in the round to get 4 corners and end the round with 1 slip stitch in the 4th chain from beg of the round (=A.2). Happy crocheting!
17.01.2025 - 09:04
![]() Hj Korfage ha scritto:
Hj Korfage ha scritto:
Mijn vraag is: worden de randen los gehaakt en later aangenaaid? Dat lijkt zo als ik de tekening bekijk, maar staat niet duidelijk in het patroon Mvg HuberteKorfage.
15.01.2025 - 17:36DROPS Design ha risposto:
Dag Hj Korfage,
Nee, je haakt de randen gelijk aan de deken, dus eerst de vierkanten aan elkaar haken en daarna haak je in de steken rondom de deken om de rand te maken.
16.01.2025 - 19:46
![]() Iréne Karlsson ha scritto:
Iréne Karlsson ha scritto:
Jag skulle vilja ha ett mönster utskrivet på svenska. Jag har fått ett utskrivet mönster på norska. Mönstret är en mormorspläd, DROPS 229-5. Mvh Iréne Karlsson Brännmursstigen 5 802 57 Gävle
15.11.2024 - 19:03DROPS Design ha risposto:
Hej Irene, det er bare at vælge Svenska øverst i opskriften, så har du det på svenska og nu kan du så også skrive det ud :)
19.11.2024 - 11:15
![]() Magali Darnaud ha scritto:
Magali Darnaud ha scritto:
Bonjour, Je ne comprends pas comment crocheter le diagramme A2 après A1. Merci de votre aide.
01.11.2024 - 09:26DROPS Design ha risposto:
Bonjour Mme Darnaud, le diagramme A.2 montre comment commencer et terminer les tours de A.3, autrement dit, crochetez 4 mailles en l'air au début du tour, crochetez et répétez ensuite A.3 tout le tour et terminez par 1 maille coulée dans la 4ème maille en l'air du début du tour (cf aussi légende du symbole de A.2 =10ème symbole de la légende). Bon crochet!
01.11.2024 - 10:05
![]() Simone Hattie ha scritto:
Simone Hattie ha scritto:
Sorry only the extended treble crochets fit the 1st round of a3
25.10.2024 - 01:43
![]() Simone ha scritto:
Simone ha scritto:
I found that at a3 in the corners I needed to do an extended treble crochet (instead of 2 loops over I did 3) instead of treble crochets which made the square and not have it wavy
25.10.2024 - 01:41
![]() Gülcin ha scritto:
Gülcin ha scritto:
Hallo ich werde die Tage anfangen diese Decke zu häkeln, muss ich die grannys einzeln spannen, oder die komplette Decke wenn sie fertig ist? Muss ich überhaupt spannen? Vielen Dank
13.06.2024 - 06:52DROPS Design ha risposto:
Liebe Frau Gülcin, je nach Wunsch können Sie entweder jede 4-Ecke spannen oder die fertige Decke spannen. Einige spannen alles, andere niemals, fragen Sie mal Ihr DROPS Händler, gerne werden Sie Ihnen damit gerne - auch per Telefon oder per E-Mail weiterhelfen. Viel Spaß beim Häkeln!
13.06.2024 - 07:53
![]() Tineke ha scritto:
Tineke ha scritto:
Als ik het patroon volg is mijn square niet mooi vierkant, maar iets teveel "rond". Wat doe ik fout?
05.03.2024 - 13:26DROPS Design ha risposto:
Dag Tineke,
Helaas kan ik niet met je meekijken, het zou kunnen zijn dat er op de hoeken iets fout gaat, maar misschien gaat het ook gewoon goed en trekt het bij zodra je het werk in elkaar zet en/of opperst.
05.03.2024 - 22:19
|
|||||||||||||||||||||||||||||||||||||||||||||||||||||||
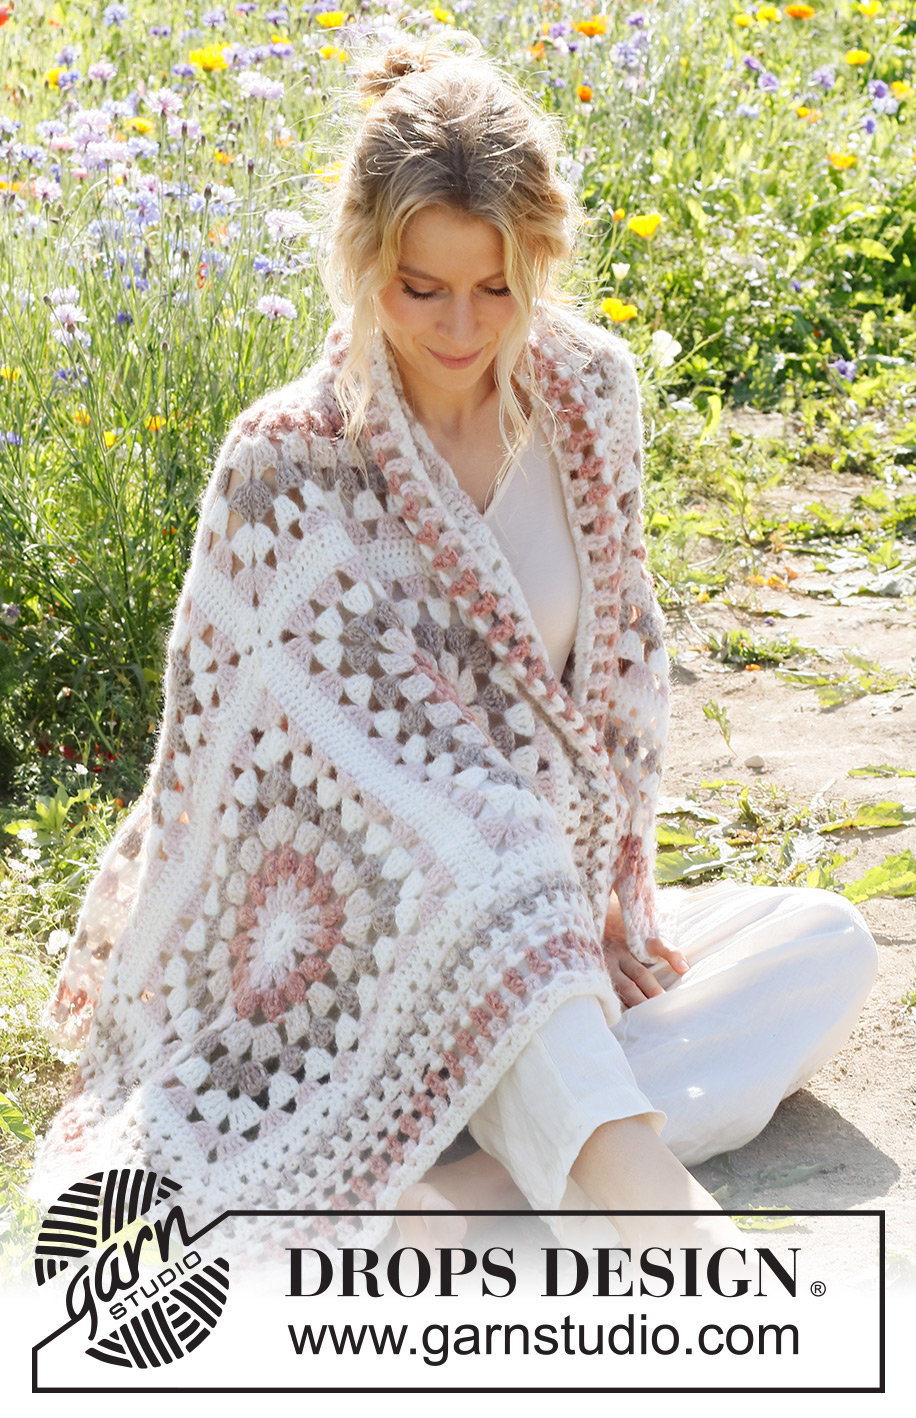
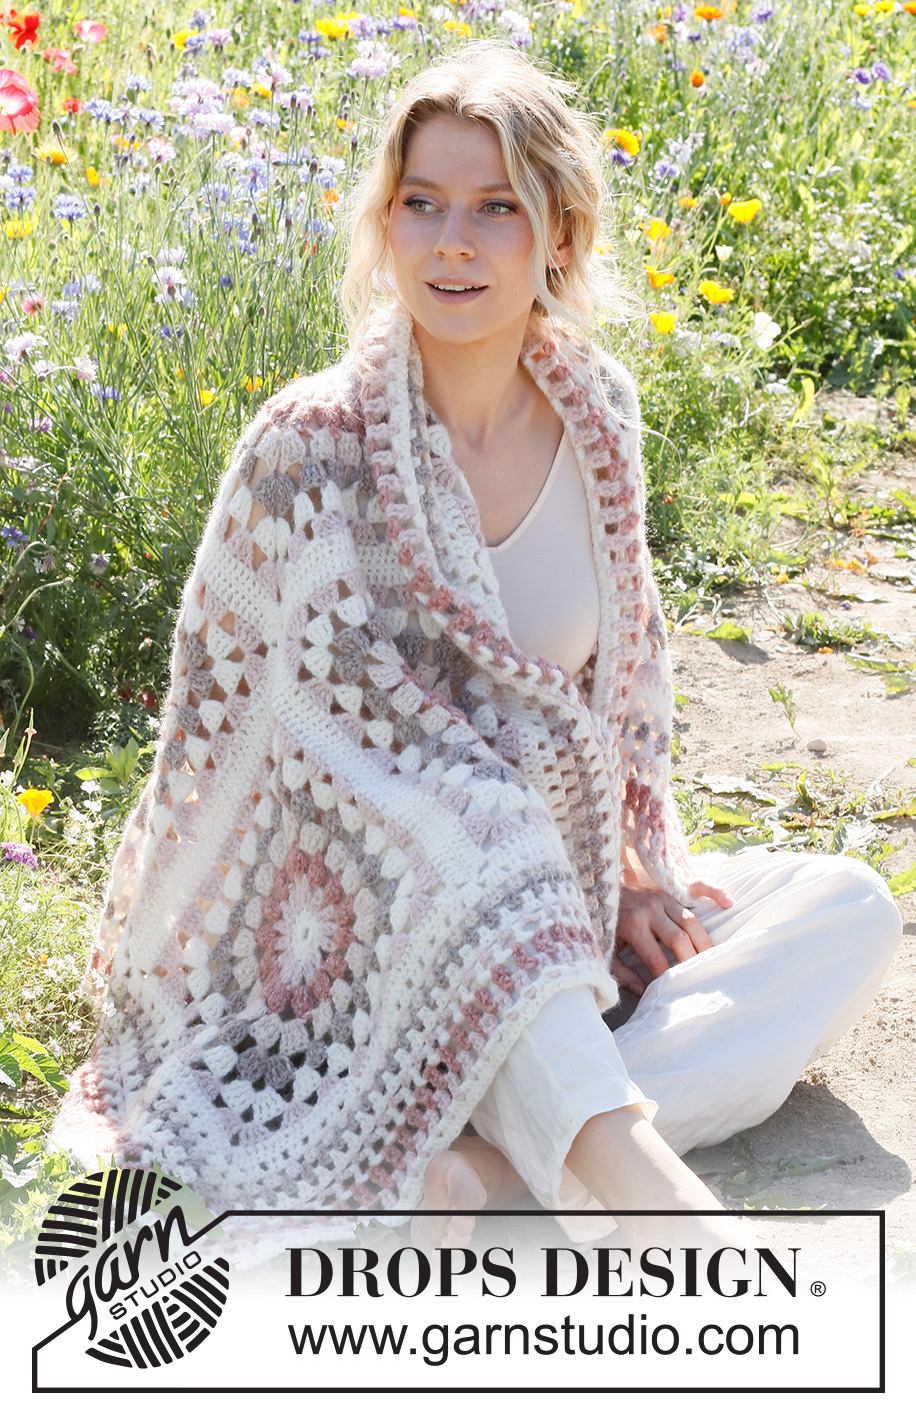
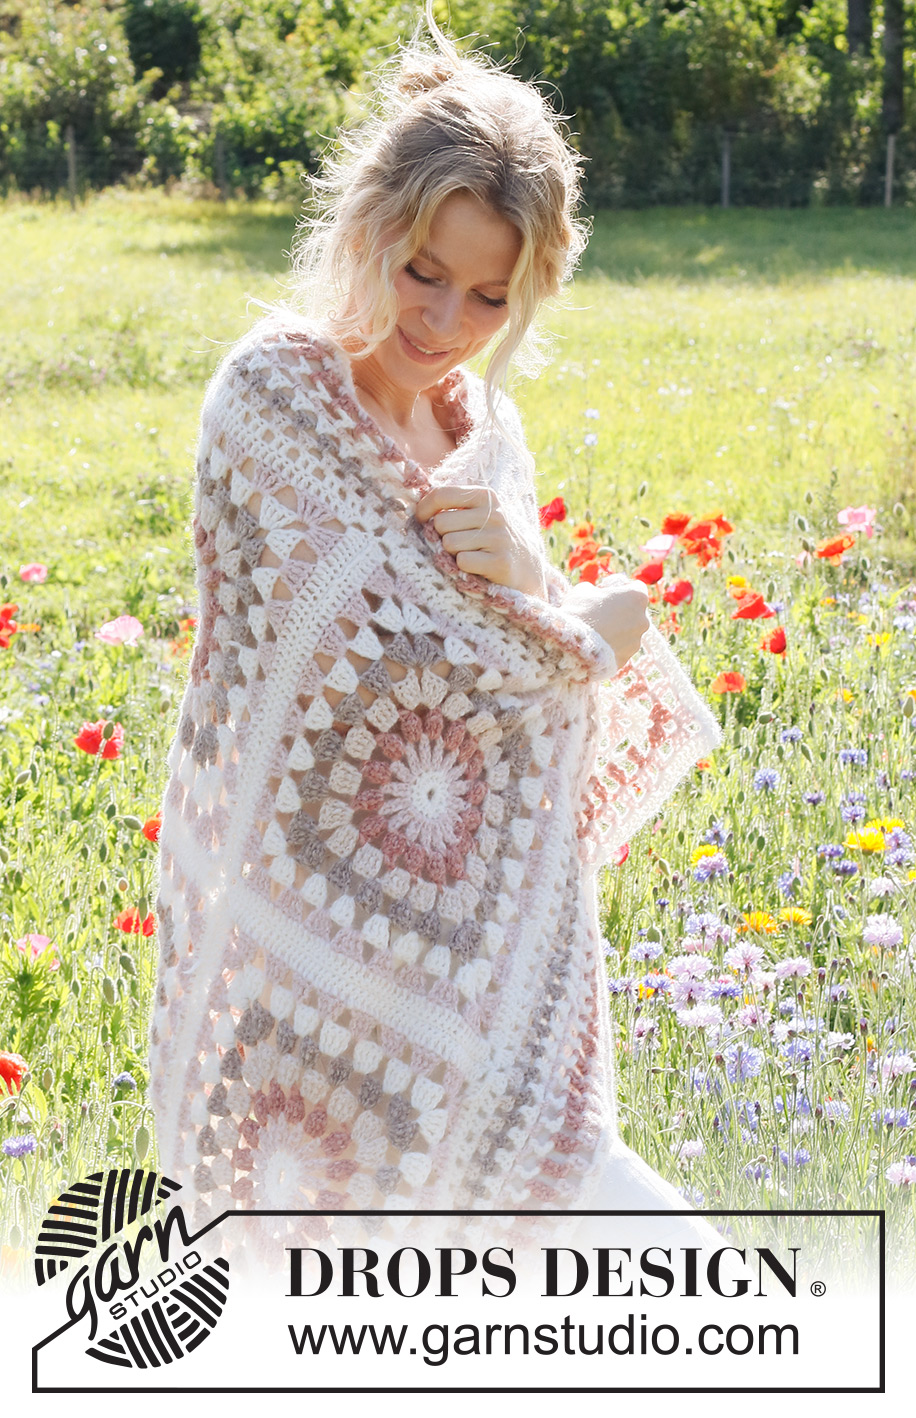
Grandma’s Hugs#grandmashugsblanket |
|||||||||||||||||||||||||||||||||||||||||||||||||||||||
 |
 |
||||||||||||||||||||||||||||||||||||||||||||||||||||||
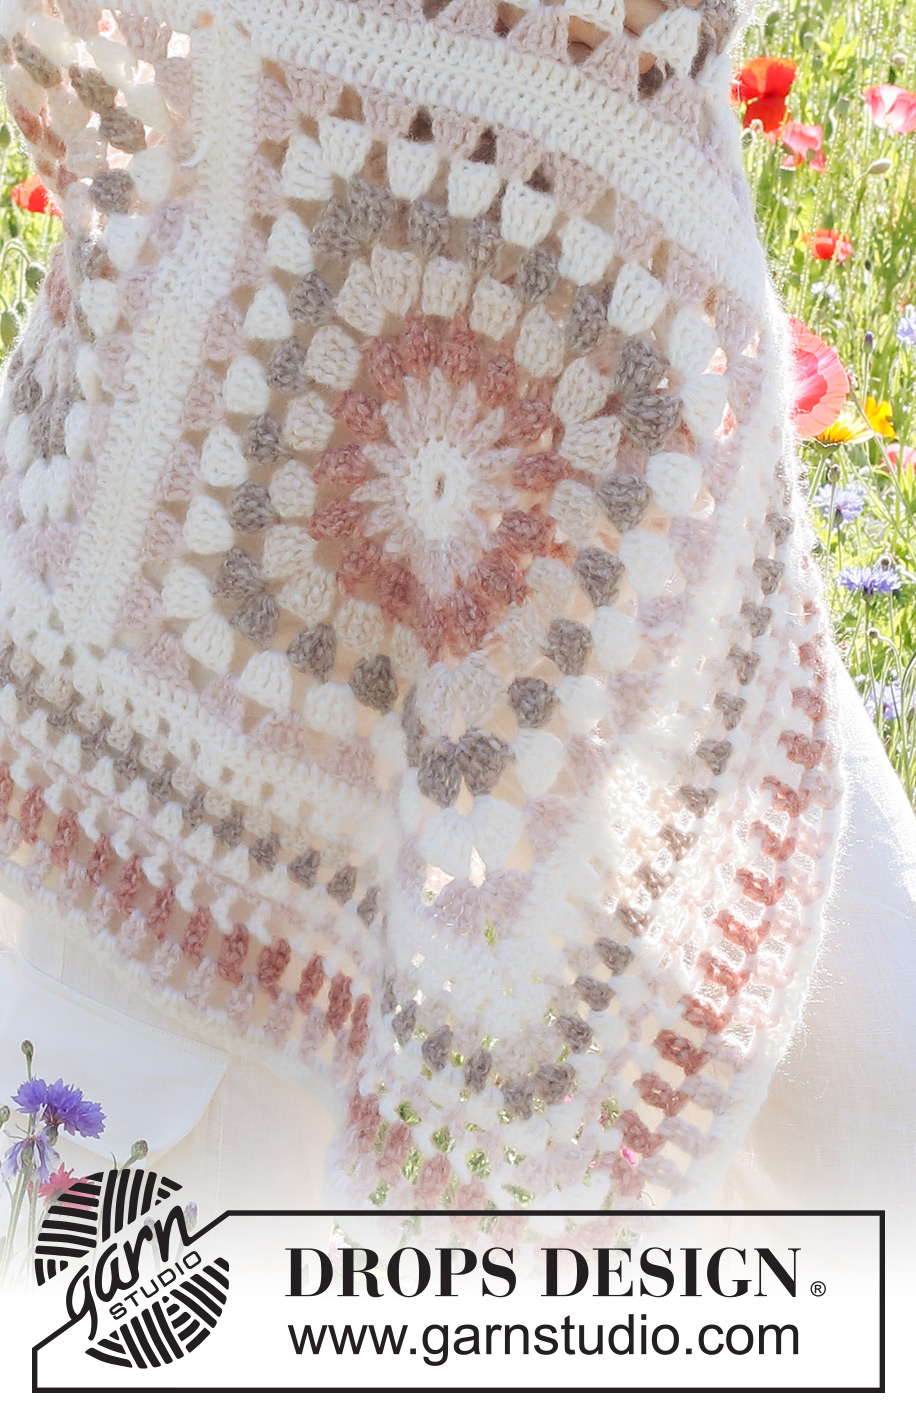
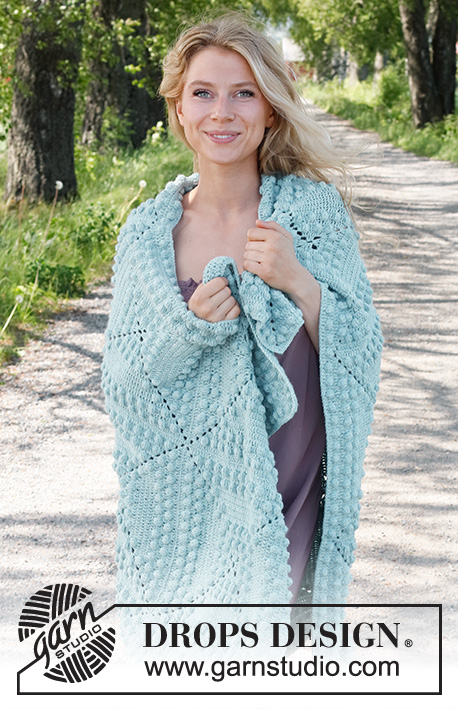
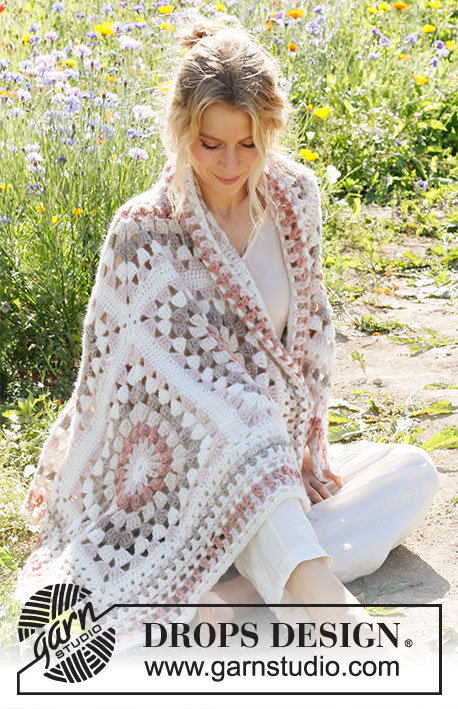
Coperta lavorata all’uncinetto con quadrati in DROPS Air.
DROPS 229-5 |
|||||||||||||||||||||||||||||||||||||||||||||||||||||||
|
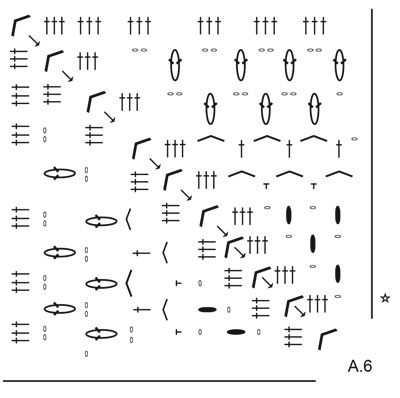
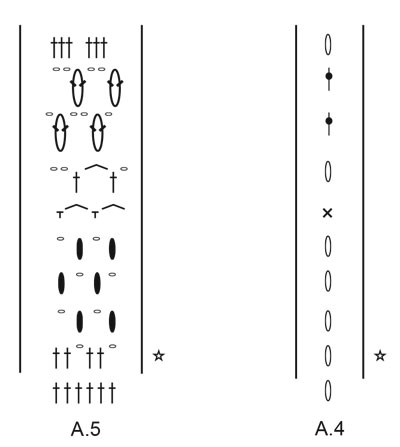
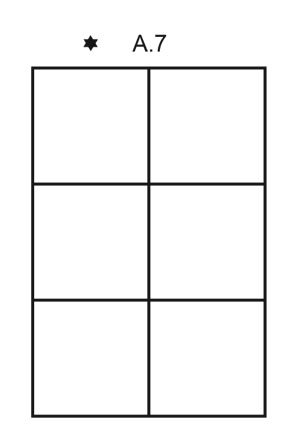
------------------------------------------------------- TECNICHE IMPIEGATE: ------------------------------------------------------- MOTIVO: Vedere i diagrammi A.1 - A.7. COLORI DEI QUADRATI (A.1 - A.3): AVVIO e GIRO 1: panna GIRO 2: rosa sabbia GIRO 3: blush GIRO 4: grano GIRO 5: beige GIRO 6: panna GIRO 7: rosa sabbia GIRO 8: panna COLORI DEL BORDO (A.4 - A.6): GIRO 1: panna GIRO 2: grano GIRO 3: beige GIRO 4: panna GIRO 5: rosa sabbia GIRO 6: panna GIRO 7: blush GIRO 8: rosa sabbia GIRO 9: panna SUGGERIMENTO PER IL CAMBIO COLORE: Durante il cambio colore, lavorare come segue: Lavorare l’ultima maglia sul giro con il vecchio colore, ma aspettare con l’ultimo gettato e passaggio, passare al colore successivo e lavorare il gettato e passaggio, poi continuare come mostrato nel diagramma. ------------------------------------------------------- INIZIO DEL LAVORO: ------------------------------------------------------- COPERTA – BREVE RIASSUNTO DEL LAVORO: La coperta è formata da 6 quadrati che vengono cuciti insieme, 2 quadrati in larghezza, 3 quadrati in lunghezza. Lavorare un bordo attorno a tutta la coperta. 1 QUADRATO: Leggere COLORI DEI QUADRATI nelle spiegazioni sopra. Iniziare con l’uncinetto n° 5 mm e il colore panna in DROPS Air. Avviare 5 catenelle e unirle ad anello con 1 maglia bassissima nella 1° catenella. Leggere il SUGGERIMENTO PER IL CAMBIO DI COLORE, e lavorare il diagramma A.1 (cerchio). FARE ATTENZIONE ALLA TENSIONE DEL LAVORO! Alla fine di A.1, continuare come segue: lavorare A.2 (= inizio e fine del giro), A.3 quattro volte attorno al cerchio. Alla fine di A.2 e A.3, tagliare e affrancare i fili. Lavorare 6 quadrati. CONFEZIONE: Disporre i quadrati con 2 quadrati in larghezza e 3 quadrati in lunghezza – vedere A.7. NOTA: Fare in modo che il quadrato indicato con una stella nera sia posizionato in modo che la fine del giro sia verso il bordo esterno. La stella indica l’inizio del bordo che verrà lavorato in seguito. Cucire i quadrati margine a margine in modo che la cucitura sia piatta. Tagliare e affrancare i fili. BORDO: Leggere COLORI DEL BORDO nelle spiegazioni sopra. Iniziare nella maglia indicata con una stella in A.2. Lavorare A.4 in questa maglia, poi A.5 tre volte, lavorare A.6 nell’angolo, lavorare A.5 fino all’angolo successivo – NOTA: In ogni punto di passaggio tra 2 quadrati lavorare 1 catenella, 2 maglie alte attorno all’arco di catenelle nell’angolo del 1° quadrato, 1 catenelle, 2 maglie alte attorno all’arco di catenelle nell’angolo sul 2° quadrato. Continuare in questo modo attorno a tutta la coperta. Alla fine di A.4 - A.6, tagliare e affrancare i fili. |
|||||||||||||||||||||||||||||||||||||||||||||||||||||||
Spiegazioni del diagramma |
|||||||||||||||||||||||||||||||||||||||||||||||||||||||
|
|||||||||||||||||||||||||||||||||||||||||||||||||||||||
 |
|||||||||||||||||||||||||||||||||||||||||||||||||||||||
 |
|||||||||||||||||||||||||||||||||||||||||||||||||||||||
 |
|||||||||||||||||||||||||||||||||||||||||||||||||||||||
 |
|||||||||||||||||||||||||||||||||||||||||||||||||||||||
Avete terminato questo modello?Allora taggate le vostre foto con #dropspattern #grandmashugsblanket o inviatele alla #dropsfan gallery. Avete bisogno di aiuto con questo modello?Troverete 10 video tutorial, una sezione per i commenti/domande e molto altro guardando il modello su www.garnstudio.com © 1982-2026 DROPS Design A/S. Ci riserviamo tutti i diritti. Questo documento, compreso tutte le sue sotto-sezioni, è protetto dalle leggi sul copyright. Potete leggere quello che potete fare con i nostri modelli alla fine di ogni modello sul nostro sito. |
|||||||||||||||||||||||||||||||||||||||||||||||||||||||


Con oltre 40 anni di esperienza nel design di modelli di maglia e uncinetto, DROPS Design offre la più estesa collezione di modelli gratuiti su internet - tradotti in 17 lingue. Ad oggi vi possiamo fornire 324 cataloghi e 12290 modelli - 9561 dei quali sono tradotti in Italiano.
Ci stiamo impegnando molto per darvi il meglio che vi possiamo offrire in termini di maglia e uncinetto, ispirazioni e consigli così come filati di grande qualità ad un prezzo incredibile! Volete utilizzare i nostri modelli per qualcosa d'altro oltre al vostro uso personale? Potete leggere tutto ciò che è consentito nel testo sul Copyright in basso su tutte le pagine dei nostri modelli. Buon lavoro!
Lasciare un commento sul modello DROPS 229-5
Noi saremmo felici di ricevere i tuoi commenti e opinioni su questo modello!
Se vuoi fare una domanda, fai per favore attenzione a selezionare la categoria corretta nella casella qui sotto per velocizzare il processo di risposta. I campi richiesti sono indicati da *.