
Popular categories
Looking for a yarn?


|
|||||||||||||||||||||||||||||||||||||||||||||||||||||||
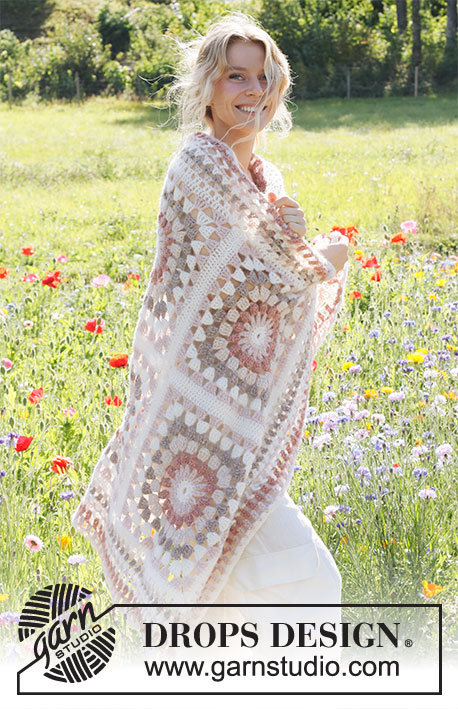
Grandma’s Hugs |
|||||||||||||||||||||||||||||||||||||||||||||||||||||||
 |
 |
||||||||||||||||||||||||||||||||||||||||||||||||||||||
Crocheted blanket with squares in DROPS Air.
DROPS 229-5 |
|||||||||||||||||||||||||||||||||||||||||||||||||||||||
|
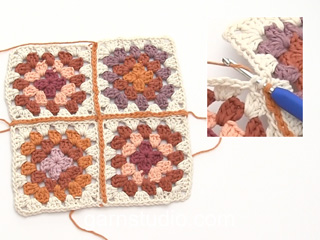
------------------------------------------------------- EXPLANATIONS FOR THE PATTERN: ------------------------------------------------------- PATTERN: See diagrams A.1 to A.7. COLOURS SQUARE (A.1 to A.3): CAST ON and ROUND 1: off white ROUND 2: pink sand ROUND 3: blush ROUND 4: wheat ROUND 5: beige ROUND 6: off white ROUND 7: pink sand ROUND 8: off white COLOURS EDGE (A.4 to A.6): ROUND 1: off white ROUND 2: wheat ROUND 3: beige ROUND 4: off white ROUND 5: pink sand ROUND 6: off white ROUND 7: blush ROUND 8: pink sand ROUND 9: off white COLOUR-CHANGE TIP: When changing colour work as follows: Work the last stitch on the round with the old colour, but wait with the final yarn over and pull-through, change to the next colour and work the yarn over and pull-through, then continue as shown in the diagram. ------------------------------------------------------- START THE PIECE HERE: ------------------------------------------------------- BLANKET – SHORT OVERVIEW OF THE PIECE: The blanket is made up of 6 squares which are sewn together, 2 squares in width, 3 squares in length. An edge is worked around the whole blanket. 1 SQUARE: Read COLOURS SQUARE in explanations above. Start with hook size 5 mm and colour off white in DROPS Air. Work 5 chain stitches and form them into a ring with 1 slip stitch in the first chain stitch. Read COLOUR-CHANGE TIP, and work diagram A.1 (circle). REMEMBER THE CROCHET TENSION! When A.1 has been completed, continue as follows: Work A.2 (= beginning and end of the round), A.3 four times around the circle. When A.2 and A.3 are finished, cut and fasten the strands. Work 6 squares. ASSEMBLY: Lay the squares out with 2 squares in width and 3 squares in length – see A.7. NOTE: Make sure the square marked with a black star lies so the end of the round is towards the outside edge. The star marks the start of the edge to be worked later. Sew the squares together edge to edge so the seam is flat. Cut and fasten the strands. EDGE: Read COLOURS EDGE in the explanations above. Start in the stitch marked with a star in A.2. Work A.4 in this stitch, then A.5 three times, work A.6 in the corner, work A.5 to the next corner – NOTE: In each transition between 2 squares work 1 chain stitch, 2 treble crochets around the corner chain-space on the first square, 1 chain stitch, 2 treble crochets around the corner chain-space on the second square. Continue like this around the whole blanket. When A.4 to A.6 are finished, cut and fasten the strands. |
|||||||||||||||||||||||||||||||||||||||||||||||||||||||
Diagram explanations |
|||||||||||||||||||||||||||||||||||||||||||||||||||||||
|
|||||||||||||||||||||||||||||||||||||||||||||||||||||||

|
|||||||||||||||||||||||||||||||||||||||||||||||||||||||

|
|||||||||||||||||||||||||||||||||||||||||||||||||||||||

|
|||||||||||||||||||||||||||||||||||||||||||||||||||||||

|
|||||||||||||||||||||||||||||||||||||||||||||||||||||||
|
Have you made this or any other of our designs? Tag your pictures in social media with #dropsdesign so we can see them! Do you need help with this pattern?You'll find tutorial videos, a Comments/Questions area and more by visiting the pattern on garnstudio.com. © 1982-2024 DROPS Design A/S. We reserve all rights. This document, including all its sub-sections, has copyrights. Read more about what you can do with our patterns at the bottom of each pattern on our site. |
|||||||||||||||||||||||||||||||||||||||||||||||||||||||


With over 40 years in knitting and crochet design, DROPS Design offers one of the most extensive collections of free patterns on the internet - translated to 17 languages. As of today we count 304 catalogues and 11422 patterns - 11422 of which are translated into English (UK/cm).
We work hard to bring you the best knitting and crochet have to offer, inspiration and advice as well as great quality yarns at incredible prices! Would you like to use our patterns for other than personal use? You can read what you are allowed to do in the Copyright text at the bottom of all our patterns. Happy crafting!
Comments / Questions (14)
Als ik het patroon volg is mijn square niet mooi vierkant, maar iets teveel "rond". Wat doe ik fout?
05.03.2024 - 13:26DROPS Design answered:
Dag Tineke,
Helaas kan ik niet met je meekijken, het zou kunnen zijn dat er op de hoeken iets fout gaat, maar misschien gaat het ook gewoon goed en trekt het bij zodra je het werk in elkaar zet en/of opperst.
05.03.2024 - 22:19Vad har a2 för funktion, det blir ju som en extra stolpe? Kan man hoppa över det och göra en smygmaska i första stolpen i stället?\r\nVarför blir varje ruta vågig, inte plan, börjar när jag kommer till a2 och a3.\r\nVirkar jag för hårt eller för löst, måtten stämmer, varje ruta blir ca 34x34 cm
19.01.2024 - 00:16Als ik naar de foto kijk, is het stuk wit tussen de vierkantjes best breed. in het patroon staat er echter maar één rijtje gewone stokjes aan de buitenrand. Klopt dat wel?
17.10.2023 - 11:23DROPS Design answered:
Dag Rolien,
Ja, dat klopt, want de buitenranden van de vierkanten worden later aan elkaar genaaid, waardoor het er breder uitziet.
18.10.2023 - 18:43Undrar om man ska sy ihop rutorna med airgarnet eller om man syr ihop med annan tråd?
14.02.2023 - 22:40DROPS Design answered:
Hej Annicka, ja sy sammen med det garn du har hæklet ruderne i :)
16.02.2023 - 09:02Hallo, Waar kan ik een link vinden naar de video’s? Ik kan ze niet vinden Gr Julia de Wit
04.11.2022 - 15:00Ik ben bij het punt dat ik A2 moet halen. Ik begrijp dit niet. Het zijn aan het begin van de toer dus 4 lossen en aan het eind een dubbel stokje. Maar dan heb ik dus telkens 2 “stokjes” over . Die hebben toch geen functie? De vraag is al gesteld, zie ik. Maar ik begrijp het nog niet. Hartelijke groet Miriam
19.10.2022 - 08:45DROPS Design answered:
Dag Miriam,
A.2 geeft eigenlijk alleen het begin en het einde van de toer aan. Dus A.2 wordt aanvullend op de toer gehaakt. Je haakt dus eerst 4 lossen (=A.2), dan haak je 4 keer A.3. Tot slot eindig je de toer met een halve vaste in de 4e losse van het begin van de toer.
19.10.2022 - 20:11Sono alle mie prime mattonelle e non mi è chiaro lo schema A3. Non riesco a capirlo, potrei avere la spiegazione dei giri? Ho guardato su YouTube ma non ho trovato il tutorial di questo lavoro
29.08.2022 - 03:04DROPS Design answered:
Buonasera Alessandra, purtroppo in questa sede non ci è possibile riportare le trascrizione di tutti i diagrammi: deve leggere il diagramma dal basso verso l'alto e da destra verso sinistra. A.3 va lavorato 3 volte sul giro iniziale. Per un'assistenza personalizzata può rivolgersi al suo rivenditore DROPS di fiducia. Buon lavoro!
29.08.2022 - 23:06Desde la web es imposible acceder al diagrama. ¿Podrían reeditarlo?. Gracias
16.05.2022 - 14:29DROPS Design answered:
Hola Ángela, el diagrama debería estar disponible ahora.
16.05.2022 - 23:20Sorry … ik zie het opeens! Het is het “bruggetje “ van 3 lossen in de hoeken .
07.05.2022 - 21:59Dit snap ik niet….hoe moet ik .A2 haken …? Die losse tellen niet als eerste dubbele stokje maar waarom moet ik ze dan haken? Ik hou dus 2 dubbel stokje over en heb de hele toer maar uitgehaald! Please help !! symbols = 4 lossen op het begin van de toer, eindig de toer met 1 halve vaste in de 4e losse op het begin van de toer (deze 4 lossen vervangen niet het eerste dubbele stokje op de toer)
07.05.2022 - 21:53